Samsung TV does not find digital channels? Don’t rush to take your TV in for repair; perhaps the cause of such a problem is much easier to fix than you think. Digital television allows you to obtain high-resolution images with improved color reproduction and contrast, but connecting to digital broadcasting does not always occur without errors.
How to find out if your Samsung model needs a digital set-top box
You have two options: setting up digital broadcasting directly on your TV or through a set-top box. The first method is only suitable for Samsung devices that already have a built-in DVB T2 digital signal receiver. As a rule, such TVs have a built-in Smart TV (they can be connected to the Internet).
The set-top box is only needed for old TVs. If you don't have a Smart TV, you'll likely need a separate set-top box or a dedicated expansion module. In this article we will consider the set-top box, since the module is not suitable for all TVs.
A built-in digital tuner is definitely present in models of the LS, M, Q, H, J, K, F, E series. These devices were released no later than 2012–2013. You just need to connect the cable from the antenna to them and make the settings through the TV menu.
How to find out the TV model? The model code is always indicated on a sticker on the back of the TV and, of course, in the operating instructions. How to determine the series using this code: this is the third letter in the combination. For example, if you have a model UN55MU8500T, your series is M.
The TV model is always indicated on the TV label
Turning on the TV for the first time
If you are turning on a new LG TV you purchased or have done a factory reset, you will need to enter some settings. After switching on, the manufacturer’s company logo will appear, then enter the data.
- The first step is to select the menu language.
- Select your country of residence.
- Setting the time and date. By selecting this item you can use the TV Guide service. This TV program guide.
- If you have a Smart TV, you will be asked to choose how to connect to the Internet via cable or Wi-Fi. You can skip this step if there is no Internet connection.
- Image and sound settings. You can adjust the brightness and clarity of the picture.
- Next you will be prompted to start installing channels.
- Click ok
How to find and set up digital channels on Samsung TVs
Let's look at both setup options in order (without and with the prefix).
For TVs with a built-in DVB T2 and Smart TV tuner
If you have a modern TV with Smart TV, you won’t have to suffer. Setting it up will take about 15 minutes at most. The interface may differ depending on the Samsung series, but basically the setup will proceed as follows:
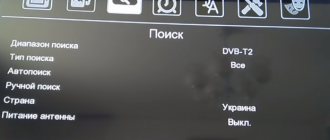
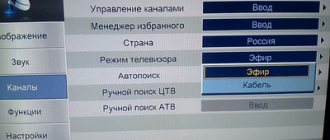
- Let's look at auto-tuning. Click on the menu button on the remote control. Go to the “Broadcast” block.
- Click "Auto Configure".
Select Auto Setup from the menu - Use an antenna or cable as the signal source. Select digital broadcasting in the channel type.
- Specify the search type - quick, full or network.
We recommend taking the full one. Click on "Scan". Specify full mode in menu - The search will start.
Gradually, TV channels will begin to appear in your list. They will be saved automatically - you just have to wait until the search is completed. Wait for the search process to complete - Check the picture quality of each channel. If you are not satisfied with it or if certain channels are not shown, reset everything and repeat the search.
If automatic configuration fails, there is an option to use the manual method:
- Again, open the TV menu.
In the “Channel” block we put a cable instead of an antenna. Choose cable instead of antenna - In the “Country” item, select Russia or Eastern Europe (on some models). If you are asked for a code, enter 0000, 1111 or 1234.
- We are looking for “Cable parameters”. They are located either in the menu itself or in auto-tuning. We independently write the frequency boundaries at which the channels are located: from 298,000 to 362,000 kHz.
- Select channel types - digital broadcasting.
- Specify the search type “Network”. We wait a few minutes and check the quality of the channels.
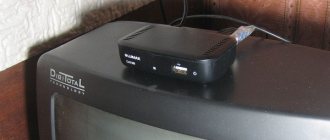
For older models that can only be connected to digital TV via set-top boxes
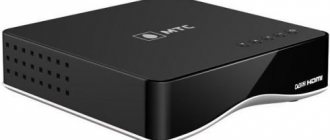
If the TV does not have a built-in tuner, we buy it separately. Its cost is not so high - you can buy a quite decent device for 1 thousand rubles.
- How to set up a Samsung Smart TV - step by step instructions
Are all set-top boxes compatible with Samsung TVs?
TV set-top boxes are usually universal, that is, they are suitable for TVs of different models and manufacturers, so there is no need to worry about buying something that is not suitable.
The main thing is that your TV has the necessary connectors to connect this set-top box (receiver, tuner, etc.). The set-top box will receive a digital signal from the antenna and convert it into a regular analog signal, which your old TV will recognize.
"Tulip" is the most popular way to connect a TV and set-top box
How to connect a set-top box to an old TV
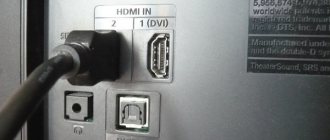
You need to choose a cable specifically for your situation. If your TV has an HDMI connector, use a cable with the same name (version 2.0) - the picture will be better. If there is no such option, we simply take a standard “tulip”. This is a cable consisting of three wires - each with a plug of a certain color (red, yellow, white).
A SCART cable can also be used.
Outdated models are connected via SCART
What is required of you: connect the TV and set-top box with a cable through the appropriate outputs. The slots for the tulip are also painted in different colors, so it will be difficult to get confused here. The receiver itself must first be connected to the antenna via a cable with a round output.
“Tulip” is connected in accordance with the colors of connectors and plugs
How to search for digital channels
The setup takes place through the TV menu and set-top boxes. The interface of the receivers is different, so each case will have its own subtleties in setting. Before searching for channels, we advise you to read the instructions that come with the device.
- How to set up digital channels on a Samsung TV?
The general course of action, however, will be as follows:
- First, go to the Source list on the TV itself. We set the output to which the set-top box is connected.
- We go to the console menu.
We go to the section indicated, as a rule, by a folder with a magnifying glass. Select channel search type - Choose automatic or manual search. In the latter case, we set the same parameters: from 298,000 to 362,000 kHz. We start the search and then check the quality of the channels found.
Setting up channels on Samsung TVs after a successful search
If necessary, you can edit the list of found channels. For example, remove unnecessary ones:
- In the TV menu, open the “Broadcast” section, and then the channel list. Place check marks next to the channels you want to remove. Click on Tools on the remote control and select delete or block in the menu that appears.
- When blocked, you need to come up with a password that will allow you to access the previously selected channels.
- If you click on "Edit", you can rename individual channels.
If you have a newer TV model, all channel settings related to changing them or blocking can be found in separate items directly in the “Broadcast” section.
Select “Change channel” or “Block” from the menu
What problems may arise during setup
Frequent problems during or after setting up digital channels on LG TVs are:
- TV does not find channels completely;
- catches only part of the programs (10 out of 20);
- TV channels disappear from time to time;
- transmissions are lost and not returned;
- the screen shows “No signal”, “Weak signal”, “Antenna not connected” and other similar notifications.
Doesn't pick up channels at all
The problem is clearly the signal getting to the receiver. This means that there is damage to the circuit somewhere. The cable may be damaged due to strong bending in some place during installation. Or the cable’s contact with the antenna or plug at the other end has simply broken.
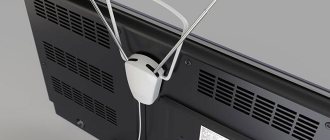
The problem may be related to the type of antenna. For digital TV, only a UHF antenna is required. If the factor of damage to the circuit (connections) is excluded, it would be useful to check the directionality of the antenna. Rotate the antenna in different directions. Perhaps a signal will appear and you will be able to complete the setup.
Sometimes the TV itself becomes the reason for the lack of search results. The problem may occur after the next update of the TV operating system. Or it could be a hardware fault.
You can easily diagnose the problem if there is another TV nearby. Connect the cable to it and try to tune the TV to digital television through the antenna. If there is a signal and channels begin to appear during scanning, then the reason lies in the TV. Try resetting the TV to factory settings through the device settings.
If resetting to factory defaults did not help, the reason is hardware in nature. Either the tuner has failed, or the contact has broken somewhere. Perhaps the antenna socket is loose, which is why there is no contact with the television board. There is no need to rule out damage to the socket itself.
Only a specialist can fix hardware problems and replace the socket. You can try to diagnose and repair yourself if you have the necessary skills.
Doesn't find all channels
- Using the CETV map, look at the characteristics of repeaters in your area. It is possible that the TV towers themselves are not designed to broadcast 20 programs (or 30 for Moscow, Moscow Region and part of Crimea). It’s rare, but it still happens that a broadcaster broadcasts only ten channels out of twenty. In this case, you can try to manually go to completely different towers in order to catch both multiplexes. But this often entails the need to radically change the location of the antenna. Otherwise, you will have to be content with some of the channels. A way out of the situation would also be to connect cable television or a parabolic dish (satellite). Internet television is popular today. The service is paid, but there are almost never any interruptions in communication. The exception is preventative work. There are many more channels, at least dozens of them, and often the number of programs exceeds 100.
- The reason is the antenna. The factory powerful design will easily catch two multiplexes. But a homemade one, even when the tower is installed close, may poorly receive a TV signal. The factors that contribute to this include not only the power of the antenna, but also the location of its installation, directionality, and windage. The latter term refers to the ability of the antenna to change its position due to gusts of wind.
Channels disappear, get lost
Often channels may disappear from time to time due to repair and maintenance work on the repeater. In this case, you will just have to wait. If the operation of TV channels does not resume for a very long time, within several days, then the likely reason is in the TV receiver itself.
This includes both software failure and technical malfunctions. Software problems can be resolved by resetting the TV to factory settings or installing updates. Go to the general TV settings, find the section or item that is responsible for updates. If the automatic updates feature is disabled, then click on the button, which will start scanning the server for updates. If new versions are found, install. To be sure, then turn off and turn on the TV.
If a reset is made, then after it is completed you will have to set up the TV again. You will receive your TV in the condition it left the factory. That is, not only the firmware version will be rolled back to the original one, but all applications will be deleted. All passwords and program settings will be reset.
The technical problems relate to malfunctions of the built-in digital decoder inside the LG TV. Only a master can understand that the reason is technical (hardware). Diagnostics followed by repair will be required. Perhaps with replacement of parts or flashing of the device.
What to do if you can’t find and save digital channels on your Samsung TV
If the channels do not appear during the search, most likely the problem is with the antenna. It may be directed in the wrong direction. Pay attention to your neighbors' antennas - which direction are they facing? Find a suitable position.
Point the antenna in the same direction as your neighbors' antennas.
It is also possible that you are using the wrong antenna. It must be decimeter, not meter, in order to receive a digital signal from the tower.
If the tower is too far away, a special amplifier for the antenna or a more powerful model of the signal receiver will help. If the indoor antenna does not receive reception, you need to buy an outdoor antenna and install it as high as possible.
Buy an additional amplifier if the antenna does not cope
- Sorting channels on a Samsung TV
If everything is fine with the antenna, there is a chance that the problem is in the cable. Check it for defects, including the plugs. If there is another cable, try connecting it. If the TV works, the problem was in the wire.
Resetting your TV (if it has a Smart TV) can also help. After the reset, you will need to start searching for channels again.
Why can't I tune in my TV?
Digital television is a new method of broadcasting that transmits sound and image using signal encoding. If digital channels cannot be tuned in on your Samsung TV, then you need to find out the problem. They come in several types.
Hardware reasons
If the TV does not tune in digital channels through the antenna, this indicates a malfunction or incorrect connection. To eliminate this problem, you need to check that the TV is connected to the antenna correctly, that all cables are intact, and that the wires are connected to the correct sockets.
The digital antenna and amplifier are connected to the Samsung TV using different cords. To check the health of the devices, you need to find channels in automatic mode. If at the same time the picture on TV changes, but there are no channels, the problem is in the antenna.
To check the territorial coverage of the antenna, you need to go to the website https://map.rtrs.rf/ and enter your region. The map will show the broadcast area in the specified region and area.
Software glitches
A program failure most often occurs due to the fault of the user himself. During the settings, the parameters may have been entered incorrectly or the frequency may have been entered incorrectly. Perhaps the old software of the set-top box is not supported by the developer. In this case, you need to reinstall the software on the digital set-top box.
How to watch digital TV without an antenna (IPTV setup)
Television can be accessed without an antenna. The source will be an Internet router or a wired connection.
If you have high-speed Internet at home, you can buy an interactive TV service from your own provider. Select a tariff on the company’s website, order it and wait for a specialist to arrive at your home to install the equipment (providers often install their own branded set-top boxes).
If you connect your TV to the Internet via a router (preferably not via Wi-Fi, but via cable), the setup will take place in the router’s personal account. The procedure will depend on the cabinet interface (it is different for each manufacturer). Let's look at the procedure using popular TP-Link routers as an example:
- Connect the PC to the Wi-Fi of the router. In your browser, open page 192.168.0.1 or 192.168.1.1. Enter admin as your username and password.
- Go to the "Advanced Settings" section.
In the “Network” block, select IPTV. Select the local port to which the set-top box will be connected - Enable IGMP Proxy if your ISP supports this standard. Turn on IPTV. Set the mode to "Bridge".
- Select the LAN port to which the set-top box or TV will be connected. Save your settings.
- Connect the set-top box to the selected port. Turn on the equipment. The TV must find channels.
If you have a new Samsung model with Smart TV, you don’t need a set-top box - the digital tuner is already built into the TV. Go to the menu and search for channels using manual or automatic search. If the TV is old, buy a set-top box, connect it using a “tulip” and configure channels through the set-top box menu.
Samsung is one of the most trusted brands in the digital TV market. The most difficult task that you will most likely encounter yourself is setting up channels. Despite the intuitive interface, it’s not easy to master the search principle on your own right away. That’s why we wrote this article, in which we explained in the most accessible way how to set up digital television on Samsung.
IPTV as an alternative to digital terrestrial TV
This is Internet TV that allows you to watch hundreds of TV shows for free through public playlists. To work, you will need fast Internet (at least 50 Mbit/s) and a TV with Smart TV.
Connecting and setting up IPTV:
- An application for watching IPTV is installed on the TV;
- the device communicates with the IPTV service through the application;
- a playlist with the required list of channels is downloaded. Access playlists both by category (for example, only federal programs) and general;
- the playlist (file) is uploaded to the service. After synchronization, all channels that are registered in the playlist appear on the TV in the application.
Which IPTV service to choose is up to you. The disadvantage of this viewing method is that the playlists become outdated and there are constant problems. Some channels stop working over time. Therefore, periodic reconfiguration is required. It consists of downloading a new playlist file and uploading it to the IPTV website.
Checking if your Samsung TV supports digital TV
Before we begin directly searching for channels, let’s make sure that the TV is generally capable of receiving “digital”. Samsung's lineup includes many series and even more individual models. Not all of them have a built-in digital tuner, and some, although equipped with one, are made for the old DVB-T standard, and not DVB-T2, which is now used in Russia.
To do this, enter the model number in the “Search” line. If you find one, you can proceed to configuration.
| Model | Diagonal | DVB-T2 support |
| 19H4000 | 19 | + |
| LT19C350EX | 19 | + |
| LT22C350EX | 22 | + |
| LT23C370EX | 23 | + |
| LT24C370EX | 24 | + |
| LT27C370EX | 27 | + |
| PE43H4000 | 43 | + |
| PS43E497B2 | 43 | + |
| PS43F4900AK | 43 | + |
| PS51E497B2KXRU | 51 | + |
| PS51E537A3 | 51 | + |
| PS51E557D1 | 51 | + |
| PS51E6507 | 51 | + |
| PS51E8007G | 51 | + |
| PS51F4900AK | 51 | + |
| PS51F5500AK | 51 | + |
| PS51F8500AT | 51 | + |
| PS60F5000AK | 60 | + |
| PS64D8000 | 64 | + |
| PS64E8007 | 64 | + |
| PS64F8500AT | 64 | + |
| T24D310EX | 24 | + |
| T24D390EX | 24 | + |
| T24D391EX | 24 | + |
| T24D590EX | 24 | + |
| T27D390EX | 27 | + |
| T27D590EX | 27 | + |
| T28D310EX | 27 | + |
| UE22F5000AK | 22 | + |
| UE22F5400AK | 22 | + |
| UE22F5410AK | 22 | + |
| UE22H5020 | 22 | + |
| UE22H5600 | 22 | + |
| UE22H5610 | 22 | + |
| UE24H4070 | 24 | + |
| UE24H4080 | 24 | + |
| UE28H4000 | 28 | + |
| UE32EH5007 | 32 | + |
| UE32EH5047 | 32 | + |
| UE32EH5057 | 32 | + |
| UE32EH5307 | 32 | + |
| UE32ES5507 | 32 | + |
| UE32ES5537 | 32 | + |
| UE32ES5557 | 32 | + |
| UE32F4500AK | 32 | + |
| UE32F4510AK | 32 | + |
| UE32F5000AK | 32 | + |
| UE32F5020AK | 32 | + |
| UE32F5300AK | 32 | + |
| UE32F5500AK | 32 | + |
| UE32F6100AK | 32 | + |
| UE32F6200AK | 32 | + |
| UE32F6330AK | 32 | + |
| UE32F6400AK | 32 | + |
| UE32F6510AB | 32 | + |
| UE32F6540AB | 32 | + |
| UE32F6800AB | 32 | + |
| UE32H4000 | 32 | + |
| UE32H4270 | 32 | + |
| UE32H4500 | 32 | + |
| UE32H4510 | 32 | + |
| UE32H5303 | 32 | + |
| UE32H5500 | 32 | + |
| UE32H6230 | 32 | + |
| UE32H6350 | 32 | + |
| UE32H6410 | 32 | + |
| UE37ES6710 | 37 | + |
| UE39F5000AK | 39 | + |
| UE39F5020AK | 39 | + |
| UE39F5300AK | 39 | + |
| UE39F5500AK | 39 | + |
| UE40EH5007 | 40 | + |
| UE40EH5047 | 40 | + |
| UE40EH5057 | 40 | + |
| UE40EH5307 | 40 | + |
| UE40ES5507 | 40 | + |
| UE40ES6307 | 40 | + |
| UE40ES6547 | 40 | + |
| UE40ES6557 | 40 | + |
| UE40ES6857 | 40 | + |
| UE40ES6907 | 40 | + |
| UE40ES7207 | 40 | + |
| UE40ES7507 | 40 | + |
| UE40ES8007 | 40 | + |
| UE40F5000 | 40 | + |
| UE40F6100AK | 40 | + |
| UE40F6130 | 40 | + |
| UE40F6200AK | 40 | + |
| UE40F6330AK | 40 | + |
| UE40F6400 | 40 | + |
| UE40F6500AB | 40 | + |
| UE40F6510AB | 40 | + |
| UE40F6540AB | 40 | + |
| UE40F6650AB | 40 | + |
| UE40F6800AB | 40 | + |
| UE40F7000AT | 40 | + |
| UE40F8000AT | 40 | + |
| UE40FH5007K | 40 | + |
| UE40H4200 | 40 | + |
| UE40H4203 | 40 | + |
| UE40H5003 | 40 | + |
| UE40H5020 | 40 | + |
| UE40H5203 | 40 | + |
| UE40H5270 | 40 | + |
| UE40H5500 | 40 | + |
| UE40H6230 | 40 | + |
| UE40H6240 | 40 | + |
| UE40H6350 | 40 | + |
| UE40H6410 | 40 | + |
| UE40H6500 | 40 | + |
| UE40H6650 | 40 | + |
| UE40HU7000 | 40 | + |
| UE42F5000AK | 42 | + |
| UE42F5020AK | 42 | + |
| UE42F5300AK | 42 | + |
| UE42F5500AK | 42 | + |
| UE46EH5007 | 46 | + |
| UE46EH5047 | 46 | + |
| UE46EH5057 | 46 | + |
| UE46EH5307 | 46 | + |
| UE46EH6037 | 46 | + |
| UE46ES5507 | 46 | + |
| UE46ES5537 | 46 | + |
| UE46ES5557 | 46 | + |
| UE46ES6307 | 46 | + |
| UE46ES6547 | 46 | + |
| UE46ES6857 | 46 | + |
| UE46ES6907 | 46 | + |
| UE46ES7207 | 46 | + |
| UE46ES7500 | 46 | + |
| UE46ES7507 | 46 | + |
| UE46ES8000 | 46 | + |
| UE46ES8007 | 46 | + |
| UE46F5000AK | 46 | + |
| UE46F5020AK | 46 | + |
| UE46F5300AK | 46 | + |
| UE46F5500AK | 46 | + |
| UE46F6100AK | 46 | + |
| UE46F6330AK | 46 | + |
| UE46F6400AK | 46 | + |
| UE46F6500AB | 46 | + |
| UE46F6510AB | 46 | + |
| UE46F6540AB | 46 | + |
| UE46F6650AB | 46 | + |
| UE46F6800AB | 46 | + |
| UE46F7000AT | 46 | + |
| UE46F8000AT | 46 | + |
| UE46F8500AT | 46 | + |
| UE48H4200 | 48 | + |
| UE48H4203 | 48 | + |
| UE48H5003 | 48 | + |
| UE48H5020 | 48 | + |
| UE48H5203 | 48 | + |
| UE48H5270 | 48 | + |
| UE48H5500 | 48 | + |
| UE48H5510 | 48 | + |
| UE48H6230 | 48 | + |
| UE48H6350 | 48 | + |
| UE48H6410 | 48 | + |
| UE48H6500 | 48 | + |
| UE48H6650 | 48 | + |
| UE48H6800 | 48 | + |
| UE48HU8500 | 48 | + |
| UE50ES5507 | 50 | + |
| UE50ES6907 | 50 | + |
| UE50F5000AK | 50 | + |
| UE50F5020AK | 50 | + |
| UE50F5500AK | 50 | + |
| UE50F6100AK | 50 | + |
| UE50F6130 | 50 | + |
| UE50F6330AK | 50 | + |
| UE50F6330AK | 50 | + |
| UE50F6400AK | 50 | + |
| UE50F6500 | 50 | + |
| UE50F6650 | 50 | + |
| UE50F6800AB | 50 | + |
| UE50HU7000 | 50 | + |
| UE55ES6307 | 55 | + |
| UE55ES6547UXRU | 55 | + |
| UE55ES6557UXRU | 55 | + |
| UE55ES6857 | 55 | + |
| UE55ES6907UXRU | 55 | + |
| UE55ES7507 | 55 | + |
| UE55ES8007 | 55 | + |
| UE55F6100AK | 55 | + |
| UE55F6400AK | 55 | + |
| UE55F6800AB | 55 | + |
| UE55F7000AT | 55 | + |
| UE55F8000AT | 55 | + |
| UE55F8500AT | 55 | + |
| UE55H680 | 55 | + |
| UE55H6500 | 55 | + |
| UE55H6650 | 55 | + |
| UE55HU7000T | 55 | + |
| UE55HU7500T | 55 | + |
| UE55HU8700T | 55 | + |
| UE55HU9000T | 55 | + |
| UE60F6100AK | 60 | + |
| UE60F7000AT | 60 | + |
| UE65ES8007 | 65 | + |
| UE65F6400AK | 65 | + |
| UE65F8000AT | 65 | + |
| UE65F90800 | 65 | + |
| UE65HU7500T | 65 | + |
| UE65HU8700T | 65 | + |
| UE65HU9000T | 65 | + |
| UE75ES9000 | 75 | + |
| UE75ES9007 | 75 | + |
| UE75F6300 | 75 | + |
| UE75F6400AK | 75 | + |
| UE75F8200 | 75 | + |
| UE75HU7500T | 75 | + |
| UE78HU9000 | 78 | + |
| UE85S9AT | 85 | + |
| UE105S9 | 105 | + |
Didn't find your model? Don't panic! Use the recommendations from the article on checking for DVB-T2 support on your TV.
Manual setting
In most cases, auto-tuning allows you to find two multiplexes of 10 channels each. But, if the automatic mode does not give results, you can try the manual setting mode.
The manual method requires the presence of frequencies on which broadcasting occurs. For satellite and cable, the numbers will be provided by the TV provider. For free-to-air broadcasting, the data can be easily viewed on a digital terrestrial television (DTTV) card.
- Go to the service via the link https://map.rtrs.rf/. The location should be determined automatically. In another situation, enter your region, city and home in the search bar.
- Pinpoint your house on the map and left-click on it.
- A table will appear with the characteristics of the two closest repeaters.
- First of all, the TVC number and frequency values for each multiplex are of interest.
- Additionally, look at the distance to the tower. The closer the repeater is located, the stronger and better the signal will be. The diamond-shaped arrow indicates the direction to the tower. By taking the compass in your hands and pointing the antenna exactly at the TV tower, you can catch the signal without any errors.
When the frequencies are known, in the already familiar “Channels” menu, open “Manual search/tuning”.
Select the broadcast type (in our case, digital).
Then, in the “Frequency” item, enter the found values for the selected TV tower.
In the table on the CETV card, the value is written in MHz, but in the settings you need to indicate it in kHz, that is, add three zeros to the original number.
The frequency itself may not be specified. Just enter the channel number of your repeater. The frequency will be automatically set to the one that corresponds to the TV channel number.
Then click on “Add/Create” on the right edge and the TV will begin manually scanning the first multiplex.
The same must be done for the second multiplex in order to find a total of two dozen channels.
It would be useful to look at the signal level scale. Based on the TV readings, you can adjust the antenna for the best reception. Try changing the location of the antenna, directing the axis of the structure at a different angle to catch a stronger signal. If the level is weak, channels may also be found. But in the future, the picture will freeze regularly and squares will appear.
Determining the series: deciphering the model number
Digital channel setup varies depending on which series a particular Samsung model belongs to.
Is Samsung a good TV?
Therefore, we first need to determine which specific TV receiver we are dealing with.
You can do it like this:
- Take a look at the back panel. There should be a factory sticker with basic information about the TV: power type, year of manufacture, etc. At the very top there will be a combination of numbers and Latin letters - this is the model code;
- Go to the TV menu. Select the “Support” item and the “Contact Samsung” item, information about the equipment will appear, including the desired combination of letters and numbers.
Let's decipher the found number in order to determine the letter denoting the series:
| UE | Screen type | |
| 40 | Screen size (inches) | From 19″ to 105″ |
| J | Series (corresponds to production date) | |
| — | Matrix type (sometimes not specified) | S—SUHD; U - UHD; No - Full HD; P—plasma. |
| 5200 | Model | Just a digital designation |
| AU | Digital tuner type | AW (W) - DVB-T/C; AK (K) - DVB-T2/C; AB (B) - DVB-T2/C/S2, in 2014 it was designated as AU (U); AT (T) - 2 x DVB-T2/C/S2. |
Possible problems and solutions
The TV does not find channels.
- Make sure all steps are correct. The wrong search mode may be selected.
- The antenna for digital can only be UHF. Meter receivers for analogue waves will not work.
- Check the antenna cable. Is there a break in the cable and is the plug inserted into the antenna connector on the TV?
- If you are using an external receiver (set-top box, T2 tuner), then double-check the connection diagram so that each cable is inserted into the correct connectors.
No signal.
Try retuning the channels again, but first change the antenna location. Select one of the countries: Germany, Sweden, Finland. Broadcasting in these states uses the same technology as in the Russian Federation.
Check to see if the antenna is positioned out of alignment. Inspect the cable for damage or severe bends. If you have experience, test the cable with a device to be sure of the integrity of the conductors. Check the antenna contact points where it connects to the cable. Renew contact if necessary. It is advisable to protect the joint and varnish it.
Channels get lost and disappear.
- It is possible that another software update caused the loss of channels. If you know for sure that the update was installed and then the channels disappeared, then you need to reset the TV. Open the settings panel, get to the “General” section. Inside, click on “Factory reset” and agree to the warning. All settings will be reset to the state in which the TV left the factory. That is, the equipment will have to be configured again, all applications installed, etc.
- Some models have an option that, when turned on, automatically updates channels. On the remote control, click on the “Home” button. Go to “Digital cable settings” and in the “Auto update” item set it to “Off”.
Automatic tuning of digital channels on Samsung
The easiest way to set up your antenna connection yourself is to run an automatic search. Let's take a step-by-step look at how to organize the reception of digital TV channels for models of different series and years of manufacture.
M, Q and LS Series
After the cable from the indoor, outdoor or communal antenna is connected and the TV itself is turned on, you need to do the following:
- Turn on the general menu using the “Home” button on the remote control.
- Select the "Source" item. In it you need to indicate the “TV” option.
- Turn on the menu again using the same button, select “Settings”.
- Go to the “Broadcast” line and select “Auto Configuration”.
- Click the Start button. A warning will appear on the screen stating that as a result the existing list of TV channels will be deleted.
- Select the signal source. You can specify “Antenna” (for terrestrial digital TV), “Cable”, “Satellite dish”, etc., depending on what kind of television you connect.
- Select channel type. You can specify “Digital” or “Digital and Analog”. In the second case, you will not have to further configure the connection of each local analog channel if they are broadcasting.
- If you are setting up paid channels, the interface will ask you to specify an operator. For cable, select Other. Since terrestrial television does not have this parameter, we simply move on.
- Specify the mode in which the search will be performed. Select the "Full" option. In this case, the system will search for everything that can be caught from the antenna.
- Start the procedure by clicking the "Scan" button.
- The found channels will begin to appear on the screen (both TV, separately digital and analogue, and radio stations) and an indicator showing which part of the range has already been scanned.
- After the completion message, press the “Close” button and exit the menu (on the remote control – “Return”).
You can start watching.
H, F, E and J Series
For models in this series, the setup process will look slightly different:
- Turn on the TV and use the “Source” button on the remote control to select “TV”.
- Open the menu (using the button of the same name or “Keypad” and selecting the “Menu” position on the screen).
- Select "Broadcast" and then "Auto Configure".
- Activate auto-tuning again.
- At the message warning you about changing your settings, click the Start button.
- Select the source from which the signal will come: “Antenna”, if you are setting up to receive free broadcasting of the DVB-T2 standard, or “Cable”, if you are connecting cable television.
- Specify the channel type. Here it is better to select “Digital and analog”, so as not to repeat a separate setting for the remaining analog programs on air.
- Select scan type. To catch as many channels as possible, you need to select the “Full” option.
- The “Scan” button is pressed.
- After the process is completed, click the “Close” button and exit the menu.
Channel list management
An LG TV, like equipment from any modern manufacturer, allows you to edit the channel list so that it is convenient to watch in the future. You can sort the channels in a convenient order so that you don’t have to scroll through the list for a long time until you get to the desired program. You can also block channels.
All actions are performed through the channel editor. You can access it in the TV settings menu. Press the “Settings” button on the remote control. In the Channels section, find and open Channel Editor.
In the menu on the left, select the type of channels that require editing. In our case, this is terrestrial digital TV. On the right in the working part there will be the channels themselves. Before the desired action (move, block, change number), the required channels are always marked. Just go through the selection through the channels and click on them with the “OK” button on the remote control. The programs will immediately be marked with check marks.
There are edit buttons at the top right or left side. Select the desired button (function) and apply to the selected TV channels.
If a channel is blocked, it will not be deleted. You can switch to it, but only through the full list, where you can select it with the remote control. The number keys on the remote will also work. If you switch between television programs using the arrows on the remote control, you will skip. For example, channel No. 5 is blocked. Scrolling through the channels back and forth, you will get to programs numbered 3-4-6-7 and so on.
To move, after clicking the “Move” button, select a TV program in the list, in front of which you want to place the previously selected ones. Then confirm the movement by pressing the “OK” key.
The remote has colored buttons with different numbers of dots. These are functional buttons that can speed up the process of controlling the TV. If you look closely at the editor buttons, each one is marked with a bottom line of a specific color. Each corresponds to one of the remote control buttons. So, to move, instead of a button on the screen, you can click on the yellow button with three dots. And to lock/unlock you need to press the red button with one dot in the center.
Manual channel search
The oldest Samsung models do not support Auto Configuration. In them, digital channels must be configured manually, and for cable or satellite television, you must also indicate the frequency and other key parameters. In general, a manual search will look like this:
- The menu opens.
- Select the “Broadcast” item.
- The signal source is indicated (cable, antenna or satellite).
- If the “Country” item appears in the menu, you must indicate “Russia”.
- Select the “Manual configuration” item.
- Select the “Set up digital channels” item, where you need to click the “Create” button. In this case, additional TV channels will be added to the existing ones, and will not replace them.
- A tab with parameters will open. Here you need to specify the broadcast frequency, module and baud rate. This information should be obtained from the operator providing access to the cable or satellite signal. For terrestrial TV, indicate the broadcast frequencies of multiplexes.
- After pressing the “OK” button, the TV will begin searching according to the specified parameters. After a while, a list of found channels will appear on the screen. You need to save them - and you're ready to start watching.
Depending on the series and year of manufacture, the search procedure may vary slightly. However, in general, the algorithm described above is suitable for all models released after 2012 and supporting digital reception.
Methods for receiving digital TV channels
You can catch numbers in several ways:
The signal for terrestrial TV is distributed using terrestrial repeater towers. In order to receive it, you need an antenna. Using this technology, the image is transmitted free of charge. But using this method, the TV often does not pick up the signal well. Because the quality of the picture is affected by where the tower is located, what the weather is like outside, and many other factors.
Cable television is most often used in apartment buildings. In this case, the signal is transmitted via a cable that is connected to a common antenna. However, you have to pay for it and it cannot be used in private homes. Satellite signal transmission is carried out by satellites, and it is received by a special dish. This method allows you to receive the largest number of channels. But you have to pay for it and buy additional special equipment.
Of all these methods of receiving numbers, terrestrial is the cheapest and most accessible. But the picture quality leaves much to be desired.
Adding local analogue channels
If from the very beginning during auto-tuning it was indicated that both digital and analogue broadcasting were being searched, then there is no need to add anything, all TV channels have already been found. You also need to remember that some modern TV models no longer support manual tuning of over-the-air channels; they need to rescan the entire range again in auto-tuning mode.
If you first tuned in to digital channels and only later remembered that the nearest TV tower broadcasts not only federal multiplexes, but also local ones in analog format, you can catch them separately.
The algorithm of actions here is as follows:
- Turn on the menu, open the “Broadcast” tab.
- Select the signal source. In our case, this is an antenna.
- Switch to Manual Configuration mode.
- Specify the search for analogue channels only.
- Select "Create".
- Searching for analogue broadcast channels will take a few minutes.
If local television operates in the UHF range, there will be no problem: a digital antenna will receive it perfectly. If the channels operate in the meter range (MV), you will have to either install a combined all-wave antenna or abandon analogue television broadcasts.
Adding local channels
If in your region not only federal programs are broadcast, but also analogue local ones, then they can also be added to the list for viewing. It is written above that if at the stage of setting up the search parameters you do not check the box next to “Digital only”, then the TV will scan all frequencies, including analogue ones. Then you will get the maximum list of TV channels, taking into account analog frequencies.
If a list of digital channels has already been found, then you can add analog channels in the same way. Open the search interface on your TV and follow all the search steps described above. To update the list of channels and add new analogue TV programs to the list, turn off the “Digital only” option. You don’t have to disable the function, then the channels will be scanned and added again.
Digital channels in the list are displayed as a number with a name. Analog ones are marked only with a number.
You can only work with an analog signal if the antenna can receive it. Therefore, in order to successfully watch both “analog” and “digital” at the same time, you need a combined antenna. Its design contains vibrators of different lengths. This will allow you to receive both types of TV signals at once. You can also connect two different types of antennas to your TV.
Removing unnecessary channels and adjusting the order
To remove unnecessary channels, proceed as follows:
- Open the menu, go to the settings section and select “Broadcast”.
- Go to "Change Channels".
- Using the “Enter” button, you need to check the boxes that need to be deleted.
- Select “Delete” from the side menu.
- Press the Yes button to confirm and switch the TV to normal mode. Immediately after this, you can make sure that unnecessary channels are gone.
If we are talking about Samsung Smart TV, then removal is easier:
- Using the “Smart Hub” button you need to go to the system hub.
- In the form with the listed channels, you need to select the editing section (usually it is on the right at the top of the table).
- Guided by the system prompts at each step, you can select all unnecessary TV channels and delete them.
As for the order of channels, the TV arranges them in two ways:
- independently in the order in which I was able to find them during auto-tuning;
- using a list sent by the operator (as, for example, when connecting to NTV+ channels).
In the second case, sorting is impossible: you cannot reconfigure what the operator has installed, you can only delete unnecessary channels. In the first, the sorting looks like this:
- Go to the menu, select “Settings”.
- Click on “Broadcast” and go to the “Advanced Settings” tab.
- Select "Change" channel numbers" and specify "Enable" if the item is highlighted. If it is inactive, then proceed to the next step.
- Select “Change channel number” or go to the “Live broadcast” section (depending on the interface option).
- Here you need to open the “Channel List” tab and go to the “Change Channel” item.
- The desired TV channel is selected using the “Enter” button on the remote control; the check mark next to it lights up.
- Select the “Change number” option and use the arrow keys on the remote control to drag the channel to a new location.
- By pressing “Enter” again, the check mark is removed and the result is recorded.
If necessary, the procedure is repeated the required number of times.
When sorting channels on Samsung TVs, you need to take into account one of their features: if the digital ones in the general list are signed and have names, then the analog ones have only serial numbers. Accordingly, when sorting, the picture will be as follows:
- The digital channels will move in the list and one of them will take the position of the other.
- The list of analogue ones will not change, only a different program will be accepted under the old number.
Expert opinion Vitaly Sadovnikov Specialist in connecting and setting up digital television In addition to deleting and sorting, in the same tab you can also configure parental blocking of some TV channels from children. To do this, in the “Broadcast” section you need to select the “Blocking” item, turn it on, use the “Change channels” item to select the desired one and click on “Blocking” again. The TV will require you to enter a password. By default, it consists of 4 zeros (0000), but after entering, a window will open where you can specify yours.
Standard settings
Turning on the TV for the first time often requires you to perform basic settings - assign the region of use of the equipment, language and time parameters (date with current time). Therefore, when you first start the TV, set the current settings.
If the switch has already been performed and the equipment has been working for a long time, then check the listed parameters in the device settings. On new LG brand TVs, these parameters can be viewed and changed through general settings. Press the “Settings” button on the remote control, select “All settings” from the bottom, then “General”. On the right you will see all the necessary items. Go inside each one and do the configuration.
The location of the items may vary depending on the TV model.
How to set up digital TV on an old Samsung that doesn’t support digital TV
If it turns out that the television receiver is not capable of receiving the current broadcast standard or is not equipped with a digital tuner at all, the user can do the following:
- Buy a new TV. Not the most affordable option.
- Connect a digital set-top box-receiver. If you only need to watch programs, then this option will cost several times less than buying a second TV.
Read more about connecting and setting up a digital TV set-top box.
There may be a separate difficulty associated with using the receiver: it does not pick up analogue television signals. If you want to watch both local and national programs, take care not only of the appropriate type of antenna, but also of a splitter for the antenna cable. It is needed so that the signal reaches both the receiver and the antenna socket of the TV at the same time. Then the transition between different types of broadcasting will be carried out as follows:
- a digital channel is required - the TV switches to AV mode;
- you need analog - switch to TV mode.
Solution
To solve the problem, you need to take several steps step by step:
- Check which antenna is installed. For digital television you need a decimeter antenna.
- Then check the wires to ensure that the cable is intact and not broken in any section.
- Manually search for channels or update the firmware of the set-top box.
- If you cannot set up paid channels, you should double-check the availability of payment.
If TV channels are broadcast using the Internet, then it is important to check your network connection and the availability of money on your balance. In general, connecting Samsung to digital channels looks like this:
- Open the “Menu” tab, then find the “Broadcast” button there.
- Click auto search.
- Then confirm by pressing the “Start” button.
If broadcasting is not configured in the menu, instead of cable TV, select “Other operators” and click “Full”. Then you need to use the remote control to set the required position. also do manual tuning, but to do this you must initially clarify the frequency of multiplexes that are broadcast in a particular region.
If, when setting up a Samsung ue28f4000aw TV, it does not pick up digital channels, then you need to make sure that in the “Antenna” item you click Cable, and “Digital” is selected as the channel type. and Analogue". If the Samsung le22b350f2w model does not find a signal, then you can select only digital or only analogue channels, and during setup you need to change the country and display a 4-digit pin code.
Regardless of the Samsung model, almost all have the ability to configure digital channels. For older brands you will have to buy a special tuner. If the setup fails, the problem may be either in the TV itself or in the antenna. Therefore, first of all it is necessary to find the reason.
It is no longer possible to imagine a single family without a TV. It is needed for watching news, movies, entertainment programs or as a background for everyday activities. But sometimes problems can arise with it. This can bring enormous inconvenience and chaos to the normal course of time. Many people are faced with the fact that a completely new TV does not show anything at all.
In this case, you just need to configure it correctly. And sometimes some channels begin to disappear on an old device. And in general, it’s terrible when the most loved ones disappear. This could be a breakdown or glitch that you can fix at home yourself. If you also have problems with your TV, do not worry, but read the tips on how to fix it.
How to set up channels correctly
Incorrect configuration is often the main reason why channels are not detected. How to set up channels:
- Having connected the equipment - antenna, set-top box and Wi-Fi adapter if necessary, turn on the TV and select the connection type.
- Open Settings and find Broadcast.
- Click on "Auto Configuration" and "Start".
- In the next window, select the cable as the antenna; next to “Channel Type”, select digital and analog TV, which will allow you to search for all types at once. Next to the mode, select “Full”.
- Click on the “Scan” button - this will start the search.
The described instructions are suitable not only for Samsung TVs. It can be used when setting up any TV. The only difference is the different names of the menu items.
What about IPTV
IPTV – Internet television. To display many channels for free viewing, you need to install a special application on your TV and configure it together with the IPTV service.
- Open the LG Content Store. Available in the list of applications on the Quick Access panel.
- Go to "Applications".
- Through the search, start typing the application name “SSIPTV”. Select the appropriate one from the proposed options.
- Go to the application page.
- Complete installation and launch.
- If the application asks you to select a country or city, you can skip all the steps at once through the button in the right corner of the screen. We will not watch TV through a specific provider, but will start using publicly available playlists for viewing. Therefore all settings are skipped.
- Through the gear icon at the top right, open the application settings.
- In the “Connection code” section, click on “Get code”.
- From another device (computer or phone), go to the application website using the link https://ss-iptv.com/ru/users/playlist.
- You need to enter the received code into the free field and click “Add device”. The service will automatically detect the name of the TV.
- We find an IPTV playlist with channels that are interesting to you. You can download playlists from our website or from any other website on the Internet. On the SS-IPTV service, click “Open”, select the downloaded playlist file in the “.m3u” format. All channels contained in the playlist should be loaded. Be sure to save your settings.
- Exit the SSIPTV settings on your TV and refresh the page (circular arrow icon). The playlist will appear in the application work area.
- Go inside to view the list of channels. Listing is done by moving the cursor to the right or using the corresponding buttons below the list. The number of TV shows depends on the specific playlist.
- To turn on a specific channel, you can enter part of its name in the search.
IPTV works exclusively over an Internet connection.
For high-quality display without freezes, the connection must be at least 50 Mbit/s. It is a priority to connect the Internet via a LAN cable rather than over the air (Wi-Fi).
Why doesn't my Samsung TV find digital channels via antenna or cable?
In some situations, automatic channel search does not bring results, which indicates a malfunction. The error may be hidden in signal reception, connection, installed parameters, software failure, or mechanical damage. Below we will study in detail the existing problems and discuss ways to eliminate them.
Why the microphone on Mi Box does not work: reasons, what to do?
Equipment
Make sure that the connected equipment can receive the desired broadcast format. DVB-T2 is a European digital TV standard that has been adopted in our country. That is, if you cannot use the new format and view digital broadcasts, then your equipment is probably outdated and cannot broadcast the accepted DVB-T2 standard.
Antenna
One common cause is a problem with the antenna placement. It is necessary to improve the quality of the received signal. But, when using an indoor antenna for digital broadcasting, the image will begin to ripple or disappear.
Location and external factors are also important. Place the antenna pointing towards the repeater. Additionally, make sure there are no obstacles such as high-rise buildings, trees, etc. If present, move the antenna higher.
Settings
The next reason explaining why the Samsung TV does not see digital channels is the settings. Often, even with the parameters set correctly, the device refuses to detect the “digit”. Solution:
- Remove the country or select “Other”.
- Additionally, search for TV channels again by choosing the manual method.
- If there are no results, reset the receiver settings to factory settings or check for an update.
Cable
Make sure that the cable is intact and that the connection is correct. If the TV previously showed channels without interruption, but now shows no more than 10 broadcasts, then maintenance work has probably begun on the provider’s side. Usually, if the cable or inputs are damaged, the TV shows nothing at all.
Equipment connection problem
Samsung TV can't pick up digital channels? Check that the connection is correct. Take your time to set up the number. Initially, make sure that you have connected all the equipment correctly. For example, a decimeter antenna, which implies a built-in amplifier, must be connected to a receiver, which in turn is connected to the TV itself.
If you have any questions or complaints, please let us know
Search settings
Search settings are often the cause of the problem in question. If the automatic search does not produce results, use the manual search. Don't forget to specify the parameters in the form of connection type, change the country, etc. Use the instructions attached at the beginning of the article.
How to connect a universal remote control to Supra: codes, instructions
Software glitches
System failure usually occurs due to user actions. Perhaps you specified incorrect settings in the parameters or made a mistake in specifying the frequency. The culprit may also be the installed software on the set-top box, which the developer has stopped supporting. The solution is to reinstall the software on the receiver.
Additionally, do the following:
- Reset the settings to factory settings and search for broadcasts again.
- Install another firmware on the receiver.
Technical problems on the transmitter side
The last cause of the malfunction may be hidden on the transmitter side, which caused the lack of a signal. Then:
- In the case of cable TV, use a multimeter to check the wiring contacts, including the shield. There may be a break between the transmitter and receiver. Make sure the cables are intact and not damaged. As a last resort, call the company that maintains your home and is responsible for providing access to TV broadcasting.
- When using satellite or terrestrial TV, make sure there are no problems with the provider. Often the official website contains information about scheduled maintenance or possible problems with receiving a signal. Call the operator and clarify the question.
How to fix the problem
You can obtain the entire process of setting up and adjusting the search for digital channels from the instructions for your antenna or by contacting your service provider. Some recommendations will help you improve your channel search, regardless of the TV model and antenna:
- in the “Country” field, enter the symbol “-”;
- add new frequencies manually;
- check the antenna on another TV;
Reset the device to factory settings or update the software version.
Digital television has already become firmly established in people's everyday lives. If you have a TV in your house and you can’t access digital channels during setup, you can solve the problem yourself. But first you need to find out the cause and carry out a diagnosis. Some details may vary depending on your TV model and brand.
Setting up cable TV
To set up cable channels, make sure that your TV receiver supports the DVB-C format. This format is present in many even older LG LCD TV models.
First of all, you need to connect to the provider’s network; to do this, enter into a service agreement. After this, your apartment will be connected to the cable operator's line. When connecting for the first time, the setup is in most cases carried out by company employees. However, you can search for cable television on your Elgie TV yourself by learning the broadcast parameters.
On the old model, you must select the broadcast country Germany or Finland, otherwise access to the DVB-C standard will not be active.
- Connect the cable to the TV socket using a plug.
- Enter the menu.
- Select the reception mode: Cable TV or CABLE.
- Select Automatic setup.
- Next, select a customer service operator. We select only our operator; if it is not in this list, be sure to click on Others .
Search type, three options will be offered.
- Full , scanning all available frequencies, select this option.
- Fast , it is necessary to maintain the initial broadcast frequency.
- Network , enter network parameters.
Network settings.
- Start and end frequency, Modulation, Speed, ID. Please check with your service provider for this information.
- Search parameters for DTV only, if you need analogue, uncheck the box.
- We all click on Start and wait for the end, the process will take more than ten minutes.
How to switch manually?
- Before setting up manually, you should find out the parameters of the digital channel:
- frequency;
symbol rate;
- modulation.
- Then you should repeat the steps for setting up channels, but instead of “Auto search”, select “Manual tuning”.
- In the window that opens, enter the parameters from the television company’s website and start the search.
This data can be found on the website of the company providing digital broadcasting in your region.
This method allows you to configure channels faster than with auto search, because the device searches in a certain range.
Sorting channels.
After all channels are installed, you can use the editor. In this editor, you can change the serial number of any program, thereby moving your favorite TV channel to another position by performing several steps. Actions must be performed using colored buttons, checking the box in advance. Here you can also delete, rename and lock any TV channel.
It is necessary to disable auto-update of channels, otherwise confusion may occur during the next update on the station.
In this manual, I tried to briefly and clearly explain how to set up the TV.
Setting up old TVs via a set-top box
If digital channels are not configured on the TV, and an external set-top box is used to receive them, automatic or manual search is done on it.
Important! To do this, the user is recommended to read the operating instructions for the tuner.
If your TV uses an expansion module, you must act in accordance with the recommendations of your digital cable TV provider. It is necessary to pair the TV and the equipment installed in it. After this, channels are searched using the methods described above.
Why might problems arise and how to solve them?
Some problems may arise when setting up digital broadcasting . But they are all solvable.
No image
This problem occurs when connecting via a set-top box.
If there is no image on the screen, it may mean that it is not connected correctly. The receiver is connected to the TV using an HDMI cable or RCA-RCA. The antenna is connected to the receiver.
Even if the antenna does not work, there should be an image of the set-top box menu on the TV screen. If it is not there, the problem may be one of the following :
- incorrect connection (wrong video input);
- problems with the cable or connectors;
- Set-top box not included.
The first step is to check the receiver . When the device is turned on, there is a green or red light indication. If the set-top box is connected, but there is still no image, you should make sure that the connection is correct.
- Most often, the receiver is connected using an RCA cable with three tulip connectors of different colors: white, red, yellow. If you use an RCA cable, you need to make sure that it is connected not to the output, but to the input of the TV. The input is indicated by the INPUT (I) indicator. output – OUTPUT (O).
- Older TVs may not have a port for the red tulip, in which case it is simply not used. On TVs with a universal input, a green-yellow connector may be used instead of a yellow connector. This input can also be used.
- Some TVs have a built-in comb input instead of an RCA input. Typically, digital receivers are not equipped with a cable for connecting to such an input. In such cases, you should purchase an RCA - SCART adapter. More modern TVs can be connected to the set-top box using an HDMI cable. The image with it will be clearer and the sound clearer.
If the TV and set-top box are connected correctly, but the receiver menu still does not appear on the screen, you should make sure that the correct video input is connected. Switching is done by pressing a button on the TV remote control, which in different models may be called:
- AV/TV;
- AV;
- INPUT/OUTPUT;
- graphic image of a circle with an arrow.
To select the appropriate video input, press the button until the set-top box menu appears on the screen.
Can’t tune in, channels are missing or lost
If your TV does not find all the channels available in your region, you should:
- make sure that the antenna is connected to the set-top box and not to the TV;
- check whether the contact in the antenna connector is good;
- clarify the number of channels available for a given locality;
- move the antenna higher, change its direction or replace it with a more powerful one.
Where to go for help?
In conclusion, let’s talk about what to do if, despite all efforts, the channels are still not configured. If problems arise with the setup that the subscriber cannot solve on his own, you can ask for help:
- To the official LG website. In the "Support" section there are video instructions for reconfiguring TVs.
- To the technical support service of the company broadcasting in the region.
- To the official website of the Russian television network rtrs.rf (watch digital.rf).
Currently, there are companies that charge a fee to reconfigure televisions to receive digital channels. But many subscribers can do this on their own using the instructions from this article.
How to update and find free channels on Smart TV models via a tuner?
If the TV is not connected to a common house antenna, you should purchase and install an individual one .
In houses located near the TV tower, you can use a room one. For people living far from a TV tower, it is better to purchase an external one. To tune channels you will need a TV remote control and a cable to connect the TV tuner to the antenna. The security system of some models may require a password at one of the setup stages. If the user has not installed his own, he should enter the one installed by the manufacturer. This is one of the following options:
- 1234;
- four zeros;
- four units.
We'll tell you how you can turn on (activate) the tuner on Smart TV models in order to connect digital to LG TV. To do this you need to do the following:
- Go to settings by pressing the SETTINGS button on the remote control.
- In the “Channels” menu, select the “Channel selection and settings” subsection.
- Select “Terrestrial TV (DVB T/T 2)” and click “Next”.
- Check the “Digital Only” box and click “Next”.
The search for channels will begin. Attention! If the TV does not find all available channels, you should try raising the antenna higher, bringing it closer to the window, and turning it in different directions. Then repeat the search. - After all channels have been found, click the “Finish” button and you can proceed to viewing.
Setting up satellite channels
To receive satellite broadcasts on the Elgie TV, it must support DVB-S. CI+ slot where you can insert an access card to encrypted channels. The cable coming from the satellite dish must be connected to the LNB socket using the F connector.
- Enter the TV MENU.
- Auto-tuning
- Select the signal source Satellite.
- In the list that appears, select your satellite, or skip by clicking on Other.
- Next, to configure the programs, select a satellite and configure it
- Enter the parameters and click on Next.
- We put a checkmark on the search we need and click on execute.
The parameters of the satellite operator can be viewed on its website.
As you can see, you can independently configure your LG TV to any television format. On LG Smart TV, you can also use free and paid IP television; for this, you need to download the desired program from the application store and run it.