All residents of Russia are gradually switching to digital TV from analogue. Not all TVs, however, support this format. How do you know if your Samsung TV is digital and how do you set up channels?
- 2 How to find and configure digital channels on Samsung
2.1 TVs For TVs with a built-in DVB T2 and Smart TV tuner - 2.2 For older models that can only be connected to digital TV via set-top boxes
2.2.1 Are all set-top boxes suitable for Samsung TVs?
- 2.2.2 How to connect the set-top box to an old TV
- 2.2.3 How to search for digital channels
Why does the Samsung TV not find digital channels: reasons, what to do?
Why doesn't my Samsung TV find digital channels? This glitch is a popular phenomenon among many users. In such a situation, do not rush to take the phone to a repair service. Perhaps you can solve the problem yourself. Digital television provides high-quality images with high resolution. Despite this, some problems and difficulties arise when displaying digital broadcasts. This article will help you figure it out.
How digital television works
This is a modern television broadcasting technology in which sound and image are transmitted using an encoded video signal. The system is protected from interference. Reception methods: terrestrial, cable, satellite.
Connection benefits:
- increased number of programs;
- interactive TV systems;
- ability to select language, subtitles;
- additional functions: video on demand, recording;
- Broadcasting modes: DVB–T2, DVB–T.
The principle of operation of digital television
The operating scheme is simple: audio and video are encoded and transmitted to radio frequencies.
Why can't I tune in digital channels on my Samsung TV?
Don't know why your Samsung TV doesn't pick up digital channels? First, let's determine the breakdown:
- Hardware problems. If the TV does not turn on digital channels via the antenna, there is most likely a fault in the wire or receiver. To fix the problem, check the integrity and functionality of cables, wires and plugs. To check the local antenna coverage, go to the official website https://map.rtrs.rf/ and determine your city of residence. The map will show the broadcasting territory in a certain area or area.
- Software glitches. Such a breakdown depends on the owner himself. Users may have incorrectly designated the frequency and parameters. Another option is outdated software on the set-top box. In this situation, you will need to install new or reinstall the software.
- Another reason is maintenance work on the TV tower or weather conditions. In such a situation, you will need to wait a little time.
How to configure channels correctly?
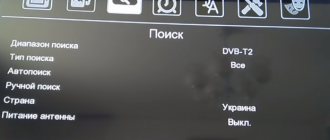
Regardless of the TV model, setup follows one instruction. The operating principle is absolutely the same. First, you must have the right antenna that receives a large signal from the TV tower. Next, the device adds the signal to the menu. After connecting to the adapter, follow these steps:
- launch the “Options” menu folder, then click “Broadcast”.
- Click on the "Automatic Search" section.
- Activate the “start” key, then select the signal source.
- When connecting to an antenna, click on the folder with analog and digital channels.
- Choose one or both options.
- The final stage is to activate “scanning”.
If your Smart TV device does not include TV channels, then use another method of connecting digital frequencies. Buy a special cable or a reinforced set-top box.
Setting up DVB T2 on TV: step by step
To set up, we need a device called a receiver. It receives signals and transmits it to the TV. Signal sources: Internet, dish or antenna. The receiver is configured as follows:
- First you need to take it out of the box and remove the covering film. Failure to remove it will cause the device to overheat.
- Cut off the cable protection sheath. Its length is approximately 15 mm from the end. We clean the shell.
- We bend the protective film and screw ports F to the wires.
- We connect the cable to the receiver and TV.
- The tulip wires are inserted into the receiver and monitor ports.
- You can connect an antenna to the TV. It must be installed outdoors (house wall, balcony). Now you can start setting up.
Note! You need to be careful when stripping, as there is a risk of damaging the film covering the center conductor. It is needed for protection.
The setup is as follows:
- We are looking for a menu. There we go to settings.
- By default, the country should be specified. If not, we indicate it ourselves.
- We select the language, region, mode and search format.
- Set the signal format. Most often, DTV-T/T2 is placed at this point. This means that the TV can pick up both analog and digital signals.
- The process of searching for channels has begun. You don’t need to do anything here; the device will find all available channels on its own. The search can be interrupted at any time and continued later. If necessary, you can choose the manual channel search method. Standard means that the TV will find all channels that are not on the TV. Manually means searching only those channels that are needed. For example, a user only watches sports and does not need channels with cartoons and TV series. The manual search method allows you to ignore the latter. To implement this, you need to set a frequency that broadcasts channels in your area of residence. This can be found out from providers or on the Internet.
- Once all channels are found, or you decide to pause the search, click the save button so as not to lose the found channels.
When setting the DVB-T/T2 format, the receiver will find all signals available in the area where the user lives. But to do this you need to install an antenna and turn it towards the transmitter.
Latest questions
We bought a TV with a built-in set-top box. We set up all DTV and ATV channels. Additional channels showed well, but cable channels were bad with interference, then they decided to reconfigure everything and as a result, cable shows, but DTV does not look for additional channels. What is the reason?
RemComCenter 12/30/2018 12:04
Do a factory reset. If it doesn’t help, then you need diagnostics at a service center.
Red robot on Tchaikovsky, 50 12/30/2018 14:33
It is advisable to check another TV on the same source. Try also changing the region in the settings.
Try contacting tech. BBK support: 8 (800) 200-400-8
Cybergrad 02/18/2019 04:59
Check the TV model, it may not comply with the modern digital standard DVB-T2.
I think you have already solved this issue. if not then: a note may help. Many TVs have an ATV setting. tsv. cable and satellite occurs separately for each and therefore you have to switch from one tuner to another to watch. Most likely you will have to select ATV or DTV (terrestrial signal) in the input signal selection menu, but if it didn’t help then in the channel settings menu switch the antenna from cable DVB-C to DVB-.T2 (analog-to-digital), but once the TV caught it, then correct. Look for a common language with him using a poke like on a smartphone... everything is learned by comparison.
Similar questions
TVs Sharp LC-32LE320
Good afternoon friends. Tell me what could be the problem. Once upon a time, the remote control (Sharp LC-32LE320 TV) was covered or not.
TVs TELEFUNKEN TF-LED43S81T2S
Good afternoon I have a TF-LED43S81T2S TV, in analog TV mode I cannot change the date and time in the menu (see attached image).
TVs BBK 40LEM-1027/FTS2C
I can’t set up my BBK 40LEM-1027/FTS2C TV, how can I do this?
Source
Why doesn't my Samsung TV find digital channels via antenna or cable?
We were faced with the question “Why doesn’t the Samsung TV see digital channels?” In this case, there is a problem with the TV. Problems may be due to signal quality or connection method. To fix a problem, first identify the problem.
Equipment
Problems with equipment arise quite often. The main option is a broken cable or a plug coming off. First of all, examine the integrity of all devices.
Antenna
Problems with the TV antenna are a common cause of no signal on the TV. Place the antenna towards the TV tower. Check that nothing is interfering with the signal. If there are obstacles in the way, place the antenna higher.
Settings
Software glitches can be dealt with quickly. First, change the country name to “Other”. Did the action not help? Do a manual search for TV channels, delete all data on the TV or receiver. Update the settings to factory settings and reactivate the search. Try also updating the firmware of the set-top box.
If you have any questions or complaints, please let us know
Ask a Question
Cable
If previous methods did not help cable TV owners, then study the operation of the cable. Check the wire for damage, holes, or other problems. Examine the condition of the plugs and input. If only 10 digital television channels work, then the reason is technical problems and structural features of the TV. After a few seconds, work will resume.
Equipment connection problem
Sometimes it crashes because the device can't find certain resources. In addition, there is an incorrect way to connect to the digital number. Before setting up, check that the equipment is connected correctly. If the user has a decimeter antenna, it is connected to the receiver, then to the TV. If you have a cable, connect the wire to the dedicated input on the receiver.
Search settings
The problem is this. Most likely, the “Search” settings are set incorrectly. Use the above options and search again. Be sure to indicate the connection type and other parameters. If the situation does not change, then contact the service center. They will help you set up your TV.
Software glitches
In case of software failure, reboot the device. Unplug the adapter and reconnect to electricity. Reset all parameters and click on the “Clear” button. Turn on the TV again and check for TV channels.
Technical problems on the transmitter side
If the transmitter is broken, contact a service center. The technician will check technical problems and fix any problems. It is not recommended to repair the device yourself.
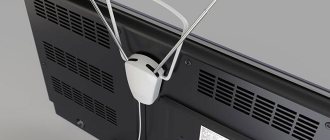
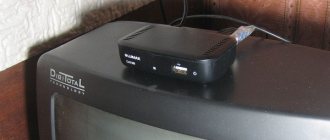
How to find out if your Samsung model needs a digital set-top box
You have two options: setting up digital broadcasting directly on your TV or through a set-top box. The first method is only suitable for Samsung devices that already have a built-in DVB T2 digital signal receiver. As a rule, such TVs have a built-in Smart TV (they can be connected to the Internet).
The set-top box is only needed for old TVs. If you don't have a Smart TV, you'll likely need a separate set-top box or a dedicated expansion module. In this article we will consider the set-top box, since the module is not suitable for all TVs.
A built-in digital tuner is definitely present in models of the LS, M, Q, H, J, K, F, E series. These devices were released no later than 2012–2013. You just need to connect the cable from the antenna to them and make the settings through the TV menu.
How to find out the TV model? The model code is always indicated on a sticker on the back of the TV and, of course, in the operating instructions. How to determine the series using this code: this is the third letter in the combination. For example, if you have a model UN55MU8500T, your series is M.
The TV model is always indicated on the TV label
How to fix the problem?
The entire period of setting up and installing the search for digital channels can be found in the antenna instructions. In addition, you may contact your service provider. Some tips will make it possible to configure the channel search based on the TV model and antenna:
- in the line “Language and country” enter the symbol “-”;
- enter certain indicators manually;
- find out the functionality of the device on a similar device;
- remove the parameters to the initial state;
- Try also updating the software version.
If the situation cannot be resolved, then use the services of a service center. Experienced craftsmen will quickly complete the job. Perform regular preventive maintenance to avoid further difficulties.
About the smartphone - prices, reviews and real customer reviews
On the Pro-Smartfon website you will find reviews and reviews of top smartphones of 2017. All about the pros and cons of mobile phones. Latest photos, prices and real customer reviews of the best smartphones
How to set up DTV on a bbk TV
Find the button on your remote control and press it so you will enter the settings of your TV.
In the Menu that appears, select the CHANNEL item and press OK.
In this menu you need to select the Antenna item and press ok, and choose between Broadcast and Cable. Select Broadcast if you want to configure twenty digital channels. If you are connected to a cable operator, then select Cable to set up digital cable television.
Next, click on Autosearch; if you selected Broadcast, an automatic search for digital channels will begin.
If you selected Cable, then when you click on Autosearch you will see a frame where you will need to enter the parameters of your cable provider, if you do not know the parameters, then use the buttons to select Search Type Full, and click ok.
If you know the frequencies of digital channels, then select the Manual DTV search item and see the options for manually searching for digital channels.
After you have started the auto search, wait until your TV finishes scanning.
Once your TV is tuned in, you can use the Channel Editor to sort your favorite channels.
In the TV menu you can also configure Picture, Sound, Set time, Set lock, update the BBK TV firmware.
DVB T2 is needed to receive analog and digital signals. Thanks to this, you can watch channels in high quality.
Checking if your Samsung TV supports digital TV
Before we begin directly searching for channels, let’s make sure that the TV is generally capable of receiving “digital”. Samsung's lineup includes many series and even more individual models. Not all of them have a built-in digital tuner, and some, although equipped with one, are made for the old DVB-T standard, and not DVB-T2, which is now used in Russia.
To do this, enter the model number in the “Search” line. If you find one, you can proceed to configuration.
| Model | Diagonal | DVB-T2 support |
| 19H4000 | 19 | + |
| LT19C350EX | 19 | + |
| LT22C350EX | 22 | + |
| LT23C370EX | 23 | + |
| LT24C370EX | 24 | + |
| LT27C370EX | 27 | + |
| PE43H4000 | 43 | + |
| PS43E497B2 | 43 | + |
| PS43F4900AK | 43 | + |
| PS51E497B2KXRU | 51 | + |
| PS51E537A3 | 51 | + |
| PS51E557D1 | 51 | + |
| PS51E6507 | 51 | + |
| PS51E8007G | 51 | + |
| PS51F4900AK | 51 | + |
| PS51F5500AK | 51 | + |
| PS51F8500AT | 51 | + |
| PS60F5000AK | 60 | + |
| PS64D8000 | 64 | + |
| PS64E8007 | 64 | + |
| PS64F8500AT | 64 | + |
| T24D310EX | 24 | + |
| T24D390EX | 24 | + |
| T24D391EX | 24 | + |
| T24D590EX | 24 | + |
| T27D390EX | 27 | + |
| T27D590EX | 27 | + |
| T28D310EX | 27 | + |
| UE22F5000AK | 22 | + |
| UE22F5400AK | 22 | + |
| UE22F5410AK | 22 | + |
| UE22H5020 | 22 | + |
| UE22H5600 | 22 | + |
| UE22H5610 | 22 | + |
| UE24H4070 | 24 | + |
| UE24H4080 | 24 | + |
| UE28H4000 | 28 | + |
| UE32EH5007 | 32 | + |
| UE32EH5047 | 32 | + |
| UE32EH5057 | 32 | + |
| UE32EH5307 | 32 | + |
| UE32ES5507 | 32 | + |
| UE32ES5537 | 32 | + |
| UE32ES5557 | 32 | + |
| UE32F4500AK | 32 | + |
| UE32F4510AK | 32 | + |
| UE32F5000AK | 32 | + |
| UE32F5020AK | 32 | + |
| UE32F5300AK | 32 | + |
| UE32F5500AK | 32 | + |
| UE32F6100AK | 32 | + |
| UE32F6200AK | 32 | + |
| UE32F6330AK | 32 | + |
| UE32F6400AK | 32 | + |
| UE32F6510AB | 32 | + |
| UE32F6540AB | 32 | + |
| UE32F6800AB | 32 | + |
| UE32H4000 | 32 | + |
| UE32H4270 | 32 | + |
| UE32H4500 | 32 | + |
| UE32H4510 | 32 | + |
| UE32H5303 | 32 | + |
| UE32H5500 | 32 | + |
| UE32H6230 | 32 | + |
| UE32H6350 | 32 | + |
| UE32H6410 | 32 | + |
| UE37ES6710 | 37 | + |
| UE39F5000AK | 39 | + |
| UE39F5020AK | 39 | + |
| UE39F5300AK | 39 | + |
| UE39F5500AK | 39 | + |
| UE40EH5007 | 40 | + |
| UE40EH5047 | 40 | + |
| UE40EH5057 | 40 | + |
| UE40EH5307 | 40 | + |
| UE40ES5507 | 40 | + |
| UE40ES6307 | 40 | + |
| UE40ES6547 | 40 | + |
| UE40ES6557 | 40 | + |
| UE40ES6857 | 40 | + |
| UE40ES6907 | 40 | + |
| UE40ES7207 | 40 | + |
| UE40ES7507 | 40 | + |
| UE40ES8007 | 40 | + |
| UE40F5000 | 40 | + |
| UE40F6100AK | 40 | + |
| UE40F6130 | 40 | + |
| UE40F6200AK | 40 | + |
| UE40F6330AK | 40 | + |
| UE40F6400 | 40 | + |
| UE40F6500AB | 40 | + |
| UE40F6510AB | 40 | + |
| UE40F6540AB | 40 | + |
| UE40F6650AB | 40 | + |
| UE40F6800AB | 40 | + |
| UE40F7000AT | 40 | + |
| UE40F8000AT | 40 | + |
| UE40FH5007K | 40 | + |
| UE40H4200 | 40 | + |
| UE40H4203 | 40 | + |
| UE40H5003 | 40 | + |
| UE40H5020 | 40 | + |
| UE40H5203 | 40 | + |
| UE40H5270 | 40 | + |
| UE40H5500 | 40 | + |
| UE40H6230 | 40 | + |
| UE40H6240 | 40 | + |
| UE40H6350 | 40 | + |
| UE40H6410 | 40 | + |
| UE40H6500 | 40 | + |
| UE40H6650 | 40 | + |
| UE40HU7000 | 40 | + |
| UE42F5000AK | 42 | + |
| UE42F5020AK | 42 | + |
| UE42F5300AK | 42 | + |
| UE42F5500AK | 42 | + |
| UE46EH5007 | 46 | + |
| UE46EH5047 | 46 | + |
| UE46EH5057 | 46 | + |
| UE46EH5307 | 46 | + |
| UE46EH6037 | 46 | + |
| UE46ES5507 | 46 | + |
| UE46ES5537 | 46 | + |
| UE46ES5557 | 46 | + |
| UE46ES6307 | 46 | + |
| UE46ES6547 | 46 | + |
| UE46ES6857 | 46 | + |
| UE46ES6907 | 46 | + |
| UE46ES7207 | 46 | + |
| UE46ES7500 | 46 | + |
| UE46ES7507 | 46 | + |
| UE46ES8000 | 46 | + |
| UE46ES8007 | 46 | + |
| UE46F5000AK | 46 | + |
| UE46F5020AK | 46 | + |
| UE46F5300AK | 46 | + |
| UE46F5500AK | 46 | + |
| UE46F6100AK | 46 | + |
| UE46F6330AK | 46 | + |
| UE46F6400AK | 46 | + |
| UE46F6500AB | 46 | + |
| UE46F6510AB | 46 | + |
| UE46F6540AB | 46 | + |
| UE46F6650AB | 46 | + |
| UE46F6800AB | 46 | + |
| UE46F7000AT | 46 | + |
| UE46F8000AT | 46 | + |
| UE46F8500AT | 46 | + |
| UE48H4200 | 48 | + |
| UE48H4203 | 48 | + |
| UE48H5003 | 48 | + |
| UE48H5020 | 48 | + |
| UE48H5203 | 48 | + |
| UE48H5270 | 48 | + |
| UE48H5500 | 48 | + |
| UE48H5510 | 48 | + |
| UE48H6230 | 48 | + |
| UE48H6350 | 48 | + |
| UE48H6410 | 48 | + |
| UE48H6500 | 48 | + |
| UE48H6650 | 48 | + |
| UE48H6800 | 48 | + |
| UE48HU8500 | 48 | + |
| UE50ES5507 | 50 | + |
| UE50ES6907 | 50 | + |
| UE50F5000AK | 50 | + |
| UE50F5020AK | 50 | + |
| UE50F5500AK | 50 | + |
| UE50F6100AK | 50 | + |
| UE50F6130 | 50 | + |
| UE50F6330AK | 50 | + |
| UE50F6330AK | 50 | + |
| UE50F6400AK | 50 | + |
| UE50F6500 | 50 | + |
| UE50F6650 | 50 | + |
| UE50F6800AB | 50 | + |
| UE50HU7000 | 50 | + |
| UE55ES6307 | 55 | + |
| UE55ES6547UXRU | 55 | + |
| UE55ES6557UXRU | 55 | + |
| UE55ES6857 | 55 | + |
| UE55ES6907UXRU | 55 | + |
| UE55ES7507 | 55 | + |
| UE55ES8007 | 55 | + |
| UE55F6100AK | 55 | + |
| UE55F6400AK | 55 | + |
| UE55F6800AB | 55 | + |
| UE55F7000AT | 55 | + |
| UE55F8000AT | 55 | + |
| UE55F8500AT | 55 | + |
| UE55H680 | 55 | + |
| UE55H6500 | 55 | + |
| UE55H6650 | 55 | + |
| UE55HU7000T | 55 | + |
| UE55HU7500T | 55 | + |
| UE55HU8700T | 55 | + |
| UE55HU9000T | 55 | + |
| UE60F6100AK | 60 | + |
| UE60F7000AT | 60 | + |
| UE65ES8007 | 65 | + |
| UE65F6400AK | 65 | + |
| UE65F8000AT | 65 | + |
| UE65F90800 | 65 | + |
| UE65HU7500T | 65 | + |
| UE65HU8700T | 65 | + |
| UE65HU9000T | 65 | + |
| UE75ES9000 | 75 | + |
| UE75ES9007 | 75 | + |
| UE75F6300 | 75 | + |
| UE75F6400AK | 75 | + |
| UE75F8200 | 75 | + |
| UE75HU7500T | 75 | + |
| UE78HU9000 | 78 | + |
| UE85S9AT | 85 | + |
| UE105S9 | 105 | + |
Determining the series: deciphering the model number
Digital channel setup varies depending on which series a particular Samsung model belongs to.
Therefore, we first need to determine which specific TV receiver we are dealing with.
You can do it like this:
- Take a look at the back panel. There should be a factory sticker with basic information about the TV: power type, year of manufacture, etc. At the very top there will be a combination of numbers and Latin letters - this is the model code;
- Go to the TV menu. Select the “Support” item and the “Contact Samsung” item, information about the equipment will appear, including the desired combination of letters and numbers.
Let's decipher the found number in order to determine the letter denoting the series:
in 2014 it was designated as AU (U);
Automatic tuning of digital channels on Samsung
The easiest way to set up your antenna connection yourself is to run an automatic search. Let's take a step-by-step look at how to organize the reception of digital TV channels for models of different series and years of manufacture.
M, Q and LS Series
After the cable from the indoor, outdoor or communal antenna is connected and the TV itself is turned on, you need to do the following:
- Turn on the general menu using the “Home” button on the remote control.
- Select the "Source" item. In it you need to indicate the “TV” option.
- Turn on the menu again using the same button, select “Settings”.
- Go to the “Broadcast” line and select “Auto Configuration”.
- Click the Start button. A warning will appear on the screen stating that as a result the existing list of TV channels will be deleted.
- Select the signal source. You can specify “Antenna” (for terrestrial digital TV), “Cable”, “Satellite dish”, etc., depending on what kind of television you connect.
- Select channel type. You can specify “Digital” or “Digital and Analog”. In the second case, you will not have to further configure the connection of each local analog channel if they are broadcasting.
- If you are setting up paid channels, the interface will ask you to specify an operator. For cable, select Other. Since terrestrial television does not have this parameter, we simply move on.
- Specify the mode in which the search will be performed. Select the "Full" option. In this case, the system will search for everything that can be caught from the antenna.
- Start the procedure by clicking the "Scan" button.
- The found channels will begin to appear on the screen (both TV, separately digital and analogue, and radio stations) and an indicator showing which part of the range has already been scanned.
- After the completion message, press the “Close” button and exit the menu (on the remote control – “Return”).
You can start watching.
H, F, E and J Series
For models in this series, the setup process will look slightly different:
- Turn on the TV and use the “Source” button on the remote control to select “TV”.
- Open the menu (using the button of the same name or “Keypad” and selecting the “Menu” position on the screen).
- Select "Broadcast" and then "Auto Configure".
- Activate auto-tuning again.
- At the message warning you about changing your settings, click the Start button.
- Select the source from which the signal will come: “Antenna”, if you are setting up to receive free broadcasting of the DVB-T2 standard, or “Cable”, if you are connecting cable television.
- Specify the channel type. Here it is better to select “Digital and analog”, so as not to repeat a separate setting for the remaining analog programs on air.
- Select scan type. To catch as many channels as possible, you need to select the “Full” option.
- The “Scan” button is pressed.
- After the process is completed, click the “Close” button and exit the menu.
Features of setting up television receivers of some brands
The TV setup process may vary depending on the manufacturer. Although these differences are not very significant. In addition, as a rule, all devices have hints that make it easy to guess how to search for channels. However, older models can only be configured manually. Below we will talk about the intricacies of this process on different TVs.
Samsung
If you have a Samsung TV, go to the menu and select cable in the “Channel” item. In the “Country” section, enter four zeros and set the country. In the “Cable parameters” section, set: “Start frequency” - 298,000 KHz, “End frequency” - 362,000 KHz. Don't touch the rest. In auto settings, select digital or analogue. In search mode, click network and wait until the picture appears. They can be removed from the list. To do this, in the “Channels” item, you need to go to the “Manager” and select which ones to delete.
If you are the owner of an LG TV, go to the menu or press the “Home” button (for smart TV). In the options, select your country, then in the settings, click “Auto search”. In the window that opens, select the signal type. And then set the initial frequency data to 274,000 KHz, the final frequency to 770,000 KHz. Then run a search. In the cable settings, you can set auto-updates, which will be carried out regularly without your participation.
Sony Bravia
Owners of these devices need to go to “Settings” or “System Settings” in “Options”. In the “Channel settings” item, select a number. Next, enter the values in the parameters, which are best clarified with the operator.
Toshiba
Toshiba is configured in the same way as previous models. In Country Settings, select Germany and input as Cable. Next, scroll down to Automatic Settings and click OK. In the pop-up window, select the “DTV” mode, and then set the parameters: for the initial frequency - 274,000 KHz, for the final frequency - 770,000 KHz. Confirm your selection and setup will begin.
Philips
In older models, setup occurs like this: press “Home” and select “Configuration”. Then go to “Settings” and select channel settings. In the window that appears, select “Automatic installations”. In order for everything found to be saved, you need to click “Reinstall”. Choose a country.
It is better to install in European countries, otherwise you will have to contact specialists to install new software.
Then go to “Digital Mode” and select the cable as the signal source. In the new window, click “Automatic search”. Then click “Start” and wait. Sometimes during the process the device may ask for a password. Try entering four zeros, four ones, or 1234.
Manual channel search
The oldest Samsung models do not support Auto Configuration. In them, digital channels must be configured manually, and for cable or satellite television, you must also indicate the frequency and other key parameters. In general, a manual search will look like this:
- The menu opens.
- Select the “Broadcast” item.
- The signal source is indicated (cable, antenna or satellite).
- If the “Country” item appears in the menu, you must indicate “Russia”.
- Select the “Manual configuration” item.
- Select the “Set up digital channels” item, where you need to click the “Create” button. In this case, additional TV channels will be added to the existing ones, and will not replace them.
- A tab with parameters will open. Here you need to specify the broadcast frequency, module and baud rate. This information should be obtained from the operator providing access to the cable or satellite signal. For terrestrial TV, indicate the broadcast frequencies of multiplexes.
- After pressing the “OK” button, the TV will begin searching according to the specified parameters. After a while, a list of found channels will appear on the screen. You need to save them - and you're ready to start watching.
BBK TV - reviews, setup, sorting
- Reviews and answers to questions
- How to set up digital TV channels
- Sorting TV channels
Purpose of some remote control buttons
ASPECT Selecting the aspect ratio
CH.LIST Displays the channel list
DISPLAY Display channel/source information
A -B/GREEN Repeats the selected area/action according to the information on the screen
BROWSE/RED Enable/disable the “Browser” function/according to the information on the screen
SLEEP Set the sleep timer
HOLD/Hold pages in teletext mode/play/pause
TV/USB Switching the TV/USB signal source
Q-PLAY/EPG Quick Play/Program Information Display in DTV Mode
SIZE Teletext input format control
Reviews and answers to questions
How to set up BBK digital channels
- BBK 40lem-1027/fts2c How to set up digital channels on cable television? I do everything according to the instructions, but nothing. Another TV picks up!
- BBK 32LEX-7047/T2 I can’t configure digital channels BBK led2452fdtg. The analog was picked up by the antenna without any problems.
- Bbk 32lem-1023ts2c How to connect digital television, it says database is empty?
- bbk 32LEX-7163/TS2C How to configure digital channels through an indoor active antenna
- bbk 32 LEM-1045/T2C Problem with setting up channels, we tried both automatic and manual search, the problem cannot be solved, it says that the database is empty.
- bbk 43LEM-1043/FTS2C there are 2 TVs in the house, one is Samsung and the new VVC had a factory setting, the compilation frequency and speed are already set, I set it up, we turn on 2 TVs, one shows the other, it says no signal, what is the reason
When setting up channels, you must correctly set the broadcast type - cable (DVB-C) or terrestrial (DVB-T2), as well as the signal type - digital, analog, analog + digital. And of course, you need to check the efficiency of the individual antenna and the absence of signal attenuation on cable runs, splitters, and antenna sockets.
Cable digital television is a paid product. The subscription agreement is associated with a card inserted into the PCMCIA slot of the TV, which decrypts the encrypted channels. If this card is not inserted into the TV, it will not show paid digital cable television.
Currently, cable television operators broadcast some of the federal channels without a CI+ card, but they are scattered throughout the broadcast network and the first numbers are usually occupied by subscription channels.
Sorting TV channels
- BBK 32LEM - 1050TS2C How to rearrange digital channels on this model to suit my needs. For example, the channel is first and I want to move it to 6?
- BBK TV 32LEX-7047/T2C Maybe I'm doing something wrong, but the manually selected channels are not saved in their places.
- bbk 22led-6094/ft2c The TV is connected to cable TV, when you turn on the TV it shows Channel One, I’m trying to move the channels so that when you turn on it shows the TVC channel, I want to rearrange them in the desired order, it won’t work. As an option, I tried to rearrange the channels by deleting unnecessary ones, they were deleted, but before turning off the TV. When I turned it on again, all the actions were not saved as they never existed.
Before sorting channels, you must disable the LCN function. This is the only way to make a list of your favorite programs in the right order.
Source
Adding local analogue channels
If from the very beginning during auto-tuning it was indicated that both digital and analogue broadcasting were being searched, then there is no need to add anything, all TV channels have already been found. You also need to remember that some modern TV models no longer support manual tuning of over-the-air channels; they need to rescan the entire range again in auto-tuning mode.
The algorithm of actions here is as follows:
- Turn on the menu, open the “Broadcast” tab.
- Select the signal source. In our case, this is an antenna.
- Switch to Manual Configuration mode.
- Specify the search for analogue channels only.
- Select "Create".
- Searching for analogue broadcast channels will take a few minutes.
Removing unnecessary channels and adjusting the order
To remove unnecessary channels, proceed as follows:
- Open the menu, go to the settings section and select “Broadcast”.
- Go to "Change Channels".
- Using the “Enter” button, you need to check the boxes that need to be deleted.
- Select “Delete” from the side menu.
- Press the Yes button to confirm and switch the TV to normal mode. Immediately after this, you can make sure that unnecessary channels are gone.
If we are talking about Samsung Smart TV, then removal is easier:
- Using the “Smart Hub” button you need to go to the system hub.
- In the form with the listed channels, you need to select the editing section (usually it is on the right at the top of the table).
- Guided by the system prompts at each step, you can select all unnecessary TV channels and delete them.
As for the order of channels, the TV arranges them in two ways:
- independently in the order in which I was able to find them during auto-tuning;
- using a list sent by the operator (as, for example, when connecting to NTV+ channels).
In the second case, sorting is impossible: you cannot reconfigure what the operator has installed, you can only delete unnecessary channels. In the first, the sorting looks like this:
- Go to the menu, select “Settings”.
- Click on “Broadcast” and go to the “Advanced Settings” tab.
- Select "Change" channel numbers" and specify "Enable" if the item is highlighted. If it is inactive, then proceed to the next step.
- Select “Change channel number” or go to the “Live broadcast” section (depending on the interface option).
- Here you need to open the “Channel List” tab and go to the “Change Channel” item.
- The desired TV channel is selected using the “Enter” button on the remote control; the check mark next to it lights up.
- Select the “Change number” option and use the arrow keys on the remote control to drag the channel to a new location.
- By pressing “Enter” again, the check mark is removed and the result is recorded.
If necessary, the procedure is repeated the required number of times.
When sorting channels on Samsung TVs, you need to take into account one of their features: if the digital ones in the general list are signed and have names, then the analog ones have only serial numbers. Accordingly, when sorting, the picture will be as follows:
- The digital channels will move in the list and one of them will take the position of the other.
- The list of analogue ones will not change, only a different program will be accepted under the old number.
How to set up digital TV on an old Samsung that doesn’t support digital TV
If it turns out that the television receiver is not capable of receiving the current broadcast standard or is not equipped with a digital tuner at all, the user can do the following:
- Buy a new TV. Not the most affordable option.
- Connect a digital set-top box-receiver. If you only need to watch programs, then this option will cost several times less than buying a second TV.
There may be a separate difficulty associated with using the receiver: it does not pick up analogue television signals. If you want to watch both local and national programs, take care not only of the appropriate type of antenna, but also of a splitter for the antenna cable. It is needed so that the signal reaches both the receiver and the antenna socket of the TV at the same time. Then the transition between different types of broadcasting will be carried out as follows:
- a digital channel is required - the TV switches to AV mode;
- you need analog - switch to TV mode.
How to set up channels correctly
Incorrect configuration is often the main reason why channels are not detected. How to set up channels:
- Having connected the equipment - antenna, set-top box and Wi-Fi adapter if necessary, turn on the TV and select the connection type.
- Open Settings and find Broadcast.
- Click on "Auto Configuration" and "Start".
- In the next window, select the cable as the antenna; next to “Channel Type”, select digital and analog TV, which will allow you to search for all types at once. Next to the mode, select “Full”.
- Click on the “Scan” button - this will start the search.
The described instructions are suitable not only for Samsung TVs. It can be used when setting up any TV. The only difference is the different names of the menu items.
Why doesn't my Samsung TV find digital channels via antenna or cable?
In some situations, automatic channel search does not bring results, which indicates a malfunction. The error may be hidden in signal reception, connection, installed parameters, software failure, or mechanical damage. Below we will study in detail the existing problems and discuss ways to eliminate them.
Equipment
Make sure that the connected equipment can receive the desired broadcast format. DVB-T2 is a European digital TV standard that has been adopted in our country. That is, if you cannot use the new format and view digital broadcasts, then your equipment is probably outdated and cannot broadcast the accepted DVB-T2 standard.
Antenna
One common cause is a problem with the antenna placement. It is necessary to improve the quality of the received signal. But, when using an indoor antenna for digital broadcasting, the image will begin to ripple or disappear.
Location and external factors are also important. Place the antenna pointing towards the repeater. Additionally, make sure there are no obstacles such as high-rise buildings, trees, etc. If present, move the antenna higher.
Settings
The next reason explaining why the Samsung TV does not see digital channels is the settings. Often, even with the parameters set correctly, the device refuses to detect the “digit”. Solution:
- Remove the country or select “Other”.
- Additionally, search for TV channels again by choosing the manual method.
- If there are no results, reset the receiver settings to factory settings or check for an update.
Cable
Make sure that the cable is intact and that the connection is correct. If the TV previously showed channels without interruption, but now shows no more than 10 broadcasts, then maintenance work has probably begun on the provider’s side. Usually, if the cable or inputs are damaged, the TV shows nothing at all.
Equipment connection problem
Samsung TV can't pick up digital channels? Check that the connection is correct. Take your time to set up the number. Initially, make sure that you have connected all the equipment correctly. For example, a decimeter antenna, which implies a built-in amplifier, must be connected to a receiver, which in turn is connected to the TV itself.
If you have any questions or complaints, please let us know
Ask a Question
Search settings
Search settings are often the cause of the problem in question. If the automatic search does not produce results, use the manual search. Don't forget to specify the parameters in the form of connection type, change the country, etc. Use the instructions attached at the beginning of the article.
Software glitches
System failure usually occurs due to user actions. Perhaps you specified incorrect settings in the parameters or made a mistake in specifying the frequency. The culprit may also be the installed software on the set-top box, which the developer has stopped supporting. The solution is to reinstall the software on the receiver.
Additionally, do the following:
- Reset the settings to factory settings and search for broadcasts again.
- Install another firmware on the receiver.
Technical problems on the transmitter side
The last cause of the malfunction may be hidden on the transmitter side, which caused the lack of a signal. Then:
- In the case of cable TV, use a multimeter to check the wiring contacts, including the shield. There may be a break between the transmitter and receiver. Make sure the cables are intact and not damaged. As a last resort, call the company that maintains your home and is responsible for providing access to TV broadcasting.
- When using satellite or terrestrial TV, make sure there are no problems with the provider. Often the official website contains information about scheduled maintenance or possible problems with receiving a signal. Call the operator and clarify the question.
What difficulties may arise
There are times when it is not possible to set up DVB T2 reception. If there is such a problem, you need to make sure that there is no damage to the antenna. If it is intact, you need to check the direction. The antenna should be directed towards the tower. It is also necessary to install it outdoors; if you place it indoors, it will block the signal. If the user does not know where exactly the tower is located, torsion of the antenna will help. It must be moved very slowly and smoothly. As soon as the antenna makes contact with the tower, the device will work.
Attention! There are errors during the automatic channel search process. For example, the receiver found few channels or did not find them at all. A manual search will help.
It is also possible that the TV has found channels, but the quality of their display is very poor. This means that the antenna is turned towards the tower, but the contacts with it are bad. Try moving it a little. This problem can occur in bad weather.
How to fix the problem
If the cables are in order and connected correctly, then use the solution to change the settings:
- In the parameters in the “Channel” section, specify the cable.
- Place a dash next to the country or indicate your own.
- In the cable settings tab, set the frequencies to 298,000-362,000 KHz.
- In the automatic search, indicate whether it is digital or analogue TV.
Did the described solutions fail? Contact your provider, there may be technical work on the line and you need to wait.
How to solve the problem yourself
If an over-the-air antenna is installed, automatic search is started, but the TV does not find channels, then there are some problems. This could be poor signal reception, an incorrect connection method, or failures in the settings or the device itself.
In this case, you need to pay attention to the following points:
- If the device cannot be tuned or not all frequencies are picked up, pay attention to the antenna. Analogue television uses VHF antennas, while digital television uses UHF antennas. The structural elements necessary to receive the signal are removed from them.
- The wire. The cable may be broken or burnt out. To determine the cause, inspect the plug and connection area.
- Settings. Problems with the program cause channels to be missing. To fix the problem, put [Other] in the [Country] column, perform the search manually, and update the firmware.
- Paid channel. If the screen shows this message, the subscription to the service has ended. After replenishing your account, the channel will continue to broadcast. If such a message appears on free frequencies, you need to contact your provider.
- To eliminate problems on the TV, frequencies are adjusted using a different antenna. If everything is fine with the device, they look for the problem in the cable or the old antenna. If the TV sees channels but does not tune in, the problem is in the tuner.
If TV channels are broadcast via an Internet connection, the first thing to check is the network connection and the account balance.
Important! It is not recommended to install the antenna in a room - the frequencies will disappear, the image will scatter into squares, and will freeze. A favorable outcome is possible if there is a good signal in the room.