The Internet on Samsung mobile phones, as on any Android device, allows you to get the most useful features from the device by visiting social networks and using various instant messengers. However, for the Internet connection to work correctly, it must first be configured and connected. During this instruction we will describe this procedure in detail.
Enable Wi-Fi, search for network
The easiest way to activate wi-fi is to use the quick access menu. Swipe down from the top of the screen, starting from the top of the screen. A menu will appear, find the Wi-Fi icon and click on it. Please note that an icon will appear at the top of the screen - this means that Wi-Fi is turned on.
The second method is as follows. Go to Settings - Connections - Wi-Fi . When the phone is connected to a Wi-Fi network, an icon will appear in the upper right corner, next to the time.
After you have turned on Wi-Fi, let's search among the available networks. The device will automatically find open networks.
How to set up internet on a Samsung phone
On all Samsung gadgets, regardless of model and firmware version, setting up an Internet connection is carried out using the same algorithm. By default, it runs automatically, without requiring any manipulation on the part of the gadget owner. But if the automation doesn’t work, you have to enter the configuration parameters manually.
Automatic setup
The most convenient option provided by mobile operators is automatic traffic connection. It is performed when the SIM card is installed and works in 95% of cases. You can make sure that the procedure was performed correctly through the general system menu of the smartphone as follows:
- Expand the phone settings menu;
- Select a category where all wireless channels are collected;
- Find and open the “Mobile network” folder;
- Go to the providers page and check that the connection is correct.
Usually, after installing a SIM card into a smartphone and its subsequent identification, the wireless connection with the provider is determined instantly. If it is missing, you should find and tap on the line with the name of the provider - the cellular service provider. Quite often this method works, and you still manage to get automatic access to the network. But if the actions do not help, you need to move on to the next option without wasting time.
Mobile data
The first priority is the need to obtain a list of configuration parameters. You can request it from each Russian provider in different ways.
- Megaphone. Send an SMS with the word “Internet” to number 5049.
- Tele2. Call 679 (free call).
- MTS. Send a message with the text “Internet” to the short number 1234 or call by dialing 0876.
- Beeline. Contact support service at 0880.
Almost instantly, a service notification will be sent to your phone, marked with an icon with an envelope with a gear drawn on it. Next you will need:
- Open SMS.
- Select the item where “Internet Application” is indicated.
- On the page with configuration parameters, activate the process with one touch of the “Install” button.
In some cases, the system may prompt you to enter a PIN code. The default combination is “0000” or “1234”. If both options do not work, you should check the correct PIN with your mobile operator.
When the installation process is complete, the system will notify you and you will need to enable the Mobile Data option in the system settings or in the Quick Access Toolbar. Now all that remains is to restart the device and check for connection.
Manual setting
Sometimes, for unknown reasons, the default setting is not performed correctly, as a result of which it becomes necessary to specify the Internet connection configuration parameters yourself. The instructions are like this.
- Obtain a list of configurable parameters from your mobile service provider by contacting support, sending an SMS message, or visiting the company’s website.
- In the settings, add a new network by tapping the “+” icon.
- Enter the required parameters. After completing entering the parameters, save them through the menu, which is called up using the button at the top of the screen on the right.
- Now return to the “Access Point” page and check the box next to the connection name.
Reboot the device.
Beeline
Connection parameters:
- Network name: beeline or any arbitrary name.
- APN: internet
- User name: beeline
- Password: gdata or leave blank.
- Access point: internet.beeline.ru
Tele 2
Enter the following data:
- Name: tele2
- APN: internet
- Username: select any or leave the line blank.
- Password: gdata or leave the field blank.
- Point: internet. tele2.ru
MTS
Settings options:
- Network name: not important, but it is better to leave mts.
- APN: internet
- Login: select any or leave the line blank.
- Pass: gdata or empty field.
- Access point: internet. mts.ru
Megaphone
Select names and values:
- Name: any, but a better network name is megafon.
- APN: internet
- Username: select any or leave the line empty.
- Password: gdata or leave the field blank.
- Point: internet.megafon.ru
How to set up Internet on a dual-SIM smartphone
You can also comfortably use mobile traffic on Samsung gadgets that support two SIM cards at once. Moreover, they can belong to different operators. To avoid problems, you need to configure your own Internet for each SIM card. In this case, the actions will be performed according to the following scenario.
Go to your phone settings, and in the connections section, select the “Mobile networks” category.
Next, the user will be able to adjust a wide range of important parameters:
- Data in roaming. Here you can activate or deactivate data transfer depending on the current situation. To avoid additional costs, it is sometimes advisable to disable the option.
- VoLTE calls. If data is transmitted in 4G format, the quality of voice calls will improve significantly.
- Network mode. In most cases, LTE is the preferred option. However, to increase traffic speed and make calls, it is permissible to use the maximum number of available standards simultaneously (usually no more than three). If you wish, you can stay with the scheme installed initially.
- Access points. This item does not require any changes. Configuration settings are usually sent by the provider and are registered automatically. If the connection does not occur, the data is entered manually.
- Network operators. As a rule, the required Internet connection channel is selected without user intervention. But if the phone owner knows which parameters will be most appropriate in a given situation, he can choose the network himself.
How to enable 3G or 4G
To enjoy Internet surfing at high speeds, it is possible to switch to a more modern data transmission standard - 4G. Activation of the service requires the fulfillment of a number of conditions:
- The device supports the 4G standard. This is easy to check in the settings: if a similar option is present, then there will be no connection problems. Otherwise, you will have to update the gadget.
- In the region of residence there is access to fourth generation networks, and the settlement or house is included in the coverage area. To check this, you should visit the official website of the network operator and find the desired address on the virtual map.
- The current SIM card must support the 4G standard.
If your Samsung smartphone has a regular Android operating system installed without additional shells, the connection can be made using this scenario.
- In the smartphone menu, go to “Settings” and select “More”.
- Go to the “Mobile networks” section.
- Find the “Network Mode” tab.
- In the window that opens, select the connection type that is most suitable at the moment.
After that, exit the menu, activate the “Mobile data” item in the quick access panel and enjoy Internet surfing.
Add Wi-Fi manually
You can add a network manually if you are an experienced user and know the name, password, encryption type, IP parameters (dynamic or static address), proxy (if used.
To encrypt data, a wifi network usually uses the following modes: WEP, WPA/WPA2/FT PSK, 802.1x EAP (Security tab). All these modes are suitable for the average user. I do not recommend using WEP, i.e. it is outdated and does not guarantee the security of transmitted data.
To protect the transmitted data, you can use a third-party proxy server. To configure a Proxy manually, you will need to enter the “Proxy host name”, Port and for which sites to use (optional option), login and password (depending on the type of proxy).
Wi-Fi network properties
You can always view information about the currently used Wi-Fi network. To do this, click on the wireless connection. Information available:
- Network speed in megabits (convert to megabytes - divide by 8).
- Security, i.e. what type of encryption is used. Usually this is WPA or WPA2 PSK - the most reliable.
- The IP address of your device on the local network. It is usually assigned automatically by your router. But you can assign it manually; to do this, go to your personal account to manage the router (type “192.168.0.1” or “192.168.0.100” in the browser command line).
- IP address for managing the router.
Advanced settings
If you need to connect WiFi on your tablet or smartphone through a proxy server, you should use the following instructions:
- Go to the Settings application.
- Activate Wi-Fi.
- Click on the network name and hold your finger for a while.
- Tap on “Edit”.
- Next to additional options, click the down arrow.
- Next to “Proxies”, select the down arrow again. Then - “Configure manually” and “Auto-detection of proxy server”.
- Set up a proxy if necessary.
- Select "Save". These data must be entered separately for each case.
- Enter the Settings app.
- Activate Wi-Fi.
- Click on “Advanced” and “Advanced settings”. The list of available options may differ depending on the device model and operating system version.
- By installing digital certificates, you can identify your device to access VPN, Wi-Fi and other functions.
- Setting Wi-Fi Direct allows you to connect directly to other devices that also use this feature.
- The WPS button enables secure wireless adjustments.
- The WPS Pin Entry option allows you to enter a personal identification number to protect Wi-Fi.
- The Network Notifications feature lets you receive alerts when your device detects available over-the-air communication options.
- The Wi-Fi On Sleep button allows you to configure signal processing for a smartphone in sleep mode.
- The “Signal range” option allows you to expand operating frequencies.
Please keep in mind that the operating system may differ on different models. The above instructions are intended for gadgets running Android 7.0 and higher. On other versions, the setup process may be slightly different, but in most cases the difference is minor.
After purchasing a smartphone, users have a reasonable desire to access the Internet from their mobile device using a wireless network connection. However, it is not always possible to realize this desire the first time. To avoid problems connecting to the Internet, you need to know how to set up Wi-Fi on your phone.
All the steps described below are equally suitable for phones and tablets running Android OS.
Before you start setting up Wi-Fi on your phone, you need to turn on the adapter. This can be done using a widget displayed on the screen or in the standard system menu of the phone (tablet). On the widget, to enable the adapter, just click on the corresponding icon:
If the widget is not on the screen, use the menu of your mobile device:
The adapter is turned on - the device will automatically search for available Wi-Fi points.
Please note: with Wi-Fi always on, the battery will drain faster than with the adapter turned off.
In addition, if you do not turn off Wi-Fi, then when moving around the city your phone will “catch” all available wireless networks and issue notifications about the possibility of connecting to them.
Wi-Fi Direct
WiFi Direct is a wireless communication standard that allows two or more devices to communicate with each other and exchange files. To configure, go to the Wi-Fi Direct tab (Settings – Connections – Wi-Fi). To “connect” phones to each other, you need to enable Wi-Fi Direct on both. And your device must be visible (not hidden in discovery settings).
Tap on the desired device - an invitation to connect will be sent to the second device. Just confirm the request. That's it, the devices are connected. Select the desired file, “share” - Wi-Fi Direct and a connected second phone.
Connection features depending on the Samsung TV model
The Samsung company is constantly expanding production, introducing innovative technologies, and improving the range of television devices. Even budget lines are equipped with smart TV technology. Each series is distinguished by small features regarding Wi-Fi connection.
All models of Samsung smart TVs are marked by series, which are designated by Latin letters, according to their date of manufacture and characteristics.
To find out the TV series, you need to look at the model code, which is located on the label on the back panel. The third letter of the code indicates the production series, and at the same time, the prevailing technical characteristics.
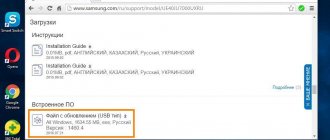
TV systems of previous generations do not have built-in Wi-Fi modules. This means you need to purchase an adapter or connect to the network via cable. The main problem with purchasing adapters is the individual compatibility of devices; each series requires an authentic device. Compatibility data can also be found on the manufacturer’s official website by looking at the corresponding table.
Wi-Fi network management
By default, your phone/tablet remembers all previously saved Wi-Fi networks (with passwords). You can delete the network or select the “Connect automatically” option when one appears in the reception area.
Go to Settings – Connections – Wi-Fi – Advanced – Network Management.
I advise you not to bother too much with this option; do not delete saved networks.
Basic settings
- Open the Settings app on your device.
- On the Wi-Fi button, move the lever to the “On” position.
- Select any connection from the list of available wireless connections. If the network is secure and a password is required for access, a corresponding request will appear when connecting.
- After a successful connection, the “Connection established” status will appear. After this, the network will be saved and the device will automatically find it once within the access zone.
Most connections are included in the list automatically. You can add a connection that is not listed, does not display its name (SSID), or is outside the access area. If the desired network is not in the list, but is nearby, you need to open “Advanced” -> “Update”. To add a new connection, you need to:
- Activate the Wi-Fi button.
- Make sure that the air connection is turned on.
- Select “Add” at the bottom of the list. On Android 6.0 and older operating systems, you first need to click "More" and "Add Network".
- Enter the SSID and other security information if required.
- Click on “Save”.
If you do not want the device to automatically connect to the saved zone, you can delete it. For this:
- Open the “Settings” application on your gadget.
- Activate the wireless connection. Make sure it is turned on.
- Select a saved network. On Android 6.0 and older operating systems, first click on “Advanced” and “Saved”.
- Then tap on “Delete”.
To view saved WiFi information on your phone or change its settings, you need to:
- Open the Settings application.
- Switch to active Wi-Fi mode.
- Now it's time to connect to a specific network. To view information about her, you need to tap on her name. Here you can see the connection status, signal quality, communication speed, frequency and security information.
- To change the settings, you need to click on the connection name and hold your finger for a while. Here you can change it or delete it.
Connecting to WiFi via WPS
Every router has such a WPS button. It allows you to connect to WiFi from this router using a simplified scheme. You will not need to manually enter the name of the network or select encryption - the system will do everything automatically. Just press the Wi-Fi Protected Network setup button on your router with the “WPS” symbol or the “update” icon. Usually you are given 1 minute to connect.
Connecting to the router is possible via WPS using a PIN code (written on the box). The code must be entered when connecting.
Connection
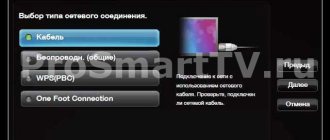
To enable the Samsung Smart TV browser, you need to connect it:
- local wired network via twisted pair cable via a TV router;
- with a wireless Internet network, that is, directly via wifi, if the Samsung Smart TV has a built-in wifi adapter;
- using a wifi router (USB), setting up the connection through the connections menu, and selecting the necessary options.
To find the desired item, you need to go to Smart Hub by selecting the corresponding key on the control mouse in its menu. “Samsung Apps Store” will provide the option you like.
It is more convenient to connect your TV to the Internet via a direct connection or through a router. To do this, just connect the cable from the network provider to the “Ethernet” television connector. If the type of Internet provider does not support the direct connection function, you need to use a router that will help you manage your home network wisely.
For now, let’s leave the option of connecting the wifi router and TV to the Internet via a LAN cable (twisted pair). Let's consider a more rational method and find out how to connect Wi-Fi to Samsung.
Wi-Fi in sleep mode
To save phone battery power, I recommend turning off Wi-Fi when you are not using it. Another thing is that constantly turning it on/off is not very convenient. Samsung has provided an automatic Wi-Fi control option.
Go to Settings – Connections – Wi-Fi – Advanced – Wi-Fi in sleep mode . When the phone goes into sleep mode (display goes dark, lock screen), 3 options are available to control the wireless transmitters:
- Wi-Fi is always on. You don’t bother and don’t even think about it. The option is convenient, but it consumes battery power.
- Wi-Fi is on while charging.
- Wi-Fi is disabled. This consumes mobile traffic. If you have unlimited, that’s good, but more often mobile operators offer traffic packages of 5/10/15/20 GB. You can forget and lose your entire cash balance.
In general, choose the right option based on your situation: either convenience and quick battery discharge, or long work and constantly monitoring traffic and Wi-Fi consumption.
Interactive Features
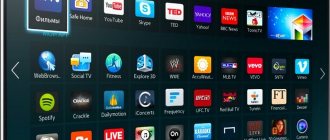
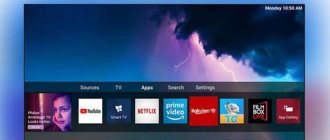
Any smart TV comes with pre-installed applications, just like on a smartphone, allowing you to watch movies, listen to music, and read the news. Different TV models may have different sets of applications, although the main ones are usually similar: media player, Internet browser, social networks, paid and free video services, music libraries, cloud file storage and other applications of interest.
Of course, a more convenient option would be a TV with the Android operating system, because a larger number of applications and games have been developed for it that you can download to your liking. Although a significant portion of applications are available through a paid subscription, money is not at all a prerequisite for using Smart TV. And if you still doubt whether you need smart functions, then here is a small list of what you can do thanks to them.
Watch films
Movies do not need to be downloaded, since there are an abundance of free services for online viewing at a convenient time. In the online cinemas IVI and Tvigle, as well as on the popular YouTube, you can find various films and cartoons in the public domain. But to gain access to relatively new paintings, you will have to sign up for a paid subscription. It is quite convenient to control the search using a virtual keyboard and remote control, or using a portable keyboard for TV.
Study
You can also learn using your browser and the YouTube app. Agree that viewing educational programs and training videos on a large screen is much more convenient than doing it using a relatively small computer or laptop monitor. In addition, you can sit on the sofa in front of the TV with more comfort than at the computer desk.
Listen to books
Yes, yes, not to read, but to listen. Sometimes, due to work and household chores, there is no time left for reading. There is an exit! You can listen to books online using your TV while doing household chores. You will have access to online libraries with selections of books by genre and author, with professional readers. Do you have no time left to read to your child? Turn on a favorite fairy tale, animal stories, or adventures to help your baby fall asleep faster or listen to the school curriculum while drawing and playing.
Listen to music
Play a podcast in the music app on your TV as a backdrop for your celebration or cozy conversations with friends. Or start your morning not with gloomy and annoying news, but with your favorite uplifting music. By the way, music lovers are better off complementing their TV with a soundbar or home theater.
Play
Smart-TV can also be used for online games, but then you will need to connect a joystick, steering wheel or other gaming accessories. By the way, you can play not only online games: smart TVs make it possible to install new games on the TV, as well as connect a console or computer via the HDMI output, providing optimal immersion in the gaming space.
Communicate
Supplement your TV with a webcam with a microphone and arrange video conferences with friends, launch webinars or online broadcasts, create streams of your games together with your teammates.
Wi-Fi management log
And this is a very useful feature in terms of security (for experienced users). Here you can find information about which applications turned on/off the Wi-Fi connection themselves without your participation. If you remember, when you first launch the application, it asks for access to manage your phone (access to the microphone, contacts, camera, etc.) So, you can monitor applications and “punish” especially independent ones, depriving them of access to manage your settings devices.
Go to Settings – Connections – Wi-Fi – Advanced – Wi-Fi management log.
Why connect to the network?
What is the Internet? This is access to social networks, quickly searching for the necessary information, viewing news, searching for archived data, watching television films, series and full-length cartoons. In essence, this is an outlet for searching for information on work and a place where modern youth most often spend their leisure time.
Why connect your TV to the Internet when you can easily access it from your tablet, smartphone or PC?
- Possibility of expanding media content by watching movies online.
- Access to Internet surfing through a large screen. Additionally, you can connect a wireless mouse and keyboard. And the TV will turn into an almost full-fledged laptop.
- Possibility of communication via Skype and other instant messengers. The interlocutor will be clearly visible on the big screen. Additionally, you will need a video camera and possibly a microphone.
- Quickly launch applications and games via TV. Many new Smart TVs support a good list of fast-paced games that are fun to play not only for children but also for adults.
- Watch broadcasts of your favorite sporting events, news and TV shows that are not included in the channel list online.
Connecting an LG, Samsung, Toshiba TV to the Internet significantly expands the functionality of the device. The main condition is the ability to install new software or Smart TV. As well as good stable Internet access.
Older TVs do not support Internet connections. You shouldn’t even try to convert CRT models into Smart TV.
What TVs can connect to the Internet
All versions of Smart TV are already designed to connect to the global network. They come with detailed instructions on how to connect the TV to the Internet. All you have to do is follow it and enjoy the extended content.
If the equipment does not have a built-in Smart TV option, you can purchase an auxiliary Android version set-top box or simply connect a PC or laptop to the TV. In the second case, the TV will not become a full-fledged “Smart” TV, but will broadcast movies included on the computer on the big screen.