“How to update a Philips TV?” - a common question among TV users who have encountered problems while watching. New TV models are not only an opportunity to take advantage of analogue and digital TV. They are in many ways similar to computers - they run on Android, but with somewhat weaker functionality. With their help, you can go online, save files and do other simple actions. To support such extensive capabilities, it is important to have high-quality software and update it periodically. How to do this in detail in this article.
Why do you need to update your Philips firmware?
Updating your Philips Smart TV software is necessary if:
- interactive TV works intermittently;
- Due to lack of update, new features are not available.
As a result of this process:
- the level of job stability increases;
- the device’s response speed to user actions increases.
Firmware is still a weak point for new TVs from Philips. To make life easier and learn the features of new programs, it is better to periodically make updates yourself.
Almost any TV glitches can be solved by replacing the firmware. But each breakdown requires a certain type. More on this below.
Error 107 on Samsung TV: reasons, what to do?
Possible problems
In the process of resolving issues related to the TV firmware and updating it, the user may encounter a number of errors.
Common problems include:
- Insufficient memory, updating is not possible. It is enough to delete unnecessary widgets, and when replacing them, erase them without looking (they will disappear anyway). If the very fact of full memory causes confusion and there are few programs, the cash is most likely full, which needs to be cleared.
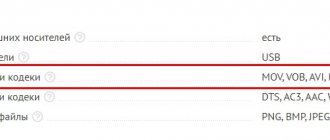
How to update a Philips TV via USB flash drive
You can update Smart TV software on your Philips TV using a regular flash drive. Read on to find out how to do this.
Connect a blank USB drive to your computer
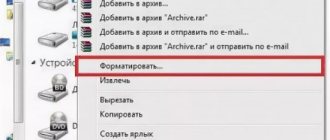
To update using a USB drive, the user needs to format the flash drive using the FAT32 program.
It is important to understand that formatted files can take up a lot of space. Make sure there is enough on the flash drive.
Open your web browser
Open the TV “Support” page on the official Philips website. It is important to accurately indicate the TV model. You can find out the data by looking at the TV serial number on the back of the screen. Or by opening the instructions that were provided with the purchase.
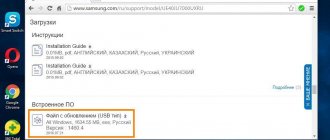
Check software availability on the product web page
On the loaded page, click on “Software Update”. Wait until the system shows the software for the specified model and serial number.
If you have any questions or complaints, please let us know
Ask a Question
Find out the current software version on your TV
You need to start updating if the version of the open page is newer than the one that is currently installed. To start the installation, click on the file and confirm your agreement with the terms of saving and further use. Save the file in ".zip" format on your PC.
Save the unzipped file to a USB drive
After saving to your PC, right-click on the file and click on “Extract to...”. From the suggested list of folders to extract, click on the USB drive.
Turn on the TV and connect the USB drive to it
While following the instructions, you cannot turn off the TV from the power supply. After preparing the flash drive, insert it into the appropriate slot on the screen.
Wait 5-15 minutes
The remaining actions require a short wait. After 15 seconds, the screen on the monitor will go dark, the TV will minimize previously open programs.
How to connect iPhone to Philips Smart TV via Wi-Fi, USB, HDMI
The software update starts. The system will notify the beginning with a special message. The status bar notifies you about the stages.
Automatic operation of the system can take up to 15 minutes.
Once the update is complete, the screen will go dark again for 5 seconds. The manufacturer's logo will appear.
Afterwards the TV will reboot on its own and work as usual will be restored.
Let's sum it up
Friends, now you know how to update a Philips TV via a flash drive. It turned out that it is not so difficult if you try a little. Please note that updates can only be downloaded through the manufacturer's official website.
Do not under any circumstances disconnect the USB flash drive or the TV from the power supply while flashing the firmware. If some kind of failure occurs (the lights are turned off, for example), then do not touch anything: the process will continue on its own after the problem is fixed. If any problems arise, try the procedure again or seek help from a specialist. We hope that everything worked out for you the first time without unnecessary problems and hassles. Don't forget to share your opinion, impressions and experiences in the comments.
Firmware update via menu via the Internet
The easiest and safest way to update. Accessible and simple even for those who do not understand modern technologies. The method suggests activating the process via the Internet by connecting Wi-FI or via cable.
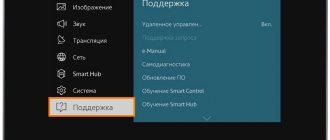
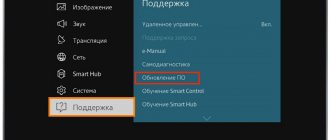
- Open Smart TV, go to “Settings”.
- Select Update Software/Search for Updates.
- Specify the source "Internet".
- Once you have found the update, click “Update”.
- Wait for the time specified by the system.
- Confirm your actions by clicking OK.
After the process is completed, reboot the device and check if it works correctly. The system is automatically updated. At this point, do not do anything with the TV.
Questions and answers
Sergey
Ask a Question
The Philips TV firmware has failed, I have a flash drive with the old firmware, can I use it first?
If it is not new, but still relevant (and supported by the developer), then this option will be simpler and more optimal. First, install outdated software via a USB drive, and then update to the latest version through the settings menu.
I bought Philips for the first time, I don’t like the design, and I’m more used to standard Android like on consoles. Can I put this firmware on my TV?
Highly not recommended. Firstly, Philips services will not work. Secondly, this option is not provided by the manufacturer, and the user does all these actions with the equipment at his own peril and risk.
How often is it recommended to check new Philips software?
Once a month is enough.
How to update the software of your Philips TV without the Internet?
Only by reinstalling via USB, there are no other options.
I lost my Philips account, is it easier for me to call the hotline to recover?
Only specialists at the Philips service center can restore the account, but in most cases it is easier and faster for the user to flash the TV. If the situation is the opposite (Philips center is nearby), then you can contact specialists.
How to update the browser on your Philips Smart TV
Updating the browser is a standard procedure that is performed through the settings. The same thing happens on almost all models. The company integrates the browser into the official firmware. Therefore, when you need to update it, you completely update the software.
To do this, follow the algorithm:
- open "Settings"/"Support";
- open the section that is responsible for updating the firmware;
- click OK.
The user selects the browser that he likes to use. Statistics show that most people choose options with an intuitive interface. The most popular are Google Chrome, Opera and Yandex.
Create an image using Ultra ISO
This software is one of the most popular on the Internet. To create an image from a USB drive:
- Go to the program and drag the contents of the flash drive into the right window, which is currently completely empty.
Confirm your actions and go to the “Boot” section.
Select “Extract boot data from device” and then save it to the hard drive. Then click on “upload download file”. Now all that remains is to save the contents in ISO image format.
There is an easier way that will create a complete copy of the image.
- To do this, connect the USB flash drive to your device;
- In the “Boot” menu, find “Create a hard disk image”;
- All you have to do is follow the further prompts of the program.
How to update flash player on Philips Smart TV
To use new additional features, you need to monitor the current version of the flash player installed on your Smart TV. The update must be carried out periodically to avoid lags in operation. If you initially purchase not the newest model, then the update must be done immediately after purchase. There are mainly two update options, which are described in detail below.
Wink “server error, enter activation number - code 1000060”: reasons, what to do?
Via Wi-Fi or Internet
Before you begin, you need to rationally evaluate the data transfer speed via Wi-Fi. If there are traffic restrictions, then the process will take a long time, since the update file is quite large. To avoid this situation, connect the cable directly. The wire usually comes from your phone or router. In the router settings, you can also specify the required upload speed.
Flash drive
The method does not require specific knowledge or skills. You just need to download the update from the official website via a PC, extract the file from the archive, transfer it to a USB flash drive and start the update process.
For successful flashing, the main thing is to follow the instructions. Do everything step by step and without experiments. Of course, you can call a specialist who will fix everything himself. But everyone decides for themselves whether they are ready to pay money for something that an inexperienced TV user can do. Especially considering that such actions must be performed regularly to work correctly.
Creating media to boot the OS
You cannot create a bootable USB drive using only the built-in tools of Windows 7. To do this, you will need special software designed to work with images. In addition, you will need to create a backup copy of the system or download the Windows 7 distribution for installation, depending on your goals. In addition, it should be said that by the beginning of all the manipulations that will be described below, the USB device must already be connected to the corresponding connector on the computer. Next, we will look at a detailed algorithm for creating an installation flash drive using various software.
Method 1: UltraISO
First, let's look at the algorithm of actions using the most popular application for creating bootable flash drives - UltraISO.
- Launch UltraISO. Then, on the menu bar, click “File” and from the drop-down list, select “Open” or use Ctrl+O instead.
A file selection window will open. You will need to go to the directory where the pre-prepared OS image in ISO format is located. Select this object and click "Open".
After displaying the contents of the image in the UltraISO window, click “Boot” and select the “Burn Hard Disk Image...” option.
The recording settings window will open. Here, in the “Disk Drive” drop-down list, select the name of the flash drive on which you want to burn Windows. Among other media, it can be identified by the letter of the section or by its volume. First you need to format the media to remove all data from it and bring it to the required standard. To do this, click "Format".
A formatting window will open. From the File System drop-down list, select FAT32. Also make sure that in the block for selecting the formatting method, the checkbox next to the “Quick” option is selected. After completing these steps, click “Start”.
A dialog box will open warning that performing the procedure will destroy all data on the media. In order to start formatting, you need to take note of the warning by clicking “OK”.
After this, the above procedure will start. Its completion will be indicated by the corresponding information in the window that appears. To close it, click “OK”.
Next, click “Close” in the formatting window.
Returning to the UltraISO recording settings window, select “USB-HDD+” from the “Recording method” drop-down list. After that, click “Record”.
Then a dialog box will appear where you again need to confirm your intentions by clicking “Yes”.
After this, the procedure for writing the operating system image to the USB flash drive will begin. You can monitor its dynamics using a green graphic indicator. Information about the stage of completion of the process in percentage and about the approximate time until its completion in minutes will also be displayed.
After the procedure is completed, the message “Recording complete!” will appear in the message area of the UltraISO window. Now you can use a flash drive to install the OS on a computer device or to boot a PC, depending on your purposes.
Lesson: Creating a bootable USB drive for Windows 7 in UltraISO
Method 2: Download Tool
Next, we will look at how to solve this problem using the Download Tool. This software product is not as popular as the previous one, but its advantage is that it was created by the same developer as the OS being installed - Microsoft. In addition, it should be noted that it is less universal, that is, it is only suitable for creating bootable devices, while UltraISO can be used for many other purposes.
- After downloading, activate the installer file. In the welcome window of the utility installer that opens, click “Next”.
In the next window, to begin installing the application directly, click “Install”.
The application installation procedure will be performed.
Once the process is complete, click “Finish” to exit the installer.
After this, a shortcut to the utility will appear on the “Desktop”. To launch it, you need to click on it.
A utility window will open. At the first stage, you need to specify the path to the file. To do this, click “Browse”.
The “Open” window will open. In it, move to the directory where the OS image file is located, select it and click “Open”.
After the path to the OS image is displayed in the “Source file” field, click “Next”.
The next step requires you to select the type of media on which you plan to record. Since you need to create an installation flash drive, click the “USB device” button.
In the next window, from the drop-down list, select the name of the flash drive you want to record to. If it is not displayed in the list, then update the data by clicking on the button with the icon in the form of arrows forming a ring. This element is located to the right of the field. After the choice is made, click “Begin copying”.
The procedure for formatting the flash drive will begin, during which all data will be deleted from it, and then recording the image of the selected OS will start automatically. The progress of this procedure will be displayed graphically and as a percentage in the same window.
After the procedure is completed, the indicator will move to the 100% mark, and the status “Backup completed” will appear below it. Now you can use the flash drive to boot the system.
You can burn a bootable USB flash drive with Windows 7 using specialized software. Decide for yourself which program to use, but there is no fundamental difference between them.
Describe what didn't work for you. Our specialists will try to answer as quickly as possible.
Install the modified recovery
This part of the post is intended for those who are not satisfied with the standard recovery and want to have more features and functionality. But most users don’t need it. I only needed it to install custom firmware. miui recovery will be shown here
. It is more convenient and has touch screen controls.
Step 1:
We do everything according to the instructions shown above, but now select the file MT6589_Android_scatter_emmc.txt from the miui_recovery folder.
It contains an image of the new recovery. Step 2:
Leave only the checkbox next to recovery.
Step 3:
Press the DOWNLOAD button.
We agree when the program is requested (click the YES button). We connect the TURNED OFF phone. Step 4:
Everything will happen automatically in a few seconds. Green circle - NEW RECOVERY INSTALLED.
Another way to create a bootable USB flash drive for Windows 10
Hi all! A week ago, our reader Vladimir wrote about this, and today I will also comment. I honestly tried to explain everything as simply as possible.
One of my friends bought a flash drive, formatted it into the NTFS file system, then threw files from an ISO image of Windows 10 onto it and went for someone to install the system on a new laptop, but they couldn’t install anything, since modern computers and laptops have a regular BIOS replaced by the UEFI interface, and this standard can only be booted from media formatted in the FAT32 file system. I explained everything to him over the phone, and the second time the flash drive was formatted in FAT32, then the Win 10 files were copied onto it, and finally I was able to install the system from it on a new laptop.
The next day, my friend again installed Windows 10 for someone from this flash drive, but on a simple desktop computer, and again nothing worked out for him. The question is why?
Friends, the thing is that the flash drive was new and there was no active partition on it. The peculiarity of the UEFI BIOS is that if there are Windows 10 files on a FAT32 flash drive (without an active partition), then it will still boot from this flash drive and you can install Win 10.
If the UEFI interface is disabled on your laptop or you want to install Windows 10 from such a flash drive on a computer with a regular BIOS, then nothing will work for you for the reason stated above - there is no active partition on the flash drive. My friend needed to format the flash drive to the FAT32 file system from the very beginning, copy Win 10 files to the flash drive, and make the flash drive active in the command line using a couple of commands. Such a flash drive would be universal and you could install Win 10 from it on any computer or laptop, with or without UEFI. How to do it!
Note: If you have been using your flash drive for a long time, you probably made it bootable using WinSetupFromUSB, Rufus and the like, and installed operating systems from it, which means it already has an active partition (it cannot be removed by simple formatting).
You can check if there is an active partition on the flash drive by running the program, selecting the flash drive in the top field, and clicking on the Bootice
Choose our flash drive
Click on the Parts Manage button
If under item Act
.
There is a letter A
, which means the flash drive is active.
In principle, it’s not even necessary to check whether your flash drive is active or not, just make it active in the command line and that’s it (the flash drive won’t get any worse).
For example, you have a new or not quite flash drive and you want to install Windows 10 from it on other computers.
You can install Windows 10 from any media that has the Windows installation program on it. The storage medium can be a USB flash drive that meets the parameters described below in the article. You can turn a regular flash drive into an installation drive using third-party programs or the official application from Microsoft.