Miracast Basics
The technology appeared in 2012 thanks to the developments of the Wi-Fi Alliance group of companies. They created a product based on Wi-Fi direct, finding the previous solution bulky and inconvenient to use.
Miracast transmits multimedia content over the air from any mobile device to the TV screen. The user just needs to make a quick setup, activate the wireless connection and enjoy watching videos in Full HD format.
Important ! The TV must be equipped with Wi-Fi, a module that supports Miracast technology.
Benefits of technology
The advantages of using Miracast are the following:
- The owner of the mobile device directly connects to the TV, without using an intermediate link - a router.
- The technology supports all Wi-Fi standards.
- There is no desynchronization or delay when transferring data from the phone to the screen.
- Miracast transmits content in various video formats, including 3D.
- Convenience and ease of use makes the service accessible to most users.
Flaws
There are fewer disadvantages, but they should be taken into account by everyone who decides to use Miracast technology:
- When playing media files on your device, you cannot play or use them for other purposes.
- The smartphone and TV must be compatible.
- Limited range.
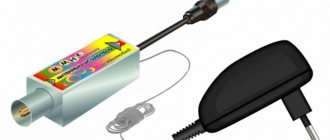
If the signal strength is not enough, then we connect a WiFi antenna with Miracast.
How the technology is used
The technology is activated in 2-3 minutes. The user turns on the wireless connection on the phone and TV, waits for synchronization between devices to complete, and then launches media files.
How to connect a TV to a phone wiredly
New models of Philips phones and TVs have different functions. Smartphones help provide the user with the Internet, communications, a video camera and other useful programs. A television device helps to spend leisure time or provide users with useful information on the big screen. But not many users know that the phone and TV can work synchronously.
USB
USB cable may vary. There is no need to purchase anything separately; the cord that comes with the phone is suitable. The advantage of this connection method is that the phone is simultaneously recharged from the TV power supply.
In this case, the phone can only be used as an external storage device. It will not be possible to show what is displayed on the display - for example, the game process. The picture is not duplicated, but you can use your phone to show videos or view photos. Control is carried out using the remote control of the TV device. The USB port is usually located on the side or back of the TV.
Main stages:
- connect the cable to the phone, then to the Philips TV;
- turn on the TV, go to settings, specify the USB connector as the main source for displaying the image;
- wait for the synchronization to occur. Then the library of files from your phone will appear on the TV screen.
HDMI
If you want to turn on a movie in FullHD quality, it is best to choose this connection option.
But connecting, for example, an Apple phone to a TV can be problematic, since it has a unique connector. To do this, you need to additionally buy a Digital AV-Adapter, Lightning to HDMI “MiraScreen” or any other adapter that is equipped with an HDMI interface. It's inexpensive, but if you need to regularly stream content to your TV, this is a great way to go. Also, the advantage of this option is that it shows the display itself, rather than a library of files.
Main connection steps:
- connect your phone to the adapter;
- connect the HDMI cable to the opposite port. Since HDMI has the same port at both ends, there is no difference in how it is connected;
- Install the other end of the cord into the port of the TV device. It is found in all new Philips models, even those that do not support Smart TV;
- On the TV, press the power button, then set the signal source. Go into settings, find the option where it says “HDMI”. Certain TV devices have multiple HDMI ports, so there are multiple menu options. If you are not sure which cable is installed, switch between them. The output where the image appears is correct. Or look at the back of the TV - the ports may be labeled;
- If everything is done correctly, synchronization will begin automatically and the connection will be completed. If the Apple smartphone is 4th generation, then the TV will show icons for video playback, and not the phone screen itself.
If the connection was not made, then you need to configure everything manually. For what:
- You need to make sure that HDMI is configured as the main source.
- Go to your phone settings and specify information transfer using HDMI.
- Wait a certain time - the phone screen should appear on the TV screen.
Principle of operation
Review and setup of the D-Link Dir-320 modem
Let's look at an example of how to connect Wi-Fi Miracast to a Philips TV.
We activate the function on the TV that is used to watch video files. It is located in the “Settings” tab.
The next step is to enable the option on your smartphone. Available connections will be displayed on the screen. We select a TV that is identified by name and model, and establish a connection between the devices.
The process will take a maximum of two minutes, after which a copy of the smartphone’s workspace will appear on the TV.
Connecting via USB to an Android phone
Above we discussed whether it is possible to connect a Philips TV to a phone; the answer is yes. Now let's see how exactly the connection is made:
- You insert the appropriate contact of the USB cable into the smartphone connector. In essence, this happens in exactly the same way as during charging.
- The second, wide, contact is connected to Philips. Finding a USB socket on the panel will not be the slightest difficulty: most likely, there are even several ports located on different panels.
How to find out if a device supports Miracast
Output and broadcast images from a computer to a TV via Wi-Fi
Most mobile devices and TVs released in 2015 or later will support Miracast. The technology is implemented depending on the vendor and equipment model.
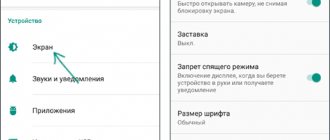
For mobile devices running the Android operating system, the option is called “Wireless Monitor”. Located in the “Screen” tab, “Settings” menu. We go into it, turn on the function, watch the video on the TV screen.
Important! The technology is available starting from version 4.2.
Apple has built the technology into a separate feature called AirPlay. To connect to the TV, the smartphone owner activates the option. After a successful connection, the communicator will display a message about the completed synchronization.
The graphical shell of TVs differs by manufacturer: each vendor creates its own interface.
There is no universal menu item that is responsible for Miracast. The user will have to search for the section independently. As a rule, it is located in the tab that contains the wireless network settings.
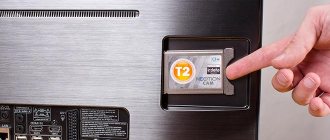
If the TV settings do not have the “Miracast” function, you need to use external adapters. You must purchase and connect an adapter to an HDMI or USB connector, depending on the model.
Microsoft has included technology support for Windows 8 and higher. The option is located in one path, so let’s look at the example of the latest version of Windows 10.
Important! Owners of laptops running Windows 7 need to install the eighth version of the operating system or upgrade to the tenth.
Click “Start” and enter the word Miracast. Follow the inscription and a new working window will open.
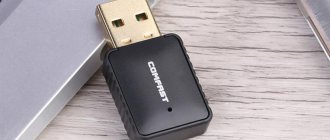
A message will appear at the top of the menu whether the laptop supports the technology or not. If not, the user buys a USB adapter and connects it to the computer.
Important! Before purchasing an adapter, check which WiFi adapters support Miracast. The information is on the official website of the laptop manufacturer.
Transferring images to Android TV via Wi-Fi (Miracast)
Before you begin, be sure to turn on Wi-Fi on your Android phone or tablet, otherwise the following steps will show that wireless screens are not available.
Transferring images from your phone to your TV may require slightly different steps depending on the Android version and smartphone brand, but the following options are generally available:
- In the notification area, find the “Broadcast” icon, and after searching for available TVs, click on the one you need and wait for the broadcast to start.
- If you have a Samsung Galaxy phone, find the Smart View icon in the notification area, click on it, wait until the TV is found, click on it and wait until the broadcast starts.
- Go to Settings - Screen - Broadcast (or Wireless Miracast screen), your TV will appear in the list (it must be turned on at this moment). Click on it and wait until the connection is completed. On some TVs you will need to “allow” the connection (a request will appear on the TV screen).
- Open the list of quick actions in the Android notification area, select the “Cast” button (may be absent), after finding your TV, click on it.
That’s all - if everything went well, then after a short time you will see the screen of your smartphone or tablet on the TV (in the photo below, the “Camera” application is open on the device and the image is duplicated on the TV).
You may also find this additional information useful:
- The connection does not always happen the first time (sometimes it takes a long time to connect and nothing works), but if everything that is required is included and supported, it is usually possible to achieve a positive result.
- The image and sound transmission speed may not be the best, and you won’t be able to play most games this way.
- If you launched some video on your phone, and it is transmitted to the TV as a black screen (which can happen in some players and with protected content), it is better to use the transmission methods described below in the section with additional image transmission methods.
- If you usually use portrait (vertical) screen orientation, then by turning on automatic rotation and rotating the device, you will make the image occupy the entire TV screen.
How to transfer an image from an Android phone to TV - video instructions
Setting up Miracast on various devices
What are the differences between 3G and 4G networks: features, advantages and disadvantages
We will provide detailed instructions with examples on how to connect WiFi Miracast Philips and how to set up the connection for each device.
TV
Let's take the TV company Philips as an example. The owner presses the “System Settings” button on the remote control. Go to the “Network” tab, “Miracast” section. Sets the trigger to “On”.
Turn on Miracast on your mobile device and wait for the synchronization to complete.
Windows
Computers running Windows operating systems have a built-in function whose settings need to be configured.
- Go to “Control Panel”, section “Devices”, item “Connected devices”.
- Click the “Add” button and select from the list of detected TV devices to connect to it. Pairing the devices will take 2-3 minutes.
- If the image does not appear on the TV screen, we perform manual adjustment. Press the key combination “Win + P”, select “Connect to a wireless display”
- We manually enter the name of the TV and confirm the changes made.
Android
Products with the Android platform are connected as follows. We activate Wi-Fi and go to the “More” section. From the list of available options, activate the “Play To” item.
The service starts an automatic search for available TVs and displays a list of results. The user selects TV and clicks “Synchronize”.
Important! The smartphone and TV must be connected to the same wireless network.
iOS
Apple mobile devices cannot connect to a TV via Miracast: the manufacturer does not work with the technology. To support Wi-FI connectivity to TV, the vendor has developed its own AirPlay solution. It is available in the top menu: swipe your finger from the base to the top border of the screen.
Go to the function parameters, select TV and connect to it. If necessary, the user sets a password for access through the service.
Important! Before connecting AirPlay, your mobile device must be on the same network as the TV.
The first step is to connect your Philips TV to your router using a network cable or Wi-Fi; the ways in which this can be done are described in detail in the article How to connect your TV to the Internet .
In this example, I will connect the TV to the router using a network cable (the difference from setting up Wi-Fi is only one step). We go to the main menu of the TV, to do this, press the button with the image of the House, in the future I will call this button “Home”.
Select the “Configuration” item.
Next, select “Network Connection”.
Select the connection type “Wireless” or “Wired”. The wireless method involves connecting to a router using a Wi-Fi network, the wired method means connecting to a router using a network cable connected to the router.
If you connect via Wi-Fi, you need to select your network from the list of available Wi-Fi networks and enter a password to connect to it. If “Wired”, then you need to connect the TV to the router using a network cable. As a result, you should receive a window indicating a successful connection to the network.
After this, you need to update the TV's firmware to correct errors in the previous software version. To do this, press the “Home” button on the TV remote control and select “Configuration”.
In the menu, click "Software Update".
Specify where the firmware will be downloaded from, in this example “Internet”.
Next, the TV will check if there are new versions of the software for the TV, and if there is, it will offer to update them. You need to agree to the firmware update. If there are no new versions of the software, a window will open informing you that you already have the latest version of the software installed.
Now you can safely launch Smart TV on your Philips TV, to do this, press the “Home” button on the remote control and select “Browse Net TV”.
When you first launch Smart TV on a Philips TV, you must agree to the terms of provision of Smart TV and select some settings, this will only be done once; in the future, similar offers will not appear. The first thing that will open is the Smart TV Terms of Service, which you must agree to.
After this, a window will open in which you need to agree to the use of Cookies.
The next step will ask you to register with Philips, this procedure is voluntary, so it’s up to you to decide whether you want to register or not, in this example I’m ignoring registration.
Then a window will open asking you to remember what you are watching in order to provide you with recommendations for watching what interests you. I prefer not to use this functionality, so I will select “Do not connect”.
In the next step, you will be asked to block applications with an 18+ rating, here the choice is yours, if you enable this function, then 18+ applications will be prohibited from viewing (in the future, this functionality can be turned on or off).
This completes the list of questions; in the future, when Smart TV is launched, they will no longer be there. As a result, a window will open in which you will see a list of applications installed by default, among them there is a browser with which you can visit any web pages and ready-made applications to watch movies, TV shows, cartoons, etc.
If you encounter problems setting up Smart TV on a Philips TV, the first thing you need to check is the network configuration of the TV. To do this, go to the menu (the “Home” button on the control panel) and go to “Configuration” - “Network Settings”.
By selecting "View Network Settings" you will see your TV's network settings.
The main thing worth paying attention to is the “IP address” field, the address 192.168.Х.Y should be written in it (for example 192.168.1.10 or 192.168.0.15), this means that your TV has received the network settings of the router and they “see " each other. If your Smart TV does not work, you need to check the settings of your router.
Here are some more popular reasons why Smart TV may not work on your TV:
— Connecting the provider cable directly to the TV. You need to connect the provider's cable to the router, set up the Internet, and only then connect the TV to the router (via Wi-Fi or using a network cable). Only if your provider provides Dynamic IP, then the cable can be connected directly to the TV.
— Check the operation of the router. I encountered the following problem: when connecting to a router, the TV gives an error stating that it cannot receive network settings, although the laptop works fine from the same router. The solution to this problem was to update the router firmware, after which the TV received network settings and Smart TV worked safely. Those. Don’t forget about the router and its impact on the operation of Smart TV.
— Updating the TV firmware. When setting up the TV for the first time and when using it in the future, be sure to install the latest version of the software, otherwise you may encounter the fact that all applications or some of them will not work.
If for some reason you are unable to set up Smart TV, I recommend reading the article - Solving the most popular problems related to setting up Smart TV .
I really hope my article helped you! Please share the link with your friends:
Connection problems
When connecting using Miracast technology, the user sometimes encounters problems: the connection takes a long time to establish or is interrupted. There are two solutions available.
- Drivers are not installed or an old version is used. We go to the official website of the vendor that produced the adapter. Find the current version of the software that is compatible with the version of the operating system, click “Download”.
- Launch the “Installer”, follow the prompts of the “Wizard”. The installer will install (update) the drivers, and then connect again.
- Miracast adapter malfunction. If the equipment is under warranty, contact an authorized service center. Otherwise we buy a new one.
Important! Before purchasing a new component, check the part number of the faulty one in order to find a compatible adapter.