Hello everyone, Turks! And today we are looking at another interesting question - how to turn on a movie on a TV from a flash drive. The procedure seems to be quite simple, but sometimes some difficulties may arise. In particular, the treasured port is not detected on the TV or the TV does not see the flash drive. We'll start with the usual connection and playback, then I'll tell you a couple more ways to play your favorite video. If you have any questions, feel free to write in the comments.
The TV does not see the flash drive
Most likely the problem is in the file system format of your drive. We need to reformat it to the desired format and only then upload the movie to it.
- Right-click on the flash drive after inserting it into the computer. Next, select “Format...”.
- The most important thing is to choose the right “File System” type. The problem is that you can only understand which file system your TV is working with through experimentation. So first we take it and format it to “NTFS”. Leave the cluster size at default. Uncheck "Quick (clean table of contents)". Next, click start.
- After formatting, download the file and try to connect to the TV again.
- If this does not help, then reformat to “FAT32”, and then try “exFAT” (if this setting is available). Unfortunately, here you just need to try.
NOTE! If you format to the FAT 32 file system, then it is impossible to upload movies larger than 4 GB there.
I also said that some TVs cannot work with large flash drives. Therefore, if after formatting the box still does not see the flash drive, then take a smaller flash drive with a smaller capacity.
One more thing - if you have a new device, then make sure that the drive is inserted into the correct slot. There are two types of USB 2.0 and 3.0, they are compatible, but on some TVs for some reason the 2.0 flash drive does not start when connected to a 3.0 port. So just reconnect to version 2.0 or 3.0 (usually blue).
Review of 4K UHD TV KIVI 55UR50GR
Hi all! Today we will unpack, take out and install my new TV KIVI 55UR50GR. At first glance he is simply handsome! I liked the bright packaging, especially the inscription on it - 3 years warranty . This is very cool. I'll tell you why I purchased this particular TV and recommend it for purchase.
I admit, in the past my laptop and smartphone were enough for me to watch YouTube. But right now the issue of buying a good TV for home has become relevant. I will give 3 reasons.
Firstly , incredibly cool games are coming out for PlayStation. Naturally, you need a good TV for such set-top boxes.
Secondly, modern TV series. They're cooler than movies! You want to watch them on a big screen with a high-quality picture; a laptop is clearly not enough here.
Thirdly , services with films and TV series. They provide a lot of content, just have time to watch.
In a word, let's quickly connect and set up a new TV, I'll tell you what it can do!
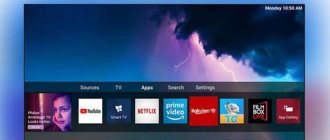
Smart TV: 7th generation Android TV platform, 55-inch screen with 4K resolution and HDR10 support. And, of course, I was impressed by the price - only 35 thousand rubles for 4K HDR! Go to any store and compare the prices of competitors with similar characteristics. Of course, there are OLEDs and QLEDs that provide a brighter and more contrasting picture. But one such TV costs as much as three KIVIs. The best price-quality ratio currently on the market.
KIVI has a bright SVA matrix manufactured by Samsung Display with Direct LED backlighting across the entire back. In total, we get a beautiful picture with minimal flare and good black color. I almost forgot: the frame refresh rate is 800 Hz. Due to this, we get a smooth image that does not tire your eyes. A powerful processor improves color reproduction and creates a natural image, and 4K upscaling technology in real time refines the image from a lower quality signal and brings it closer to 4K.
My new TV has its own unique operating system - KIVI VISION based on Android. Turn it on. Android 7 starts. Now let's look at KIVI VISION. Looks awesome! Wow, hefty! Unusual after a laptop. The design is beautiful. Aesthetics are on point. I was pleasantly surprised, in fact you wouldn’t think that the TV costs only 35 thousand! The modern remote control looks minimalistic, has a pleasant Soft-touch, a voice control key in the center and a minimum of buttons. But the adult generation will take a long time to get used to it. It would be cool if the set also included a classic remote control. I hope KIVI will correct the situation.
So, turning on the TV for the first time. The system offers to make the necessary settings, such as language, time, Wi-Fi and connect the remote control via Bluetooth. Detailed instructions that immediately appear on the screen help me. Everything is simple and clear. If you skip setting up the remote control, you can continue to use it in IR mode, but then you will not be able to use the voice input function. In any case, this can be fixed by going to Settings - Bluetooth.
A little more about the technical characteristics of the TV: Bluetooth 4.2, 8GB of internal memory, 1.5GB of RAM, Wi-Fi 2.4GHz, 4-core processor with a frequency of 1.5 GHz, digital/cable/satellite tuner, overall sound 24 W (2 speakers located at the bottom) . There is not enough bass and there are no Dolby Audio or DTS HD technologies, but the problem is solved by connecting a soundbar or speakers.
The button with the house icon on the remote control launches the main screen. All films, TV series, recommendations, applications are displayed here. “X-Men” is now in cinemas, you can re-watch the previous parts. There is a KIVI TV button on the remote control. The support said it will soon start working in Russia. Curious what it is. Now for the best part - let's watch in 4K. To do this, open YouTube, enter “4K video” in the search, open the video and set the quality to 4K. It loaded a little and everything works great!
In such cases, it is necessary to update the firmware to a more recent one. To do this, write to technical support; there is a special form on the website. The request was answered quickly, within an hour they sent detailed instructions for installing the firmware, everything was described simply and clearly.
Technical support email [email protected]
Support website address: https://kivismart.ru/support-center
Hotline
If you are unable to reach the hotline, you can always write by email. That's exactly what I did. I wrote an email and received my firmware.
Below are detailed instructions for updating the firmware.
Before you start updating the software, save all the files you need in the TV's memory to another medium, since the update process will delete all files from the TV's memory and return it to factory settings. Note: if you update via Wi-Fi, the data is not lost. But the Wi-Fi method doesn't always work.
Also pay attention to the following things:
— It is PROHIBITED to turn off the TV during the software update process until the main menu appears on the display.
— It is PROHIBITED to transfer the firmware to third parties, since each firmware is selected for a specific model and serial number. If you use this file to update software of a different model, problems may arise that will require contacting a service center to resolve.
Sequence of actions when updating software using a flash drive:
- Follow the link that was sent after the software update request.
- Download the “install.img” file containing the software update to your computer.
- Copy the file to the USB flash drive (not to a folder). The file system must be FAT32, you can find out about this by right-clicking on the flash drive icon and going to “Properties”. If the file system of the flash drive is not FAT32, then you need to start formatting the flash drive; before starting formatting, change the file system to FAT32.
- Unplug the TV from the outlet and insert the USB flash drive with the software update file into it, having first removed all other flash drives and modules from the TV.
- Plug in the TV.
- After this, the software update process will automatically start, the screen may be dark for the first 15-20 seconds, then the software update menu will be displayed.
- Wait for the software update process to complete (the TV main menu will appear on the screen).
- Once the update process is complete, remove the USB flash drive from the TV and delete the software update file to prevent accidental startup of the TV software update process
I'm starting to test the system. The interface is convenient and understandable even on an intuitive level. Everything you need fits on the main screen. At the very top are YouTube recommendations. Next, all available signal sources are displayed (TV, 3 HDMI, satellite, etc.). Applications are located exactly in the middle of the screen, and at the very bottom are system settings icons. By the way, the location of all elements of the main screen, their size and background can be changed to suit you by pressing the button with three stripes on the remote control
There are pre-installed, basic applications. There are few of them: YouTube, a browser, online cinemas and a media player. And if you want more, head to the Aptoide TV , which is also included in the basic package. This is an alternative app store for Android. Even though I had never heard of it before, the store actually turned out to be very good. It includes applications that are not even available on Google Play Market. For example, the free online cinema HDVideoBox, where you don’t have to pay at all to watch even the newest films and TV series. I'll tell you about it later. Aptoide TV includes familiar sections by category, with popular apps and search on the home page. Everything is very intuitive and I quickly figured out what was what.
If you are used to Google services and want to use only them, ask for the Ukrainian version of Google Play Market for this TV model. Various methods for installing the market can also be found on the Internet, although, again, the built-in store is more than decent and was enough for me.
Useful free applications on KIVI 55UR50GR:
— HDVIDEOBOX (free collection of films, TV series, cartoons, reminiscent of IVI OKKO and MEGOGO). I downloaded it installed out of the box in the Aptoide TV app store. Here, 1 film in high quality costs 300 rubles. Just enter the name of the HDVIDEOBOX application in the search, select what is optimized for your TV model. Click the Download button, then Install and confirm the installation with the Finish button. We watch all the newest things for free and in good quality. Cool!
- ES Explorer (a useful program that will make it easier to access your files). Its main functions are to copy, paste, create, sort and delete files. Basically, through Explorer, I open the contents of the flash drive and install APK files (the so-called installation files for Android applications). Additionally, if your computer and smartphone are connected to the same local network, you can view files from shared folders on your drive. This way, you can store heavy files on your computer without clogging up your smartphone’s memory, and, if necessary, access them over the air. “ES Explorer” also has something like CCleaner. When launched, it analyzes the contents of the smartphone's memory and looks for what can be deleted. “ES Explorer” can find and delete temporary files and duplicates, application logs, trash contents and other garbage. You can download the explorer from the Aptode TV app store. The installation method is described above.
- VLC media player is a simple and at the same time very functional player that supports most content formats that you may encounter on the Internet. VLC media player plays streaming video and audio (for example, for watching Internet TV or listening to radio online).
- TV+ is an application that allows you to watch online TV channels in HD quality for free, including paid sports channels, such as Football 1/2/3 and Match Premier. You can download it from the link below: https://trashbox.ru/files30/1096990/tv_1.1.3.0.apk/ Please note that the application is not available in the built-in store, so I will describe several ways to install it.
Method 1: Download the APK file to your computer, copy it to a flash drive, insert it into the TV, open Explorer through the ES application and install directly from the flash drive. You must first allow installation from unknown sources in the settings.
Method 2: Download the file from the link directly to your TV (hereinafter, as in the first method).
Lifehack bonus. If you notice that the system slows down slightly when switching between applications, run the utility that is installed on the system to optimize its operation. This can be done by pressing the settings shortcut key on the remote control. Flame icon.
You can connect a wireless keyboard to the TV, which is what I did. Mine also has a touchpad. Surfing in the browser has become noticeably more convenient and faster
However, not everyone has such a keyboard. Then the KIVI Remote app for controlling your TV using your smartphone will help you. With it, your phone will turn into an alternative remote control, touchpad and keyboard. And if you have several KIVI TVs, you can switch between them. You can download KIVI Remote from Play Market or AppStore. Download, connect your smartphone to the same Wi-Fi network as the TV, and use it! By the way, I liked the application more and put the keyboard aside.
Miracast functionality . This is duplicating the smartphone screen onto the TV screen. It is convenient to view photos or videos taken on a smartphone. Many people use this feature to watch movies or YouTube content. The downside is that the quality is lost, although I played Asphalt.
If you haven’t yet understood how to connect Miracast, I’ll tell you step by step:
— On the main screen we find a panel line, the system is usually at the very bottom. Click on the Android icon, select the Network option, and then MCast (Miracast). Let's turn it on.
— After turning on, the TV name appears, by which you can find the TV on your smartphone. Important! The TV and smartphone must be connected to the same Wi-Fi.
— On the smartphone, go to the external screen output mode, find the TV and connect.
I almost forgot: you can also duplicate your smartphone screen on IOS devices (Apple smartphones).
Finishing with connecting peripherals to the TV, I note that it is possible to connect other devices. For example, a wireless mouse or gamepad. The TV won't handle heavy games, but the store has plenty to choose from.
I won’t write much about HDMI and USB ports. I think you know very well that they are necessary to connect a flash drive, laptop, PS or XBOX game console, projector, etc. This TV has all the latest connectors, so you can connect any devices and gadgets without any problems.
To adjust the picture and sound settings, use the shortcut button on the control panel (bottom left with the cube icon). Select the “picture and sound” option from the drop-down menu. Here are the optimal parameters I configured, in my opinion.
Image:
- Brightness 50
- Contrast 80
- Saturation 100
- Cool shade 2
- Adjust the backlight level depending on the room lighting.
Important! Don't forget to enable HDR. When you connect HDR-enabled content, the difference in image quality is really noticeable.
Lifehack. To make a TV on Android 7 allow you to use 4K 60Hz:
- Go to the HDMI settings to which the set-top box is connected.
- Press the button with three stripes on the remote control (function button) and a menu will appear on the right, a menu will appear on the right.
- In the menu, go to Function and enable 4KEnhanced there.
Works!
Sound:
- Low 70s
- High 55
If anyone has problems setting up channels, don't worry! It is very simple to set up cable and digital television.
- On the remote control, press the home button and go to the main desktop.
- We find the line INPUTS and among HDMI 1/2, AV, ATB select Television.
- Specify the location and click Next.
- A message will appear in a new window: select the Antenna type and start scanning, that is, searching for channels.
- To search for channels using a regular antenna, select “Antenna Type: Antenna”. If you have cable TV, select “Antenna Type: Cable”. After that, click Search.
How to set up satellite TV
- To start setting up, in the Inputs line, select “DVB-S2”.
- Then, in the Satellite section, select the satellites you want to search for.
- In the Transponder section, select Search Parameter Configurations.
- In the section on the right side of the screen you can change the satellite connection settings.
- Having selected the satellites that interest you and made changes in the satellite and transponder settings, press the Functions button on the remote control and select Search.
- After that, set the search parameters, channels and services, select Enter. The TV will begin searching for satellite TV channels.
How I connected PS4 and other HDMI devices so that the TV displays the picture correctly without distortion
Instructions based on the example of my TV 55UK50GR. In my case, the TV produced a terrible picture for the PlayStation 4 and greatly degraded the graphics. Attempts to configure using standard means led to nothing. But thanks to the w3bsit3-dns.com forum I found a solution for myself. It's all about post-processing, which was originally intended to improve the image. But in practice, because of it, the picture quality for PS4, XBOX, etc. suffers. How to get out of the situation?
- Turn on the required signal source (HDMI1 or HDMI2).
To do this, press the farthest button on the left on the TV itself. The Signal Source menu opens. We dial the secret combination on the remote control: left-left-up-right and get into the engineering menu .
- After entering the engineering menu, select the PC parameter in picture mode, not Game, since it also distorts the picture.
Everything is ready - now we can play or watch movies through the console without distortion and in excellent quality.
Note!
- There may not be a PC mode in older firmware engineering menus. In this case, I recommend updating the firmware.
- I also recommend setting up all HDMI devices you use. For example, after this setting my picture became much better, the distortion disappeared.
Bonus - a program that will help the control panel work longer. I found a program on the forums that helps solve the problem with the rapid depletion of batteries in the remote control. I have not encountered such a problem, everything is OK. But if someone needs it, you can use it.
You can download it from the link:
https://drive.google.com/open?id=1tLbSr1YVrIUuetwW09RaYO_P41HIwFBW
https://drive.google.com/open?id=1hmum12Mu5CLAYXDJhv43X1W3SxrundGn
Installation instructions:
- Download files to a flash drive.
- Connect the flash drive to the TV.
- Launch file manager.
- Install launcher extension on TV.
- Install the OTA extension on TV.
- Connect a remote control whose charge is above 10% via BT to the TV.
- Start using the remote control.
- Agree to install the application to update.
For advanced users, I have collected links with useful settings:
Access to the engineering menu, reset to factory settings:
https://4pda.ru/forum/index.php?showtopic=792689&st=4400#entry70790588
Disable post-processing on Android 7: https://4pda.ru/forum/index.php?showtopic=792689&st=7780#entry80203102
If the TV slows down. The process of obtaining ROOT
https://4pda.ru/forum/index.php?showtopic=792689&st=5000#entry72234580
Accidentally turned on aging mode (the screen shows different colors)
https://4pda.ru/forum/index.php?showtopic=792689&st=7340#entry79336025
Easy installation of Google Play for Kivi TV owners with Android 6.0
https://4pda.ru/forum/index.php?showtopic=792689&st=10300#entry83252722
Thank you very much for your attention, dear readers! Arthur Codlin was with you. Write your comments, I will be glad to answer your questions.
Doesn't play movie or video
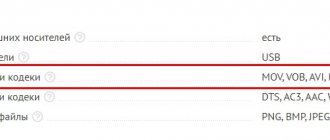
This is the most common problem and occurs on almost all even the newest and most expensive TVs. The problem is simple - your TV most likely cannot read this format. Therefore, the easiest way would be to download this movie or video from the Internet in a different format. You can also see for yourself which video formats your model supports. This can be found out from the technical data sheet or from the Internet. I’ll show you using the LG 49UK6390 TV as an example.
- You can immediately go to the official website and simply enter this model in the search.
- Now I’ll tell you what problem I encountered. For some reason this information was not available on the official page. Therefore, you can find it in any online store, just enter the model name into any search engine. Next, we go to each store and look at the characteristics.
Another option why the TV cannot play your video is because it is very large. For example, there are films in large formats and weigh from 30 or 40 Gigabytes. Old TVs are simply not able to open such large files, so here you just need to find and download a movie with a smaller size on the Internet. It is better to use files from 4 to 10 Gigabytes - no more.
Common questions and answers
Let's look at the most common questions that arise when connecting a flash drive to a TV.
How to watch movies from a flash drive on TV?
- burn the movie to a Flash drive;
- insert it through the USB connector on the TV body;
- select the required source through the “Menu”;
- start the video to play.
If there is no USB port on your TV?
To view video or photo content through a TV device that does not have a USB connector, you must use alternative methods: through a media player, through a DVD player, through an adapter, an HDMI cable.
Playback did not start
This is possible if you inserted a flash drive and forgot to turn on the TV. Or playback does not start because the video format is not supported by the TV device.
Methods for connecting a USB drive to a TV
Modern technologies allow you to enjoy watching home videos and photos on the big screen. And the Flash drive plays an intermediary role. USB ports are available in almost all models of TV devices. This makes it possible to quickly and easily view the data. But if your TV receiver is not equipped with such a port, then you will have to use an alternative. If you need to connect a USB drive to a TV receiver, you can do this in several ways:
Using the USB port on the TV
The easiest and most natural way to connect a TV to a flash drive is to insert it directly into the port on the TV panel body. The algorithm of actions is as follows:
If you cannot find the required connector on the TV panel body, then use an adapter. This is a cable where there is an HDMI connector at one end and a USB connector at the other. As a rule, such cables are not long, but only 20-30 cm. The sequence of actions required for viewing is maintained.
If the video broadcast on the TV receiver has not started, this means that the format in which the file was recorded is not supported by the TV device. In this case, you will have to download the movie in a different format, but first find out what formats the TV supports.
Using a DVD or media player
Let's figure out how to connect a flash drive to an old TV. Older models were not equipped with USB connectors. But probably every owner of an old TV has a DVD player, so connecting a flash drive can be done through it. The DVD player connects to the TV through the tulips, and then you can insert a flash drive into the port on the player.
If there is no player, then a media player will replace it, which is an excellent modern alternative. Using a cable, the player is first connected to the TV panel, and then a flash drive is inserted into it via a USB port.
Using a digital set-top box
An excellent alternative for connecting a flash drive and playing video is a digital set-top box. As a rule, modern receivers are equipped with all the ports that currently exist. The only exceptions are Apple products, which have abandoned USB ports on their set-top boxes. The connection to the TV is via an HDMI port, and the flash drive is inserted into one of the USB ports.
Also, video from a flash drive can be played through an Android set-top box, which has all the connectors as in a digital tuner. All connection steps must be performed in the same way.
Using a computer or laptop
It is not necessary to watch movies from a flash drive; you can stream them directly from your computer or laptop. You just need to connect these devices together. There are several types of wired connections:
Broadcasting can also be done wirelessly using your home Internet network. To do this, both devices must support the Miracast feature, which mirrors the laptop screen on the TV panel screen. Before establishing a connection, you need to make sure that your PC has the necessary drivers.
It is especially easy to stream content from a tablet or smartphone, which can easily connect to Smart TV. To do this, just select the “Screen Cast” menu item.
5 ways to connect a flash drive to your TV to watch movies from it
Mostly external memory drives are used by TV owners who do not support the ability to set up an Internet connection.
A TV with a flash drive allows you to watch your favorite movies, TV series, programs, photos and other multimedia content on the big screen. Not everyone is able to watch movies from a flash drive.
Immediately after connecting, many users encounter various difficulties. Now we will analyze 5 ways to connect a flash drive to a TV, and then we will select effective solutions to problems that arise immediately after connection.
How to turn on a flash drive on LG, Samsung and other TVs
A small flash drive has become an integral part of information transfer, because there is nothing easier and more reliable than downloading a movie or photos onto it and transferring them to another device for viewing. It's especially good to watch photos on a big TV screen. All leading manufacturers equip their TV devices with USB connectors. If this is not provided, then it is quite possible to get by with adapters, of which there are a lot on sale now. Let's take a closer look at how to connect a flash drive to a TV.
Recovering presentation files
(which stopped opening or were completely deleted from the drive)
Option #1: Using PowerPoint Features
Important! Conventionally, the article is divided into several parts (4). The first 3 are suitable if you have the presentation files themselves, but they do not open in the usual way (for example, they were damaged for one reason or another).
The last option (4) is useful if your documents have been deleted from your hard drive (flash drive), and you do not see them using regular Windows Explorer.
And so, to begin with, I would like to recommend using modern versions of PowerPoint (currently 2021, 2019). They have wider functionality, often when opening damaged files - they offer to try to restore them (as, for example, in my screenshot below).
Microsoft PowerPoint has encountered a content problem
You can also use this function through the program menu: to do this, open the “File/Open/Browse” tab (see example below).
Open - overview / Microsoft PowerPoint
Next, select the file and specify the required action: instead of “Open”, put “Open and restore”. An example in the screenshot below.
Open and restore
If the file does not open (or little of the original document is displayed), then move on.
Option #2: using Recovery Toolbox
Advantages of the method: high probability of recovery, simplicity and speed (no technical knowledge is required for work).
Cons: the program is paid (but the price is reasonable, plus you can view part of the restored file before paying).
In general, there are quite a lot of programs for file recovery. But there is very little specialized software for working with documents (in particular, with presentation files .PPT and .PPTX). And, in my opinion, Recovery Toolbox makes you pay attention.
Program for Windows
Recovery Toolbox for PowerPoint
A specialized program for recovering damaged PowerPoint files. Supports both files from older programs (.PPT format) and modern versions of PowerPoint (.PPTX).
- support for files from Microsoft Office 97-2003 to 2021;
- an attempt to reconstruct the presentation and calculations in it (if the file is severely damaged);
- in the most hopeless cases (when the file is severely damaged), the program will help you get out of it all the files that are possible: pictures, videos, music, etc.;
- simple and intuitive interface (with step-by-step actions);
- Russian language support;
- support for Windows XP, 7, 8, 10.
And so, let's move on to restoring the damaged file.
1) I omitted the installation of the program (it is standard, the Russian language is installed automatically). After starting the program, you must specify the broken file (see example below) and click on the “Next” button.
Step 1 - specify the presentation file
2) Further, depending on the size of the file (and its integrity), it may take some time to process it and evaluate the possibility of recovery. If the file is small, as a rule, the waiting time is no more than 30 seconds.
STEP 2 - waiting for processing
3) After the analysis is completed, click on the “Submit” button.
STEP 3 - Transfer Content to PowerPoint
4) Then wait for the program to transfer all the slides to the PowerPoint program (the program should open automatically).
Is it possible to connect via a USB cable and how to do it?
Connecting any modern gadget to a TV media via USB is the easiest way to transfer data from one device to another. Unlike synchronizing equipment via a WI-FI network or using an HDMI connector, using USB can be called intuitive and does not require special skills or special equipment.
To transfer data you will need:
- phone or tablet;
- standard cord - usually included with the mobile phone, but can be purchased separately at any hardware store;
- TV with USB input – located on the side or behind the monitor.
The connection principle is very simple:
- You need to find the connector for the USB cable on your mobile and TV device and connect them with a cable.
- Next, select the USB socket recognition function on the TV, and confirm this action on the phone if necessary. Subsequent manipulations depend on the specific purposes of the connection.
Synchronizing devices gives you a lot of possibilities:
- View and listen to audio, photos and presentations.
- Ability to play games installed on a mobile device.
- Reading books.
- Making calls in Skype, provided that this application is installed on a mobile device.
- Simultaneously with the above actions, the mobile device will be recharged from the TV, but more slowly than through a power outlet.
The process of synchronizing a TV and smartphone via USB is identical to the same process using a PC, where the phone acts as a flash drive.
The connectors for a particular model of mobile gadget or TV may be incompatible with each other and may not fit one USB cable. This problem can be easily solved with the help of the correct selection of an adapter or adapter.
Connection problems
| Problem | Solution |
| Connection error | Phones from Samsung and Sony can transmit copy-protected video using Miracast. But Philips equipment cannot support such technology, that is, when trying to connect, the TV reports an error. |
| Lost connection | When transferring files via Miracast, connection interruptions sometimes occur if there are obstacles between the phone and the TV. That is, the smaller the distance between equipment, the better. |
| Lack of parallel connection between multiple TVs | Not all phones allow you to connect multiple network connections in parallel. For example, Philips TVs can connect to the device either via Miracast or Wi-Fi. |
| High network load | The load on the wireless connection increases if files are first transferred to the smartphone and then to the TV. The best solution in this case is to use the YouTube application. |
There are many ways to connect phones to Philips TVs, and if you have new generation equipment, then most likely one of the methods described above is suitable. Despite the enormous popularity of smartphones, users still often buy TV equipment and connect their phones at the same time. If recently these were ordinary TVs, today they are smart gadgets in which everyone can watch any video using the Internet or cable TV.
Creation and configuration
We will need a project from which we will make a video. The finished version will retain all the transitions and effects, as well as the sound and even the pointer. Not bad, right?
Open the project and go to the “File” tab in the control panel. Next, “Save and send”, “Create video”. In the interface that opens, we can adjust the quality:
- computer monitors and high-resolution monitors - high;
- Internet and DVD - average;
- portable devices - low.
And you can also specify whether the sound and pointer will be turned on. Click “Create video” and wait for processing to complete. The output file will have a WMV extension; you can convert it to another format using the appropriate programs; there are plenty of them on the Internet.