- Large diagonal. Monitors are rarely larger than 28”, while for a TV a diagonal of 40-60” is the norm;
- Better image quality. As a rule, a TV provides a better picture than a monitor - especially if we are talking about a laptop;
- Location. The monitor is usually located on the desktop, and the TV is positioned so that watching a movie is really comfortable.
Yes, you can use a DVD player, flash drive or external hard drive, but why endure additional inconvenience if you can directly connect your TV to your computer? In addition, this will allow you not only to watch movies, but also to simply use the TV as a monitor: surf the Internet, play and work - and all this without leaving the couch.
Connect via Wi-Fi
Wireless broadcasting is a complex method that deserves special attention. But it remains the most popular because every home has a router. Before connecting, you need to prepare several devices that you cannot do without:
- A computer, laptop or other device that plays video. Through it you will start the server.
- TV with DLNA support. It will port everything contained on PC. If there is a built-in Smart TV function, the connection will be simplified.
- Internal network connecting laptop, TV. 2 gadgets must connect to one router.
Developers produce Smart TVs and computers that support DLNA technology. If this function is built-in, this will be enough to play music, videos, and movies. Instructions for DLNA will be below.
Google Market is pre-installed on your Samsung TV and finding suitable applications is not difficult. The image transfer will be instantaneous without delay. If you have a good router, the video quality will not change.
Instructions for Windows 10
Select the desired file, right-click. In the window that appears, select “Transfer to device.” Then select the name of the TV.
Instructions for Windows 7
Right-click on the file and select "Play to". Click on the TV. After this, a player will appear where you can manage the selected files and change the order in which they are displayed. To expand the list, transfer files through the player. This way you can remotely control the display, updating it with new files. You can also combine photos, music and other movies.
It happens that before the image is transferred, the “Media Streaming Options” window appears. Click "Enable Media Streaming."
In the next window, check the permission checkbox next to your TV model.
Repeat the file transfer procedure.
For convenience, you can transfer files to a separate folder and use it for playback. All files will appear on the computer screen and player.
When using the Movies & TV feature on Windows 10, the method is slightly different. Open the menu and click on Transfer to Device, click on your TV. All files will be broadcast on the second monitor. If desired, you can set what will be played.
Also watch video instructions to understand how to display video on TV:
How to stream video content to TV using a wireless connection
Don't like a lot of wires in your house? Then the optimal solution would be a wireless connection. You can:
Playing videos on TV via WiFi
You can transfer data when your PC is connected to WiFi and has a DLNA server. If your TV equipment supports DLNA streaming media, you can send movies, photos and other files without the need for additional hardware.
To stream video over a local network to a TV, follow these steps:
1.
Launch Wi-Fi Direct mode on TV through the menu. On your computer, open Control Panel or Settings. Specify the "Internet" category. Select the “Show available networks” action and select the desired option in the pop-up window.
2.
Enter the WPA key displayed on the big screen and confirm. This key is very case sensitive, so make sure you enter it correctly before connecting.
Wi-Fi connection
If you want to show a video from a PC, then before broadcasting from a computer to a TV, you can prepare a video clip. You may need to remove unnecessary fragments or advertising, change the proportions of the material, or increase the brightness of the picture. To do this, use the special video editor VideoMONTAZH. It will improve the quality of the clip and remove unnecessary moments from any part of the video.
To stream TV, you'll need to download video streaming software to your TV that allows you to send content using DLNA. There are simple solutions for showcasing streaming media, such as Kodi. It is an open source player that offers basic media server capabilities and runs on all operating systems. Kodi is also compatible with almost all streaming services. Alternatively, also take a look at the excellent Plex or Emby software.
Kodi interface
Transferring images from a computer to a TV via LAN on Windows 10
To transfer media data to a LAN-enabled TV, press the “LAN” button on the TV remote control. Switch to a source named “Screen Mirroring” or a similar name. Then set up your PC: open hardware settings and go to the “Devices” - “Devices and Printers” category.
Windows 10 Settings
Hover over the "Add a device" option to connect a new one to your PC.
Enter the TV name and enter the PIN code
It will take some time to establish the connection. Do not unplug the power cord while the equipment is being connected. This may cause the equipment to freeze or cause further malfunction and malfunction.
Using Chromecast
Chromecast is a special device that helps connect equipment and transfer media data. It is compatible with multiple OSes including Windows, iPhone, Mac, Android, and Chromebook.
Appearance of the device
Chromecast allows you to stream video content or music and play content from websites. It can be purchased in many stores, including online: for example, you can order equipment on Ozon or Yandex.Market. To broadcast a PC to a TV using it, you will need to perform several steps:
1.
Set up your Chromecast and connect it to an outlet and your appliances. Make sure you have downloaded the latest version of the Google Chrome browser. If you already have one, click on the ellipsis icon in the top bar.
Hover over the "Broadcast" option
2.
In the new window, set "Cast to..." and select either Cast Tab or Cast Desktop. Once you are done with this, click on the icon located in the top right corner to show your laptop screen on TV.
The method has several disadvantages. For example, the machine does not work on its own: you must connect it to a power source. It also doesn't support displaying 4K media.
If the PC does not see the TV
Outputting video to a TV is simple, but can cause complications or problems. Each device and technique may vary. First, check whether everything is connected correctly and which devices are participating in the broadcast.
What should I do if my TV does not appear in the list of new devices on my computer? Just wait a little without closing the list, and the TV will appear. First of all, make sure that the output device has the “Smart TV” function and is connected to the same router as the computer. Check the connection and functionality of the output device.
Other possible problems:
- The file cannot be played and a “Format not supported” notification appears on the screen. A common occurrence, the reason is the lack of support for the file format. Or the problem is related to the computer: on the Windows 10 operating system the file runs without problems, but on Windows 7 an error is displayed.
- Music/movie playback slows down. If the file is of high quality or weighs a lot, it will slow down during playback. If the Internet speed drops, the picture will begin to slow down. For example, Full HD video is played without delay. If it is 4K, then it is better to purchase a router with a 5 GHz band.
- There is no sound. Go to sound settings. It is located next to the clock, then in “Playback devices”, “Use default speakers”.
To improve performance, create a media server. Use one of the following applications:
- Home Media Server - many possibilities and customizable programs.
- Twonky Server is a simple, convenient communication program that does not require any special knowledge to install.
- Plex Media Server is a Russified version with support for mobile gadgets, which expands the list of capabilities.
Effective ways to mirror your computer screen to your TV
We output the image from the computer to TV via HDMI
The most convenient connection method among wired methods is the use of an HDMI cable. This connection does not require any special skills or knowledge. The main advantage of using this type of cable is the high data transfer speed, which ensures broadcasting with maximum resolution. This type of cable usually comes with your TV. However, if you don't remember where the unused cable is, or you never had one, computer stores will solve the problem. You can choose the option with the right color and the required length.
The vast majority of computers of the last decade have HDMI. The only exceptions are the lower models. To transfer data to the TV from a computer, you also need to find the HDMI connector on the TV body. But even their absence will not be a hindrance - it is not difficult to find a suitable adapter that converts the signal from an existing type of socket. After connecting your computer and TV using an HDMI cable, you need to do some simple software setup.
On your computer, you can quickly access the desired section of the settings by right-clicking on the desktop and selecting "Screen Resolution" from the list that appears. A dialog box appears asking you to select the type of second screen you want to use. There are usually several options:
- Duplication. This type will make your TV an exact copy of your computer. The movements of the cursor and desktop will be displayed on the TV screen.
- Second monitor. If you choose this option, you can split your computer's work between two screens, so you can, for example, read an article on your computer and watch the media player on your TV.
- Single desktop. This option allows you to expand the boundaries of your computer desktop by adding an area of the TV screen.
- In addition to the three standard options presented in front of you, additional options may be available for your graphics card.
In addition to the types of uses of the second screen, you can choose the image quality by setting the required resolution. Here the HDMI cable shows its undeniable advantage - it allows you to transmit images with a resolution of 1920x1080 pixels, which corresponds to Full HD quality.
If, when connected, the TV does not show signs of new sources as a PC, manually specify the path from the PC to the TV. It is important not to be confused with the number of HDMI outputs; if there are several of them on the TV, select the one into which the cable is inserted. Due to the fact that the most popular method of connecting external sources for many TVs remains “tulip”, you can easily get out of the situation by using an HDMI-RCA adapter.
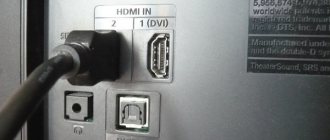
Select HDMI input as signal source in TV settings
It often happens that when you connect devices and turn them on, there is no picture on the TV. You will receive a message like “No signal”, “No signal source selected” or something similar. You need to select the signal source on your TV. The port to which you connected the cable.
To do this, there must be a separate “SOURCES” or “INPUT” button on the TV remote control.
When you press it, a menu should open in which you can select the signal source. You can see which TV port you connected the cable to (each port has its own number). Or simply select an active source. The process itself may vary from TV to TV. I have an old LG.
The image from the computer should appear on the TV screen. This will either be a copy of what is displayed on your monitor (if you have one) or a blank desktop (expand).
An article that may be useful at this stage: Why is there no image on the TV from a computer (laptop) via an HDMI cable.
The most important thing is that the image from the computer appeared on the TV screen. Then in Windows settings we can change the image output mode. There are several of them.
Setting up an HDMI-connected TV in Windows
In most cases, the screen resolution is adjusted automatically. Therefore, in Windows settings we will only be able to change the multi-screen display mode. This only matters if a monitor and TV are connected to the computer. If only one display is connected, these settings are not required.
The easiest way to change mode in Windows 10, Windows 8 and Windows 7 is to use the Win + P shortcut.
When you click on it, the “Project” menu appears. At ten, it looks like this:
On Windows 7 it looks like this:
Let's take a closer look at each mode.
In most cases, these settings are sufficient.
USB will help transfer images from PC to TV
If you connect the USB-USB connector, you will not be able to watch movies. This standard is not intended for interoperability with video files. Thus, this method is suitable for viewing images, presentations, and simple text documents. In this case, the computer will work as a flash drive.
You can use the HDMI output of the TV to display the screen. An adapter that looks like an external video card will help. You will also need to install the video card driver on your computer.
When purchasing an adapter, choose a model that supports Full HD and audio.
Connecting a TV to a computer via VGA
The VGA connector looks like this:
VGA connector
This 15-pin analog connector can output an expansion image with a maximum threshold of 1600 x 1200 pixels. This connector was originally developed in the mid-1980s for electron beam monitors. However, today it is installed in various technological devices that can potentially transmit images. The image is displayed on the TV via a computer using a VGA cable. It is necessary that both devices have a connector for this activity.
Technically this is absolutely correct, VGA generates a high resolution image, but no sound is reproduced on the image using this connector. However, if the presence of sound is not critical, then this method may be suitable.
VGA cable
For the output to work correctly, you must also activate the VGA connection on the TV itself through the settings.
DVI
The following describes how video is transmitted over DVI. The DVI standard was developed to transmit video content to digital devices. This is the predecessor of HDMI. And unlike the latter, it does not carry sound. In this case, you will need a TRS connector or adapter, otherwise known as a mini-jack, a very common audio connector, probably known to many as a headphone jack. To mirror the screen of your computer or laptop, follow the same steps as for HDMI. Once connected, you can easily transfer the file you are playing.
RCA
Early models of digital televisions without the Smart-TV option can also be connected to a computer to view files. To do this you need an RCA cable with a triple plug (“loop”). Each cable transmits a separate signal, which can be distinguished by the color of the plug:
- White (audio). Transmits a sound signal.
- Yellow (video). Transmits video.
- Red (c-audio). Transmits a synchronization signal responsible for transmitting image brightness and clarity.
Legacy output devices only have an RCA connector or its SCART equivalent because HD video and high-bandwidth cables did not exist at the time of their release
Each of the plugs must be connected to the corresponding colored sockets on the TV body. There is only one connector on the back of the cable, which connects to the socket on the system unit case. How and with what help to connect such an old TV to a computer? The answer is simple - use a digital decoder.
Also note that instead of three inputs there may be one long connector with more pins. It is also designed to be connected via a cinch and you will need an AV SCART adapter.
Advice! In the case of several types of connectors, it is better to use the one that gives the maximum resolution of the output image.
For example, if both devices support HDMI, it's worth connecting using it. However, keep in mind that if your graphics card doesn't have one, you won't be able to get ultra-high definition video even with a set-top box because it won't be able to encode it into a digital signal.
Connection via cable
How to quickly turn on a movie? Connecting via cable is considered the simplest and takes less time.
Before purchasing, look at what ports are present in PCs and Smart TVs. Also measure the distance from the system unit to the second monitor so as not to change the cable several times.
- If you don’t have a router, there’s nothing to worry about, since any store sells an HDMI cable. Since the mid-2000s, Smart TVs with an HDMI port have appeared on sale. The image transmission speed is high, and the loss of quality is minimal. This connection method is recommended for those who don't want to tinker with the software. Not only the video stream is transmitted, but also audio, which gives you the feeling of watching it like in a movie theater.
- DVI is a popular interface that transmits video signals of the same quality as HDMI. But before purchasing, you need to take into account that the audio track does not pass through the cable if the ATI video card does not have this function. Using this connection, connect additional cables with the function of transmitting an audio channel.
- The VGA cable will be older than the previous one, but remains relevant to this day. The connector is present on almost all modern devices, but some TV manufacturers are gradually getting rid of the VGA port.
If the above ports are not available, but your computer does have them, use adapters. There are many similar devices, sold in every hardware store. This connection may have problems with sound transmission. This can be fixed if you use columns.
- USB connectors are built into every laptop or computer; they are also used to create a connection to a TV. This is doable if you have a USB to HDMI or VGA converter. To connect a TV, one of these ports must be present.
- S-Video is present in all new computers and Smart TVs. It is used only for transmitting video tracks with quality not exceeding HD. The audio track is not transmitted with this cable.
- SCART is a popular port on TVs for transmitting video and audio signals. Laptops and computers do not have this port, so they use an S-Video-SCART or VGA-SCART connection.
- RCA is an interface with three connectors, equipped in all modern TV and video cards. The quality of video signal transmission is worse than in previous versions, especially with regard to color rendition.
Problems connecting to a TV via HDMI and VGA
When connecting any device to a TV, problems and errors do not bypass us. Below you will find solutions to the most common problems.
No signal from laptop/computer to TV
There are times when, after connecting an HDMI or VGA cable, the image does not appear on the TV, or it simply does not see the connected device. To solve this problem, use the following tips:
1. Check the connection.
Sometimes the image does not appear due to the wrong HDMI input selection in the TV menu. Usually there are several of them and each of them is numbered.
2. Inspect the cable and connectors.
The problem may lie in a cable that is not fully plugged in or that it is damaged. Carefully check the cables and connector on both the TV and your computer or laptop:
- the problem is in the wire - in this case, only replacing it will help;
- the problem is in the connector - if there are additional connectors on the device, then plug the cable there and change the signal output value in the TV menu.
3. Change your computer settings.
There are several types of image transmission to a TV. Press the Win+P key combination and select one of the menu options: Computer Screen Only, Duplicate, Extend, or Second Screen Only.
4. Update your drivers.
Download new software for your laptop or PC graphics card and install it.
5. Another way.
If the problem cannot be resolved, then you need to find its source. To do this, you will need another computer, TV, or connection cable (ask a friend or relative to test your equipment with their devices). By elimination, you can identify the problem and fix it.
How to watch video via cable?
To watch movies from your computer via cable, first do the following:
- Turn off your laptop/computer and Smart TV.
- Disconnect the antenna and other equipment from the TV.
- Connect cables and switches.
- Turn on your PC/laptop and TV.
If connected correctly, select the appropriate channel on TV, which can be tuned through the laptop. All that remains is to configure the video transmission.
For Windows XP
Right-click on any free space on the desktop and select “Properties”. In the window that appears, open the “Settings” category. Select the second monitor and click “Extend Desktop”.
The TV will display the desktop as on the main monitor, but without folders and other icons. To watch movies, flip the window with the player onto the TV. You can configure the location of the TV: it will be on the left or on the right. You can also set the TV as the main monitor. To do this, click “Use device as primary.”
For Windows 10
After connecting the TV to the computer, a notification will come or a window will open about the new monitor. You will need to select a mode of use:
- Display on the second display information that is broadcast on the first.
- Expanding the desktop on the new display.
- Display the image exclusively on the second monitor, the first one will turn off.
Once you select the option you want, you can change it by going to “Monitor Settings.”
Wirelessly connecting a computer/laptop to a TV in Windows 10 via Miracast
To connect, press the key combination Win + P. A menu will pop up on the right with video display options. Select "Connect to a wireless monitor." If this option is not available, it means that your equipment does not support this function.
After clicking the specified item, the computer will begin searching for wireless devices. Enable Miracast/Intel WiDi on your TV. For example, in older LGs, for this you need to go to the “Network” section.
Enabling Miracast/Intel WiDi function on LG TV:
The procedure depends on the TV brand:
- on Samsung TVs you need to go to the menu and select the signal source - “Screen Mirroring”;
- in Sony, select “Screen mirroring” by pressing the corresponding button on the remote control;
- In Philips, go to Settings, click Network Settings and Wi-Fi Miracast.
If your TV does not support Miracast, buy a special adapter and connect it via the HDMI port to the TV:
- Select your TV that appears in the search, then the connection will start.
- If necessary, confirm that the computer is connected (confirmation is not always required).
Sometimes you can’t connect right away. Try restarting both devices. Another option is to change the projection mode. You can, for example, enlarge the screen or duplicate the picture on two screens.
Changing the projection mode:
Connecting a TV can be done by adding a new device in the settings. To do this, go to the “Devices” tab. There you need to select “Add Bluetooth/other device”.
For this:
- Select Wireless Display or Dock.
- Select Miracast on your TV. After that it will appear in the list of devices. Click on your TV and the connection will begin.
How to control sound when connected via Miracast
Miracast can transmit sound just like through a wired connection. The sound from the computer should come out of the TV speakers. If the default settings are “Digital Output”, you can change the item by selecting the desired device for playback.
Having done this manipulation, you will receive sound from the computer speakers. If necessary, set back “Digital Output”.
If Miracast does not work and the “Connect to a wireless display” option is missing
If in previous versions of Windows 10 the system, “realizing” that Miracast is not supported, produced a corresponding message, then new versions simply do not have an item about connecting to a wireless monitor in the menu called up by the combination Win + P.
Project menu:
For the desired function to work, support is required from the adapters - Wi-Fi and graphics. Check by typing “netsh wlan show driver” at the command line. If “Wireless monitor supported” appears, great.
If there is no support, do the following:
- update the Wi-Fi adapter driver, the probability of success is small, but there is a chance that this manipulation will help;
- try changing the Wi-Fi adapter;
- connect your TV via HDMI cable.
Can't connect to wireless display
If the TV fails to connect for a long time and then an error message appears. Or computer equipment cannot “see” the TV and it is not even displayed in the list of available devices.
Cannot connect to display:
Try to reconnect using one of the following methods:
- Click restart your computer and turn off the TV's power for a few minutes.
- The reason may lie in poor signal quality. Therefore, try to reduce the gap between devices, and at the same time check whether Miracast is active.
- Update the driver for the Wi-Fi adapter.
- If you have another TV, connect to it to check the connection.
- Try disabling your discrete graphics card.
Do not disable the integrated one. To do this, go to Device Manager. This will turn off the video adapter. It happens that this method helps solve the problem.
Disable the video card:
Then, when you are not using the TV as a wireless monitor, turn on the video card again.
DLNA
DLNA is a technology for connecting computers, laptops, tablets, smartphones and other devices into one home network (server). I'll tell you about setting up DLNA for LG TVs using a special program. This will allow you to watch videos from your computer.
- Download and install the “Smart Share” software on your PC.
- After opening the program, its icon will appear in the computer tray. Right-click on it and select “Set up Smart Share program”. Set the switch to “ON” and click “OK”. With this action we give access to files on the PC.
- In the “My Shared Files” tab, you can add or remove folders that will be available for viewing on TV. Then click “Ok” and “Apply”.
- In the “My Device Settings” section you can change the name of the server.
- In the “Allow/Block other devices” section, you need to find your TV and click “Apply”.
This is the end of the settings. Now let's move on to how to watch movies or other content:
- On your TV, go to “Smart TV” and look for “Smart Share”.
- Open “Connected devices” and select the server that we created earlier.
- In the “All Folders” section you will find the files that you have accessed. We open them and watch them on TV.
If you do not find your server in the list, disable your antivirus program, restart your computer and try again.
A video with instructions for setting up Smart Share is also available for viewing:
We wrote in this article how to output video from a computer to TV using DLNA in the standard way.
Video Mirroring
To connect your TV to your laptop, you will need the following:
- At least one video communication port.
- Correct cable type.
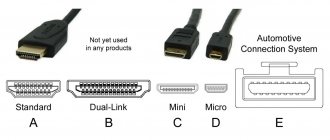
Types of video connectors
There are two types of video transmission: digital and analog. If you try to connect a digital jack to an analog port or vice versa, you will not be able to view video. Additionally, if you try to play protected high-definition digital content, such as Blu-ray movies, over an analog connection, you will likely receive an error message or the movie will play at a lower resolution.
| Name | View | Description |
| HDMI connector (digital) | The HDMI connector is a digital connection type for transmitting high-definition video signals. When used with a compatible monitor or TV, HDMI has the ability to carry video and audio, as well as HDCP-protected content (for playing high-definition Blu-ray movies). A monitor or TV with HDMI must have speakers to listen to sound | |
| DisplayPort connector (digital) | A DisplayPort connector is a digital connection type that transmits high-definition digital video and audio signals to a monitor with a DisplayPort connector. DisplayPort has very similar characteristics to HDMI, but can also support a content protection method called DPCP in addition to the common HDCP format | |
| VGA and SVGA (analog) connector | The VGA connector is a video connection for sending analog video signals to a monitor or TV |
So, the video connectors listed above are present on many laptops, as well as on monitors, TVs and projectors.
Necessary connectors on a laptop
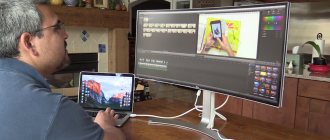
To transfer images from a computer to a monitor or TV, they must be connected as shown in the photo below.
Connecting a computer and TV
Set display properties to use additional displays
Once you connect your computer to your TV, you need to configure your screen settings. To do this, follow the steps below.
Step 1: In the Windows search box, search for and open Display Settings.
In the Windows search window, find and open “Display Settings”
Step 2: Open the drop-down menu in the Multiple Monitors section and apply one of the configurations.
Open the menu in the “Multiple Monitors” section and apply the desired configuration
Once you set up your screen, the image will appear on your TV. You don't need to do anything else.
Find out how to display an image from a computer to a TV without losing quality in the new article - “How to display an image from a computer to a TV.”
Special programs for displaying images on the screen
There are also wireless ways to mirror video. This is done through special programs.
Miracast
Miracast implements the peer-to-peer WiFi Direct standard and allows you to stream 1080p HD video
Miracast is one of the most widely available screen mirroring technologies. Miracast is part of the WiFi Alliance and was released back in 2012.
Note ! Miracast is not a product, but a technology. It implements the peer-to-peer WiFi Direct standard and allows you to stream 1080p high-definition video as well as 5.1-channel surround sound. As of March 2021, there are only about 6,700 devices certified by the WiFi Alliance to support Miracast.
DLNA
DLNA, which stands for Digital Living Network Alliance, is one of the powerful standards for screen mirroring. The only problem is that it was introduced by Sony and accordingly works best with Sony devices such as Sony Bravia, Sony PlayStation, Sony Xperia and Sony VAIO.
DLNA is one of the powerful standards for screen mirroring
DLNA works using a client-server model. This means that when the client and server are connected, the client can access the files present on the server. Simply put, if your computer and TV support DLNA, you can access the files present on your PC from your TV.
TV set-top box
Such a set-top box almost completely copies the functionality of the new Smart TV, but the list of features is larger and it is easier to manage. For example, consider Apple TV:
- Connect it to your TV.
- Start watching videos, audio, photos and other content.
Once connected, you will have access to movies and photos stored in your iCloud and iTunes account. You can also play small toys by connecting several gamepads to the console.
Of course, Apple TV is designed for users of Apple products only with licensed files. Therefore, many choose consoles with the Android system, where there are more options and freedom of action. You can watch movies and other videos through the browser, download the application through the Play Market. In fact, these are the same smartphones on the Android platform. In addition, you can connect a keyboard and mouse for quick text entry.
What does connecting a laptop (PC) to a TV receiver do?
When connected to a monitor, the user has such opportunities as watching a movie on a large screen.
This is especially important if you are gathered in a large group - your friends will be grateful to you for this opportunity. However, that's not all. In addition to watching films, you can arrange a presentation, slide show, and if you have a good camera on your TV, you can communicate via video conference. This allows the computer to continue working while the video is projected on the TV screen.
Using third party programs
For Miracast and Intel Wireless Display, your TV must support these technologies!
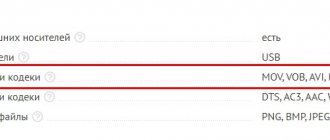
- Codecs are an important part of any system, thanks to them film and other media files are decoded. K-Lite Codec Pack is a proven program that has been used for several decades. After setting up the application, the function of transferring files to the TV screen will be available.
- Download and install the Intel Wireless Display app. The user will be asked to connect the device to the monitors, find your TV among them, click “Connect”. It will show a digital code - you will need to enter it in the window that opens. The broadcast is carried out thanks to a connection using a WiFi router. In this case, the processor on the PC must be Intel, starting from the third generation.
- Miracast. This program is designed for operating systems higher than Windows 8. Click “Device”, this icon is located at the bottom right, then “Projector”, “Add wireless monitor”. Connect the display as indicated in the previous method.
If anyone is interested, you can see how to install the K-Lite Codec Pack correctly:
As you can see, there are many options to display video from your computer on a large TV screen. Choose the one that seems simpler and more accessible to you, and enjoy watching. Good luck!
Connecting your TV to your home network
This method does not allow you to directly output a picture from a computer to a TV, but it does make it possible to play files located on the computer.
LAN connection
Many modern TVs support DLNA technology and have an Ethernet connector, which allows you to connect them to your home network:
You connect your TV and computer to the router. It is important that DHCP is configured on the device - otherwise the network settings on the TV will have to be configured manually (how to do this should be indicated in the instruction manual).
Next, you need to install a media server on your computer - a program that will give the TV access to certain folders. This can be special software (for example, “Home Media Server”) or regular Windows Media Player. In the latter case, you need to enable the corresponding option: in the “Stream” drop-down menu located at the top left, select “Enable media streaming”, and in the settings window that opens, select your TV and click “Ok”.
In any case, you will need to choose which folders the TV will have access to - in WMP, for this you need to go to “Video Library Management” and add the necessary folders. Next, you can select the “PC Browse” item on the TV (depending on the model, it may have a different name - see the instructions) and watch movies.
Wi-Fi connection
To do this, you need to use a special USB adapter that will allow your computer to connect to your home Wi-Fi network. If you do not have a Wi-Fi point, you will need to purchase another adapter that will allow the computer to distribute information.
Keep in mind that not all adapters are supported by TVs—for some models there may simply not be drivers. Use devices recommended by the TV manufacturer (you can find out their names in the instruction manual or from the manufacturer’s technical support).
The further procedure for setting up a home media server and accessing files is completely similar to the previous paragraph.
Information partner of ComboPlayer.