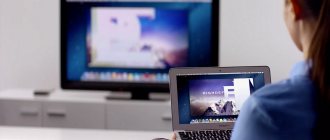
Today, any user can connect a laptop or desktop computer to a flat-screen LCD TV using an HDMI cable, and then enjoy an enhanced image. This connection is not always successful: for example, there may be no sound. But there are times when the computer does not see a TV connected via HDMI at all, although the cable was just purchased at the store. There are many reasons for cable malfunction, and the search for the true problem must be done consistently.
We carry out diagnostics
What should you do if the TV does not see the laptop via HDMI? Video cards of all modern products support this connection: HDMI on the TV is installed on almost every model. If the connection of the laptop was carried out according to all the rules, but there is still no image, then we connect the laptop to the TV, while sequentially checking all possible problems.
Cable check
Not a single product, even the most reliable brand, is immune from manufacturing defects, especially when assembled by hand. When purchasing, the quality of the image and sound are checked, but they never check the specific connectors and connection sockets on the TV - at best, they make sure that they are present, and even then not all buyers. It often happens that the cable itself does not work, although it has not been used for such a long time. You need to connect the same cable, but to another device, if it functions normally, then the reason that the computer does not see the TV lies in the latter. It is necessary to diagnose the TV to recognize similar signals.
Checking the signal source
Press the button on the remote control to select the external input option. It depends on the specific model of the product which button on the TV remote control you need to press: “source”, “input” or “HDMI” (LG, Sony or Samsung). After pressing, a menu appears on the screen with a detailed list of active inputs. Select and confirm by pressing OK or Enter exactly the desired input into which you previously connected the cable coming from the laptop.
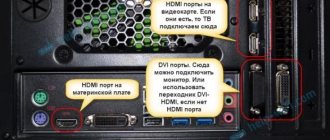
Connection port problem
Any connector may suffer mechanical damage or burn out during a power surge, which is not uncommon in our electrical networks. Experienced technicians advise connecting the HDMI cable when the devices are disconnected from the network; it is recommended to even disconnect the antenna cable at this time.
There is also a very rare reason why the TV does not see HDMI: it simply does not have additional power on the video card, and without this the connection will not work.
Features of HDMI cables and the main causes of malfunction
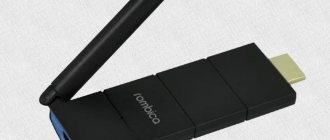
The abbreviation HDMI stands for High Definition Multimedia Interface. This is a modern connector that simultaneously transmits audio and video. Almost all equipment is equipped with this interface. “Tulip” and other cables that were popular in the past are designed to transmit an analog signal. The HDMI cable broadcasts digital content with Full HD or 4K resolution (depending on version).
Therefore, if you need to connect a computer to the TV screen, then it is best to use this interface. The connector ensures data transmission in the highest quality and with minimal latency. Unlike other wires, HDMI simultaneously transmits sound and video to the TV.
The HDMI interface was introduced back in 2002. Since then, the developers have released many different modifications. They gradually increase the capacity of the cord. The developers try to timely add support for popular formats and many other useful features.
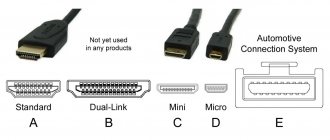
HDMI versions older than 1.4 support Internet signal transmission, 3D and 4K resolution. An Internet connection via HDMI differs from wireless Wi-Fi technology in increased data transfer speeds, as well as a more stable and reliable signal. The most popular HDMI form factors are:
- type A – classic version;
- type C – mini HDMI;
- Type D – micro HDMI.
The last two types are designed to connect mobile phones, cameras and other portable devices. What causes wire breakdowns? Mostly short circuits and mechanical damage.
Image output settings in Windows
If the connection cord and interfaces work, but the system unit still does not display a picture on the TV screen, then the problem lies in the operating system settings. How to properly configure the system manager for different OS versions is described below.
Windows 7.
- On the desktop, you need to open the task menu and find the “screen resolution” item.
- Select “connect to a projector” and click duplicate so that the image remains on each monitor. If you need to completely transfer the picture to TV, then click on “projector only”.
Windows 8.
- After logging into the control panel, select the “Design and Personalization” submenu.
- In the “display” section we find “multiple displays” and select “duplicate” or “extend the table to only the second display”.
Windows 10
- In the screen options, select “display” and scroll down to “multiple displays”.
- If all connections are made correctly, the second screen will be immediately displayed, all that remains is to indicate exactly how to use it - duplicating it or as the main one.
Connection rules
To avoid troubles, experts recommend following the rules and instructions for connecting equipment:
- Disconnect the TV from the network, disconnect the antenna and other peripheral devices.
- Connect your computer equipment, use an adapter if necessary.
- Turn on the power.
- Start your PC and wait until the operating system boots completely.
- Turn on the TV, set the source.
Try to interact with equipment very carefully and store the cord without bending it. Then the equipment will work properly. But if malfunctions or software glitches are still detected, it is better to use the services of specialists and refuse to independently restore expensive equipment from LG, Samsung, Philips, Sony. You can call a specialist at your home by calling 8 or on the website using the feedback form.
Setting resolution and frequency
Sometimes, after following the recommendations listed above, the picture still does not appear. In this case, the reason may be that the TV and the system unit are not compatible in their parameters. For example, for an old SD or HD TV, the FHD resolution set on the PC video card is too high. In this case, you should go into the screen settings using the above algorithms and, selecting the second display (TV), lower the resolution for it.
The second reason that can affect the image is frequency. By default, the PC video card is set to 60 Hz. For TV it is worth trying to gradually reduce the value.
Important to remember! Some TV manufacturers provide connection to a PC, and there is a special mode for this. It can be combined with the image adjustment or separated. Through it you can select the appropriate resolution for your PC.
Some Samsung TVs have encountered a problem where a window with the text “HDMI mode is not supported” appears. There were many recommendations on the forums to combat this, but it turned out that this is a problem with the factory firmware, and in order to eliminate the defect, you need to contact the manufacturer’s service center, where new software is installed. Modern Samsung TVs do not have such nuances.
1] Enable playback devices
- Open the Run command prompt (Win + R), type control and press Enter.
- Go to Hardware and Sound and then click Manage Audio Devices.
- Right-click on any of the listed devices and select "Show disabled devices" and "Show disabled devices."
- If your HDMI playback device is listed, turn it on
How to update software on a video card
If connection difficulties continue after the recommendations above, updating the PC software associated with image output may help. The driver may be out of date, damaged, or simply missing. In such a situation, you should open the device manager and look at the “video adapters” tab. To do this, you need to select “manage” from the “my computer” icon in the menu, which opens by right-clicking on the mouse.
If a red or yellow icon is lit next to the adapter, then there is a problem with the operation of this node. To update, you can immediately open its properties and select automatic driver update, but it is more efficient to download it from the manufacturer’s website.
Advice! The update can be found using the DriverPack Solution utility. Its convenience is that it scans the system itself and looks for all the necessary drivers.
Why can't my computer see my TV via HDMI?
Since the wired connection method is very popular and is used by millions of people, over the entire history of HDMI it has been possible to identify several factors that influence the occurrence of the problem:
- damage to the wire, plug or connector;
- incorrect connection settings on PC or TV;
- video card malfunction;
- exposure to viruses.
Despite a fairly wide range of reasons, problems can be eliminated by anyone, even without seeking the help of specialists. But first it is recommended to study the instructions, which discuss all the factors causing the problem.
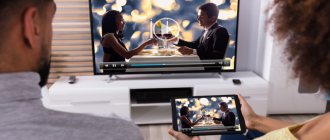
How to adjust the sound
When connecting a TV to a PC, it may happen that there is an image but no sound. This means that the wrong adapters/cables were used, or the computer is not configured correctly.
- In the tray, you need to click on the sound settings icon and select “playback devices” for Windows 7 and 8 or open “sound settings” for version 10 of the OS.
- We see a list of available speakers, among them there should be a TV - switch to it and, if necessary, click “use as default”.
If the sound still does not appear, then you should check the volume on both devices, and also update the sound card software.
Perhaps the fault lies in the fact that the operating system was infected with viruses, or unauthorized penetration of malware occurred. Using a powerful antivirus program (computer protection program) capable of finding all spies of any level, carefully scan your computer and reconnect.
Some experts strongly advise checking the version for your Smart TV platform: sometimes a laptop does not connect using HDMI for this very reason. Update the Smart TV firmware and the problem may go away.
If the equipment does not start working together, the reason lies in an internal breakdown, which only a specialist can diagnose and fix. Of course, if you have knowledge of the electronic components of devices, you can try to repair the TV yourself.
Reasons why Windows 10 does not detect the monitor via HDMI
The HDMI connection between Windows 10 and our monitor failing is a fairly common problem and it could be due to several factors. In case we have problems with audio or video signal, most likely it is a failure due to driver incompatibility. It may also be that the problem is due to a cable that is in poor condition and this prevents the operating system from recognizing it. Or, even though the connection is correct, we have not selected the correct HDMI port on our TV's remote control. In case we cannot get Windows 10 to recognize our monitor connected via HDMI, we must try some of the solutions that we present below.
Advice from the experts
There are several rules and nuances when connecting equipment via HDMI.
- Experienced specialists advise connecting equipment with an HDMI cable in the off state. According to them, even the television cable should be temporarily disconnected from the antenna socket.
- An external inspection of the cable involves checking for broken, rusted, oxidized contacts, fractures, kinks in the wire, and the presence of dust or debris inside. The connectors should also be free of broken contacts and dirt, and the port itself should not be loose. All these disturbances affect the operation of the cable and interfere with signal transmission.
- When updating video card drivers, you should download the current version from the manufacturer's official page. Only in this case is the installation of the latest working version of drivers guaranteed.
- To connect your TV to your computer, you should purchase a good quality HDMI cable. Cheap wires significantly degrade the signal quality and are not reliable and stable.
So, if when you connect a PC to a TV via HDMI, no image is displayed on the panel screen, there may be many reasons for this. Some of them are associated with the user’s banal inattention and can be eliminated immediately on their own. Sometimes the situation is much more serious and requires cable replacement. In rare cases, you will have to take one of the devices in for repair. To find out which option led to the absence of a picture on the television panel screen, it is necessary to conduct a thorough diagnosis of the connection and technology. This will allow you to understand what to do next to fix the problem.