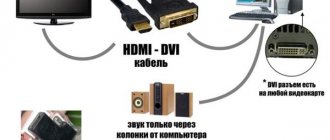
Features of HDMI cables
The HDMI interface is actively used in modern technology for simultaneous transmission of audio and video files. With it, you can stream content in Full HD or 4K resolution without worrying about lags or glitches.
The first prototypes of the connector were developed back in 2002. After that, manufacturers modernized them in various ways. And thereby increased throughput and transmission quality. In addition, HDMI began to support different formats and other interesting features.
Version 1.4 and above can be used to transmit the network signal. As well as 3D video or files in 4K resolution. And unlike wireless technologies, HDMI provides high speed, reliability and stability of the Internet connection.
The following connector form factors are common today:
- Classic version - type A.
- Mini HDMI - type C.
- Micro HDMI - type D.
The latest varieties are suitable for smartphones, photographic equipment and other portable gadgets.
How to connect TV to PC via HDMI
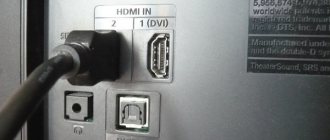
Their locations on different types of devices:
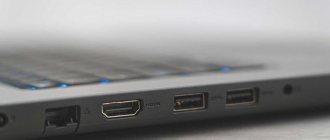
- desktop computer - rear panel of the system unit;
- laptop - on the side or back of the case;
- TV - on the back of the case, next to the cable antenna connection.
TVs that support HD picture quality are equipped with HDMI ports. It is simply useless to look for this type of connection on TV models without a designated format.
Before you start connecting your personal computer system to your laptop, you should check the HDMI cable for damage. First of all, you need to look at the integrity of the connectors that connect to electronic devices. Then carefully inspect the wire itself for damage.
If no problems are found in the cable, then you can proceed directly to the connection. To do this you need:
- Find HDMI ports on devices.
- Connect the cable to the desired PC input. If there are several of them, we find the port related to the computer’s video card.
- We connect the other end of the cable to the TV.
- Using the “Source” (or “Source”) button on the remote control, we switch to the desired broadcast channel: HDMI-1 or HDMI-2, depending on where the cable was connected.
- On the desktop monitor, right-click on an empty space.
- Select the “Screen Extension” menu.
- In the “Multiple Screens” tab, select the “Display desktop only on the second screen” option.
If the connection instructions were followed correctly, the desktop of your personal computer will appear on the TV monitor.
The main causes of problems and their elimination
If a computer or laptop does not see the TV via HDMI, this may be due to the following factors:
- Errors were made when connecting the equipment.
- The cable or connector is damaged.
- The device has inappropriate drivers installed.
- The external display settings are incorrect.
- The GPU has failed.
To determine why the PC does not see the HDMI cable, you should follow this algorithm:
- Inspect the wires for damage. And also evaluate the correctness of the connection.
- Check settings on all devices.
- Make sure that the operating system is free of malicious files and viruses.
- Perform port diagnostics.
- Update video card drivers.
Broken cable
If you were streaming content without any glitches but then lost sync, the cable may have been damaged. In most cases, problems occur when the plug is connected incorrectly or accidentally pulled out. Mechanical breakdowns occur less frequently.
To avoid interruptions, it is necessary to correctly calculate the cable length. In addition, if the HDMI interface does not see the TV, you should make sure that it is installed correctly.
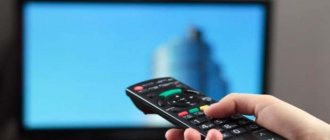
TV is not configured
Before you start repairing the HDMI cable, you should check your TV settings. Indeed, some devices do not have a function for automatically selecting a transmission source. And especially if you previously selected other parameters. Therefore, first of all, try changing the settings using the remote control and changing sources by selecting “HDMI” from the list.
To fix the error, follow this sequence of actions:
- Insert one side of the HDMI cord into the TV port (it can be located on the back panel or on the side). And the reverse plug into a suitable connector on a laptop or personal computer.
- Using the remote control, press the signal source selection key. It may be called “Source” or “Input” depending on the features of the model and brand. And after displaying the available connection options, go to the “HDMI” item.
- Open your TV's settings to determine the connector. Moreover, modern technology has 2, 3 or 4 inputs with the corresponding digital designation. Activate the interface into which you inserted the plug. And to switch between ports, use the appropriate keys or numbers 2 and 8.
- To save the parameters, press the “Ok” or “Enter” key. And if there are no buttons, find the “Apply” button on the screen and go down to it using the navigation elements.
Many remotes have an "HDMI" button that makes it easier to select the correct source.
If difficulties arise during the setup stage, you should read the instructions that were sold along with the TV. Because it describes in detail all the features of synchronizing devices through different interfaces.
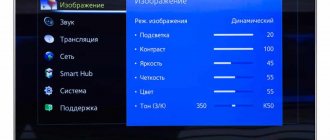
Incorrect monitor settings
If the connector is selected correctly and the cable is fully functional, try checking the settings of your PC or portable device. Often, display errors occur due to inappropriate system parameters. To check the settings, follow the following procedure:
- Select a free space on the desktop with the mouse cursor and press the right button.
- In the section that opens, select “Screen resolution” or “Graphics characteristics”.
- Determine the external monitor's transmission method and set the appropriate resolution.
Enabling demo settings on a laptop is much easier. To do this, just hold down the combination Fn + F4, after which the system will automatically determine the resolution.
Video card problem
GPU damage is a common cause of problems in computer image design. If you see a "No Signal" error on your screen, try updating your drivers. You can download the software package through the manufacturer's official website. You can also use standard Windows tools, following this principle:
- Open the “Control Panel”.
- Select "Device Manager".
- Go to the “Video adapters” section and find the “Update drivers” item.
- The system will offer 2 update options: via the Internet or root storage.
- The installation process occurs in the background.
Connection port not working
All interfaces and connectors often fail due to mechanical failures or shorted contacts. It is known that careless operation of equipment or power surges cause problems with displaying images on an external monitor. At the same time, experts recommend making connections only in cases where the equipment is disconnected from the power supply.
During use, the HDMI connector wears out and oxidizes. Therefore, the technology cannot determine the connection. And to eliminate the error, you should take professional help and transfer the HDMI connector for soldering.
Sometimes synchronization errors are associated with a lack of additional power on the computer's graphics processor. In this case, it will be more difficult to find the cause of the failures.
Viruses on your computer
Sometimes the computer does not see the TV via HDMI due to the presence of viruses and malicious applications in the system. This error is rare, but it cannot be ruled out.
In order to protect your PC, tablet or laptop from virus files, you should install a good antivirus. However, it is not necessary to buy a paid subscription, since the free version is also suitable for basic system testing. Its validity period is limited to 30 days.
Problems with connecting various gadgets to a TV via HDMI rarely arise. But if you encounter such troubles, try to eliminate them yourself. Software failures can be easily resolved without the help of a specialist. But failures of connectors and cables require the use of a contact pad and specialized systems for repair.
Fixed: HDMI no signal -
Over time, more and more companies are adopting the HDMI connection concept. What's not to like? It connects easily and transmits both video and audio with the ability to support huge resolutions. It has versatility and has more or less become the primary means of communication between electronic devices.
With more electronics embracing this concept, users are sure to encounter problems where they are unable to connect to a monitor, TV, etc. and see a “No Signal” message on their screens. Don't worry, you can instantly start a connection between your electronics. In most cases, the problem is only in configuring software settings or port settings.
Solution 1: Check the input source
Before you move on to checking your cables and system settings, it is recommended that you check the input source on your monitor or TV. The display electronics do not have a single input source. They are compatible with various inputs such as VGA, HDMI, Display Port, etc.
Make sure you have properly connected the cable to the correct ports and change your monitor/TV's input source from VGA to HDMI . Implement all changes and exit settings. If it was successful, you will be able to see the changes instantly.
Note: Many TVs and monitors have this input source button hidden on the sides. Either look in your owner's manual, check physically, or look up your model online to determine where these buttons are. You may also have an input switch button on your remote control if you are using a TV.
Solution 2: Check connections and projections
If the correct input source is selected, we can check if the connections are connected to the correct port on both the output device and the input device. Additionally, you should also check if you have the correct predictions installed on your computer.
- Press Windows + P and select the correct forecast you are trying to get. You can choose to duplicate or extend to properly use your second screen.
Why is there no sound playing?
An HDMI cable transmits not only the image from one device to another, but also the sound. However, it is with this that users often have problems.
If, after connecting a desktop computer or laptop to the TV, there is no sound, or the audio track does not come through the TV speakers, but through the PC speakers, then most likely the problem lies with the output device.
To fix this problem, you need to change the speakers through which the sound is played. This is done through a personal computer or laptop system.
Step-by-step instructions for replacing the audio output device:
- You need to right-click on the “Speakers” icon, which is located in the lower right corner of the taskbar of the Windows operating system.
- Then, in the selection panel that opens, left-click on the “Playback devices” item.
- After this, a panel will open with all possible speakers.
- In the listed devices, you need to find the TV and right-click on it.
- Then select “Set as default”.
After completing the setup, each time you connect to this TV via an HDMI cable, the computer system will transfer audio playback to the TV speakers.
Video instructions for replacing the audio output device from a PC to a TV