Many monitors support audio via HDMI and also come with a speaker or audio port for connecting to an external speaker. These speakers appear as HDMI playback devices. However, if this is not the case, then this post will help you solve the problem of HDMI playback device not showing up in Windows 10. How to make HDMI show up on playback devices?
Sometimes HDMI playback devices become disabled. So if you want to show it in the list of playback devices, go to Control Panel
>
Hardware and Sound
> Manage Audio Devices.
Right-click an empty area and select Show disabled devices and detached devices. Once you find it, turn it on. Why is my HDMI device not detected?
This may be because it is not connected correctly or your monitor does not support HDMI audio.
If your monitor doesn't have a built-in speaker or audio port, it won't appear in the list. How to add a playback device in Windows 10?
If you can't find your device in the list, open Device Manager. Then right-click the computer name and select Scan for Hardware Changes. This ensures that if the HDMI audio device was not listed, it will appear. Follow these tips to get HDMI playback devices.
- Enable playback devices
- Update HD Audio Device Drivers
- Update your display adapters.
Since this involves updating drivers, you will need administrator rights to install it.
The computer does not see the TV via HDMI
There can be many reasons for such a malfunction, so we will try to consider the most likely of them. Today we will talk about what to do if the computer does not see the TV via an HDMI cable.
What defects should you pay attention to:
1.
The pins are the most important part for a successful HDMI connection. The pins can rust or oxidize over time, so you need to pay special attention to this part.
2.
Check the port for foreign objects (dust, small debris).
In case of contamination, the transmitted signal may be distorted or even completely lost. 3.
Check port stability. If the HDMI cable wobbles with the slightest movement, then it must be secured in any available way (by yourself or contact a service center)
Don't forget to check the HDMI cable itself for defects. Please note the following points:
1.
Damaged contacts (replacement of the cable is required)
2.
Violation of the integrity of the cable (cuts, broken wires).
In this case, the cable must be replaced immediately, because in addition to poor signal transmission, it may pose a threat to your health. 3.
Check the cable for small debris and dust.
Solution to the problem. Computer settings
This section will be relevant for you if you use a computer with multiple screens, because in this case, incorrect settings can lead to HDMI malfunctions.
Our instructions are relevant for Windows 7,8,10.
1.
On the desktop, right-click on a free area.
In the window that appears, go to “Display Settings”
(screen resolution).
2.
Click the
“discover”
(find) button in the central part of the window.
3.
All connected monitors should appear before your eyes (if there are no technical problems). If the required monitor does not appear, then you should check the connection.
4.
Here you can also select the display mode for the screens.
“Duplicate”
will mean that all screens will display the same image.
“Expand screens”
- monitors will complement each other.
For correct operation, it is better to select the “Duplicate” mode.
An HDMI cable is capable of high-quality support for working with only one screen, since it provides a single-stream connection. Problems with operation may occur due to the fact that you have connected more than one device to the computer.
Method 3: Update video card drivers
In some cases, your graphics adapter may simply not be capable of outputting images to two displays at the same time. You can check this video card capability on the Internet.
Now let's start updating the drivers.
1.
Open
Control Panel
, then go to
Device Manager
.
2.
Expand the list of video adapters.
3.
Right-click on one of them and select
"Update Drivers"
.
Next, you just have to wait for the automatic download to finish. 4.
Do the same with other adapters if there is more than one.
If necessary, you can find the necessary drivers on the Internet by indicating your video card model on the manufacturer’s official website.
Method 4. Cleaning your computer from malware
Various viruses can interfere with many functions of your computer, so problems with the HDMI connection are likely.
To immediately check your computer for viruses and subsequent prevention, we recommend that you use Kasperky antivirus. A huge team of qualified specialists works on this program every day, constantly increasing the level of protection. It is worth noting that high-quality software is usually paid, so you can try Kaspersky for free only for a month.
2.
On the left side of the window, select
“Full scan”
and click the corresponding button to start.
3.
You will have to wait some time for a quality analysis of your computer for threats. After the process is completed, you will see all dangerous and potentially dangerous files, and you will also be able to personally decide which treatment methods to apply.
This is where the methods for solving the problem of connecting a computer to a TV via HDMI end. One of the options should definitely help you. If you have any questions, feel free to ask in the comments. We hope our article helped you.
Recommendations
It should be noted that difficulties in setting up a correct connection between a PC and a TV via an HDMI cable usually arise infrequently. And even if problems do arise, you can usually solve them on your own. The only exception is considered to be the problem of port malfunction, since it is unlikely to be possible to change the HDMI interface or re-solder the entire contact pad without using professional tools. To prevent breakdowns, you can follow simple tips.
You should not use a cable for another connector, for example, DVI. It is better to immediately purchase an HDMI cable that operates in HDMI-HDMI mode, otherwise the TV or monitor may simply not accept the cable, which requires the ability to connect to several ports simultaneously.
From time to time, be sure to check the status of the ports on the TV broadcaster and personal computer. A number of defects deserve your attention.
Check the wire for physical damage.
If in some places its insulation is broken, there are clamps, fractures, deep cuts or exposed areas, then such a cable, even if it reproduces an image, will most likely have defects.
The following video provides instructions on how to connect a computer to a TV via an HDMI cable.
Source
Device connection methods
Connecting a computer or laptop to TV can occur in different ways:
- VGA or D-Sud cable. Almost all monitors, PCs and TVs have this connector. This is an analog connection, which does not best convey all the nuances of video files.
- DVI. A more modern option. Can work with analog and digital devices. Has its own subclasses.
- S-Video. In addition, you will have to purchase an adapter.
- RCA or tulips. Connecting a laptop and TV using this method is rare.
- Scart. A popular method, since such a connector is found in modern TV models.
- HDMI cable. A good option for connecting a computer.
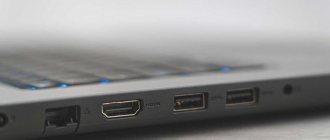
The HDMI connector on your TV is usually located on the back or side. The computer almost immediately after connecting begins to see the other device, but problems may arise that there is no image or other errors. Moreover, this is the most proven and common way to connect a laptop to a TV.
Features of HDMI cables
The HDMI interface is actively used in modern technology for simultaneous transmission of audio and video files. With it, you can stream content in Full HD or 4K resolution without worrying about lags or glitches.
The first prototypes of the connector were developed back in 2002. After that, manufacturers modernized them in various ways. And thereby increased throughput and transmission quality. In addition, HDMI began to support different formats and other interesting features.
Version 1.4 and above can be used to transmit the network signal. As well as 3D video or files in 4K resolution. And unlike wireless technologies, HDMI provides high speed, reliability and stability of the Internet connection.
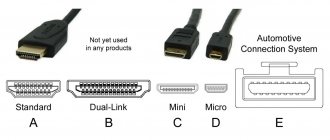
The following connector form factors are common today:
- Classic version - type A.
- Mini HDMI - type C.
- Micro HDMI - type D.
The latest varieties are suitable for smartphones, photographic equipment and other portable gadgets.
Equipment testing steps
- First of all, you need to check the quality of the wire connections and the condition of the connectors.
- Next, you need to check that the computer settings are correct.
- Then it checks for driver updates and video card settings.
- Run an antivirus program to scan for malware.
- Checking the port. It is recommended to connect to another device.
Cable check
If the TV connected to the PC suddenly stops working, and until that moment everything was set up properly, it means that the cable has come loose or has been broken. The first option is more common, since you can hook the adapter simply by passing by. But the second one is less common, since the optimal length of the HDMI cable is not so long as to lie on the floor and get under someone’s heavy foot.
In any case, if there is no picture, first check whether the connectors are fully inserted into both devices. And are there any foreign objects on the adapter itself? You can also try installing a different cable to make sure this error does not occur.
Causes
When the computer/laptop does not see TV, the monitor screen says “No signal”. This is what happens when HDMI doesn't work. The most common reasons include:
We will look at how to determine the cause of the malfunction in the following sections of our article.
Signal check
If all manipulations do not bring the desired result, it is recommended to check the signal using other connection options.
The check is performed as follows:
- Disconnect equipment from the network.
- Connect the HDMI cable to the computer and screen.
- Turn on the TV and press the “Source” key.
- In the column that appears, select the HDMI operating mode and click “OK”.
- Turn on the computer: when the OS boots, if everything is done, the TV screen and monitor will broadcast identical information.
- If the signal does not appear, then you need to go to the “Device Manager” to see if there are still available connectors for connection.
7. For example, if VGA is available, then you need to perform the same algorithm of actions, only set the appropriate mode in the settings.
If even after these steps the equipment does not start working, then most likely the problem is an internal failure.
Thus, the computer may not see the TV via an HDMI cable for various reasons, which can be diagnosed and fixed at home without special knowledge in the field of modern technology.
Driver installation and verification
And so, let me remind you that the HDMI output comes directly from the video card. It doesn't matter whether it's built-in or separate. Our task is to install newer drivers.
- Press two “Win+R” keys at the same time. Next, we write the command as above in the picture.
- Go to the "Video adapters" section. Right-click on our card and then “Update drivers...”.
- We immediately select the first item and wait until the system finds a new driver on Microsoft servers. If the driver is found, install it. But it is not always possible to update the software this way. Sometimes the system finds nothing and you see a message that the driver does not need to be updated. In fact, he just didn't find it.
- To install the exact driver, you need to know the name of your video card. As you may have noticed, the name is displayed there in the “Device Manager”. Next, simply enter it into the search engine and download the driver from the official website.
- Don't forget to specify the operating system. We download only the latest version of the driver and the full package. After downloading, install and reboot the device.
If this does not help and there is still no image on the TV, then try a different port on the TV and on the laptop (if there is one). Otherwise, you need to take some other wire, perhaps the one you are using is broken or not compatible according to the standards. You can check the cable by connecting another laptop or computer to it.
Diagnostics
If your TV does not see a device connected via HDMI, and a message indicating no connection is displayed on the screen, then simple instructions will help solve the problem.
The type of error on the TV screen may vary depending on the model and brand
Cable check
First of all, eliminate the possibility of damage to the cable itself. To do this, connect the wire to another device and check the image output. You will immediately discover the cause of the problem or narrow down the troubleshooting area. If the cable does not work with other equipment, the recommendation is obvious - you need to purchase a new one. If everything works, then you should check whether the signal source on the TV is selected correctly:
- On the TV remote control, find the button for selecting the external input option. The most common ones are: HDMI, source and input.
- Go to the menu.
- Now you need to select the input to which you previously connected the cable and confirm the action.
Check the number of the socket to which the cable is connected
Check monitor support on laptop
The problem may occur if the laptop or computer monitor is configured as the main one. To change the main output device, you need to go to the settings on the PC itself.
To set up Windows 8 you need to do the following:
- Go to the Start menu.
- Select "Control Panel".
- Go to the "Design and Personalization" tab.
- Now you need to find the “Screen” item.
- Click Screen Resolution.
- In the window that opens, change the PC display to “Multiple monitors” and “Duplicate these screens” and save the changes.
Selecting an external monitor in Windows 8
In Windows 7, in addition to the connection method through the control panel, there is a special program that comes with the system:
- Search for "Connect to a projector" or search for the program in the Start menu.
- When opening the program, select the desired item: “Duplicate” or “Projector only”.
Below are the settings icons that appear automatically when connected
Windows 10
To set up TV output in Windows 10, follow these steps:
- Go to the Start menu and click the gear icon (Settings).
- Next, go to “System”.
- Go to the Display tab.
- The external monitor settings window that opens displays the displays available for connection.
When you select a monitor, you will see a schematic representation of the available devices
In the “Multiple Displays” item, you can configure the image to be displayed on both screens or switch to the desired one
Windows XP
Despite the fact that support for this OS has long been discontinued, you can still connect modern TVs to it:
- Right-click on an empty space on your desktop and select “Properties” from the context menu.
- In the “Properties: Screen” window that appears, we are interested in the “Options” tab.
- In Settings, find the Display menu.
Selecting an image output device
Connection to a Mac OSX system is made using a specialized Belkin Mini DisplayPort to HDMI cable.
The Belkin cable can be purchased at any store that specializes in Apple technology.
As in other systems, you have the opportunity to select the required monitors and their number: built-in and/or external. There are three monitor modes on Apple. We are interested in the extended desktop:
- Find System Preferences in the Apple menu and choose Displays.
- Choose the right monitor.
In this window you can also scale the image or fit it to standard TV resolution
We will look at the instructions for the most popular distribution - Ubuntu:
- Go to system settings.
- Select Displays.
- In the window that appears, select the desired screen.
Setting up an external monitor may look different in different distribution versions
Checking the video card
Quite often, the problem with displaying images on the screen is outdated software of the video card to which we are connecting. To eliminate this problem, you need to install the latest driver. But first you need to find out the exact name of the video card model.
On Windows
We will look for information about the video card in the “Device Manager”. To enter it, use the universal method that works on any version of the OS:
- Right-click the My Computer or This PC (Windows 10) icon on your desktop or in File Explorer.
- In the context menu that opens, select “Management”.
Selecting “Manage” will require you to have administrator rights
Device Manager contains information on all devices connected to the computer.
On Mac OSX
On a computer running Mac OSX, the algorithm is approximately the same:
- Open the Apple menu by clicking on the logo in the upper left corner.
- Select the "About This Mac" menu item.
In this window you will see basic information about the system
You will see a list of all connected devices
The easiest way to find out information in this system is through the terminal:
- Press Ctrl + Alt + T to launch terminal.
The Linux terminal will tell you all the necessary information about the system
Driver update
Now we have information about the video card model. We follow the instructions common to all systems:
- Go to the official website of the video card manufacturer.
- Select your model through the search and download the driver.
- Install them. You may need to restart your computer.
Checking the health of the HDMI port on your TV and laptop
Inspect the HDMI connector. It should not be severely damaged, metal parts should not be broken or bent. If the port is damaged, you will need professional help to replace it.
The connector may break if used incorrectly: pulling the wire too sharply, trying to connect the wrong cord, etc.
The easiest way to accurately determine the functionality of the port is to use an HDMI cable that you are sure is working. So if you have one on hand, use it.
Checking connectivity through other connectors
If the TV does not display an image due to a damaged HDMI port, it is not necessary to immediately contact a service center. If the other ports are working properly, you can purchase an adapter and connect it to the corresponding socket.
Types of adapters
Adapters come in the following types:
- HDMI-VGA supports 1920x1080 screen resolution. When purchasing, you should pay attention to the presence of an audio output;
HDMI-VGA - the most common and cheapest adapter
DisplayPort-HDMI is sometimes included with cameras and may already be in your home.
HDMI-DVI connects an HDMI port to a DVI cable over a distance with minimal signal loss
Audio playback problems
If the device is connected and working, but the connected TV does not play audio, then there may be two reasons for this. Perhaps you are using an adapter to connect HDMI to an external monitor that is not equipped with an audio interface. In this case, the solution is obvious - change the adapter. But most often the problem with audio playback on an external device is due to incorrect hardware settings.
Windows 7 and 8
The setup is identical in these two versions of Windows:
- Right-click on the speaker icon at the bottom right of the taskbar.
- Select the "Playback Devices" line.
The TV should also appear in this window
Windows 10
To configure audio output in Windows 10:
- Right-click on the speaker icon at the bottom right of the taskbar.
- Select the line “Open sound options”.
Setting Audio Output
Windows XP
In Windows XP, the setup is done as follows:
- Open the Start menu.
- Select "Control Panel".
- Then go to the Sounds and Audio Devices tab.
Selecting an Output Device
The setup on Mac is as follows:
- Open the System Preferences menu.
- Select Sound.
- Go to the Output tab.
You will see a line with the name of the HDMI device
Most distributions use Pulseaudio Volume Control software. Use the program to configure audio output as follows:
- Press the keyboard shortcut “Alt + F2” to open the program launch window.
- Enter the command pavucontrol, confirm the action by pressing Enter.
- In the window that appears, select “Configuration” (or Configuration).
In this interface, you can configure not only the output device, but also audio recording
Correcting HDMI connection errors is not difficult if you have clear and accessible step-by-step instructions in front of your eyes. Now technical problems will not be able to ruin your pleasant evening in the company of your favorite films or TV series.
No sound
- First, let's check whether sound is output to the second device. Let me remind you that a cable of this format should easily output both sound and video images on the screen. Click “Start” and then enter the word “Sound” in the search bar. Next, select this section.
- Go to the “Playbacks” tab. You should now see the name of your TV there with “TV” written on it. Right-click and select “Set this device as default.” Don't forget to click "Apply". If there is still no sound, move on to the next chapter.
PC does not see HDMI
Windows does not see the monitor connection via HDMI. This is a problem: there are 2 monitors, 1 is connected via DVI, 2 is connected via HDMI (via an adapter). 2nd.
Does not see HDMI Audio Vidyukha MSI R4350 (MS-V161) Sound of Vidyukha ATI RV710/730/740 High Definition Audio Controller Win 7.
HDMI: The computer does not see the TV The problem is this: I connected the computer to the TV to play on the TV (via an HDMI cable). Need to.
The video card does not see the TV via HDMI Good afternoon. I tried a lot and decided to come here. __ Connected the TV via HDMI.
How to connect DVI-HDMI or HDMI-HDMI? Which connection is better? The monitor does not have built-in speakers.
you yourself diagnosed everything perfectly
the port on the monitor is a working cable, therefore? the port on the vidya is not working
qwertehok
, the port does not work either on the video card or on the board → the problem is in the drivers
Added after 2 minutes
Maks
, GIGABYTE AMD Radeon R9 390X 8GB. Why do I need the “Computer Configuration” line in my profile?
This doesn’t mean anything: you didn’t specify that the subject you are talking about is a PC, the config of which is indicated in your profile.
Added after 2 minutes
driver pack, in the right hands, works fine
HDMI works for me with standard drivers too
IMHO the problem is with the hardware
during a mass installation, no one uses off-fire wood, since it’s a waste of time to press buttons
Max
, even when selecting the “second screen only” option, there is “no signal” on the TV
Added after 33 minutes
by persen27
, “the installer has encountered an error when starting application processes, the installation will be terminated.” Following advice on the Internet, I deleted all Visual C++, same thing
I reinstalled the system from scratch, bought an adapter from DisplayPort to HDMI - there is sound that the device is connected, but there is no image even if the adapter is plugged into DP, which is usually connected to the monitor. Why does my PC hate HDMI so much? Moreover, I tried two devices on HDMI - neither one sees
Added after 5 hours 12 minutes
Hmm, he still sees one thing, but it is identified incorrectly. Perhaps I'll create a separate topic. But still he doesn’t see TV. Maybe some old driver from the TV is completely ingrained somewhere?
How to update software on a video card
If connection difficulties continue after the recommendations above, updating the PC software associated with image output may help. The driver may be out of date, damaged, or simply missing. In such a situation, you should open the device manager and look at the “video adapters” tab. To do this, you need to select “manage” from the “my computer” icon in the menu, which opens by right-clicking on the mouse.
If a red or yellow icon is lit next to the adapter, then there is a problem with the operation of this node. To update, you can immediately open its properties and select automatic driver update, but it is more efficient to download it from the manufacturer’s website.
Advice! The update can be found using the DriverPack Solution utility. Its convenience is that it scans the system itself and looks for all the necessary drivers.
Connecting a TV to a computer on Windows 10 and 7
Users often ask how to connect a TV to a Windows 10 and 7 computer via hdmi in order to use a large screen as a second (or main) monitor.
The connection process itself is very simple, but to implement it you need to choose the right type of cable, as well as make a number of settings to correctly display the picture on the TV receiver display.
Malware cleaning
It happens that the video signal from the laptop to the TV disappears due to viruses or other malicious programs appearing in the equipment. Fortunately, this problem occurs infrequently, however, such a breakdown cannot be completely ruled out. In order to increase the level of security of a computer or laptop, you should definitely download any antivirus, and it is not at all necessary to purchase a license - for the first time, usually about a month, users are provided with a free test version.
Connecting a TV to a Windows 10 computer
Connecting your TV to a Windows PC via an HDMI cable rather than via Wi-Fi is the easiest way to use a large screen as a monitor for playing movies or running games. This connection has a number of advantages, including transmission of high-definition content, support for audio and video signals, and ease of connection setup.
Thanks to this, it is through HDMI that the television receiver is most often connected to other devices, be it a computer, laptop, home theater or other equipment. On Windows 8 and 10, outputting images from a computer to a TV via HDMI is very simple and is done in a similar way. There are differences for Windows 7, but they are minor and will be listed below.
Cable selection
One of the important steps in connecting a TV to a Windows PC is purchasing a cable. The HDMI standard is constantly changing, but that doesn't mean the updated versions are better than their predecessors. The backward compatibility option allows each subsequent device to receive all the features of the previous standard.
You can determine the types of this cable by their number, the most common are versions 1.4 and 2.0, the second is the best.
There are other definitions of cable versions:
- Deep Color. This standard is intended for television receivers capable of transmitting more than a trillion colors;
- V.Color. Used for modern high-resolution television screens with an improved color range that is not available to television receivers using RGB technology;
- Standard. Wire for data transmission in resolution 1920x1080 up to 15 meters;
- High Speed. The signal in Full HD resolution is transmitted at 7.5 m, but this increases the response time of the display.
In addition to different versions, the cable comes in several types - HDMI, mini and micro HDMI. To connect to laptop or PC TV receivers, the HDMI form factor is most often used. When buying a cable, you need to choose only high-quality products and not buy cheap Chinese wire. Having saved money, the user may find that the computer does not see the TV via HDMI.
Connecting to a TV
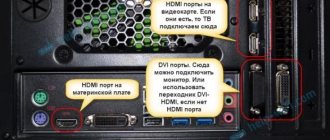
To connect a laptop or PC running Windows OS to the TV via HDMI, you need to connect both devices with a cable. It is recommended to turn off the equipment first. The required connectors are usually located on the back of the system unit, on the sides of the laptop, on the back or side panels of the TV set. If the TV is hanging tightly to the wall, you won’t be able to use a regular cable; you will need to purchase an additional corner adapter. It connects to the connector, and the cable is inserted into it. If the system unit does not have an HDMI connector, you can use an adapter from VGA or DVI to HDMI. It should be taken into account that when using adapters or adapters, the picture quality will decrease. After the cable is connected to both devices, you need to turn on the equipment and set the required signal source in the TV settings by clicking on the “Input” or “Source” button.
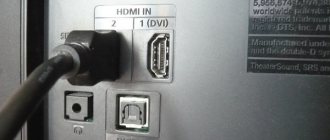
If your television receiver has several HDMI ports, you can determine the required one by searching through it or by looking at the designation next to this input. After the port is determined correctly and the equipment connects successfully, the loading screen for Windows 7, 8 or 10 will appear on the TV screen.
If the PC does not see the TV via HDMI and the “No Signal” notification appears on the screen, you need to diagnose the cable and make sure that it is working. To do this, you can connect it to other equipment or connect the laptop to the TV via another HDMI cable. When you first start the connection, the computer monitor (laptop display) and the TV will have an identical image, and the maximum resolution will be set. To customize the picture to suit the user’s needs, in Windows 10 you need to right-click on the desktop and select “Display Settings”.
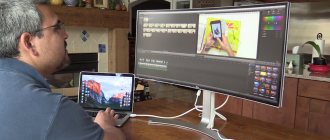
Here the user can set the resolution for the new screen, assign landscape or portrait orientation, and also configure how the displays work together. There are also options available such as screen mirroring (the image is the same on both displays) or extension (you can run different applications on each monitor). In addition, one of the screens can be turned off if it is not needed. If there is no sound on the TV when connected via HDMI, you need to make adjustments in the Windows settings. To do this, you need to understand how to enable sound in the system parameters. The user will need to click on the speaker icon in the Windows OS tray (on the right side of the control panel), select “Sounds”, then “Playback”.
In the list of devices, you need to find the connected TV and assign it as the default device. If the TV receiver is not displayed in this list, to configure the sound, you need to click in an empty area of the window and select display of disabled and disconnected devices. If the sound via HDMI on the TV still does not work, you need to reinstall the drivers for the video adapter.
The procedure for connecting the TV receiver to a PC or laptop via the interface
- Connect the HDMI cable to your laptop or computer. If you have a laptop, the connectors are on the side panel. If it's a computer, look in the back of the system unit.
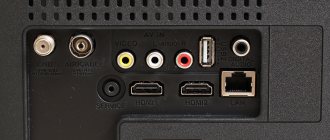
- We insert the other end of the cable into the connector located at the back of the TV.
- On the TV remote control, press the button that is responsible for selecting the signal source displayed on the screen.
Attention! The button has two names: “INPUT” or “SOURCES”. Depends on your TV model. - After pressing the button, a menu will appear on the TV screen in which we select the signal source, in this case our HDMI cable numbered one, two or three, depending on which port you inserted into (the port number is indicated on the back of the TV).
Connection on Windows 7
Connecting a TV to a computer running Windows 7 is done in the same way as to a PC running Windows 8 and 10. The only difference will be in the appearance and names of the system partitions that will need to be opened to adjust the image settings or if the PC does not transmit sound to the TV. Thus, a quick change of operating modes with displays is opened the same way on all versions of the OS - with the key combination Win+P. For Windows 10 and 8, the menu is called Project and appears vertically on the right.
It contains modes such as Computer Screen, Repeating, Extend and Second Screen. On Windows 7, the menu opens horizontally and contains the same modes, but under different names: “Disable Projector”, “Duplicate”, “Expand”, “Projector Only”. To adjust image settings, on Windows 10 use the “Display Settings” section. On Windows 7 you need to select "Screen Resolution".
Conclusion Connecting a TV to a computer running Windows OS via HDMI is very easy; to do this, just connect both devices with a cable, turn it on and select on the TV to display the image from the corresponding connector. Controlling the TV from a smartphone on Windows Phone or Android with this connection is not available; all operations are performed using a mouse and keyboard, and the TV receiver is used as a large screen.
If problems occur with sound output, you can determine why the computer does not output an audio signal to the television receiver and correct the error in the settings of your laptop or PC.
Setting resolution and frequency
Sometimes, after following the recommendations listed above, the picture still does not appear. In this case, the reason may be that the TV and the system unit are not compatible in their parameters. For example, for an old SD or HD TV, the FHD resolution set on the PC video card is too high. In this case, you should go into the screen settings using the above algorithms and, selecting the second display (TV), lower the resolution for it.
The second reason that can affect the image is frequency. By default, the PC video card is set to 60 Hz. For TV it is worth trying to gradually reduce the value.
Important to remember! Some TV manufacturers provide connection to a PC, and there is a special mode for this. It can be combined with the image adjustment or separated. Through it you can select the appropriate resolution for your PC.
Some Samsung TVs have encountered a problem where a window with the text “HDMI mode is not supported” appears. There were many recommendations on the forums to combat this, but it turned out that this is a problem with the factory firmware, and in order to eliminate the defect, you need to contact the manufacturer’s service center, where new software is installed. Modern Samsung TVs do not have such nuances.
Adapters and converters
The variety of video connectors has naturally led to the appearance of a large number of adapters between them in almost any combination. You can find any connection option, for example:
- mini HDMI to VGA with audio support
- DVI to HDMI
- Bidirectional adapter between SCART, 3RCA or “tulip” and S-video
As you can see, you can connect anything to anything. Adapters can be branded, as is the case with Apple, and third-party manufacturers, which, at a lower price, are often not inferior in performance.
Is it possible to make a lan from several TVs?
If all TVs have a LAN port, then there is no obstacle to connecting them to a single network, for example, through a router. Each TV will be a separate network device and can play video, audio and view photos from the home video server independently of the others.
Computer service St. Petersburg Travel to all areas 0 rub.
The HDMI connector has become increasingly popular in recent years because, unlike other ports, it has the ability to transmit audio. Absolutely all laptops are equipped with such a connector, thanks to it you can easily connect to a TV and display images on a large screen. Let's look at what you can do if HDMI on your laptop doesn't work, depending on the situation.
What should you do first?
First, you need to determine what caused the problem, since how to solve it may vary depending on the situation.
A common phenomenon is that HDMI does not work on a Windows laptop, that is, after the connection has been made, you only see an empty desktop on the screen. Here the problem lies not in the connector or cable. The fact is that the TV here acts as an extension of the laptop screen, i.e. it becomes an additional desktop area. To see the window in this situation, it will be enough to simply move it left or right.
This is not enough for correct operation, so you need to switch the display to full desktop duplication mode. To do this, proceed as follows:
right-click on an empty area of the desktop; then select screen settings (or screen resolution - depending on the OS); if the device does not see the TV display, then select “Detect”; Next you need to find the drop-down menu and there you will also find the “duplicate screens” item. If the HDMI output on your laptop does not work, this method will help fix the problem.
The laptop sees the connection, but there is no image on the TV display. First of all, you need to check the connection. The wire should sit firmly; carefully inspect it for damage and kinks. If they are present, the cable will have to be replaced.
If everything is absolutely fine with the cable, there is no damage, then you need to check whether the correct socket was selected. Often TVs have several ports at the same time, but signal reception in the settings is set to only one port.
Everything is fine with the picture, but there is no sound. In this situation, your task is to route the audio signal correctly. To do this we do the following:
in the “Control Panel” select the “Hardware and Sound” section; then go to the category called “Sound”; in the “Playback” tab, depending on the settings, select a TV or video card, click “Apply”.
If HDMI on your laptop stops working, and all of the above steps did not help, then you should check whether the port itself is in working condition. Sometimes they burn out - naturally, you will have to take the laptop to a service center. To avoid this problem, be sure to disconnect the cable cable and satellite dish from the TV before connecting. If the outlet that supplies power is not grounded, disconnect power from all devices before connecting.
It is worth noting that troubles of this kind can appear both with the TV port and with the laptop connector. To find out exactly where the problem lies, connect another gadget using HDMI. If problems are found with one of the devices, it is best to seek help from professionals.
Service center for laptop repair in St. Petersburg. We do our work professionally, see for yourself the laptop service. Laptop glass crack? Need a screen replacement? - laptop screen replacement - we will complete it in one day. We repair Lenovo laptops, constant discounts on Lenovo laptop repairs.
Source: https://www.atmir.ru/sovety/349-rasskazyvaem-kak-vklyuchat-hdmi-na-noutbuke.html
Method 5. Use DVI
DVI (Digital Visual Interface) is a digital video transmission standard that can be considered intermediate between VGA and HDMI in terms of the time of its creation, but not in quality. The DVI-D and DVI-I currently in use are capable of transmitting video in FullHD quality and in 3D format. Audio transmission is not supported here, so you will have to use a separate speaker system or if there is a separate audio input on the TV. The connector looks like this:
The DVI standard does not contain a maximum cable length, since it depends on the amount of video information transmitted over it. For video with a resolution of up to 1920x 1200 pixels, the length can reach 10 meters, for lower resolutions it can be easily increased to 15 meters. If possible, always test the cable before purchasing.
Special signal amplifiers with separate power supplies can transmit DVI video signals over a distance of up to 60 meters.
Method 7: RGB or Component
Sometimes we are forced to connect a TV to a laptop via the RGB output, better known as “tulip” because of the appearance of the connectors. The transmission of video from the TV to the laptop is divided into three channels: red (Red), green (Green) and blue (Blue). Cables and connectors on the TV have corresponding colors, and, despite the presence of HDMI and DVI, they continue to be installed on modern models. The picture shows the back panel of the LG LB653v series released in 2014 and we see the component input (circled in red) and “tulips” for sound (circled in green).
It is not found in its original form on laptops and is connected via an adapter, usually from a VGA connector. they have the same three-channel principle of color formation. As with S-Video, it is recommended to use cables no longer than 10-15 meters.
Method 8. Connect using SCART
Sometimes SCART is called a Euro connector, and despite the fact that the standard was developed back in 1978. its “comb” can also be seen on modern models, as in the picture above. At one time, it was a real breakthrough in the standardization of video transmission. It allows you to connect almost anything using the appropriate VGA to HDMI adapter.
Of course, using SCART if there is an alternative in the form of more modern interfaces will not be the best solution, but for the “friendship” of modern laptops with old TVs it will be a good solution. Without video distortion and signal attenuation, the maximum cable length should be no more than 10-15 meters. Finding a SCART cable of this length is currently problematic: the cost of high-quality cables is approaching a hundred dollars or more.
Method 6. S-Video
At one time it was called super video, but those days are long gone. But, despite its venerable age, connecting using the S-Video standard remains the best way to transfer images to analog CRT TVs, where this connector was present on any model. Of course, laptops with S-Video have not been produced for a long time, but you can use an adapter.
You can’t count on FullHD and surround sound with this connection, but it’s quite suitable for watching videos on an old country TV. The maximum cable length depends heavily on the quality of the materials used and protection from external interference. There are examples of signal transmission over distances of up to 300 meters, but usually acceptable playback quality is within 10-15 meters.
Method 5: VGA or PC IN
This connector can be found on many LCD and plasma TVs. It was the VGA connector that was used when monitors were “non-flat”. Despite the fact that more advanced standards have been used for a long time, VGA is not going to lose ground and can be seen on many laptops and netbooks from two to three years ago. Let's see what PC IN looks like:
Please note that the TV has an additional audio jack because The VGA interface does not transmit sound. The maximum possible video resolution is 1600x1200, there are video cards capable of transmitting 1920x1080 i.e. FullHD, but this is very rare.
The length of a standard VGA cable is usually 1.5-1.8 m, the maximum length according to the standard is 15 meters, but on the Internet you can find offers up to 20-30 meters or more in length. If the cable is made of high-quality materials and has good protection from external interference, then there are no technical obstacles to such distances.