Some laptop users prefer to work on large screens by connecting an external monitor to the device. In some cases, such a screen may be needed if the matrix has failed (so as not to spend money on replacing it).
It is also important to know that the display of a mobile computer significantly drains battery power. If you're just using your device to listen to music, you can turn off the display to extend battery life. Let's figure out how to turn off the monitor on a laptop.
Turn off laptop screen when idle
If you do not plan to work with the laptop, you can configure it to turn off when idle. In this case, the screen will automatically turn off if the user does not use the mouse or keyboard for a certain time.
Windows 10
In Windows 10, to do this, you need to right-click on the “Start” menu (or press Win-X) and select “Power Management”.
After this, the “Settings” window will open in front of you in the “System - Power and sleep” section. Here you can configure the time the screen turns off after inactivity when running on battery or network power.
Here you can set any value starting from 1 minute of inactivity.
Windows 7
In Windows 7, you can also set the screen to turn off when idle. To do this, open the “Control Panel”, go to the “Hardware and Sound - Power Options” section and click on the “Setting to turn off the display” link on the left side of the window.
As a result, a window with the settings of the current power plan will open.
Here you can specify after how many minutes of inactivity the laptop screen should turn off.
Turn off the laptop screen by pressing the power button
Another option is to turn off the screen by pressing the laptop's shutdown button. In this case, the function of the power button is redefined to turn off the screen.
Windows 10
In Windows 10, to do this, you need to open “Power Management”, as described above, and follow the link to “Advanced system settings”.
After this, a window with additional power settings will open. Here you need to follow the link “Actions of the power buttons”.
As a result, a window with settings for laptop buttons will open. Here you can configure the screen to turn off when you press the power button, the sleep button, or when you close the laptop lid.
Windows 7
In Windows 7, the option to turn off the display by pressing the laptop's shutdown button is configured in a similar way. To do this, open the “Control Panel”, go to the “Hardware and Sound - Power Options” section and click on the “Power button action” link on the left side of the window.
As a result, a window with settings for laptop buttons will open. Here you can configure the screen to turn off when you press the power button, the sleep button, or when you close the laptop lid.
Please note that the set of available options depends on the laptop configuration. In some cases, turning off the display is not possible. In this case, this option will not be in the list (as in the screenshot above).
Connection using WiDi technology
The Wireless Display (WiDi) or Miracast function is available on most modern Smart TVs and laptops with a built-in Intel 3rd generation video adapter or higher. Moreover, full support for this technology is guaranteed on branded Intel laptops with a pre-installed Windows 8.1 or Windows 10 operating system. For earlier editions (Windows 7/8), additional drivers may be required, which can be found on the Intel website.
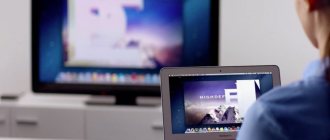
The convenience of WiDi technology is that all actions on the laptop are synchronized with the TV, which actually plays the role of a second display. Therefore, this connection is suitable for computer games, surfing the Internet and other streaming activities.
Establishing a wireless connection in this case is quite simple:
Turn off laptop screen when connected to TV via HDMI
Very often the need to turn off a laptop screen is associated with connecting a TV via HDMI. This problem is also solved quite simply.
Windows 10
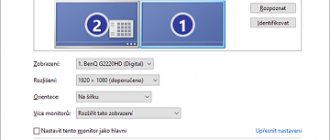
In Windows 10, to turn off the laptop screen when connected to a TV via HDMI, you need to right-click on the desktop and select “Display Settings”.
As a result, the “Settings” window will open in front of you in the “System - Display” section.
Scroll through the settings to the Multiple Displays block. A drop-down list with operating modes for two monitors is available here.
Open this list and select the “Show only on 2” option.
After this, the laptop screen will turn off, and the picture will only be displayed on your TV connected via HDMI.
Windows 7
In Windows 7, you can also turn off your laptop screen when connected to a TV via HDMI. To do this, right-click on the desktop and select “Screen resolution”.
After this, a window with screen settings will appear. Here you need to open the “Multiple screens” drop-down list and select “Display desktop only on 2”.
After this, the laptop screen should turn off, and the picture should appear on the TV connected via HDMI.
Source
Connection via HDMI
- To avoid burning the ports, turn off both devices. Using an HDMI cable, connect the laptop to the TV. To avoid loss of sound and image quality, do not use the DVI output - the connectors must be the same.
- Turn on your laptop and TV. The laptop will boot as usual and the TV screen should flash. Set your TV to AVI mode and select the appropriate HDMI input.
- Now you need to adjust the image. Call up the context menu on the laptop desktop (right-click) – “Properties” – “Options” – “Advanced” and select the required value. After this, your laptop table will appear on the TV screen.
How to switch video from PC to TV and turn off the monitor (turn off)
Quite often, computer and laptop users resort to the available option of connecting a second monitor or even a TV. This is done in order, for example, to display a movie playing on a computer on a TV.
Although this is convenient, there are also problems with this scenario of using a computer. To be more specific, we are talking about a working computer and laptop display, although at this moment it is completely unnecessary, because All eyes are directed towards the connected TV. If you are faced with this problem and you are not indifferent to the resource of the display of your laptop or monitor that is connected to the PC you are using, then this material will undoubtedly be very useful to you.
When is it necessary to remove Youtube from TV?
If you installed YouTube on your TV (see how to connect YouTube to your TV, follow the link), then you were able to evaluate all the possibilities of the new way of watching videos. Images that can be viewed in greater detail, vibrant colors, relatively easy operation, and support for all languages. But there are times when an application needs to be removed from the device:
- in case of change of owner of household appliances: moving, renting out housing;
- restricting access to content for children. We will dwell on this in more detail in one of the sections;
- reluctance to use video hosting in the future.
How to turn off the monitor and leave the image only on the TV
Sure, you can just use the power on/off button on the monitor, but that's not very elegant. But this won’t work at all with a laptop display, because it doesn’t have a separate shutdown button.
The developers of the Windows operating system are aware of this problem and have created a special system tool to solve it, which allows you to quickly switch image output from the main to a secondary monitor or TV, duplicate the image or expand it to several connected video output devices at once.
To use it, you don’t even need to look for the corresponding options and items in any of the numerous menus that are available in the Windows operating system. To call the tool, press the key combination Win + P
Where these keys are located can be seen in the image.
After pressing, a menu of several items will appear on the screen. Use the arrows to move between items, and the Enter to select.
The menu is quite informative and does not need any additional description. Simply select the desired operating mode, provided a second display or TV is connected, and press the enter key. By selecting the “Second screen only” (or similar) option, you switch the video signal from the computer to an additionally connected image output device, for example, a TV.
Why doesn't YouTube load or freeze?
The main reasons for the incorrect operation of the Youtube application, system errors and crashes, freezes have already been described in detail above, as well as ways to eliminate these problems.
- In most cases, it is enough to update YouTube itself or the TV firmware.
- Often you can get away with resetting the settings or rebooting the device.
- Sometimes errors disappear on their own after some time.
Let's not go through all this again. Let's list a few more possible reasons for the dysfunctionality of YouTube.
- Problems with video playback, especially in high definition, can also arise due to overload of the Smart TV processor or memory with other running programs. To exclude this version, simply turn off and turn on the TV again.
- It would also be a good idea to scan your device for viruses, and also check if there is a conflict between YouTube and any other program. The choice of free antiviruses on Google Play is quite rich and almost all of them support the television platform.
- But before you start experimenting with updates or resetting all settings, take the time to check the speed of your Internet connection. Perhaps the failures occur here, and the TV has nothing to do with it.
Directly by cable
The presence of the same VGA and HDMI connectors on the laptop and monitor evokes thoughts of their interchangeability without any extra effort. These thoughts are fueled by numerous tips from the Internet claiming that a laptop can be connected instead of a monitor using a regular VGA (¬¬DS¬UB) or HDMI cable. Alas, this is not always the case.
The VGA and HDMI connectors of the vast majority of laptops work only as an output: you can connect an external monitor or TV to them, but vice versa - you cannot transfer an image from a video card to the laptop through them. There are exceptions, but they are quite rare. For example, some Eurocom laptops have a separate HDMI input, while the Lenovo Y710/730 laptops had a bidirectional VGA port with a convenient in/out switch.
However, it is still possible to turn the LCD screen of any laptop into a full-fledged monitor using a cable - however, to do this you will have to remove it from the case and connect it to an LCD controller purchased separately.
Using the system
If both computers are connected to a local network, you can use the laptop as a monitor without any special tricks. However, to use this method, you must not only meet certain conditions, but also have system administration skills. In addition, this method places quite high demands on the local network and the “stuffing” of the laptop. Especially if the PC screen resolution is high, and you need a clear picture without freezing.
Both the laptop and the computer will require system preparation.
Windows computers (version 7 and later), you can use the RDP (Remote Desktop Protocol) service to share your desktop with other users. By default this access is disabled. To enable it, you must allow remote connections in the “Remote Access” tab of the system properties window on your PC.
You can see the computer desktop on your laptop using the standard “Remote Desktop Connection” program by entering the password of the PC administrator or any other user who is allowed remote access.
Remote access to the desktop of another computer is not always possible on the first try. The operation of RDP is influenced by many factors: versions of installed service packs, firewall settings, local network settings, and more.
On Windows 10, there is an easier and more accessible way - using the “Project to this PC” option in the “Options” tab of the Display Properties window. However, it will only work if the laptop is equipped with a Wi-Fi adapter that supports Miracast (a standard for wireless multimedia signal transmission). But not only other computers with Wi-Fi modules running Windows 10 will be able to use this laptop as a monitor, but also any other devices that support Miracast technology - the laptop screen will appear in their list of available wireless screens.
For MacOS there are similar mechanisms:
Sharing is done using VNC technology, so you can share your screen not only with macOS users on your network, but also with anyone else using a VNC client who knows the password you set. VNC clients exist for both Linux and Windows.
For a computer running Linux, there is generally no particular difference between “its” monitor and the monitor of any other computer on the network running an SSH client. The SSH protocol (from English Secure SHell - secure shell), which allows remote control of a computer, is supported by any Linux distribution. Of course, in order to see the screen of a Linux system on a laptop screen, it must also be configured accordingly.
Third party programs
Third-party programs also use the transfer of information over the local network. Therefore, if you connect a laptop to a PC via weak Wi-Fi, you will not be able to watch HD video on the laptop screen from this PC - the picture will be ungodly “slow.” However, there are some advantages to using third-party programs: the relative ease of setup and versatility of use on different versions of different operating systems.
For example, the most common program, Teamviewer, has distributions for all current versions of Windows, Mac OS, linux, Android and iOS. With its help, the PC screen running one of these systems can be accessed from almost any mobile device or computer. When installing Teamviwer on a PC, you are automatically given an ID and password, which by entering them in the program window on another computer, you will have full access to the screen.
Teamviwer is free for non-commercial use. There are many other programs with similar capabilities: Chrome Remote Desktop, AnyDesk, Splashtop, various VNC clients (TightVNC, UltraVNC) and others.
As you can see, although simply plugging in a laptop instead of a monitor most likely won’t work, there are ways to transfer video information from a computer’s video card to a laptop screen—and they are quite varied. All that remains is to choose the right one.
Source
Android, iOS
Smartphones have become the most popular and favorite toy among children and teenagers. Here they have fun, listen to music, watch videos, communicate, and even study. Just like every sword has two edges, mobile devices, on the one hand, give the child useful skills and knowledge, and on the other hand, children accidentally or purposefully find video materials and channels that destroy their concepts of good and evil, morality and ethics , about what is right and what is wrong and destructive. How to protect fragile souls from unnecessary and dangerous information, and block channels on YouTube, other video hosting sites or social networks?
For example, to block an unwanted video on YouTube, you need to touch the menu (three dots) in the upper corner of the screen. Some users write that there is a “block” button in the menu. Perhaps there really was such a tool on YouTube. But now there is only a “complain” button.
The YouTube Go app on iOS works similarly.
Parents can take another measure, albeit a drastic one, in relation to video hosting - delete its application. In some smartphone models you can remove it, while in others you can simply turn it off. To do this, you need to touch the application icon in the main menu of your smartphone and hold until the context menu appears.
Or this:
This way you can remove any inappropriate application. In a similar way, programs can be removed on the iPad.
Let's go back to YouTube. Pre-installed applications do not always allow you to eliminate yourself. And if the system only offers to disable it, this recommendation should not be neglected. This measure will make the program inaccessible to the child. If you want to restore the program, go to settings, select “Application” and click “Enable”.
Turning off the screen on a running laptop
Sometimes a situation arises in which you need to turn off the laptop screen while it must remain in working condition. That is, do not turn off or go into standby/hibernation mode.
You will learn how to implement this on a particular laptop in this article.
Keyboard shortcut
Pay attention to the very top row of buttons on your keyboard, where the F1-F12 keys are located. As a rule, they contain various images.
For example, on Asus laptops the F7 key shows a monitor with a cross. When you press this button in combination with the Fn key, the laptop monitor turns off. The laptop continues to work. When pressed again, the monitor turns on again.
An example of the location of the display off button on the F7 key
For Acer laptops this combination is different. Fn + F5 or Fn + F6 depending on the model. At the same time, the screen off button also has a corresponding image.
An example of the location of the display off button on the F5 key
Look closely at the top row of the keyboard button on your laptop and find an image that looks like a monitor. Try pressing this button once in combination with the Fn button, as well as without it.
An example of the location of the display off button on the F10 key
Fn button on the keyboard
In this case, you can proceed in the following way. Set the laptop display to automatically turn off after a minute, provided that no keys are pressed and the mouse does not move.
To do this, regardless of the version of Windows, right-click on the battery level icon in the lower right corner near the clock and select “Power Options” in the menu that opens.
More wired connection options
In addition to the HDMI-HDMI interface, you can use other wired connection options to display images from a laptop to a TV. Depending on the configuration, these may be the following options:
- VGA - VGA. With this type of connection, you will have to separately worry about outputting sound to the TV.
- HDMI to VGA - If your TV only has a VGA input, you will have to purchase the appropriate adapter for this connection.
You can imagine other wired connection options, but I have listed all the most common ones that you are most likely to encounter.
How to turn off a laptop monitor when connecting hdmi. We tell you how to enable HDMI on a laptop.
The HDMI connector has become increasingly popular in recent years because, unlike other ports, it has the ability to transmit audio. Absolutely all laptops are equipped with such a connector, thanks to it you can easily connect to a TV and display images on a large screen. Let's look at what you can do if HDMI on your laptop doesn't work, depending on the situation.
What should you do first?
First, you need to determine what caused the problem, since how to solve it may vary depending on the situation.
This is not enough for correct operation, so you need to switch the display to full desktop duplication mode. To do this, proceed as follows:
If the HDMI output on your laptop does not work, this method will help fix the problem.
If everything is absolutely fine with the cable, there is no damage, then you need to check whether the correct socket was selected. Often TVs have several ports at the same time, but signal reception in the settings is set to only one port.
It is worth noting that troubles of this kind can appear both with the TV port and with the laptop connector. To find out exactly where the problem lies, connect another gadget using HDMI. If problems are found with one of the devices, it is best to seek help from professionals.
If you have difficulties or have questions about connecting your laptop to your TV via HDMI, this article will help you figure it out. There is nothing complicated about this, but there are a number of nuances that need to be taken into account. Here we will tell you step by step how to connect correctly.
Connection cable
To connect your laptop to your TV, you will need an ordinary and budget HDMI cable (no need to buy an expensive cable). However, if you have a 3D-capable TV and use this mode frequently, you will need a cable that supports HDMI version 1.4 or higher.
Carefully! Do not connect the cable to the Output connector because this may burn it or cause other equipment malfunction. Perform all actions with the TV and laptop turned off (be sure to remove the power plugs from the sockets).
Connection procedure step by step
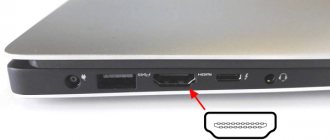
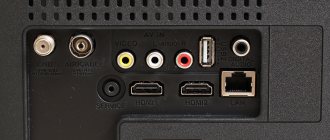
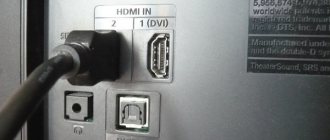
To connect a laptop to a TV via HDMI, the first thing you need to do is find the required HDMI connector. It is located on the back or side of the TV. However, the TV often has several HDMI connectors, so you need to find the one located in the “Input” block and marked with the number “1”.
A similar connector must be found on your laptop. In principle, any HDMI connector will do.
After all the connectors have been found, you need to insert the cable into them (one end into the TV, the other into the laptop). At the same time, check the tightness of the connection - the cable must be inserted all the way.
Outputting images via HDMI
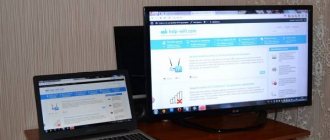
After connecting the laptop to the TV via HDMI cable, turn on the laptop and TV.
After booting the laptop, we need to check that the screen resolution is set correctly. We will describe the steps for Windows: you need to right-click and select “Screen Resolution” from the drop-down menu and then check the settings. If you have a Full HD TV, most likely the optimal resolution for it is 1920x1080. If you have an “HD Ready” TV, then its optimum is 1366x768.
You have several options for connecting your TV and laptop (depending on your needs).
After checking the screen resolution, you need to set the screen refresh rate. To do this, go to “Advanced Settings” and select your TV. Most likely, it will be displayed as a monitor (for example, "generic PnP monitor"), because... Windows usually calls all connected display devices monitors. So, having selected your TV, in the “Color quality” field you need to set “True Color (32 bits)”, and in the “Screen refresh rate” field - more than 60 Hz. If your TV supports a frequency of 100 Hz, it is better to set it. However, you can try to set different frequencies and evaluate the image quality and the presence of interference at each of them.
Outputting sound to TV via HDMI
To connect a laptop to a TV via HDMI and establish correct interaction, in addition to the picture, you also need to configure the sound transmission.
If you have a fresh video card driver installed, then there should be no problems with sound transmission. To check your driver, click on the speaker icon located in the lower right corner of the laptop screen. If you see, in addition to the volume bar, an icon called “HDMI Digital Audio Device” or “High Definition Audio Device,” then everything should be fine.
If you don’t see such an icon, then you need to find it through “Device Manager” (Start > Control Panel), selecting “Sound, game and video devices” there. If you see the device “Device supporting High Definition Audio” there, then you can configure the sound through it. If there is no such device, you will need to reinstall or update the video card driver.
Possible problems connecting a laptop to a TV
Why can't my TV see my laptop via HDMI?
The picture shows an incorrect setting. To reconfigure, select Define and select manually.
Why is there no sound after connecting my laptop to the TV via HDMI?
It happens that everything is done correctly, but there is no sound. This may be due to the fact that not all TV models accept sound at all input connectors. Try connecting devices to different HDMI connectors.
Problems may also be associated with a faulty cable, which can be checked by replacing it.
Why doesn't my laptop see the HDMI cable from my TV?
A very common question and quite often it appears due to the fact that the wrong display method is defined by default (for example, VGA). To correct the situation, you need to override the display method by manually selecting it.
Happy setup!
We hope this article was useful to you and helped you resolve the issue of how to connect a TV to a laptop via HDMI.
Have you been wondering for a long time what the HDMI input is for? Then we advise you to read this article to the end, which will explain this in detail, as well as tell you what types of this input exist.
What are the HDMI inputs used for?
This type of input appeared more than five years ago, the need for its appearance was the desire of people to directly connect their TV to a laptop, without losing the quality and speed of the picture. You may ask, isn’t this what the VGA input is for? Of course, it is for these, but you must understand that the VGA input is a rather outdated development, which simply horribly distorts not only the quality of the transmitted picture, but even sounds that are constantly delayed due to the small input bandwidths. The HDMI input copes with all these tasks quite easily and efficiently.
How to connect a TV to a laptop through this input?
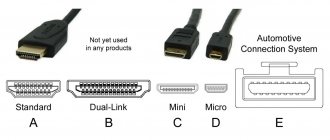
•First, you will need to purchase a wire with the same input on both ends. Please note that in addition to the regular HDMI input, there is also a mini HDMI. They do not differ in their bandwidth, but mini HDMI is usually installed on TVs to make them lighter and thinner.
Conclusion
With youtube activate, the user will be able to set up a connection between a smart TV and any modern gadget. It is enough to generate a special access code. But it is important to remember that all devices must be placed in the same WiFi zone. Otherwise, video broadcasting will not be possible.
In a previous article I talked about how to connect your TV to the Internet, and in this article I want to talk about different ways in which you can watch YouTube videos through your TV. Personally, I only watch YouTube on my TV. Even until recently I did not have a television (antenna) connected. But even after television channels started working, I don’t watch them. I turn on the TV, immediately open YouTube and watch the channels I subscribe to, or something that the service recommends.
It's no longer a secret that television is fading into the background. Especially children and young people are now actively watching YouTube, subscribing to channels that interest them, commenting, following the lives of their favorite bloggers, etc. Of course, most people watch videos on their smartphones, tablets, computers and other devices. And they completely forget about televisions, which have advanced so much lately that playing videos on YouTube is a common task.
About five years ago, I was introduced to smart TVs by purchasing a Smart TV from LG. And even then you could watch YouTube without any problems. They still sometimes watch videos on it over the Internet. And it all worked very simply and easily. There was no need to go to the site, use complex navigation, etc., just launch the application and watch the video you liked.
Nowadays this is not a problem at all. Yes, if the TV is without Smart TV, then it’s more complicated. Many people want to watch YouTube on TV through their phone (Android, or iPhone) or computer. In principle, this is also possible, but a lot depends on the TV itself, the same phone, or PC. Now I will show and explain everything in detail.
How to turn off a laptop screen? | World-X
The power supply of laptops is one of the weak points, since battery life often lasts for 2–4 hours, with rare exceptions up to 8–12 hours. And sometimes you want to enjoy the music longer...
How to turn off a laptop screen?
We have already discussed the option of operating a laptop with the lid closed, while the laptop does not go into sleep mode, but continues to work with the display turned off. Another way to prevent the screen from working is the key combination with “Fn”.
With a desktop computer, everything is much simpler: we press the power button and the monitor is turned off, and why should it if the PC runs on network power? But in order to turn off the laptop screen in offline mode, you need to use a keyboard shortcut: hold down “Fn” and a key from the “F1 - F12” row.
Note! On each laptop model, the keyboard shortcut is individual, so before pressing, find the exact value specifically for your device model.
Instead of an afterword
Sometimes this key can be used specifically to turn off the display, but most often it is a function of switching between the laptop screen and an external monitor. In my case, this is true, it was enough to press Fn + F1, and the display type selection panel appeared; by selecting the “Projector only” mode, you will have to agree with its absence. To return the display to work again, use a keyboard shortcut to select the “Computer only” or “Turn off projector” mode, press the same combination twice.
That's all, the main thing is to know the key combinations, and in most cases you will be able to work with your eyes closed.
Priora575In your phrase, there is also ambiguity.. Win+P Baldeyu kõigest..
Kapot UzekuHow to turn off the display on a laptop with one touch? Method number 1! N ° 2 and n ° 3 in the description..
I never thought that, nevertheless, I would write something here... We should be happy and, without exaggeration, live)) IMHO...
Sokol AlalAlso the only and in other respects the simplest storyline
, so that you can turn off the display on your laptop with one touch, which is suitable for everyone!
Best TezoWhy talk so much?? we can get to the point quickly.
Sphinx NonoI have two computers many need the eyes not the laptop through the display
Nissan PipelThank you brother
Racer411Laptop settings when connecting via HDMI to a TV 2.More details.
Some grievances do not go away and are not forgotten. What are you waiting for, so to say that over time they will fade into the background, in part, as clearly as this happens. True, the pain remains, because, so to speak, it just hurts. You can set the task in more detail..
Acimez Crazy There are no suitable words to turn off, through, the screen. In the settings you set Display only the second screen În general, nu suffer nonsens.
Honda MolodHow to turn off your laptop display!
My VK: https://vk.com/ilianchic.
(Visited 1 times, 1 visits today)
Safe mode
This is the name of the content filtering system, as a result of which channels and individual video materials that are not intended for children are eliminated. YouTube strives to keep up with the times, its interface and settings are constantly changing, something is added, or, on the contrary, it stops working or moves. The creators of video hosting are modifying the functionality so that the tools operate the same on all operating systems, be it Windows, Mac or Android, and are easier to synchronize. And if previously the button to enable protected mode was located in the footer of the site, to which it was not always possible to scroll and go down, now programmers have moved it to the account management tab on Youtube.
On the computer
To open the profile management section on YouTube, you must first log into your account and click on your avatar (photo) in the upper corner.
This will bring up the profile menu. You will find the “safe mode” button on the bottom lines of the tab.
An adult user can view any channels offered by YouTube, and therefore safe mode is disabled by default. But if a child uses the computer, then it is advisable to activate this function. To do this, first click on the arrow,
Another drop-down window will appear.
Move the slider to the right as shown in the screenshot. The button will turn blue. This means that Safe Mode is active. It will not block channels, it will simply not allow you to display “adult content” in your preference feed. The child will not see what he should not see.
In phone
We must not forget that children and teenagers are increasingly watching or listening to video content on phones and tablets. In these gadgets, YouTube is presented in the form of a software application, for example, You Tube Go. To block an unwanted channel or a particular video from children watching on your phone, you can also enable safe mode on it. To do this, go to the application. Tap your profile picture or photo in the top right corner.
Here, just like in a computer browser, the account menu will open.
Find the safe mode in it and move the slider with your finger. The function is activated.
Even on YouTube, filters cannot filter out everything that children would rather not know, but the bulk of inappropriate content will become inaccessible to minor viewers.
On iPad
iPad is a tablet developed by the American company Apple. You can also watch YouTube from a browser, or through the built-in application. Safe mode is activated using the above method.
Most browsers on different devices are synchronized if you have a single account. It is not at all necessary that it be only Google Chrome. If you have this web browser installed on your computer, Yandex browser on your tablet, and Firefox on your smartphone, then having a single account with one login and password, they can be linked together, and those settings that are made from the computer are automatically transferred to other devices.
True, this note does not apply to safe mode. It must be installed on each device separately.
On TV
Modern TVs are connected to the Internet, thanks to which you can watch YouTube videos, television channels and much more on TV. Children enjoy watching cartoons and children's films, finding them on the Internet. Unfortunately, on YouTube, children don’t always come across exclusively children’s content. How to protect the child in this case? Is it possible to control what children watch on TV?
Smart TV, like phones, runs the You Tube Go application. This is an analogue of the site Youtube.com. You can log into it with the same account that is installed on your smartphone and (or) computer. Only safe mode is activated on each device individually. To activate it on your TV, you need to go to settings, find the Safe Mode option and also activate it.
see also
Your TV is broken and you don't know what to do? Take this short test and find out the best way to repair your TV.
Source