A wired connection between a computer and a TV using HDMI technology is the most popular, since this technology allows you to transfer both picture and sound from the PC to the TV at once. However, what should you do if, after connecting via an HDMI cable, you find that there is an image, but no sound - it is played through the PC itself?
- 2 Check volume levels on both devices
2.1 TV settings: is the HDMI connector set as a valid audio output2.1.1 Video: how to set up the TV speakers correctly so that it can play sound from a PC via HDMI
- 4.1 The cable is connected to the HDMI (DVI) v1.3 port, through which no sound is transmitted
- 8.1 If the equipment is disabled in Device Manager
- 9.1 Diagnosing problems with “firewood” in the dispatcher
9.2.1 Video: how to install Nvidia GeForce drivers correctly
Checking volume levels on both devices
On Windows, open the panel with the volume level - click on the speaker icon to the left of the date and time on the “Taskbar” in the right corner. If the sound is at a minimum, increase the volume using the slider - set it to the highest possible level.
Set the volume to maximum mode
Also, right-click on the sound icon and select “Volume Mixer.” In the new small window, make sure that the TV and the running video player (or other program you are currently using to play sound) are also set to an adequate volume level.
Look into the mixer - perhaps the volume of the TV speakers is reduced there
You can increase the volume on Windows using the function keys: hold down Fn with one of the F buttons at the top of the keyboard with a loudspeaker icon (usually F12). A window with a level will open in the upper left corner of the screen on top of all windows - enlarge it by pressing the two indicated keys several times simultaneously.
Conveniently increase volume using function keys
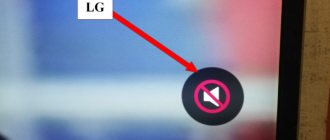
Check the sound on your TV: turn on a channel and press the volume up key on the remote control. Make sure your TV is not set to any silent mode. If there is an audio stream, then everything is fine with the speakers. If there is no sound, take the TV in for repair.
Use the remote to increase the volume of the TV speakers
If you don't have a remote control, use the volume up key (with the + sign and the springboard) on the back or front of the TV to turn up the volume.
You can increase the volume using physical keys on the TV
TV settings: whether the HDMI connector is set as a valid audio output
In order for audio from your computer to be transmitted to your TV via an HDMI cable, the HDMI connector must be set as the default audio source in your TV's settings. If another output is installed, of course, the sound from the computer will not be reproduced on the TV, since the latter simply will not perceive it.
Select HDMI as input device
In the TV settings, the “TV Speakers” device must be specified as the default playback device. Also try turning off Smart mode so that the TV stops independently controlling the sound level.
Select TV Speakers to play audio from the HDMI cable
Video: how to set up your TV speakers correctly so that it can play sound from a PC via HDMI
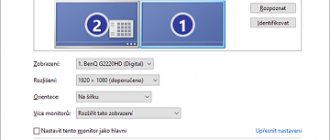
Selecting the playback source
Windows OS determines the playback device independently after connection. If you are unhappy with the automatic operation of this service, select the playback source manually.
How to output audio via hdmi manually:
- To quickly bring up the “playback devices” window, hover your mouse over the volume icon and right-click. A menu of options will appear on the monitor: “volume mixer”, “parameters”, “recording devices”. Find the “playback devices” option in this list and select it with the left mouse button;
- When the connected devices window opens, right-click on the item with the name of the TV;
- In the pop-up menu, find and left-click “Set as default”;
- Click Apply to confirm and save your decisions.
If your TV is not listed in the playback devices, right-click on an empty space in the list box. In the pop-up menu, check the box next to the “Show disabled devices” option. When the disabled devices appear in the list, find your TV among them and follow the previous instructions.
Malfunction of the HDMI cable, adapter or connector
The first thing to rule out is equipment failure: the cable itself, the adapter (if you use one), as well as the HDMI connectors on your computer and TV. Most often, the reason is in the cable: check if it is damaged - perhaps it was previously pinched by some piece of furniture. There may be no visible defects: there is a possibility that the thin cables inside are damaged. Contacts in plugs often oxidize if stored improperly, so even a new wire may be faulty.
See if there are visible defects on the cable
If possible, try connecting the PC to the TV using a different cable - if everything works, then the reason is indeed a cable fault. In order for the PC to successfully transmit the signal for picture and sound to the TV, you need to buy a high-quality branded cable.
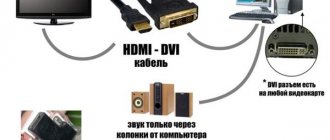
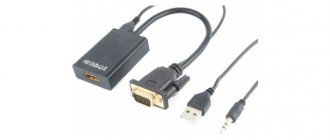
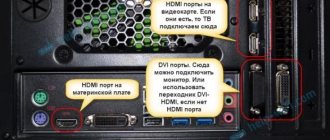
If you use adapters such as DVI-HDMI or VGA-HDMI, audio will not be transmitted from them. If you want not only picture but also audio to be supplied to your TV, purchase a DisplayPort to HDMI adapter.
To receive an audio signal along with a picture on your TV, use a DisplayPort to HDMI adapter
The cable is connected to the HDMI (DVI) v1.3 port, through which no sound is transmitted
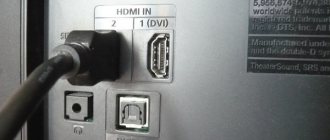
It is worth separately noting the situation with the lack of sound if the connection is made through the HDMI (DVI) version 1.3 connector (on older TV models). For audio to play, the jack must be at least version 1.4. Unfortunately, version 1.3 does not have sound support. If you have another port on your TV, HDMI IN or HDMI (STB), connect through it.
Insert the cable plug into the HDMI IN, or HDMI (STB) port
Reinstalling drivers
ATTENTION! I advise you not to use “DriverPack Solution”, since in addition to drivers, it installs a huge amount of garbage on your computer, which is why it can start to glitch, slow down and work poorly.
If none of the above helped, then most likely you have problems with your drivers and should reinstall them. It is best to completely remove the device first and then install fresh drivers. Otherwise, the computer will refer to the fact that they are already installed.
Connect your laptop or computer to the Internet. Next, open the task manager ( + R = devmgmt.msc). Go to the “Sound, Game and Video Devices” section and remove your audio card. You can remove all devices altogether.
Next, find the “Hardware Configuration Updates” button at the very top of the control panel and click on it. Drivers should be automatically downloaded from the Internet and installed on your computer. If this does not help, then uninstall the “NVIDIA” and “AMD” sound driver and do the same.
If these steps do not help, then you should update the drivers for your video card and sound card manually. The fact is that Microsoft servers do not have all the drivers, and sometimes they are installed with an error. For installation, see the following instructions.
First, you need to find out the full name of the video card. To do this, in the same “Device Manager”, go to the “Video Cards” section. Next, go to the “Properties” of your video device and look at the full name on the “Details” tab. Although the name may be displayed immediately in the section.
You also need to know the exact type of your system - to do this, go to “Properties” of “My Computer” and look at the “System Type” line (32 or 64 bit).
NVIDIA
We go to the official support website. We set all the parameters and click “Search”. Next, download the driver to the computer, install it and reboot.
AMD
We go to the official website. You can enter the full name in the search bar “search all products”. Or select your video card according to the options from the lists. Finally, click “Submit”. Next, you will need to select the system, bit depth and download the latest “pack of firewood”.
If you have a built-in video card, then you can install drivers by ID. Since we still need to completely reinstall the drivers on the sound card, I will show how this is done on it. And then you yourself will install the drivers for the built-in video card in the same way (if your video card is not from AMD or NVidia).
- Go to the “Sound, video and gaming devices” section. Find your sound card and go to its properties.
- On the Details tab, set Properties to display the Hardware ID. Right-click on the first line and copy the value.
- We go to any search engine (Google or Yandex) and enter two words: “Drivers ID”.
- Next, follow the first link and paste the line you copied into the search bar of the portal.
NOTE! If the drivers are not found, then simply select another portal for the same request.
- Once the drivers are found, download them and install them on your computer.
For those who have not yet reinstalled the drivers for the video card, do it in the same way. After this, the video should start broadcasting with sound.
The laptop does not see the TV as a playback device - how to quickly fix it
If the TV simply does not appear in the “Sound” window, even if you have enabled the display of disabled sound gadgets, do the following:
- Restart the laptop - do not unplug the HDMI cable. When the operating system is fully loaded, go to the “Sound” window again - most likely, TV will appear.
- Disconnect from your computer all devices (flash drives, cables, etc.) that you do not need right now. The system may not be able to select the priority connection (port) to which maximum electrical power should be supplied.
- Check the operation and configuration of the High Definition Audio controller, as well as the status of its drivers. If necessary, update the “firewood” (reinstall it). Detailed instructions can be found in the sections below.
Using multiple TVs with Actual Multiple Monitors
Actual Multiple Monitors is a program that simplifies the use of multiple TVs or monitors connected to a PC.
Program features:
- customizable hot keys for most functions of the program; It is possible to configure hot keys for most of its functions in the utility
- access to the Start button, toolbar, recycle bin, etc., on any monitor;
Access the Start button, toolbar on any monitor - window separator with expanding areas (tiles) within specified boundaries;
Window divider with expanding areas - preventing games from minimizing when working on other screens, blocking the mouse in the game window;
Function to prevent games from minimizing when working on other screens, blocking the mouse in the game window - placement of buttons in window headers for convenient management (selection of location, screen overlap, etc.);
Function of placing buttons in window headers for convenient management - Snap windows to points on the screen for manual positioning, improved Aero Snap (windows side-by-side) on screen borders;
Function of snapping windows to points on the screen for their manual positioning - wallpapers and screensavers on connected screens (one picture, separate pictures, slide shows, flexible arrangement (stretching, cropping, etc.));
Ability to customize screensavers and select wallpapers on connected screens - mirroring (cloning) of monitors to control a hidden screen, reflecting part of the information only on a specific projector (screen) and much more.
Possibility of mirroring (cloning) monitors to control the hidden screen
Using this program, you can, for example, play your favorite games and simultaneously chat, connect to the Internet, stream online videos, etc.
Installing and using the program
Step 1. You can download Actual Multiple Monitors at: https://www.actualtools.com/multiplemonitors/whatsnew/ by clicking “Download Now” at the bottom of the screen.
Go to the developer’s website at the address, click “Download Now” at the bottom of the screen
Step 2. Launch the installation file by clicking on the browser downloads icon, hover your mouse over the downloaded file, and click on the “Open” option.
Click on the browser downloads icon, hover the mouse over the downloaded file, click on the “Open” option
Step 3. Select a language and click OK.
Select the language, click “OK”
Step 4. Click “Next”.
Click “Next”
Step 5. Oh, click Next.
Oh, click “Next”
Step 6. Follow the installer’s instructions, read the information and click “Next”.
Click on the “Next” button
On a note! To change the folder for installing the utility, you need to click on the “Browse” option, open the path to the folder, click “OK”, then “Next”.
Click “Browse”, open the path to the folder, click “OK”, then “Next”
Step 7. Click “Install”.
Click “Install”
Step 8. After installing and launching the program, select the “Multiple Monitors” menu item to get started.
Select the “Multiple Monitors” menu item to get started
On a note! You can use the functions listed above using the help tips at the bottom of the program windows.
To familiarize yourself with the functions of the program, click on the icon with a question mark at the bottom of the windows
Windows troubleshooting utility
If all of the above does not help, then in the control panel you should find the “troubleshooting” tab. This is a proprietary Microsoft utility that will help you get rid of crashes. A dialog box will appear where the system will clarify the problem and offer solutions. It should be noted that the HDMI cable today is the most common and progressive method of connecting devices. In addition to a laptop and computer, you can use it to connect other devices. Find out more about how to connect a DVD player, iPad and other tablets to your TV.
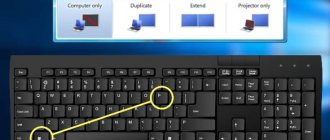
How to set up multiple displays
If a monitor is connected to the TV at the same time, the Windows 7/8/10 system will consider that several displays are connected. In general, it doesn’t matter what it is, a TV or a Monica, for the system it’s all displays.
There are two modes for multiple displays: duplication (cloning) and desktop extension. This is selected in the same place where you set the resolution.
Duplicating screen
If cloned, your desktop will appear identical on both devices. At the same time, the screen resolution is common for both devices, and it is impossible to set it differently, at least for now. If you know how this can be done, please write to me in the comments.