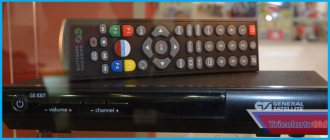
How to connect the Tricolor receiver to the Internet and TV
Almost every subscriber knows how to connect a Tricolor receiver to a TV.
But not every viewer knows how to establish a connection and receive a signal via the Internet. But the provider has provided such an opportunity, and therefore any client, if he devotes enough time to this topic, will be able to understand the peculiarities of the connection and the rules for installing equipment. The only difficulty that users may encounter is related to differences in the settings of different console models. Almost every existing receiver has its own characteristic details that need to be taken into account. Although in general the process of establishing a connection turns out to be extremely similar, and therefore if subscribers suddenly encounter difficulties, it will not be difficult to find the right solution.
In the most difficult situations, when it is impossible to do without outside help, viewers can call the support line and use the help of operators or call a technician to their home.
How to open a recorded file
Satellite receivers are regularly improved, turning from initially ordinary devices for receiving and converting signals into real multifunctional media centers.
Each of them comes with a detailed guide - how to record and how to open a file already recorded on your Tricolor receiver.
Therefore, read the instructions carefully, follow them, and everything will work out. Usually, the following steps are sufficient:
- Transfer the recorded video to a USB flash drive and connect it to the TV directly.
- On your computer, you will need to convert the file to some suitable format (for example, from ts to mkv in the TsRemux converter).
- Do not forget, for such an operation to be successful, a “fresh” K-lite codec pack must be installed on your computer.
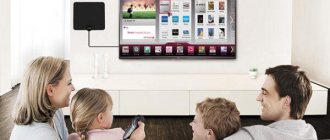
Available connection methods
The main advantage of connecting the Internet to the receiver is the ability to watch television and use Tricolor services without a satellite dish. Users will only have to configure the correct operation of the equipment and pay for online TV; they will not have to do anything additional. In this case, the process of setting up and connecting equipment to the Internet can occur in several ways:
- via a standard wired connection;
- via a wireless wi-fi network.
Typically, the connection occurs automatically, and the only task of subscribers is to control the process. But, if it is impossible to establish a reliable connection without human intervention, the system allows for independent manual configuration. It is extremely simple, but may require preliminary preparation and searching for reference information.
Description
“Manage the air” is a comprehensive service. It allows the Tricolor TV user to record broadcasts, as well as use the following functions:
- Pause while watching live broadcasts.
- Watch the show first.
- Access to the program archive.
The service is available free of charge to all subscribers who have an active subscription to the “Unified” package or any other. It can work both online and when receiving a signal via satellite. The list of available options will be slightly different. When connected to a satellite, you can pause up to 30 minutes, and also record content during the broadcast and according to a schedule. When you connect via the Internet, you have access to rewinding the broadcast and the TV archive.
The service supports the following models of receiving equipment: GS E521L, B521, B531M, B532M, B533M, B534M, B531N, B521H, B521HL, E501, E502, A230, 8307, 8308, 6301, B520, B522, U510, U210, U210CI, B210, E212, B211, B212.
Customers will also be able to use it on GS C211, C592, C5911, C5911 receivers with an active connection to the server and on systems with AC970 receivers, but only on a device acting as a server.
Connecting the Tricolor receiver to the Internet
To connect the Tricolor receiver to the Internet, you will need:
- connect the ethernet cable to the corresponding slot of the set-top box;
- wait for automatic connection;
- if automatic connection does not occur, use the remote control to open the receiver menu and switch to the settings section;
- find the “network” item in it and select the “auto” option in the mentioned item;
- if the connection is not established even after these steps, you should select manual mode and use the remote control to give a command to set the exact parameters yourself;
- in the window that opens you need to enter the IP address, gateway, subnet mask and DNS server;
- after which all that remains is to save the entered parameters and check the result.
It is worth adding that you can find out the exact parameters that will have to be entered manually from your provider. To do this, just call the contact number of the company involved in connecting the Internet.
Which Tricolor receivers can be connected to the Internet
The provider's official portal lists 15 models of receivers that are capable of reproducing broadcasts received via the Internet. All models offered by the operator begin with GS, so they are easy to distinguish from other devices. But technological progress does not stand still, and therefore the telecommunications company regularly updates its line of equipment. Therefore, when buying a dish and receiver, you should focus not only on the list, but also on the recommendations of the dealer, who knows exactly what equipment is available and best suits the client’s needs.
Where to go if you can’t connect yourself
If insurmountable difficulties arise with self-connection, you should choose one of the following methods to solve the problem:
- calling the telecommunications company's call center;
- a call to the dealer from whom the equipment was purchased.
In both cases, the responding specialists will explain which sections of the menu you need to enter and what commands you need to enter. As a last resort, they are able to accept a request for a visit from a technician who will prepare the equipment for operation and set the appropriate settings. But it is worth considering that his help will be paid. The cost depends on the complexity of the work and the client’s place of residence.
How to connect the Tricolor receiver to a TV via HDMI
Connecting the set-top box to the TV using an HDMI cable or tulip cable will not cause any difficulties and does not differ from the standard equipment assembly process. It is much more difficult to establish a connection with a wi-fi network.
To use a wireless connection you will need:
- open the settings menu and select the “Internet” section;
- select a wireless connection;
- indicate the appropriate network in the drop-down list;
- enter the network password using the on-screen keyboard;
- wait for the connection to be established.
If the network you need is not in the drop-down list, you should find it yourself by selecting “add network.” Then all you have to do is enter its name, indicate the encryption type and enter the security key for authorization. After completing these steps, viewers will be able to watch online television and use all the services of the provider. But it is worth adding that the recommended network speed should reach 12 Mbit/s.
Digital receivers Tricolor
Tricolor has a galaxy of receivers. Some were produced literally for two months, others longer. There is a significant difference between them. Interfaces found on the rear wall of the device:
- HDMI.
- Tulip.
- High frequency antenna output.
- SCART.
It is clear that rare people are happy with abundance, it is worse when there is no choice. Budget receiver models contain one HDMI. Before purchasing, check the equipment provided by the provider. Receiver brands change with firmware. Some require you to select a signal output, others broadcast the program to all connectors. In the latter case, each TV is connected by cable to individual interfaces, there are no problems. We recommend splitting even one HDMI. For a small hotel, an HDMI signal divider for the required number of TVs is suitable. Inside the box is an amplifier that allows you to increase the cable length.
The HDMI standard is constantly expanding. The restrictions of 10 meters, 35 meters have been overcome... Before purchasing, you need to know the version of the standard (receiver passport). According to the figure, select equipment and cable length. You can schedule the broadcast by room... only one channel. You can use video senders on cables using the WiFi standard. In the latter case, image transmission is not much different from organizing access to the Internet; the equipment will cost a pretty penny. But there are zero wires. Take the trouble to clarify the permitted transmitter power. Bands similar to WiFi are used: 2.4 GHz, 5 GHz.
We believe that the task of bifurcating a tulip will make a radio amateur smile; if the signal goes the indicated way, there should be no problems connecting two TVs. The method of using the SCART connector was described earlier, but it is not without problems. The full version of the standard is rarely implemented; only partial lines are used.
Make inquiries with the provider (the dealer does not know the intricacies). A typical high-frequency antenna video output represents a standard channel, for example, 38. Buy a splitter in the store with minimal attenuation (measured in dB, indicated by the case), use it.
What recommendations will we give?
- The provider offers to change the equipment, find out the timing of the replacement, the model of the receiver included in the kit, the possibilities. It’s easier to type in a request and search the forums. People willingly discuss the shortcomings discovered. By avoiding stepping on mistakes, you will show your intelligence by learning from the mistakes of others. Tricolor has a characteristic feature: receiver models change regularly. There is only one drawback: we don’t know in advance what the next one will appear (possibly worse than the previous one).
- On your first visit to the provider, hesitate to take the equipment. When you come home, calmly evaluate whether the interface is suitable. What restrictions apply to cables? Length. Wikipedia will provide information. As for those who like to do things with their own hands, handicraft connections of cords are equipped with high attenuation, the length in the literature is given without taking into account the plugs. You'll have to divide by two, taking the trouble to subtract the attenuation. As for amplification equipment, it costs money and is affordable for small hotel owners.
- Finally, if you want to connect two Tricolor TVs, look at the interfaces available on the back walls of the devices. You will need to develop a cable installation plan in advance. Rather, one TV will stand next to the receiver, the second will occupy the next room. It will be useful to know how many meters the cable of the selected protocol is (taking into account the version number obtained from the provider).
Let's add that you can connect the signal to the carrier using the help of an RF modulator. It costs about 2500 rubles, think about whether it’s really necessary.
A live example of a Tricolor TV receiver
Example. As of August 2014, in exchange for old receivers (the list is indicated on the website of the Tricolor TV provider), you can get a number of new ones:
At the request of the first one, we find a forum: there is a stupid explanation, but a photograph is posted here. It can be seen: the set of interfaces is as follows (excluding input ones):
- LNB OUT. Why is the beast needed? Repeater. The output is similar to the signal transmitted by the Tricolor satellite antenna. We'll hang a second receiver or computer here. Many plasma panels have their own built-in hardware; you must insert an access card. Will it work, it’s easier to ask the provider, he should give you a card. You can try at home in transit to set a signal to another consumer by borrowing a card from the main one. We believe that the receiver can behave differently. We avoid saying what the model will do. You can watch channels. What danger? Rare versions of the software correctly manage power on the loop. It becomes possible to burn the computer card and the receiver. It is useful to read the nuances on forums, avoiding getting into a puddle.
- HDMI is visible on the back wall. This means that the new Tricolor advertising slogan is being implemented by practitioners. FullHD is ready to enter the homes of the average person. How to split a channel into two or more has already been discussed.
- Finally, there is a tulip in the middle.
- You can see the USB interface, used to update the receiver software. On the right side of the case you can see the hole for the power plug.
Tricolor receivers are pre-configured for the provider. The first menu item is a list of channels. Channel search and editor are missing. It is possible to create a list of favorites. Don't be surprised by this feature.
From the description it becomes clear: the receiver outputs a signal to one output, connecting a second Tricolor TV will not be an easy task. Use a loop (you'll have to set it up manually), make a splitter, and be content with having to watch your wife's TV shows.
Archivally important for those connecting: the Tricolor receiver does not display the antenna signal level. For guidance, you will have to use third-party equipment (another receiver, a typical professional tweeter). We talked about it in detail in previous reviews. Before connecting the Tricolor to your TV, consider the pointing issue. When exchanging old equipment, avoid touching a plate that has already been aimed. It will be more difficult in regions where the transition to new satellites is underway. First aim at the spacecraft with an old receiver, then go for the exchange and enjoy FullHD.
Information site - about Tricolor TV
Home » Services
Reading time: 3 min Published: 02/01/2020 Category: Services
Tricolor TV users have access not only to watching television, but also to many additional services. They increase the viewer's comfort. One of these options is “Manage the air.” It allows you to record various programs and programs on Tricolor TV, opens access to the archive and allows you to pause the broadcast.
What does the Tricolor equipment set consist of?
The standard equipment set consists of the following components:
- Satellite antenna. The material from which the equipment is made is steel. The weight of the equipment is 3 kilograms. The kit also includes parts to secure the antenna.
- Satellite receiver. The equipment has been produced. The receiver supports Full HD video quality. An additional DRE module is also built into the receiver. The receiver searches for channels, displays information about the TV program and has a built-in TV guide.
- Converter.
- Receiver.
- Smart card. This card receives television signals from various channels. The number of TV channels received depends on the tariff plan chosen by the subscriber.
- Coaxial cable. Connects directly to the TV.
You can purchase a complete set of equipment for connecting to satellite television from the online store at shop.tricolor.tv. You can also contact one of the company's dealers. When purchasing from dealers, always check for a certificate, otherwise they may sell you a low-quality product that will not work. The Bashtel company received good reviews; the Internet from this provider is of decent quality. And in Moscow the Svyazinform provider is becoming popular.
How to open a recorded file
Satellite receivers are regularly improved, turning from initially ordinary devices for receiving and converting signals into real multifunctional media centers.
Each of them comes with a detailed guide - how to record and how to open a file already recorded on your Tricolor receiver.
Therefore, read the instructions carefully, follow them, and everything will work out. Usually, the following steps are sufficient:
- Transfer the recorded video to a USB flash drive and connect it to the TV directly.
- On your computer, you will need to convert the file to some suitable format (for example, from ts to mkv in the TsRemux converter).
- Do not forget, for such an operation to be successful, a “fresh” K-lite codec pack must be installed on your computer.
How to connect a flash drive to a TV in order to watch a movie downloaded from the Internet, photos from a vacation, or listen to musical compositions is a question often asked by owners of modern models.
Almost all new panels are equipped with a USB connector for connecting a flash drive. If there is no connector on the TV, then this problem can be easily solved with special devices. You should also know that you can only download movies or other materials to the media from certain portals and in formats supported by the device.
Price of equipment and installation
The cost of the equipment depends on the model of the receiver included in the kit. The company offers the following sets for connecting to satellite television:
- with GS B532 receiver. The cost of this kit on the company’s official website is 7990 rubles;
- with GS B532M receiver. The cost of the kit is 10,990 rubles;
- with CAM module Cl+. Cost 6499 rubles.
You can find out how to connect Tricolor TV to your TV yourself below. However, if you are unable to complete the installation, then you can contact special companies involved in the installation of satellite dishes. The cost of installing Tricolor TV varies in different regions:
- for satellite dish GS B532 - from 2000 rubles;
- for satellite dish GS B532M - from 2500 rubles;
- for equipment with a Cl+ module - from 1500 rubles.
GS U510
Let's take a closer look at another model equipped with a recording function - the GS U510. Among the main technical characteristics it is worth noting:
- Ability to record SD and HD TV programs in a special PVR format.
- Full support for video files in 1080p, 1080i, 720p, 576p, 480p and others.
- Compatible with DVB-S/S2 standard criteria.
- Delayed viewing option, rewind during live broadcast.
- Latest software and Linux operating system.
- Supported decompression of MPEG-2/MPEG-4 files.
- High-quality video playback from external media.
- High-speed interaction with tablets, laptops and smartphones.
- Integrated applications: Tricolor TV cinemas, TV Guide, TV Games and more.
- Extended package of additional options: subtitles, teletext, EPG and others.
- General hardware acceleration and performance.
How to install Tricolor TV yourself step by step
Installing Tricolor is not difficult if you proceed step by step:
- Choosing the optimal location for the plate . It is recommended to install it so that it has a free direction towards the satellite, that is, there should not be any objects in this direction. It is also recommended to mount the dish closer to the TV, as this will greatly simplify the setup process. Recommended placements : balcony, walls of the house near the window, roof of the building. Not recommended places : the inside of the balcony, a place where a large amount of natural precipitation will fall on the plate.
- Equipment assembly . It is recommended that you first study the assembly instructions that come with the equipment.
- first of all, you need to secure the fastenings to the selected location;
- Next, the converter is installed. It must be installed so that natural precipitation does not get inside;
- Now you need to connect the cable to the converter. Then seal the joint along the entire length using electrical tape or a special tube. You can also apply a layer of silicone sealant;
- After connecting the cable, you need to secure the plate to the selected location. The plate must be secured so that it can be moved in different directions.
- Installation of the Tricolor antenna is impossible without adjustment:
- go to tricolor website. tv and find the azimuth and angle data for the nearest city there. After this, adjust the plate according to the data found. Azimuth, it is recommended to set using a compass;
- now you need to connect the cable that goes from the converter to the digital receiver;
- After this, the receiver is connected to the TV using a cable.
- Setting up TV channels. In order to catch more TV channels, you first need to achieve a high signal level from the satellite. To do this, you need to rotate the plate in different directions until you get the best result. If the signal level does not reach 70%, then try reconnecting the cable to the equipment. Also, the signal may be poor due to weather conditions. For example, in high clouds, during heavy rain or snowfall, the signal level can reach 0%. As soon as you achieve a high signal level, proceed to search for TV channels. To do this, go to the TV menu and select the appropriate “Channel Search” tab. Channels will be found automatically. To get more TV channels, you need to subscribe to a more expensive tariff plan.
Have you installed a set-top box, but can’t set up YouTube on your TV? Read our special review: Why YouTube doesn’t work on Smart TV - and you can troubleshoot it yourself!
Setting up the Tricolor GS B626L receiver.
GS B626L is a digital dual-tuner set-top box (receiver-server), running on an Ali processor and Stingray software. The receiver receives channels in standard (SD), high (Full HD) and ultra-high definition (Ultra HD/4K). Channels can be watched via satellite dish or via the Internet. It is possible to stream content to a second TV when used in conjunction with the GS C591, GS C5911, GS C592, GS C593 or GS Gamekit/AC790 (client) receivers. In this case, a 2-output converter must be installed on the satellite dish and a coaxial cable must be connected to the LNB 2 IN connector of the server receiver. The smart card is not used on this receiver. The receiver ID is built into the main board of the receiver itself. There is a built-in Wi-Fi module for connecting to a local network to view content over the Internet.
In this article, we will review the GS B626L receiver, consider setting up the receiver to view channels via a satellite dish and via the Internet via Wi-Fi, learn how to check the signal quality on a satellite dish and how to reset it to factory settings.
Exterior of the box.
The delivery set is indicated on the box.
The box contains:
- Digital receiver
- Remote control (RC)
- 220 V power supply adapter (Power supply)
- User documentation set
Also included in the package are an HDMI-HDMI cord (1) for connecting the receiver to an LCD TV, an IR cord (2) for receiving commands from the remote control when the receiver is not in direct view of the remote control (for example, the receiver is located behind the TV), branded salt batteries Tricolor 2 pcs. (3). They are issued separately.
Receiver appearance.
The front panel has a blue backlit display. On the top cover there is an on/off (1) and a button to turn on the Find Me (activate the search for the remote control). This feature works with a special model remote control that is purchased separately and will be available in future versions of the receiver software.
Receiver rear panel.
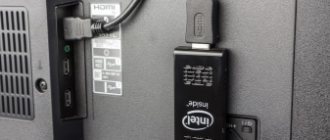
- LNB1 IN MAIN ”/“ LNB2 IN connectors . Connectors for connecting cables from the satellite dish converter.
- HDMI connector . Connector for connecting the receiver to a TV using an HDMI cable.
- USB 3.0 connector . Connector for connecting USB storage devices.
- USB 2.0 connector . Connector for connecting USB storage devices.
- IR connector . Connector for connecting an external infrared receiver (IR receiver) for signals from the remote control. When connecting an external IR receiver, it is possible to process the remote control signals using the front panel of the receiver.
- AV connector. Connector for connecting the receiver to a TV using a Jack 3.5 mm - 3RCA cable.
- LAN connector . Connector for connecting the receiver to a local network.
- Connector "12 V 3 A" . Connector for connecting the receiver power adapter included in the delivery kit.
There is a slot for a SIM card (smart card) on the right side, but it is not used in the current version of the software.
Display with pleasant blue backlight. Unlike previous models, which used bright white backlighting, the blue backlight is not so striking.
Remote control (RC). Model DDL-1034.
We connect the receiver to the TV using an HDMI cable (LCD TV) or using Jack 3.5 mm-3RCA (CRT TV).
Setting up the GS B626L receiver to view channels via a satellite dish.
We connect the coaxial cable from the satellite dish to the receiver. We turn on the receiver, loading occurs.
The Setup Wizard menu appears .
Select the receiver operating mode : Satellite and Internet .
Select the menu Time zone . In my case, Yekaterinburg time (MSK +2) .
Click Next .
Next again.
The Tricolor client registration menu appears .
The equipment has already been registered by the dealer. Therefore, we select Skip registration.
Select Operator.
This receiver is registered as Tricolor Center. Select Tricolor Center . In the lower right corner, with the satellite dish properly configured and the converter in working order, the signal quality should be at least 45%. This is a great signal. In my case 47%. According to the device for tuning the satellite signal, this equals 87%. Attention! The scale gradation of the receiver and the device for tuning the satellite signal do not match. On different receiver models under the above conditions, the signal quality scale on the TV screen is different.
Click Continue .
The list of regions will be .
My region is Moscow +2 hours. Select Start search .
Tricolor TV channels will be searched.
When the channel search is complete, the Search Complete . Select Save .
Next, select Do not show again .
Click OK .
The Main Menu will appear . To prevent this menu from being displayed the next time you turn on the receiver, you need to disable Display of the main menu in the settings. Otherwise, after each turn on, you will constantly need to press the Exit on the remote control. We will do this later.
In the meantime, let's go to Settings .
Settings menu appears .
Select Receiver Settings .
If you do not want the receiver to go into standby mode (turn off) when inactive from the remote control after 3, 4 and 5 hours (the default is 3 hours), go to the Automatic shutdown item.
Click Right .
Go to the item Automatic shutdown .
Click Right .
Select Off .
Click Exit .
Now let's move on to disabling Main Menu Display .
To do this, go to Interface .
Click Right .
Go to the item Automatic display of the main menu .
Automatic display of the main menu checkbox is turned off by clicking the OK . A red stripe will appear. That's it, we disabled this menu. Exit the settings menu.
The Info channel will turn on.
We check the receiver software version (3 menu item Status ) and the module software version (4 menu item Status Tricolor TV button on the remote control . In this case, the software is current and does not require updating. Exit the Status by clicking Exit .
The setup is complete. The channels will be decoded (begin showing) within 10 minutes, but no later than 8 hours.
Checking the signal quality of the GS B626L receiver.
During operation of the satellite television set, the satellite antenna may move due to sudden gusts of wind or direct contact with snow/ice when it slides off the roof. To check the maximum antenna setting, you need to turn on the receiver on the First Channel broadcast in SD quality by pressing button 1 on the remote control. Then press the i buttons (red button) and then FAV (blue button).
Channel Options menu appears . In the lower right corner of the TV screen there is a Quality . The quality must be at least 47%. If the quality is lower, you will have to tune the antenna to the satellite. To exit the menu, press the Exit .
Setting up the GS B626L receiver to watch channels via the Internet via Wi-Fi.
We turn on the receiver, loading occurs.
The Setup Wizard menu appears .
Select the operating mode of the Internet .
Select the menu Time zone . In my case, Yekaterinburg time (MSK +2) .
Click Next .
Network Settings menu appears .
Select Wi-Fi .
Available access points are displayed.
Select your access point and click OK .
OK again .
Enter the password and press Enter with a blue underline.
The following menu will appear.
Select Connect .
The receiver will connect to your access point.
Click Exit .
Then Next .
The equipment has already been registered by the dealer. Therefore, we select Skip registration.
The Select Operator menu appears .
This receiver is registered as Tricolor Center. Select Tricolor Center .
Select Finish setup .
Disabling the Automatic display of the main menu and disabling or changing the time of the Automatic shutdown of the receiver are carried out in the same way as in the previous configuration of the receiver.
After exiting the settings, the Info Channel .
When you press the OK button, a list of channels with logos of these channels will appear. The ball next to the letter P indicates that this channel is broadcast via the Internet.
And if, when the list of channels is displayed, you press the red button i , then the channel logos will disappear and the channels will be displayed more crowded on the TV screen. The list of channels broadcast via the Internet and satellite is different.
Reset GS B626L receiver to factory settings.
If the receiver turns on/off very slowly, switches channels slowly, or the receiver freezes, it is recommended to reset to factory settings. To do this, press the Menu . Main Menu is displayed .
Go to Settings .
Settings menu appears .
Go to Receiver Settings .
The following menu will appear.
Let's move to the right .
Select Reset to factory settings .
A menu will pop up warning you that all data will be deleted.
Press Left Continue item active and press OK .
The receiver will reboot.
The Setup Wizard screen appears .
Further configuration of the receiver is described above.
Setting up the GS B626L receiver is practically no different, except for connecting via Wi-Fi, from setting up other GS receivers when using the latest software versions.
Self-registration of a subscriber: instructions
Registration of Tricolor TV is necessary to gain access to television from the operator.
Gaining access is carried out in two stages:
- passing registration.
- viewing activation.
Register Tricolor TV yourself:
- You can register on the official website.
- First, you will need to indicate the ID number that is indicated on the purchased smart card.
- Next, indicate the model and serial number of the purchased digital receiver.
- In the next section, the subscriber is required to provide personal information: full name, date of birth, series and number of passport, as well as date and place of issue.
- Then the address of installation of the equipment is indicated.
- In the last section you must indicate the subscriber's contact information.
View activation process:
- Turn on any channel on your TV.
- Wait for the broadcast picture to appear, it will appear later than 8 hours later. In this case, the TV can be turned off, but the receiver must remain on.
- After this, viewing activation will be completed successfully.
Not everyone can successfully install Tricolor TV on their own. Therefore, in case of problems, it is better to contact the company for support.
Video “Registration of Tricolor TV”
Why is this necessary?
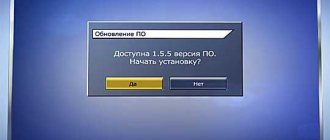
The software gives the user an interface to interact with the functions that are offered by the supplier. Large update packages from TricolorTV allow you to upgrade the receiver to use new services, such as Multiroom or Cinema, as well as correct errors that arise in the operation of the previous version of the software and make viewing difficult.
In addition, when new services are implemented, the software of the receivers may change, and a non-updated version may simply not support the functions that you want to use. This even leads to blocking access to certain subscription channels, general system lags and equipment failure. The introduction of new channel encoding also requires updated software that could withstand the increase in satellite communication throughput.
It is recommended to check for updates every couple of months. In addition, TricolorTV posts the dates of expected updates on its website - you should not ignore them, otherwise you may miss your favorite TV show one fine evening or be left without access for a couple of days (remember that calibration and new channel search can take up to 8 hours) .
How to connect Tricolor without a receiver to a TV
Simply purchasing equipment for receiving satellite television is not enough; you need to know how to connect and configure it correctly. It is best to handle such a task by an experienced TV technician who knows all the features of the correct operation of such equipment. But, if you don’t want to wait for a specialist’s visit and don’t want to pay him for the work done, you can try to figure out the connection yourself. To do this, you should find out in advance how to connect the receiver to the TV and strictly follow the instructions received. If you comply with all the most important requirements and do not deviate from the planned action plan, the entire procedure will take no more than an hour, and often it takes much less time to complete it. In this case, the result will be close to ideal.
Where to start
In order not to encounter unexpected difficulties, to get rid of the need to buy additional equipment and spend money, you should carefully approach the purchase of equipment. It is necessary to ensure that the slots on the TV coincide with the cable input on the receiver. There are 3 options in total:
- modern HDMI cables;
- SCART or RCA cable (bells);
- standard antenna wire (tulip).
If you do not ensure compliance, you will have to buy an additional cable that will help connect the two devices. This will lead to additional inconvenience and expense, which is best avoided. Moreover, you don’t have to do anything special or complicated, you just need to be careful when buying a receiver.
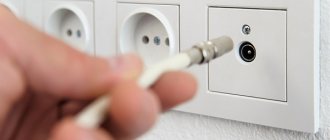
Antenna connection
The simplest part of connecting purchased equipment is connecting the receiver to the antenna (to one dish, regardless of the number of TVs). To connect you will have to:
- prepare a coaxial cable;
- expose the central core of the cable by unscrewing the braid onto the insulating wire;
- make sure that the braid does not come into contact with the core;
- connect F connectors to both ends of the wire;
- connect the cord to the antenna converter;
- insert the second end into the LBN in the receiver input;
- attach the cable to the satellite dish.
It is necessary to ensure that each mount is secure, otherwise the signal quality will suffer.
How to connect a Tricolor receiver to a TV via a tulip
Connecting the receiver to the monitor is not difficult, despite the cable option chosen by the subscriber. The only condition for proper connection is the correct choice of slots. But, given the difference in the shape of the connector, it will be almost impossible to make a mistake.
Special attention must be paid to checking the connection. Those who connect via tulip will need:
- turn on the equipment;
- switch to channel zero;
- start search;
- wait for the message “no signal” to appear.
It is this inscription that will signal the correctness of the actions.
The main differences when connecting other wires are the need to turn on other channels.
To perform the initial setup, you must press the A/V button on the remote control.
How to connect a second Tricolor TV receiver to one antenna
The choice of technology is also of great importance in cases where signal transmission to two monitors from one dish is required. Users are required to select a dual-tuner set-top box and purchase a client receiver. If all of the above is already available, you must:
- connect the equipment by connecting the cable to the appropriate slots;
- configure the main receiver using the standard method already described above;
- repeat this procedure with the second TV.
It is important to remember that for a reliable, correct connection of two set-top boxes when setting up, by opening the section related to choosing a network, you will need to select the “server” item.
In cases where subscribers have used wireless communication via Wi-Fi, you need to select a router that supports communication between two devices. There are no other noticeable differences in 2021.
Connecting Tricolor TV to a TV without a receiver
The most modern and advanced users who own Smart TV should figure out how to connect Tricolor to a TV without a receiver. Modern digital technology allows you to get rid of unnecessary wires and limit yourself to using a small module. To connect it you will need:
- find the slot on the back of the monitor (sometimes you need to install the CL adapter that comes with Smart TV);
- insert the Smart card into the purchased module;
- install the module into the slot (you need to make sure that it is inserted all the way);
- check the operation of the equipment by performing the initial setup.
If you cannot receive a signal without a receiver, you should check the reliability of the adapter and module. In the most difficult situations, when the correctness of the connection is beyond doubt, but it is not possible to receive a signal, you will need to call a teleworker who can set up the equipment. To apply for a specialist visit, you should call 88005000123. But it is important to remember that the specialist’s help will require an additional fee.
Connecting a portable hard drive
External hard drives are incredibly easy to use; they do not require special knowledge or unnecessary movements. They are simply connected to the TV via USB using a special cable. Moreover, HDDs do not require a separate power source, as they receive the necessary energy from the device to which they are connected.
Any TV has several USB connectors, which are usually located on the back panel. To connect a drive, you need to find one of them labeled “HDD IN”.
The example used was LG, but if you have a TV of another brand, for example Rolsen, Philips, LG, Sony or Samsung, the connection diagram will be similar.
It is through this that the hard drive connects to the TV. Just connect the cable, after which you will see a message on the screen stating that the hard drive has been successfully connected and is ready for use. After that, select the hard drive using the remote control and open the required file.
Couldn't fix the problem? Contact a specialist for help!
It is recommended to use drives that support USB 3.0. They are the fastest to date, which will make using your device as comfortable as possible. The difference in performance is especially noticeable with large volumes of data.
But if you connect the drive to an old Samsung TV with USB 2.0 support, then it will work using 2.0 technology, even though your hard drive supports more modern technology. Therefore, take this factor into account when choosing and purchasing a drive.
Software is improved several times a year - with such a pace of progress, it is necessary to update it in a timely manner on any equipment, be it a smartphone or a laptop. This also applies to television equipment. And, although many TVs are not equipped with any processor or software, receivers and satellite signal access modules have software for the coordinated operation of all system components. And it needs to be updated regularly.