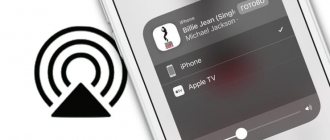
In a recent article we talked about ways to connect a mobile phone to TV. But the telephone is not the only device capable of broadcasting an image to the TV screen. There are others - for example, laptops. And they have no less opportunities in this regard. So, today we’ll talk about how to connect a laptop to a TV via Wi-Fi and wired interfaces.
What is Miracast
Miracast on Windows 10 is a unique technology developed by Microsoft that allows you to project images and sound to any device that meets certain requirements. The main condition for its operation is the presence of a Wi-Fi module built into the equipment.
Wireless image transmission function
Note! The key advantage of the technology is the complete absence of wires, which ensures higher mobility and operational safety.
Best Alternatives for MIRACAST for PC
Here are a couple of perfect alternatives for MIRACAST for PC
TUBE CAST
Tube cast is one among the absolute best technology to play YouTube videos on your PC. you'll watch videos on Xbox one and Xbox 360.
To install with these steps:
- – First download Android emulator (blue stacks)
- – Run and install blue stacks
- – Open in Google play store
- -Type Wi-Fi display (TUBE CAST) for PC
- – Click on the app and download it
After successful download, open the app using blue stacks installer
Once installation is complete, TUBE CAST is prepared to be used. Or alternatively you'll
Type “download Tube cast app”
Select the link: “https://www.microsoft.com/en-in/p/tubecast-for-youtube/9wzdncrdx3fs?activetab=pivot:overviewtab
Click the download button and install from the link
AIRSERVER
This application helps to mirror the screen of any compatible devices or PC, this app is comparatively not free, however you get an attempt period of 7days.
To download and install:
- – First download Android emulator (blue stacks)
- – Run and install blue stacks
- – Open in Google play store
- -Type AirServer for PC
- – Click on the app and download it
After successful download, open the app using blue stacks installer
Once installation is complete, AirServer is prepared to be used. Or alternatively you'll
Type “download AirServer app”
Select the link: Download”Download ‹ AirServer” https://www.airserver.com
Click the download button and install from the link
SQUIRRELS AIRPARROT 2
This is an ideal alternatives for MIRACAST users and for people that desires quality streaming. Another interesting fact is that you simply can multitask with this App.
To download and install, you:
- – First download Android emulator (blue stacks or Nox player)
- – Run and install blue stacks
- – Open in Google play store or App store
- – Type Squirrel AirParrot 2 for PC
- – Click on the app and download it
- – After successful download, open the app using blue stacks installer
- – Once the installation is complete, Squirrel AirParrot 2 is prepared to be used. Or alternatively you'll
Type “download Squirrel AirParrot 2”
Select the link: AirParrot Remote on the App Store” https://apps.apple.com/us/app/apple-store/id1078412469
Click the download button and install from the link
X-MIRAGE
This App is one among the simplest, multitasking and an honest alternative for MIRACAST. it's the capacity to reflect and stream content from IOS device to windows.
To download and install, you:
- – First download Android emulator (blue stacks)
- – Run and install blue stacks
- – Open in Google play store or App store
- – Type X-Mirage for PC
- – Click on the app and download it
- – After successful download, open the app using blue stacks installer
- – Once the installation is complete, X-Mirage is prepared to be used. Or alternatively you'll
Type “download X-Mirage app”
Select the link: www.x-mirage.com/download.html&geid=NSTN&hl=en-US
Click the download button and install it from the link.
SQUIRREL REFLECTOR 2
This App allows you to record the streaming content, broadcast the video on YouTube and make live streaming on YouTube.
To download and install, you:
- – First download Android emulator (blue stacks)
- – Run and install blue stacks
- – Open in Google play store or App store
- – Type Squirrel Reflector 2 for PC
- – Click on the App and download it
- – After successful download, open the app using blue stacks installer
- – Once installation is complete, Squirrel Reflector 2 is prepared to be used .
How is this technology used?
Miracast is supported by modern Windows operating systems (7, 8, 10). It is designed to broadcast images or sound to other devices via Wi-Fi. For example, you can redirect the video stream from the monitor screen to the TV, duplicating the picture. You can also select the screen enhancement feature. In this case, the desktop will be divided between 2 or more monitors. This is especially convenient if you simultaneously work on your computer in several programs that do not fit on the space of one monitor.
Miracast supports audio files in LPCM, Dolby AC3 and AAC formats. More than 50 video file formats are also supported, including those for broadcasting to mobile devices. The maximum possible resolution is 1920x1080 pixels. Thus, you can easily broadcast the image to other monitors and TVs in FullHD format.
Windows 10 already provides this feature, so setting up Miracast is easily done in Windows itself. Also, the Intel WiDi function is often found on TVs and other media devices. This is an alternative technology from . The company has stopped its further development, but WiDi can be used if it is present on your monitor. Miracast technology will be indispensable if you want to give a presentation or play your favorite computer game on a large TV. The quality of video and audio is at a high level, comparable to transmission via an HDMI cable.
Advantages and disadvantages of technology
Miracast has many different benefits, including:
- well-established technology that allows you to stably transfer “heavy” media files using the IEEE 802.11n standard;
- a router is not required to establish communication between devices;
- WPA2 technology is used to protect data;
- minimal signal delays and resynchronization;
- ease of detection of other devices;
- support for 3D content.
There are practically no significant drawbacks, except perhaps the limitation of the maximum resolution at the FullHD level, at a time when 2K and 4K monitors are actively starting to appear. A small drawback is the lack of a recognizable logo. This is largely the reason why not everyone knows about Miracast. Among the closest analogues, we can highlight Apple AirPlay technology.
Despite its obscurity, Miracast technology offers truly broad opportunities. With its help, without unnecessary manipulations on Windows 10, you can start broadcasting from a computer or laptop to other devices. A large list of audio and video formats is supported. It is possible to project an image from a smartphone to a TV or computer over the air, eliminating the need to create a wired HDMI connection. It is likely that developers will soon add the ability to broadcast video in resolutions greater than FullHD.
Description
Miracast is a technology that “streams” content using a wireless network. Users of new OS Windows can use this feature without additional settings. Use Miracast to stream videos, photos and music from your computer to third-party devices that support this technology. Miracast transmits the “picture” from the computer screen to third-party devices using a wireless network, that is, without additional cables. Smart TVs, mobile devices, projectors and other devices can receive broadcast content. To broadcast via Miracast, you do not need digital signal cables HDMI, VGA and others. All data is “transmitted” via Wi-Fi wireless technology. To fully “broadcast” multimedia, the mobile device and TV (another screen) must be connected to the network. Both devices (“transmitter” and “receiver”) are synchronized at one access point.
Using a router
Using a router, you can connect your mobile device to your Samsung TV. To do this you need to do the following:
- Go to the main menu of the TV, find the “Network” submenu, click on “Wireless Network”.
- From the list of available WiFi networks, select yours and enter the network security key.
Useful article: All ways to connect TV to a computer
After these steps, you can see and play media files from your phone via TV (provided that it is also connected to your home network).
Key Disadvantages
- If you want to download Miracast for free on Windows 10, then be prepared for the fact that you may encounter unplanned compatibility problems.
- There is no way to do without the closed H.264 codec if you need to transmit video.
- High resolution (1920×1200) will not work.
- Due to its limited functionality, Microsoft's product does not look very good, especially compared to its competitors.
- If the receiver and source are located far from each other, then sudden malfunctions are inevitable.
Transferring pictures with Miracast is the best for Windows 10
To take advantage of the new technology, you need to download the appropriate drivers, which are available on our website. Moreover, we have a Russian version of this software, which will allow you to understand this technology a little faster. So, this technology can provide you with the following conveniences and benefits:
- Possibility of abandoning annoying and inconvenient wires;
- The connection and configuration process is simplified as much as possible;
- Sometimes mobile devices simply do not have a corresponding input for the same HDMI cable;
- You don't have to use a wireless network. Just like the router itself;
- To work with this technology you need a fairly convenient adapter.
To use this technology, you just need a Wi-Fi adapter, the drivers themselves to use it, and the latest operating system with all the updates. If these conditions are met, the connection process via the latest type of wireless connection will be very simple. Of course, some older devices (TVs, etc.) will not be able to support this technology. But it is quite possible to solve this problem if you purchase the appropriate device in advance - an adapter for Miracast. To organize image transfer using this technology, all you have to do is download the necessary drivers for Windows 10 from our portal and install them on your devices. The Russian version is desirable, which we also have. Otherwise, you simply shouldn’t have any problems with such a new product, which can work even with older devices.
If you managed to set up Miracast, then you will be able to transfer data between devices without the need to use wires.
Setting up a Miracast wireless display
You can connect image playback to a TV or other monitor by following clear instructions. But, in addition to video, the service also allows you to broadcast sound. It is usually output to the speakers of the connected device. If you need to send it through your computer speakers or other acoustic system, then you should specify in the settings where to output it.
Miracast technology allows you to organize a wireless connection between your computer and another device to broadcast audio and video. You can take advantage of all the benefits of the option quite easily (all instructions and menus are in Russian, the interface is intuitive). However, difficulties may arise during operation. Their cause is incorrect operation of drivers or hardware. If you download Miracast again to a Windows 10 computer, you will not be able to solve the problem; you will either need to reinstall the drivers or purchase more modern equipment.
Miracast Features
- Transmitting and receiving a wireless signal - it is possible to transmit sound and picture.
- The completely Russian version of this application is available for download from our website.
- The connection of two devices is carried out via a separate communication channel - a router is not required to complete the task.
- Strong compression of multimedia files is provided - if they are too large, then this fact will not affect the speed of information transfer.
- Supports video broadcasting in the popular 3D format.
- Due to the high data transfer rate, the gamer can play without any freezes and other “brakes” - an excessive drop in FPS in resource-intensive video games can be avoided.
- A simple interface that will be understandable to absolutely any user.
How to check for Miracast on Windows 10
- After opening the system search bar, type Miracast. Once entered, the only available tab will automatically appear. Click on it.
- After clicking, the “Project to This Computer” section will open with system parameters. Here you can read important information, which is written in red.
How to enable Miracast Windows 10
Connections can be made to wireless monitors, TVs and computers that use Miracast or wireless docking stations. All the user needs is a Wi-Fi adapter, which is found in all laptops, and is often purchased separately for a computer with wireless connection support. Before connecting to the display, you must turn it on and activate Miracast technology in the settings of your TV or other device.
- Press the keyboard shortcut Win+P and in the pop-up window select screen projection select Connecting to a wireless display.
- Next, in the list of search results for wireless displays or audio devices, select the desired TV.
You can also add a device in the Windows 10 operating system using the updated system settings. The user just needs to go to the settings and click the add device button, the operating system itself will search for available devices.
- Open Start > Settings > Devices > Bluetooth & other devices .
- Next, click the Add button Bluetooth or other device, and in the window that opens select Wireless display or dock.
- The last step is to select the below detected device to connect to the display.
Instructions for launching and connecting via Miracast
If all devices meet the requirements, then you can try to establish communication between them via Miracast/Intel WIDI. There are several methods.
equipment requirements
Wi-Fi Direct Windows 7 - how to enable technology
For Miracast to function correctly, you need:
- appropriate adapter in all devices, which must support the required standards;
- the processor must be at least third generation Intel or its equivalent;
- wireless module supports NDIS version no less than 6.3 and the corresponding standard;
- The driver must ensure operation of the equipment using WDDM technology version no less than 1.3.
Via "Connect to a wireless display"
The classic method is to use the standard Windows interface. Let's look at connecting Miracast using the example of a modern TV. The instructions include the following steps:
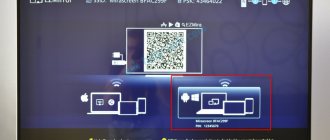
- On the TV, activate detection and turn on Miracast, if this function is displayed in a separate menu. The picture below shows an example for LG.
- Next you need to do one more action. Press WIN+P on the source keyboard, and then click on “Connect to a wireless display.”
- In the list, click on the desired TV. Wait for the synchronization to complete.
The image from your computer should appear on the TV if the "Repeating" option is selected. Clicking Second Screen Only will turn off your laptop or PC display so you can control the system using your TV.
Through the "Options" section
There is an alternative method that allows you to set up projection. If you suddenly don’t have a keyboard or some keys don’t work, use the following setup method, which only requires a mouse:
- Activate Miracast on the receiver device in the same way as the previous instructions.
- Connect to the network provided by your TV through the corresponding icon at the bottom right of the screen on your laptop/PC.
- Go to system settings and click “Devices”. In the “Connected devices” subsection, click on “Add...”. Then you need to select your TV from the list.
- Wait for synchronization and make sure that the picture appears on the receiver device.
To change the display principle (repetition, expansion, etc.), you need to open the projection menu via WIN+P. An alternative option is through the notification icon on the right side of the screen (in case the keyboard is not available).
Nuances when connecting via WiDi module
If you use Intel WiDi technology, then you need to consider a number of requirements, in particular:
- Requires a 2nd generation Intel i3, i5 or i7 processor or higher. The third and second generations are not supported by Windows 10.
- Network card with WiDi support.
- Windows 7 and later.
- Special software. Not required for Windows 10.
On the company's official website there is a list of adapters and graphics solutions that are necessary for full operation of Intel WiDi. Pairing of devices occurs through a special program of the same name, which will need to be installed. Like Miracast, Intel's solution allows you to choose between repeating and expanding the picture.
Please note that if the software immediately displays a message that your computer or laptop does not support this technology, then you should not try to start image transfer using workarounds. Intel specialists clarify that full WiDi functionality and stable operation are guaranteed only on devices running Windows 10 that meet the system requirements.
Settings
There are many ways to customize Miracraft. The user can choose the most convenient option for him. Regardless of the method used, the result will be the same.
Keyboard shortcut
Enabling and configuring Miracast using a keyboard shortcut takes literally a few minutes. How to enable Miracast on a laptop with Windows 10 is shown in the instructions:
- Activate the wireless network on your PC. You should also enable this feature on your TV or connected device.
- Press keyboard shortcut Win+P on the keyboard of a laptop or computer (works also on the on-screen keyboard).
- This will bring up the Projection . At the very bottom of the panel that pops up, you need to click on “Connect to a wireless screen” .
- After which the display will show that a search is in progress for devices available for connection. When it ends, select the required display from the displayed list.
- As soon as the connection is made, the computer desktop image will be displayed on the second screen.
Advice! It is recommended to find out in advance how exactly the name of the TV is displayed when searching for devices available for connection.
System parameters
To set up a wireless connection between two displays, you need to do the following:
- Go to the Start and go to Settings . This can also be done using the key combination VIN+I .
- Go to panel "Devices".
- Through the side menu, go to the “Connected devices” . Here it is possible to connect a PC to a new one by clicking on “Add device” .
- After this, the system will search for available gadgets. You must select the one you need from the list that appears.
Via WiDi
There are other technologies similar to Miracast. One of them is WIDI. It is also supported by modern TVs and screens. But unlike Miracast, it requires installing additional “Intel Wireless Display” software to work.
Widi is good because it can be used to connect to a laptop even a TV that does not have a Wi-Fi adapter. The connection in this case goes to the receiver, which in turn has a direct connection to the screen.
DLNA server
This technology will work if both devices support Miracast and DLNA technologies, and both are connected to the same WiFi network. Step-by-step instructions for Android smartphone users on how to connect their phone to a TV via WiFi as a media server will look like this:
- Go to the Play Market and find the DLNA Server application there.
- Next, you should open the program and add a new server, which should be given a name - the name of your home wireless network.
- We go to the “Root” submenu to select the folders that need to be shared in order to view their contents on the TV.
- In the main menu, activate the newly created server.
- Open the TV settings. In the “Video” submenu, select this server to connect to.
- All folders available for viewing will be displayed on the TV screen.
Now you can open photos, videos and audio on your TV directly from the directory of your mobile device. This method does not imply the ability to broadcast the smartphone screen to TV. For iOS devices, the connection procedure is slightly different. For Samsung Smart TV you will need to download a special application. Instructions on how to connect a smartphone to a Samsung TV:
- Make sure both devices are connected to the same access point.
- Afterwards we install the AllShare service on TV.
- For iPhone, download the application from the AppStore to connect to the TV. You can choose from Belkin MediaPlay, iMediaShare, TV Assist, Twonky Beam. The principle of operation of the programs is not much different from each other.
- In the application menu, select the one you need from the list of available devices.
Controlling sound when using Miracast
When properly connected, sound should automatically transfer from source to receiver. Volume control is usually necessary on the receiver. If you stream video from your phone to a TV, then change the sound directly on the TV. If there is no sound, check whether it is turned on on the receiving device, or change the volume switch on the source. Problems may be due to incompatibility, since Miracast is not correctly supported on all TVs, mobile phones and tablets.
Via USB
As a last resort, when you cannot set up a wireless connection due to the fact that the TV model is outdated or due to other reasons, you can use a regular USB cable to transfer the picture. You need to insert one end into the corresponding connector on the TV, and the other into the phone, and then select the signal source - USB using the remote control. Now the TV screen shows all the contents of the phone for viewing.
Problems and difficulties
I'll tell you right away. If you have a desktop PC, then you need to buy an external Wi-Fi adapter with Miracast support.
Let's look at the main troubles that can cause the video to fail to be displayed:
- There is no "Connect to a wireless display" button on Windows 10 PC;
- Can't connect to wireless screen.
Miracast does not work, the “Connect to a wireless display” option is missing
If you press Win+P in Windows 10 and see the message “Your PC or mobile device does not support Miracast and cannot project wirelessly” or there is no option to “Connect to a wireless display”, your hardware or driver may not support Mitracast.
To check for Miracast support at the Wi-Fi adapter level, open a command prompt and run the command:
netsh wlan show driver
If the command results contain the line:
Wireless Display Supported: No (Graphics Driver: Yes, Wi-Fi Driver: No)
This means that the graphics driver supports Miracast, but the Wi-Fi driver does not.
In my case, updating the Wi-Fi adapter driver to the latest version helped. As a result, the line changed to:
If you are using the latest version of the driver, but there is no support for Miracast, you will have to replace the Wi-Fi adapter with another more recent model.
Also check if the local or domain policy (if the computer is in a domain) is enabled in the section Computer Configuration -> Windows Settings -> Security Settings -> Wireless Network (802.11) Policies -> Network Filters . The policy must not be configured or enabled, but the Prevent connection to adhoc networks and Don't allow WI-FI Direct groups are disabled. Otherwise, Miracast connection may not work.
The device does not support Miracast
If you don't see the "Connect to a wireless display" option, it usually means one of two things:
- The existing Wi-Fi adapter does not support Miracast
- Required Wi-Fi adapter drivers are missing
The second sign that the problem is one of these two points is the display of the message “The PC or mobile device does not support Miracast, so wireless projection from it is not possible.”
If your laptop, all-in-one PC, or computer with a Wi-Fi adapter was released before 2012-2013, we can assume that the problem is the lack of Miracast support (but not necessarily). If they are newer, then it is more likely the problem is with the wireless network adapter drivers.
In this case, the main and only recommendation is to go to the official website of the manufacturer of your laptop, all-in-one or, possibly, a separate Wi-Fi adapter (if you purchased it for a PC), download the official WLAN (Wi-Fi) drivers from there and install them. By the way, if you did not manually install the chipset drivers (but relied on those that Windows 10 installed itself), it is better to install them from the official website.
At the same time, even if there are no official drivers for Windows 10, you should try those provided for versions 8.1, 8 or 7 - Miracast can also make money on them.
Failed to connect to wireless display
The reason for this problem may be the lack of necessary equipment. In such a situation, you will either have to abandon the wireless method of operation or purchase a device of a later model.
If the necessary modules are present in the equipment, it is recommended to perform the following actions:
- Update device drivers, as they are responsible for broadcasting video and audio.
- Check the operation of the WLAN service.
Note! In some cases, the equipment does not support Miracast technology. In such a situation, the solution would be to purchase and install a new one.
There are several solutions to problems: from reinstalling software to purchasing the necessary equipment
Connecting to a TV and monitor via Miracast takes a very long time
The reason could be either the presence of inappropriate drivers or hardware problems. In the first case, it is enough to reinstall the necessary programs. Secondly, if the devices are outdated, they will need to be replaced. Due to intensive use, they may fail or their performance may deteriorate significantly (in particular, the information transfer speed will drop).
Antivirus/firewall prevents connection
To prevent data theft and the impact of malicious software on the system, of course, the system has a built-in firewall. Almost all users also install an antivirus. Such software can mistake ordinary harmless programs for a potential threat and, accordingly, block their activities. This may refer to establishing a connection between a computer and another device using Miracast.
As an experiment, we recommend disabling the firewall and the antivirus you are using, and then try connecting Miracast again. If the process is completed successfully, then you need to add traffic from Miracast to the exceptions. If you have a third-party antivirus (Dr Web, ESET, NOD32 or Kaspersky), of course, we recommend completely disabling the firewall. The antiviruses described are quite capable of ensuring computer security on their own.
FAQs
A simple program for taking screenshots from Windows 10 screen
1. Can I add Miracast To My PC?
Yes. You can add Miracast to your PC if your computer supports Miracast. Like for instance, Windows 10 laptops do support Miracast.
However, if you are using a laptop that does not support Miracast, you can try using a USB transmitter form any manufacturer.
2. How Do I Download and Install Miracast WIFI for PC?
If you need to use Miracast WIFI on your PC, you will have to make use of an Android emulator.
The best emulator for this is the Bluestacks Android emulator. All you have to do is to download the software and follow the prompts to download and install WIFI Display Miracast on your PC.
3. How Do I Connect My PC to Miracast TV?
All you need to do is ensure that your PC supports Miracast and then follow the prompts to connect it to your Miracast TV.
You will add a wireless display on your laptop or computer while you ensure that your Miracast tv is on. You will then select screen mirroring on your Miracast TV. On your computer, go to settings and then to devices. On devices choose connected devices then your Miracast TV will show and you can connect it.
4. How Do I get Miracast on Windows 10?
Getting Miracast on Windows 10 is quite easy and straightforward. You will only need to have your Miracast feature or TV in action.
Click on the bottom right of your PC to connect, and that's how you get Miracast for PC. Ensure that your Miracast TV is already working.
5. Can I share my computer screen on my TV?
Yes, you can. You will only need to ensure that your computer and TV will support Miracast then connect your computer to the TV.
You can do this by using the screen mirroring on your computer and then connecting it from your computer.
Also Check: How to use LocalCast for Chromecast on the PC
Ivcho Georgiev
A professional app developer, tech author, and writer who talks about technology and innovation in the world of hardware and software.
His expertise is in software, mobile apps, and games running and operating on operating systems like Windows and Mac.
You can reach me on social media.
More Posts - Website
Setup on a laptop or PC
In order to connect to a TV (Samsung, LG, etc.) using Miracast, you must have Wi-Fi adapters for both gadgets.
Please note that:
- Your PC must have Windows 8.1 or higher operating system installed;
- your TV must be modern and support Miracast or Screen Share (the name of the technology depends on the model).
Sometimes this feature does not appear on the TV until you connect it to a wireless network.
To duplicate the display, you need to follow these steps.
- Turn on your TV and make sure it is connected to Wi-Fi. This happens differently on different models. Here is an example for LG.
- Press the “Smart” button on the remote control.
- Immediately after this, a menu will open.
- You need to navigate (using the right arrow on the remote control) to the “Screen Share” application. After that, click on the “OK” button.
- Immediately after this, the necessary utility will launch.
From now on the TV will be in standby mode. Pay attention to the device name.
- Now press the key combination Win + P on your laptop or computer. A menu will appear on the right side of the screen, in which you need to click on the “Connect to a wireless display” link.
- After this, you will need to wait until Windows finds your TV.
- The name that was specified earlier should appear in the list.
- Click on this device to start connecting.
Immediately after this, a picture from your PC or laptop should appear on your TV display.
Connection problems
When connecting, the following error may appear.
You can correct the situation as follows.
- Click on the Start menu and click on Settings.
- Go to the "Devices" section.
- After this, you need to click on the “Add Bluetooth or other device” button.
- A new window will appear. In it you need to select the “Wireless display or docking station” item.
- Immediately after this, the search will begin. You need to wait a little.
- As soon as your TV appears in the list, you will need to click on it.
- After this action, the connection will begin (it may take a long time).
- If successful, the wireless display will be added to the list of devices.
Now press the Win + P key combination again and try to connect. Everything should work. If so, the message “Connected” will appear.
Firewall problem
If you still cannot connect, then the problem may be with your antivirus, or more precisely, with your firewall. This traffic protection system works differently on different programs. Let's consider a way to solve this problem of communication between a TV and a laptop using the example of the Eset Smart Security program.
First, try disabling this feature completely. To do this, right-click on the antivirus icon in the tray and select the desired item.
After this, repeat all the steps described above to connect to the TV. If everything works out this time, then the problem is in the firewall. But keeping it turned off all the time is not an option.
Typically, it runs in automatic mode by default. You need to switch to interactive mode. You can do this using the following steps.
- Open an antivirus window.
- To launch the settings, press the F5 button on your keyboard. In the window that opens, go to the “Personal Firewall” section and expand the “Advanced” category.
- Switch "Filtering Mode" to "Interactive".
- Save the settings by clicking on the “OK” button.
After this, no program will be able to go online and send or receive data without your knowledge. Thus, you can at the same time block Internet access to various updates.
Try connecting to the device again. This time you should see the windows shown below. Allow network traffic to and from your computer to your TV.
Be sure to check the box next to “Create a rule and remember forever”
This time everything should end in success.
Part 4: Miracast player
Miracast Player is an Android application that allows you to mirror the screen of your Android device to any other device running Android. Most mirroring apps will mirror to a computer or Smart TV, but with Miracast player, you can now mirror to another Android device. The first device will display its name as "Sink". Once launched, the application will search for the second device, and once it is found, its name will be displayed. You only need to click on the name of the second device in order to establish the connection.
Features of Miracast Player
It is an Android device that easily connects to another Android device for screen sharing purposes. This allows people to easily split their screen so they can do a task at once. If you want to teach someone how to use an Android app, you simply mirror it to another phone and you can take the student through the steps. This is one of the simplest screen casting devices from phone to phone. If you want to watch a movie on your phone and let someone else watch it, then you can do it with ease.
Pros of Miracast player
• It's easy to use
• It communicates via its own Wi-Fi network and is independent of your home network
• It only connects with a simple click on the name of the new device
• It makes Screencasting among mobile devices possible without fuss
Against Miracast player
• It does not support HDCP, and when it works as a Wi-Fi source, it will cause some devices to force HDCP encryption, thereby causing the screen to display as a black screen.
• Sometimes there is difficulty establishing a connection, thereby requiring a reboot of the Wi-Fi connection
Sometimes there are problems with screen playback. The screen will only appear as a black screen. This may require you to toggle "Don't use built-in player" or "Use built-in WiFi player" if they are available on devices.
Download Miracast player here: https://play.google.com/store/apps/details?id=com.playwfd.miracastplayer&hl=en
Connection on Android
First, you need to turn on the TV and launch the Screen Share application.
Instructions on this issue are described above in the PC connection section.
After this, you need to perform the following steps.
- Check if your Wi-Fi is turned on on your phone.
If you don't have this icon on your phone, it means your wireless connection is turned off. You can enable it in the settings.
- After that, go back to the settings and open the “Xperia Connections” item (in our case). This feature may be called differently on different phone models.
- Launch the Screen Mirroring feature.
- In order to connect to TV, you need to click on the “Start” button.
- First the search will begin. We need to wait a little.
- Your TV should appear in the search results. To select it you need to click on the name.
- During the connection process you will see the following.
- If the process completes successfully, then instead of the “Cancel” button it will say “Disable”.
- As a result, the contents of your phone will be broadcast on the TV screen.
The viewing angle will depend on the orientation of the phone.
How to set up Miracast connection to your computer display
You can transfer images not only from your device to others, but also receive images from other devices yourself. To check Miracast casting support on your Windows 10 device:
- Click on the search button and type Miracast;
- Select the Project to this computer option (Settings -> System -> Project to this computer);
- If your computer does not have a Miracast receiver device, you will see a message:
This device does not support Miracast signal reception, so it cannot project wirelessly.
If the computer supports projection onto it, there will be an inscription here: “You can project an image from your phone or Windows 10 computer onto this screen, and also use its keyboard, mouse and other devices.” - Here you can also configure display visibility parameters and set a connection PIN;
- After that, on the Miracast source, start connecting to the wireless display and select the display of your computer;
- If everything is configured correctly, the message “Projection will begin soon” will appear and you will see the image from the remote device on your computer display.
Via HDMI cable
Using an HDMI cable, you can transfer data of higher quality than via USB. Any TV is equipped with a corresponding connector, but a mobile device requires a special adapter (or you can purchase a special HDMI to Micro USB cable). The setup sequence for how to display your phone screen on TV is as follows:
- Turn off the TV.
- Then we connect the smartphone and TV with an HDMI cable.
- We turn on the TV. The setup will happen automatically.
To access the phone directory, you need to select the signal source - HDMI1 (the very first active icon).
The device does not support Miracast Windows 10
You can check whether the connection to a wireless display is supported in the Windows 10 operating system in just a few clicks. The user just needs to open the command line as an administrator and run the command: netsh wlan show driver .
In the command results, look for Wireless Display Supported and look at the Graphics Driver and Wi-Fi Driver . You can often see this exact situation where the graphics driver supports the connection, but the Wi-Fi driver does not.
In this case, the user will receive a connection failed message when attempting to connect to the device. Your PC or mobile device does not support Miracast, so it cannot project wirelessly. Here's what you can try in this situation:
- Make sure your Windows device supports Miracast or wireless docking and that your wireless display, adapter, or dock has the latest firmware.
- Try updating the drivers through Windows Update in the application in the updated system settings, or install the driver from the disk to the external Wi-Fi adapter.
If the situation has not changed after installing the latest Wi-Fi drivers, then you need to look for another external adapter. All modern laptops support Miracast connection to TVs. There are also situations when there is support, but you can’t connect. In this case, you need to disable the anti-virus software and restart all devices, both the computer and the TV itself.
Conclusion
The Windows 10 operating system allows you to use Miracast technology without the need to install third-party software. All components have already been implemented into the system. The user just needs to update the drivers of the Wi-Fi adapter and graphics adapter. After which you can display the image from your computer to a Miracast-enabled TV without using wires. All you need to know is how to enable or connect via Miracast in Windows 10.
Can I use Miracast in Windows 7
Though Microsoft doesn't provide built-in Miracast in Windows 7 and Windows 8, you can also enjoy Miracast with Windows 7 computers.
Before setting up, you should check your computer and see if it supports Miracast technology. Follow the steps below:
1. Does your Windows 7 computer support Miracast technology?
You can use Miracast technology if your computer supports wireless display. You can check the information with the methods below:
Method 1: Check Miracast support in cmd
- On your keyboard, press the Windows logo key and R at the same time to invoke the Run box.
- Type cmd and click OK.
- Copy and paste the follow command in your cmd, and press Enter. netsh wlan show drivers
- In the result, find Miracast and see if it's supported.
If you see Wireless Display Support: No, your computer doesn't support Miracast unfortunately. But you can still stream your screen to your TVs via Google Chromecast, which is the alternative for Miracast.
If you see Wireless Display Supported: Yes, then your computer supports Miracast and you can use Miracast directly. Then continue to the next part: .
Method 2: Check Miracast support in DirectX Diagnostic Tool
- On your keyboard, press the Windows logo key and R at the same time to invoke the Run box.
- Type dxdiag and click OK.
- DirectX Diagnostic Tool pops up. Click Save All Information.
- Save the information in your computer.
- Open the text that you just saved, and find Miracast to see if it's available.
If Miracast is not supported, your computer doesn't support Miracast unfortunately. But you can still stream your screen to your TVs via Google Chromecast, which is the alternative for Miracast.
If Miracast is available, that's great. And you're good to go.
2. Is device drivers up to date in your computer?
Since Miracast is available in your Windows 7 computer or laptop, you can connect your computer screen to TVs or projectors wirelessly. Before setup, you should ensure that the drivers in your computer are up to date, especially your graphics card driver and network adapter driver.
There are two ways to update your drivers: manually and automatically.
Manually update drivers – You can manually update your drivers by downloading the latest version of your drivers from manufacturers, and installing it in your computer. This requires time and computer skills.
Automatically update drivers – If you don't have time or patience, you can do it automatically with .
Driver Easy will automatically recognize your system and find the correct drivers for it. You don't need to know exactly what system your computer is running, you don't need to risk downloading and installing the wrong driver, and you don't need to worry about making a mistake when installing.
You can update your drivers automatically with either the FREE or the Pro version of Driver Easy. But with the Pro version it takes just 2 clicks (and you get full support and a 30-day money back guarantee):
- Run Driver Easy and click the Scan Now button. Driver Easy will then scan your computer and detect any problem drivers.
- Click the Update button next to flagged devices to automatically download the latest drivers (you can do this with the FREE version).
Then install the drivers in your computer. Or click Update All the automatically download and install the correct version of all the drivers that are missing or out of date on your system (this requires the Pro version – you'll be prompted to upgrade when you click Update All). - Restart your computer to take effect.
After updating device drivers in your computer, you can now start setting up Miracast for Windows 7.
Analogue Miracast
There are other technologies. For example - WiDi. Many modern TVs support it. The big difference compared to Miracast is that in this case it is necessary to install additional software - Intel Wireless Display.
It is worth noting that this program has certain requirements, due to which it does not work on every computer or laptop.
In this regard, Miracast wins, since Windows 8.1 and older are sufficient for its operation. There is no need to install any additional programs.
The advantages of WiDi include the ability to connect to a receiver, which, in turn, is connected to the TV if it does not have a built-in Wi-Fi adapter.
Laptop - set-top box - TV
Happy owners of Smart TVs can connect their laptops to them in many ways. If one doesn't fit, there is always an alternative. And owners of ordinary, especially old television receivers, sometimes have to suffer: either the required adapter is not on sale, or the connection does not work.
In this case, the best solution would be to buy a set-top box with SMART functions, like Apple TV or Android Box. It’s not very expensive, and it also eliminates the hassle of connecting other equipment to the TV forever.
I finally figured out the wireless display feature in Windows 10. I spent half a day connecting and checking everything to prepare an article with verified information for you. And of course with photos and screenshots.
There are two main technologies: Miracast and Intel W>(Intel has stopped developing this technology), with which you can display image and sound from a computer, laptop or mobile devices via Wi-Fi. Simply put, use a TV (projector, monitor) as a wireless display. The trick is that with the help of these technologies you can not just display a movie or photo over the air (as is the case with DLNA), but broadcast everything that happens on the main computer monitor or laptop screen.
A wireless display, which is most often a TV, works as if it were connected via an HDMI cable. You can duplicate the image, expand the screen, etc. And all this wirelessly. There are also monitors that support Miracast.
The Wireless Display feature in Windows 10 displays images using Miracast technology. But, for some reason, when connected, the TV had the inscription “Intel's W> (read on the Intel website), they stopped developing and supporting Intel® WiDi technology. And they report that Windows 8.1 and Windows 10 already have support for Miracast out of the box, which can be used to connect wireless displays without additional programs.
I tested on the following equipment:
- PC with Intel Core i3-6098P processor and GeForce GTX 750Ti graphics card. Wi-Fi adapter TP-Link TL-WN725N V2.
- A laptop with an old third-generation Intel Core i3 processor and built-in Intel HD Graphics 4000 video. NVIDIA GeForce GT 635M video card. Wi-Fi adapter is the same TP-Link TL-WN725N V2. Because the adapter built into the laptop does not work.
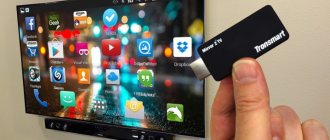
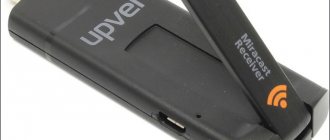
- I used an LG TV as a wireless display. The model is still 2012, but with support for Miracast and Intel WiDi. As it turns out, the new and sophisticated Philips TV does not have built-in support for Miracast. If your TV also does not support this technology, then you can use a Miracast adapter.
In this article, I will first show you how to enable Miracast on Windows 10 and how to connect to a wireless display. Then, we will consider solutions to possible problems and errors.