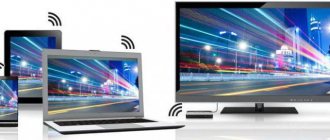
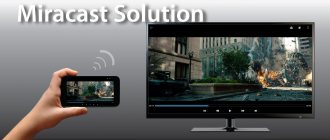
Miracast is one of the technologies for wirelessly transmitting image and sound to a TV or monitor, easy to use and supported by many devices, including computers and laptops with Windows 10, if you have an appropriate Wi-Fi adapter (see How to connect a TV to a computer or laptop via Wi-Fi). This instruction will tell you how to enable Miracast in Windows 10 to connect your TV as a wireless monitor, as well as the reasons why such a connection fails and how to fix them. Please note that your Windows 10 computer or laptop can also be used as a wireless monitor.
Connecting to a TV or wireless monitor via Miracast
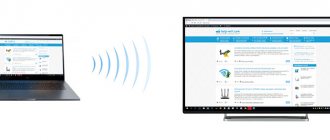
In order to enable Miracast and transfer images to the TV via Wi-Fi, in Windows 10, just press the Win+P keys (where Win is the key with the Windows logo, and P is the Latin key).
At the bottom of the list of display projection options, select “Connect to a wireless display” (see below for information on what to do if there is no such option).
The search for wireless displays (monitors, TVs, etc.) will begin. Once the screen you want is found (note that most TVs require you to turn them on first), select it from the list.
Once selected, the Miracast connection will begin (may take a while), and then, if everything went smoothly, you will see the monitor image on your TV or other wireless display.
Connection and setup via HDMI
- We take a cable of the required length and connect it to one of the inputs on our TV. The most important thing is to connect it to the correct input. If possible, find an input named “PC” or “IN” and insert it there.
- And of course, the second end must be inserted into the same port on the laptop. Luckily there aren't many of them there. Make sure that it sits tightly in the groove and does not fall out.
- Now you need to select the desired input on the TV. To do this, take the remote control and select the appropriate button - it is usually called “INPUT”.
- You should, in theory, immediately see an image of the laptop screen on your TV.
- If this does not happen, then on your computer simultaneously press the “Win” key (located between “Ctrl” and “Alt”) and the English “P” key. Next, simply select one of the options. The best options are “Repeating” and “Second Screen Only”.
If there is no picture, check that you are connected to the TV correctly. Some models have separate input ports labeled "IN". You can also try all possible inputs on both your TV and laptop. If this does not help, then go to my article on solving this problem at this link.
If Miracast doesn't work on Windows 10
Despite the simplicity of the steps required to enable Miracast, often not everything works as expected. Next are possible problems when connecting wireless monitors and ways to eliminate them.
The device does not support Miracast
If you don't see the "Connect to a wireless display" option, it usually means one of two things:
- Projecting Windows 10 (Windows 10) how to connect a second screen
- The existing Wi-Fi adapter does not support Miracast
- Required Wi-Fi adapter drivers are missing
The second sign that the problem is one of these two points is the display of the message “The PC or mobile device does not support Miracast, so wireless projection from it is not possible.”
If your laptop, all-in-one PC, or computer with a Wi-Fi adapter was released before 2012-2013, we can assume that the problem is the lack of Miracast support (but not necessarily). If they are newer, then it is more likely the problem is with the wireless network adapter drivers.
In this case, the main and only recommendation is to go to the official website of the manufacturer of your laptop, all-in-one or, possibly, a separate Wi-Fi adapter (if you purchased it for a PC), download the official WLAN (Wi-Fi) drivers from there and install them. By the way, if you did not manually install the chipset drivers (but relied on those that Windows 10 installed itself), it is better to install them from the official website.
At the same time, even if there are no official drivers for Windows 10, you should try those provided for versions 8.1, 8 or 7 - Miracast can also make money on them.
Cannot connect to TV (wireless display)
The second common situation is that the search for wireless displays in Windows 10 works, but after selecting it, it takes a long time to connect via Miracast to the TV, after which you see a message that the connection could not be made.
In this situation, installing the latest official drivers for the Wi-Fi adapter can help (as described above, be sure to try), but, unfortunately, not always.
Moreover, I don’t have clear solutions for this case, I only have observations: this problem most often occurs on laptops and all-in-one PCs with 2nd and 3rd generation Intel processors, that is, not on the newest equipment (accordingly, the Wi-Fi used in these devices -Fi adapters are also not the latest). It also happens that on these devices, the Miracast connection works for some TVs and does not work for others.
From here I can only assume that the problem with connecting to wireless displays in this case may be caused by incomplete support of the Miracast technology variant that is more used in Windows 10 or on the TV side (or some nuances of this technology) on the part of older equipment. Another option is that this equipment is not working correctly in Windows 10 (if, for example, in 8 and 8.1 Miracast turned on without problems). If your task is to watch movies from your computer on your TV, then you can set up DLNA in Windows 10, this should work.
- How to enable Miracast on Windows 10 and what kind of technology is it?
That's all I can offer at the moment. If you have or have had problems with Miracast to connect to your TV, share both problems and possible solutions in the comments. See also: How to connect a laptop to a TV (wired connection).
Author: · 06/23/2019
This technology was developed by Microsoft. Thanks to it, it became possible to connect a computer monitor, laptop, tablet or smartphone based on Android OS to a TV without using HDMI cables. This standard has its pros and cons. Below we will tell you how to enable Miracast in the Windows 10 operating system.
No sound
- Find the speaker icon in the lower right corner of the screen and go to “Playback Devices”;
- The “Playback” tab should contain all possible devices. Your TV should be there with the name - right-click and then select “Set as default”. The connection may not have the name of the TV, but the HDMI port number.
If there is no sound or this connection does not exist, then most likely there is a problem with the drivers for the video card. On this occasion, I already left the previous link in the previous chapter - the problem with the image and sounds is solved there, so it’s better to go there. But you can also ask your questions in the comments.
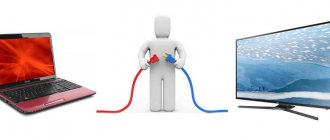
If you decide to connect your TV to a computer or laptop on Windows 10, now I will show you and tell you how to do it. We will connect in two ways: via a wireless Wi-Fi network, and using an HDMI cable. Under Wi-Fi connection, I will enter the connection via a Wi-Fi router, and the DLNA technology setting. When using a computer, you can watch movies, photos, and listen to music on TV. Well, is connecting using an HDMI cable a regular HDMI connection? With this connection, we will have the TV as a monitor in Windows 10.
- Connecting a laptop to a TV via an HDMI cable: tips and setup details
Honestly, there is not much difference whether you have Windows 7 or Windows 10. Both connecting to the TV via HDMI and Wi-Fi is practically no different. But let’s look at the example of a laptop with Windows 10 installed. I think this article will be relevant and useful for a long time.
Flaws
Of course, like any technology, Miracast also has its downsides. These include:
- Microsoft's wireless display delivery method needs further improvement, as only what's happening on the source screen is transmitted to the device. Competitors have much more functionality;
- Miracast technology does not always work stably. Periodic failures are possible. Especially if the receiver and source are located at a great distance. In this case it will be very inconvenient to use;
- As practice shows, not all devices will connect to each other without fail.
Setup on a laptop or PC
In order to connect to a TV (Samsung, LG, etc.) using Miracast, you must have Wi-Fi adapters for both gadgets.
Please note that:
- Your PC must have Windows 8.1 or higher operating system installed;
- your TV must be modern and support Miracast or Screen Share (the name of the technology depends on the model).
Sometimes this feature does not appear on the TV until you connect it to a wireless network.
To duplicate the display, you need to follow these steps.
- Turn on your TV and make sure it is connected to Wi-Fi. This happens differently on different models. Here is an example for LG.
Why HDMI
This is an interface that transmits high-resolution video data and a copy-protected audio signal.
This is the best connection option.
Advantages:
- Simplicity. Transmission occurs over one cable;
- Transfer efficiency. The data does not require additional compression;
- Large bandwidth allows you to broadcast high quality films;
- Copy protection technology.
HDMI supports screen resolution of 2560X1440 pixels.
Let's consider what to consider when choosing.
Length
Up to ten meters long is enough for the average user. Pay attention to the update frequency. Look in the documentation or on the packaging. For convenient video viewing, 60-70 MHz is enough for the eye. High frequency values are relevant if the monitor supports 4K (horizontal resolution 4000 pixels). The longer the cable, the larger the diameter of the conductor. If length:
- Five meters. Diameter seven millimeters (28AWG);
- Ten meters - eight millimeters (26AWG);
- Fifteen meters - nine millimeters (24AWG);
- Twenty meters - ten millimeters (22AWG).
Cable type
Identified by its number. Common versions: 1.4, 2.0. Other version definitions:
- Standard Standard. Supports 1920x1080 resolution. Data is transmitted up to fifteen meters. Use to connect any devices;
- High Speed High Speed. Full HD resolution signal is transmitted up to 7.5 meters;
- Deep Color. For connecting TVs displaying trillions of colors;
- Color. The color range is not available on TVs using RGB technology.
The following types of cables exist:
Consider these features when choosing. If the TV and laptop are more than ten years old, these connectors are not installed on it. Use a connection method without HDMI. For example, VGA interface. If the TV is old and the PC is new or vice versa, buy an adapter.
Connection on Android
First, you need to turn on the TV and launch the Screen Share application.
Instructions on this issue are described above in the PC connection section.
After this, you need to perform the following steps.
- Check if your Wi-Fi is turned on on your phone.
If you don't have this icon on your phone, it means your wireless connection is turned off. You can enable it in the settings.
- After that, go back to the settings and open the “Xperia Connections” item (in our case). This feature may be called differently on different phone models.
Analogue Miracast
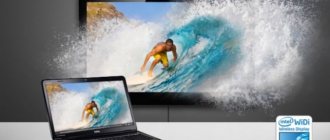
There are other technologies. For example - WiDi. Many modern TVs support it. The big difference compared to Miracast is that in this case it is necessary to install additional software - Intel Wireless Display.
It is worth noting that this program has certain requirements, due to which it does not work on every computer or laptop.
In this regard, Miracast wins, since Windows 8.1 and older are sufficient for its operation. There is no need to install any additional programs.
The advantages of WiDi include the ability to connect to a receiver, which, in turn, is connected to the TV if it does not have a built-in Wi-Fi adapter.
How to add a folder for a DLNA server
Launch Windows Media Player.
If you want to add a folder with videos, for example, then click on the corresponding item on the left and select “Manage video library.”
In the new window, click on the “Add” button. Select the folder to which you want to open access via DLNA, and click on the “Add folder” button.
That's it, the required folder will appear in the list and will be displayed on the TV. For example, I opened access to the “Video” folder in which I store films.
In this way you can add any folders or remove them from the list.
A few more tips
2 If during playback of files via DLNA the computer goes into sleep mode and playback is interrupted, simply turn on the “High Performance” power plan.
Several articles on the topic:
If video playback is slow
When playing videos this way, many experience unstable performance. Playback hangs all the time, has delays, stops, etc. Basically, such problems arise when playing large video files. Typically, these problems appear due to insufficient connection speed between the computer and the TV. Most often, a budget, weak router is to blame for this. There just isn't enough bandwidth. True, a powerful router does not guarantee stable file transfer via DLNA.
At the time of viewing, disable various downloads, online games, and do not use the Internet on other devices. If possible, connect your TV or computer (or better yet, both devices) to the router via a network cable. Then the connection will be much more stable and the speed will be higher.
If all else fails, then you can use a more stable connection via an HDMI cable to output images from a computer or laptop to a TV. Or simply copy movies from your computer to a flash drive or external hard drive and watch them on your TV.
Source
Video instruction
If you still have any questions, you can additionally watch a video in which you can learn something new.
Quite often, users connect a laptop or PC to other devices to display images, sound or video, such as a TV. There is no need to use cables for this, since the computer has a built-in Wi-Fi adapter with such capabilities. How to enable Miracast Windows 10 on a PC, laptop and enjoy the absence of cables can be found below.
Content
How to check if your computer supports Miracast
Troubleshooting Windows 10 - Possible Methods
To do this, just type the name of the application in the system search bar. The program will display the section with its parameters. The Control Panel console will indicate whether the user's hardware will work as a Windows 10 wireless monitor or not.
For your information! Any equipment with the official version of Windows 10 can broadcast images with sound, but not all of them will be able to receive the signal. If there is no reception function, you need to download special software or purchase a separate Miracast receiver.
Determining the feasibility of maintaining the technology
What is Miracast
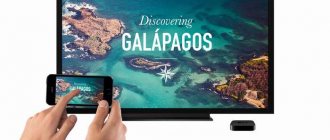
Miracast technology is one of the developments of Microsoft. It is designed to wirelessly transmit sound and images to other gadgets: computer monitors or TVs. The transfer can also be carried out to other devices capable of displaying a picture and playing sound.
The function is available for any type of gadget that has a built-in Wi-Fi adapter. The main thing is that it is possible to transmit and receive a wireless signal on both devices.
Advantages and disadvantages
Among the advantages of the technology, users note the following points:
- Ability to transmit images and sound without using cables.
- No need to transmit the signal through a router. Devices are synchronized using a different technology and create their own communication channel, which no one can interfere with.
- The image transmission speed is very high. Even when playing complex games you will not feel any lag or drop in FPS.
- The technology heavily compresses files. So even very voluminous documents will be transmitted in a minimum amount of time.
- Supports 3D video broadcasts.
- Miracast is a very easy-to-use feature with a simple interface. Any user can enable and use it without additional instructions.
- This function is built into almost all modern devices, computers and laptops, televisions, for example, brands LG and Samsung.
Among the shortcomings, only one is noted, namely, the maximum quality of image or video transmission reaches only 1920x1200. This indicator does not make it possible to transmit video in UltraHD quality. But the average user will almost never encounter this problem, since devices that support such a high resolution are rare and are very expensive.
How to set up on laptop and PC
The function is present in most modern laptops and computers. The main thing is to figure out how to configure it and connect the PC to another screen.
Settings
There are many ways to customize Miracraft. The user can choose the most convenient option for him. Regardless of the method used, the result will be the same.
Keyboard shortcut
Enabling and configuring Miracast using a keyboard shortcut takes literally a few minutes. How to enable Miracast on a laptop with Windows 10 is shown in the instructions:
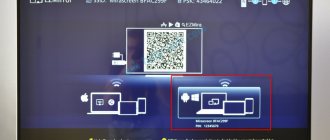
- Activate the wireless network on your PC. You should also enable this feature on your TV or connected device.
- Press keyboard shortcut Win+P on the keyboard of a laptop or computer (works also on the on-screen keyboard).
- This will bring up the Projection . At the very bottom of the panel that pops up, you need to click on “Connect to a wireless screen” .
- After which the display will show that a search is in progress for devices available for connection. When it ends, select the required display from the displayed list.
- As soon as the connection is made, the computer desktop image will be displayed on the second screen.
Advice! It is recommended to find out in advance how exactly the name of the TV is displayed when searching for devices available for connection.
System parameters
To set up a wireless connection between two displays, you need to do the following:
- Go to the Start and go to Settings . This can also be done using the key combination VIN+I .
- Go to panel "Devices".
- Through the side menu, go to the “Connected devices” . Here it is possible to connect a PC to a new one by clicking on “Add device” .
- After this, the system will search for available gadgets. You must select the one you need from the list that appears.
Via WiDi
There are other technologies similar to Miracast. One of them is WIDI. It is also supported by modern TVs and screens. But unlike Miracast, it requires installing additional “Intel Wireless Display” software to work.
Widi is good because it can be used to connect to a laptop even a TV that does not have a Wi-Fi adapter. The connection in this case goes to the receiver, which in turn has a direct connection to the screen.
Wired methods
The type of wired connection you choose depends on what connectors your TV and computer or laptop have. The optimal interface for multimedia is HDMI. It allows you to simultaneously stream high-definition digital video and audio to your TV. An HDMI connector is available on almost all digital TVs, even quite old ones, as well as on laptops. HDMI ports are less common among system manufacturers. More traditional for PCs: DVI for digital video transmission and an analog VGA connector. But the problem of port incompatibility is easily solved with the help of adapters. However, signal transmission through adapters does not always work correctly, so matching ports is preferable.
Other types of interfaces are less common or less convenient for connecting a computer to a TV, so we will leave them outside the scope of this article. It is also worth considering that all options except HDMI-HDMI and HDMI-RCA involve video transmission only. For parallel audio broadcasting, you will also have to use a 3.5 jack (computer) - RCA (TV) cable.
Let's look at the connection using Windows as an example. The cable should be connected with the devices turned off, so as not to burn the ports. On the TV remote control, press the INPUT or SOURCE button. From the Input List or Source menu, select the appropriate port (in this case HDMI).
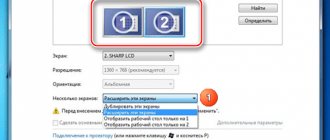
On your computer, you need to right-click on the desktop and select “Screen Resolution”, thus opening the screen settings. If the connected TV is not detected automatically, use the “Find” button. Once the TV is displayed here as a second screen, you can select it as the main screen and change the resolution.
The Win+P key combination activates a special menu in which you can select the option to select an image on the TV screen. If you select “Computer Only”, the picture will only be on the computer, if “Projector Only” - only on the TV. You can also expand or duplicate the image. If the resolution of the TV is significantly higher than that of the monitor, in the “Duplicate” mode the picture on the TV screen will be unclear. The “Expand” mode will allow you, for example, to simultaneously play a video on TV while doing other tasks on your PC.
Problems during connection
Some problems may occur during connection. The most common one is the message “Unable to connect” . Also, the connection can take a very long time and be unsuccessful.
In this case, the reasons may be the lack of the latest version of drivers on the adapter or the fact that it does not support such a function. The drivers can be updated, but in the second case nothing can be done.
It is also recommended to try connecting with different devices. It's just that some of them can connect and others can't.
Firewall problems
If the connection is not established or is reset at the very last moment, then the problem may be with the Firewall. You need to disconnect it and try to connect again. If everything went smoothly, it is recommended to switch the Firewall to interactive mode. In this case, it will ask for permission for suspicious connections.
Useful: How to disable the firewall