Immediately after purchasing and connecting a TV, the user is faced with the problem of how to set up the TV for comfortable viewing of movies, TV series, TV shows, and sports broadcasts. This is a very serious procedure, since the quality of the image and signal strength depend on it.
How do professionals set up TV? The specifics of the software settings directly depend on the type of television broadcasting:
- cable;
- ethereal;
- satellite.
To set up broadcasting, it is not at all necessary to have special skills or experience. Simply follow the instructions. Do not forget that, for example, satellite television requires appropriate equipment - a dish and a tuner.
Cable broadcasting is configured by the provider, but failures occur periodically, after which the saved parameters are lost. Therefore, this material will be useful for absolutely all users.
Preparing the TV
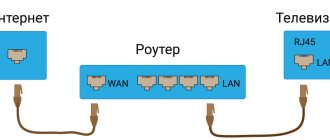
To set up your TV, first connect your device to a signal source. For example, if we are talking about analog or cable broadcasting, then you first need to connect the cable to the antenna connector.
How to set up TV if there are several TVs in the house? If there are several TVs in your house at once (two or more), then all devices can be connected to one antenna. However, for the distribution to be stable, you should use a high-quality splitter or splitter. Such components have several outputs into which antenna cables are connected.
Separately, it is worth noting that manual and automatic settings are significantly different. Searching for channels in automatic mode is as simple as possible, since the user simply starts the process and then waits for the result. Manual settings are more subtle; you can independently adjust the image quality, minimizing possible interference.
Setting up cable TV
As practice shows, providers independently set up channels for their clients. However, sometimes failures occur, for example, the TV shuts down incorrectly due to power supply fluctuations - as a result, the saved parameters are erased.
Therefore, each user should be able to correctly install digital channels so as not to constantly call specialists and spend money on it.
How to set channels on TV? If circumstances force you to set up broadcasting yourself, be sure to follow the simple step-by-step instructions:
- Immediately after turning on the TV device, a notification “digital TV channels are not configured” will appear on the screen.
- Take the remote control, go to the main menu by pressing the corresponding button.
- Go to the “TV Channel Setup” section, and then select the “Automatic Tuning” command and click “OK” or “Start”.
- The TV will begin scanning the incoming signal, identifying available TV channels. Automatic tuning is bad because it creates doubles, and the quality of the broadcast leaves much to be desired: stripes, interference, ripples. It is possible that the sound will be distorted. It is better to delete such channels immediately.
- Automatic search lasts only 2-3 minutes, it all depends on the number of available channels. Once scanning is complete, a list of saved TV channels will appear on the screen.
- An alternative is manual tuning, but this is time-consuming as the user enters the frequency. As a result, you can spend more than 30 minutes setting up channels.
The described algorithm for setting up cable television is generally accepted; certain subtleties may arise depending on the equipment used. The characteristic features are described in detail in the operating instructions for the television equipment.
What to do if there is no remote control? Settings can also be done using the buttons located on the device panel. If you are using a Smart TV, then you can connect a computer mouse or keyboard.
Reception parameters of the Impulse TV channel on the Sigma-KTV cable network
Since September 30, 2014, the parameters for receiving programs from TVC and Impulse TV channels have changed.
To retune all channels, you can perform an automatic network search by setting the following parameters:
- Frequency: 322 MHz
- Flow rate: 6750
- Modulation: QAM 64
You can also search manually on many devices:
- Frequency: 458 MHz
- Flow rate: 6375
- Modulation: QAM 64
As always, Impulse programs are aired three times a day: at 7.00, 14.50 and 19.30.
Impulse 10-16. Issue 142.
The amazing world of Japanese culture, anime, movies and games! For the last two weeks, the editorial staff of Impulse 10-16 has been in isolation, so this issue is not entirely standard. We managed to film some before the holidays, and some we filmed remotely! So don't be surprised! The format is not standard! But we hope you like it. As usual, we will talk about something interesting, this time about Japanese culture and anime, watch the best cartoons of the week in Kinomashka and learn a few […]
Impulse class. Issue 15.
Talk show! And talk show again! To be honest, we are delighted with this genre, because we meet many interesting people. In this issue, we were lucky enough to talk with Novy Urengoy science fiction writer Artyom Posokhin. The dialogue turned out to be very lively.
Ordinary people. Issue 29 part 2. Alexey Matveev
Interview with Alexey Matveev. Part II We continue to get acquainted with the new director of the Novy Urengoy Museum of Fine Arts. In the first part of the program, Alexey spoke about his fruitful scientific activities; this part will be devoted to travel and creativity. Since 2000, our hero has been an active member of the Russian Geographical Society. It must be said that one of the expeditions became the starting point of Alexei’s falling in love with the Russian North and subsequent move to Novy Urengoy. About his travels, the guest […]
“The Ballad of Vysotsky” concert by D. Pevtsov
"The Ballad of Vysotsky." Concert of Dmitry Pevtsov. On October 24, a live broadcast of the concert program “The Ballad of Vysotsky” was held at the city palace of culture “October”, with the participation of People’s Artist of Russia Dmitry Pevtsov. The warm, cozy atmosphere of a winter evening reigned for two hours. Dmitry presented the viewers of the live broadcast with the favorite and popular songs of Vladimir Semenovich Vysotsky: “Song about a Friend”, “Dialogue on TV”, “Fasicky Horses” and many others...
Setting up satellite channels
Users who have installed a satellite dish probably also experience difficulties finding channels. Let us immediately note that the process of setting up digital channels and satellites is significantly different.
So, the satellite dish is pointed in the right direction, which means it’s time to find and set up channels on the TV. Let us immediately note that satellite TV is not only a dish, but also a receiver connected to an antenna cable. As a result, the TV operates in the mode of a very ordinary monitor.
Few people know, but satellite dishes under the influence of natural conditions (heavy wind, heavy rain, snow) can change the initially set position, resulting in a failure. Constantly check and adjust the position of the antenna, otherwise a stable signal will disappear, and it will be very difficult to return previously saved channels.
The tuner is controlled using a special remote control. Take it and press the “Menu” button, follow the step-by-step instructions included with the equipment. There are a lot of TV channels, so save only those that you plan to watch at least occasionally.
Practice shows that the most watched channels are educational in nature, that is, they talk about travel and the mysteries of the planet. TV channels broadcasting sports competitions are also popular. Therefore, it is not necessary to connect additional channels; save only those that you plan to watch.
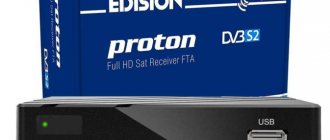
Kaskad group of companies recently released a new receiver model to the market - VA2103HD .
The kit , in addition to the set-top box itself in a metal case, includes: a remote control, an audio-video cord with “tulips” (96 cm), two AAA batteries, and an instruction manual. The power cord is long . The box also contained a bag of silica gel (the first time I’ve seen it in set-top boxes). The package includes the note “Attention: AAA batteries are not included.” However, batteries were included.
The body is slightly oblong, covered with a protective transport film, but it does not cover the ventilation holes. Dimensions of the case itself: 167x96x38 and there are also 10 mm connectors on the back.
On the front translucent, smoky panel there are: a USB connector , an IR sensor for the remote control, a green digital indicator for the channel number and clock, plastic buttons for switching channels CH-/CH+ and POWER, as well as a green/red on/standby indicator.
Channel switching buttons will always help if the batteries suddenly run out, or you just can’t immediately remember where the remote control went?
The following connectors : antenna input - RF IN and output - RF LOOP THROUGH. RCA connectors (for “tulips”): digital audio output S/PDIF - orange COAX, HDMI , composite yellow VIDEO, regular analog audio output: red R (right channel), white L (left channel).
The legs are large rubber “snouts”. The weight of the console is about 350 g.
The remote control looks the same as a computer console. It “hits” from all sides and from walls, everything works fine, you don’t need to be a sniper.
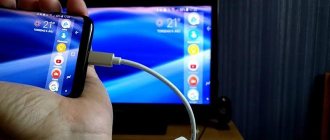
We connect yellow “tulips” to the yellow socket on the set-top box (VIDEO) and on the TV (VIDEO IN), white “tulips” to the white socket of the set-top box (L) and on the TV (AUDIO IN LEFT), red “tulips” to the red socket of the set-top box ( R) and on the TV (AUDIO IN RIGHT).
If your old TV only has one white socket (AUDIO IN), then you don’t have to connect the red “tulip” or buy an adapter: two RCA jacks, one “tulip” so that the sound from both channels goes to the common AUDIO IN input.
We connect an antenna to the RF IN input, and if you want to continue receiving existing analog channels, then from the RF LOOP THROUGH antenna output jack you can connect an adapter cable (not included) to the antenna input of the TV. An example of such a connection.
By switching TV/AV on your TV, you will be able to watch both “digital” from the set-top box and the existing old analog channels from the same antenna, without reconnecting the cable. After connecting all the connectors to the TV and switching it to AV mode, turn on the set-top box and see on the screen exactly the same picture as on the box (loading about 12 s ).
On the console panel, at first only the green power indicator lights up, then the digital indicator shows boot and dashes — — — -.
We launch “Channel Search” and wait about 3 m 30 s. At this moment, the panel says SCAN. All television and radio channels of the 1st multiplex were found and remembered. There is no need to launch “Channel Search” every time. If you have 2 multiplexes, just go to the “Channel Search” menu and perform Auto Search.
Next, we can sort/rearrange the channels as it suits us, and also rename them using only Latin letters (as on other set-top boxes).
The video will allow you to evaluate the speed of switching between channels (up/down), the REC and PVR functions (by pressing the INFO button), as well as some features of connecting set-top boxes via HDMI (more on this below):
To record the current program, simply press the REC button. And to stop - with the stop button (white square) and OK. Of course, before this you should already have a flash drive inserted (preferably formatted in FAT32).
Files of the form are created in the HBPVR folder: Channel Name-Date-Time.mts – 720×576 25FPS MPEG4 AVC (H.264), 192kbps 48 kHz mp3. The average recording speed almost 1.3 GB/hour.
As you can see, after the RTRS changes of December 16, 2013 (increase in the total bitrate from 2.1 to 3 Mbit/s), accordingly, the recording stream also increased almost 1.5 times. And, in particular, the sound is now not 128, but 192 Kbps.
You can specify the time for the subsequent automatic start of viewing or recording a program.
On the issue of the possibility of simultaneous recording and continued viewing of programs on other channels - here it is necessary to take into account the broadcasting features of 1 multiplex and the objective technical limitations of demodulators in set-top boxes.
To begin with, let’s clarify the current parameters of 1 multiplex after December 16, 2013, in particular the structure: PLP0 TV channels
- First channel
- Russia 2
- NTV
- St. Petersburg channel 5
- Russia Culture
- Carousel
- OTR
- TVC
TV channels PLP1
- Russia 1
TV channels PLP2
- Russia 24
When starting recording in any of the PLPs, it is highly undesirable to switch to a TV channel in another PLP, because at this moment the recording will no longer take place. It will resume again as soon as you return to your PLP.
For example, having started recording NTV (PLP0), you can safely switch and watch any TV channels from the same PLP0, but as soon as you switch to Russia 1 (PLP1) or Russia 24 (PLP2), the recording will pause until you return to any of the PLP0 TV channels.
And if you started recording Russia 1 or Russia 24, then it is not advisable to switch at all, because this will be an immediate transition to another PLP.
And it’s not very relevant yet, but a little clarification about simultaneous recording and viewing - with two or more multiplexes. In this case, if you start recording in one multiplex and want to simultaneously watch TV channels from another multiplex, the recording will also pause, because There is only one tuner-demodulator pair and is configured to receive only one multiplex at a given moment.
Perhaps someday there will be set-top boxes with two demodulator tuners, then it will be possible to record from one multiplex and simultaneously watch TV channels from another multiplex.
By pressing the TTX button, we will see functioning Teletext . For example, the teletext of the First Channel transmits the Program Guide for 2 days: Channel One, Russia 1, NTV, TVC, Russia 2, Culture, Home, STS, TNT, Peretz, RenTV, Moscow 24, Channel Five, Zvezda. And also - the current weather forecast in Russian cities, foreign resorts, European cities and a weekly forecast and much more - can be useful if there is no access to the Internet.
The TV Guide function also works fully . I note that in this set-top box, turning the pages of the program description works properly. On some models based on MSD7816, only the first page of the description is shown: there is no response to the Page below/Page above buttons. Here, as an example, I went to the 3rd (out of 4) page of the description.
The set-top box also has media player functions: listening to music, viewing photos and movies, but if you use some non-standard or unsupported codec or format, then there may be no image or sound. In TV set-top boxes, the media player is only an additional function, and not the main one, so you still shouldn’t expect absolute omnivorousness from TV set-top boxes, like a specialized media player. For example, this set-top box does not support AC3 (Dolby Digital) sound.
clocks working in standby mode . Let me remind you that they are synchronized with the transmitter, which in turn receives the exact time from the satellite.
By default, the set-top box menu is set to Auto power off after 3 hours. Therefore, it may turn off while watching. If necessary, change to Off.
Temperature conditions (with covers removed), °C: processor +62, demodulator +42, tuner +44, memory +42, power supply chip +46. The processor radiator size is 14x14x10 mm.
In general, the Operating Manual begins with the following points: 1. Read these instructions. 2. Pay attention to warnings. … 9. Be sure to unplug the device during lightning storms. 10. Do not block ventilation openings.
Terrain parameters : transmitter channel 27 (522 MHz), 2 kW (45 km zone). Reception point: 16 km from the transmitter, 3rd floor of an office building, urban development ahead, i.e. there is no direct visibility - the signal is only reflected. As an antenna, two pieces of ordinary mounting wire were used, screwed with electrical tape to a hanger - a classic half-wave dipole. Of course, without strict coordination with the cable, but nevertheless it works and shows.
Its total length is l = 300 / 2f,
where f is the channel frequency, in this case, 522 MHz, so l = 0.287 m. The frequency for channel N can be calculated as: f = N x 8 + 306
Undoubtedly, in the calculation for a half-wave dipole, all the nuances are not taken into account, but often even such a homemade antenna shows better than one purchased for 1000 rubles. indoor antenna with an amplifier - this type: Such antennas are usually only operational in the immediate vicinity, and even better - in the direct line of sight of the transmitter.
If possible, it is better to purchase antennas in specialized stores, and not in audio-video or computer stores, where the high price and stylish design often hides a simply expensive and, most importantly, ineffective antenna. It is advisable to purchase ordinary UHF antennas, and without an amplifier - passive ones. The quality of reception does not depend on the set-top box “with the most sensitive tuner” and not on the “most powerful amplifier”, but on the antenna. Approach the choice of antenna from a technical point of view, relegating the presence of modern design to the background. This way you will save yourself both nerves and money.
The manufacturer itself positions this receiver model as less sensitive in comparison with the VA2101HD (MxL603 tuner), because it uses the first generation NMI120 tuner, which was included with various set-top boxes 2 years ago. But nevertheless, not only Kaskad, but also other manufacturers now, for some reason, sometimes release new models with this tuner. This may be due to its lower price or other circumstances.
In my case, the difference was immediately felt, but I only had to move the hanger antenna close to the window itself. And set-top boxes with the MxL603 tuner were caught even when the hanger antenna was half a meter from the window.
I would like to note one more technical point that is found in set-top boxes (and on different processors). When connected via HDMI and a weak antenna, the Quality scale level may drop by 20-30% (different set-top boxes) if you select 720p or 1080i Resolution. Perhaps there is some kind of interference with the input signal, harmonics or spurious interference from HDMI, and only in 720p and 1080i modes.
In the second part of the video (starting from 3:20) this is clearly demonstrated by switching Resolutions (V-FORMAT button) and demonstrating the Quality scale (INFO button). At the end of the video (4:45) it is shown what will happen if you simply unplug the HDMI cable at 720p or 1080i - the Quality scale will immediately return to 100%.
This behavior is not observed if you are connected via the Composite input (“tulips”) - the Quality scale will always be maximum for your antenna. I repeat, this happens with different processors, tuners, demodulators when connected via HDMI and a weak antenna in 720p and 1080i modes. And in any other modes, including 1080p, this is not observed, the Quality scale is maximum. Place the antenna closer to a window or outside.
Well, one more nuance with weak indoor reception - if your antenna is located indoors away from the window, then when the computer is running, the Quality scale may decrease and be unstable. Moreover, when checking, the system unit was first connected through a simple two-pole power extension cord, and then directly into a grounded outlet - this did not have any positive effect. But as soon as you turn off the computer, the Quality scale immediately returns to a stable 100%.
Therefore, if possible, try to ensure that the antenna is located as close as possible to the window (or better yet, outside the window or on the roof), and the operating computer system unit is located as far as possible from the antenna.
If, after purchasing and turning on, in the title of the initial menu instead of VA2103HD you see the following message:
Installation Guide
This means you still have the very first version of the firmware. I strongly recommend updating by downloading the firmware from .
Technical details : tuner NM120AA, demodulator MSB1236C, processor MSD7816, memory Winbond W9751G6KB-18 (DDR2-1066, 64MB), flash Winbond 25Q32FVS1G (4MB), output linear amplifier 4558D JRC, LED driver FD650S, LED KY2843CD itself G-302, three 24 MHz quartz, DC-DC converters CU3FX and two LD3AN, power supply chip TNY176DG.
The NMI120 tuner is one of the few key components in manufactured set-top boxes that is publicly available. As a rule, there is no information (except for advertising) yet on tuners, demodulators and processors.
While looking at various set-top boxes, I sometimes noticed a small, incomprehensible connector (usually just 4 pins for a connector).
As it turned out, this is a UART MSD7816. In total - 4 contacts, as a rule, not even signed. In this set-top box, the place for the connector is designated as CN301.
- NC (not connected)
- GND (ground)
- RX (receive) may be marked SCL
- TX (transmit) may be labeled SDA
RX and TX are connected via 100 ohm resistors R36 and R40, respectively, to pins 94 and 95 of the MSD7816. Sometimes there is wiring without protective resistors. By connecting, for example, via a DATA cable from an old phone, you can get direct access to the console. The connection parameters are standard - 115200 8N1 without control.
For example, this is what it looks like to turn on the set-top box, show it a broadcast of Channel One, and then turn it off. If, when turning on, we immediately press any button on the keyboard (for example, Enter), we will be taken to the U-Boot bootloader console. A list of available commands with examples of their execution for some of them.
What is all this for? Sometimes, by accident, you flash firmware from another set-top box. In this case, you should contact the Service Center. But, for example, if it is very far away, then if you have the skill, you can try to restore it yourself. And to do this, it is not at all necessary to immediately unsolder the flash memory and look for (or make) a programmer. The set-top box itself can download the prepared firmware file directly from the flash drive. Similar operation. It also uses an MStar processor, albeit a slightly different model - MSD5043, and the flash memory is 8MB in size (8388608 bytes).
Moreover, the Trimax TR-2012HD in the regular menu has the opportunity to make a complete dump of flash memory and save it to a flash drive (for backup). Therefore, the above procedure simply flashes the correctly renamed previously saved dump. Or - the original firmware from the website of the Ukrainian manufacturer (this is also just a dump).
In set-top boxes on our market, there is usually no such thing as saving a flash memory dump. And the firmware on our manufacturers’ websites are images with a list of initial control commands in the file header. By cutting off the first 4096 bytes (0x1000) from the manufacturer’s original firmware and saving the modified file to a USB flash drive, you can use the above method to write it to the flash memory of an unsuccessfully flashed set-top box (“brick”).
Positive: working clock, buttons on the panel, rubber feet. Negative: Less sensitive tuner.
In general, it can be recommended for reliable reception of digital television in the near and middle zone.
5/5 — (1 vote)
You can ask questions about digital television on the DVBpro forum
Author: Alexander Vorobyov, 21 Jan 2014 | Permanent link to the page:
TV with Smart TV
Television equipment with smart functionality appeared in Russia relatively recently, but almost immediately began to enjoy enormous popularity. There is nothing surprising in this; Smart TV supports absolutely all modern formats, and also allows you to connect to the Internet.
To set up television channels, follow the instructions that come with the equipment. You can also use the services of professionals. If this is provided for by the terms of warranty service, the specialist will set up programs and add TV channels absolutely free of charge.
However, setting up a broadcast connection on your own on modern models will also not take up much free time; the main thing is to be patient and fully follow the basic recommendations. Smart TV on a Samsung, LG, Sony TV or any other device will automatically set up broadcasting. The found TV channels will be saved on the device’s internal memory.
Manual adjustment is required only in some cases, for example, to improve the picture or sound quality of a previously saved TV channel.
Separately, I would like to note the features of setting up high-definition television - HDTV. This innovative standard is capable of ensuring the transmission of the highest quality images in comparison with analogue and digital broadcasting. The format is based on careful compression of video and audio, digital transmission makes the picture rich and the audio tracks voluminous.
If digital TV channels are already configured on your Smart TV, then to add HDTV broadcasting you just need to rescan, after which they will appear in the list.
What you need to connect digital TV
To connect a new type of television broadcasting, you need to purchase some equipment in advance. The process will be easier if a modern TV already has a special adapter installed that decrypts the incoming signal. If the TV equipment is an old model, you will have to buy an additional receiver, and in some cases even change the cable antenna. For the smooth functioning of the system, you will also need a high-quality cable for the TV.
Full list of equipment:
- Cable antenna. If the tower is located close to home, then it is not necessary to spend a lot of money on purchasing the most modern models. An ordinary indoor antenna will do. If cable TV is connected to an apartment building, you will not have to buy an antenna. It should already be on the roof and set up by the cable signal supplier.
- Cable signal amplifier. If previously you had to use an amplifier to receive channels, you will also need one if you connect digital television. A high-quality device will provide good signal reception, even if the TV is very far from the tower. In order for cable channels to be shown without interference, it is advisable to purchase an amplifier with a 12 V power supply. But manufacturers sometimes reduce this voltage to 5 V. You need to find out such nuances by reading the instructions for your equipment. If there is no signal on the TV, then an amplifier is needed.
- Tuner. To receive a high-quality picture, you must use a special cable receiver. On modern models it is already installed in the TV. If this is not the case, you will have to purchase a special set-top box with a remote control. They also buy a special tuner for new TVs, connecting to a specific operator to get a larger number of channels.
- Cable. A modern cable is used to connect the antenna and cable TV. If your TV is a model, you will need RCA or S-video connectors. For modern devices, the preferred option is HDMI. It is important to clarify that when connecting via an RCA connector, good HD image quality cannot be achieved. The picture will be the same as with analogue television broadcasting. To improve the TV signal, if there are no HDMI inputs on the TV panel, you will need to additionally buy special adapters.
How to watch channels without an antenna?
Consumers have the unique opportunity to watch all the popular channels on their TV without connecting to satellite, analogue or digital broadcasting. There is absolutely no need to pay a provider for cable TV or install a dish or antenna; you just need to purchase a Smart set-top box and connect it to the Internet. As a result, absolutely all popular channels in the former CIS countries will become available for viewing.
The good thing about watching television without an antenna or cable is that the quality of the broadcast is absolutely independent of weather conditions. In addition, the TV set-top box is equipped with a lot of additional useful functions. For example, it records all programs, movies, TV series, etc. on the internal memory. That is, if you are late for a match of your favorite team, you will be able to watch it recorded and in excellent quality. If you need to leave urgently, you can always pause the broadcast. Considering these features, it becomes clear why Smart set-top boxes are so popular.
If you already have a smart Smart TV, then you can connect to any IPTV service, install the application and enjoy watching. For example, on https://www.ottclub.cc you will find more than 200 IPTV channels in Full HD quality from $4.5 per month. Including sports 50fps and strawberry.
Additional packages
| HD PLATFORM | 350 rub./month |
| MATCH PRIME | 299 RUR/month |
| SUPER SPORT | 250 rub/month |
| FILM | 150 rub./month |
| CHILDREN'S | 100 rub./month |
| MIX | 250 rub./month |
| FILM+CHILDREN'S+MIX=FAMILY | 500 rub./month 350 rub./month |
| NIGHT | 350 rub./month |
| + mandatory payment for the “Basic package” - 250 rubles per month (paid separately according to the general utility bill) | |