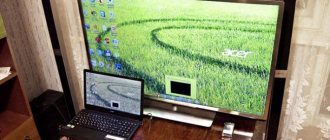
I have already prepared several instructions for connecting a TV to a computer via an HDMI cable, and I noticed that there is one very popular problem that many people face. The problem is that after connecting the TV to a computer or laptop, there is no sound on the TV. That is, the sound is not played through the HDMI cable, but continues to sound from the laptop speakers or speaker system.
We know that sound is transmitted through an HDMI cable. This means it should sound from the TV speakers. And as a rule, the sound on a TV is much better and higher quality than on the same laptop. Therefore, it makes sense to still configure the sound via an HDMI cable on the TV. When I wrote the connection instructions, I myself encountered a problem when there was no sound on the TV. But this problem can be solved very simply. You just need to change some settings on your laptop or PC. Moreover, in Windows 7 and Windows 10 these settings are almost the same.
I’ll immediately provide links to detailed articles on connecting a TV via HDMI:
- How to connect a laptop to a TV via HDMI? Using the example of an LG TV
- How to connect a TV to a laptop via Wi-Fi or HDMI cable in Windows 10?
By the way, in these articles, I wrote about problems with sound. Everything is described there in detail. One article uses Windows 7 as an example, and the second uses Windows 10 as an example.
Setting up audio transmission via HDMI
If audio over HDMI is required, this setting must be selected in Windows preferences.
Step 1. Press the key combination “Win+R”.
Press the key combination “Win + R”
Step 2. Type “control” in the menu and click “OK”.
Type “control” in the menu and click “OK”
Step 3. In the “Control Panel” window, select “Large icons” in the drop-down list and click on the “Sound” icon.
In the “View” mode, set “Large icons”, click on the “Sound” icon
Step 4. On the “Playback” tab, select “Digital Audio (HDMI)” from the list, right-click on it, left-click on the “Use as default” line in the menu, then “OK”.
Select “Digital Audio (HDMI)” from the list, right-click on it, left-click on the line “Use as default”, then “OK”
Important! If the connected TV is not detected in the “Sound” window, you need to right-click on the “Speakers” icon and left-click on the “Show disconnected devices” line. Next, select the icon that appears with the name of TV, right-click on it, then left-click on the “Enable” line.
Right-click on the “Speakers” icon, left-click on the line “Show disabled devices”
Right-click on the icon with the TV name, then left-click on the “Enable” line
Step 5. Restart your PC and check if the HDMI audio works.
Video - No sound via HDMI on TV
Update HDMI audio driver
If after making the changes there is still no sound, it is possible that the sound card with HDMI output is not activated in the system, or the required driver is not installed.
Step 1. Press “Win+R”, type “devmgmt.msc” and click “OK”.
In the “Open” field, type “devmgmt.msc” and click “OK”
Step 2. In the “Device Manager” window, click to open the “Sound, video devices...” section and look for the presence of devices marked with an arrow, exclamation mark or question mark.
Note! Modern video cards have a built-in High Definition Audio controller for audio output via HDMI.
Expand the “Sound, video devices...” section with mouse clicks and find the devices marked with an arrow
Step 3. If the device is inactive (marked with an arrow), right-click on it and select “Enable” with the left mouse button.
Right-click on the device with the down arrow and select “Enable” with the left mouse button.
Step 4. If there are exclamation or question marks on the devices, select “Update driver” using the same method.
Right-click on the device with exclamation or question marks, left-click on “Update driver”
Step 5. Select “Automatic search...”. The system will search and install the driver.
Select “Automatic search...”
Step 6. Repeat the steps in the “Setting up audio signal transmission via HDMI” section, restart the PC and check the sound output on the TV.
Important! If the automatic search does not work, download the drivers and install them manually or use a third-party utility, instructions for which are presented below.
Using Driver Easy
If the user does not have the time or skills to search and install all the necessary drivers, this can be done using the Driver Easy program.
Step 1. Follow the link: https://download.cnet.com/DriverEasy/3000-18513_4-75090748.html?part=dl-&subj=dl&tag=button and click “Download Now”.
Go to the website, click “Download Now”
Reference! After downloading, the installation file can be found by going to the “Downloads” of the browser.
Open your browser settings and select the “Downloads” option.
Step 2: Run the installation file, select your language and click OK.
Select the language and click “OK”
Step 3. Click “Browse...” if you want to specify a different path, or click “Next” directly.
Click “Browse...” to select a different path to save the file, or immediately click “Next”
Step 4. Select whether to create a shortcut for the program on the desktop and click “Next”.
Check the box to create a program shortcut on the desktop and click “Next”
Step 5. Click “Install” to install the software.
Click “Install”
Step 6. About to start the program automatically and click “Finish”.
To automatically start the program, click “Finish”
Step 7: After opening the program, click “Scan Now”.
Click “Scan Now”
Step 8. The program will create a list of PC drivers to update. Click “Update All” to perform the update.
Click on the “Update All” button
Step 9. Follow the steps in the “Setting up audio signal transmission via HDMI” section, restart the PC and check the audio output on the TV.
No sound due to drivers
Even if everything works fine, the components are in working order, this does not mean that the reason is not in the drivers.
A driver is a program that controls the operation of each computer component.
It is possible that the wrong driver was installed initially. For example, a universal package that does not take into account individual equipment parameters. Or the drivers were damaged. This also becomes the reason why there is no sound when connecting to HDMI. Then you need to install the “firewood” from scratch.
Determine your video card model
- In Device Manager, under Video Adapters, open the properties of the displayed video card.
- The full name of the graphics card will be written on the Details tab.
Find out the system capacity
In the computer properties, the type of operating system is always written: 32 or 64-bit.
Download the software
- For NVIDIA users, you need to go to the official website using the link and select a graphics driver, taking into account the bit depth that was determined earlier.
After clicking on the “Search” button, the site will redirect to a page where there will be a download button “Download Now”.
Save the driver file to a convenient location and install it after downloading. - To download software for AMD equipment, the same steps are taken. Follow the link to the company's official resource. Scroll down the page a little to see a filter for selecting the program version. Select the required driver and click on “Submit”.
On the next page, expand the branch that matches your system. Click the “Download” button and after downloading the driver to your PC, install the software.
You can find many recommendations on the Internet regarding the DriverPack Solution program. This is a comprehensive software for installing firewood. But many also do not recommend using the program due to the fact that, in addition to the main driver, the system may be replenished with unnecessary “stuff”. Therefore, it is better to download software from official sources.
How to connect two TVs to a PC with one HDMI connector
If the video card has only one HDMI connector, the first and easiest option for connecting two TVs is to use a video splitter, for example, Telecom TA653.
One end of the splitter is connected to the HDMI output of the PC video card, and HDMI cables going to two TVs are inserted into the other two.
Video signal splitter for connecting two TVs to a computer
However, this solution has an obvious drawback due to the fact that the same image will be displayed on two connected TVs.
You can expand the capabilities of your PC when transmitting a video signal if you use additional connectors located on the video card.
Many modern video cards include two or more connectors for connecting external signal display sources. Typically these are sets of VGA+DVI, VGA+HDMI, etc. connectors.
For example, if the video card comes with a proprietary DVI-HDMI adapter as well as an HDMI-HDMI cable, or a separate DVI-HDMI cable, this will allow you to output video and sound to your TV via HDMI.
DVI-HDMI cable
Reference! Not all video adapters can operate in image transmission mode over several channels simultaneously. In these cases, one of the TVs will be inactive when viewed.
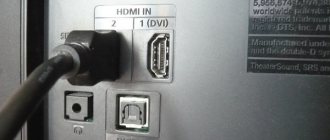
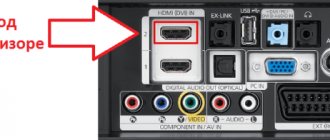
Check the connected port
If there is an image via HDMI, but there is no sound on your television, first check that the connection is correct. TVs on the back panel are equipped with several ports. On older receivers you can find an HDMI connector that transmits only a picture and does not transmit sound. This is an old version of the interface (1.3), which is indicated in brackets as “DVI”.
If you used this particular port when connecting, the sound will not be transmitted even if the entire system is working properly. It is necessary to switch the cable to another connector that is not labeled “DVI”.
The hot connection method (with the TV turned on) can damage the port.
Therefore, any actions with HDMI should be performed only after turning off the television equipment.
Adjusting the TV picture
Let's consider a situation where a video card provides output to several video devices simultaneously.
Step 1: Right-click on the desktop and select the Screen Resolution option from the menu.
Right-click on the desktop and select the “Screen Resolution” option from the menu
Step 2: If the connected monitor is not yet detected, click Find.
If the connected monitor has not yet been detected, click “Find”
Step 3. Activate the “Duplicate these screens” function to display the same image on your PC and TV monitor. Click "OK".
Activate the “Duplicate these screens” function, click “OK”
Note! This function is often used to watch high-definition videos on TV.
Step 4: Activate the “Extend these screens” feature to use your PC and TV screens independently. Click "OK".
Activate the “Extend these screens” function and click “OK”
Note! This feature is often used to simultaneously watch video and work on a PC or display a game on multiple TV screens.
The "Extend these screens" feature is effective on PCs that are powerful enough to handle the tasks assigned to them in this case.
Troubleshooting
Every version of Windows OS has a built-in troubleshooter. Can be used to correct the operation of each component. In our case, diagnostics are launched through the speaker in the system tray.
Let the tool scan and find problems.
If necessary, make corrections by following the on-screen prompts.
Causes of malfunction
In the vast majority of cases, the complete disappearance of sound is caused by the failure of any components of the speaker system. Therefore, to identify a malfunction, it is simply necessary to diagnose such components as:
- amplifier. It is designed to ensure high-quality sound from a television receiver. The device is very susceptible to voltage surges in the network, due to the impact of which it can quickly burn out. Therefore, you should start looking for breakdowns with it;
- speakers. The very simple design of these components makes them very reliable, but mechanical damage or natural wear can cause the sound to disappear;
- radio channel Its malfunction may be indicated by the sound volume being too low and the inability to adjust it.
If we talk about the most common problems, then in almost any TV, it is the speakers that fail over time. To independently diagnose the malfunction of these parts, you can suggest connecting headphones to the device. If sound appears in them, then you will need to install new speakers.
See also -
How to choose a TV for your home: expert advice
If the connection is made through an adapter
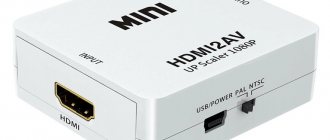
Sometimes equipment is connected not directly with an HDMI-HDMI cable, but through adapters. For example, an audio channel is output via HDMI on a laptop and goes to the VGA or DVI input of a TV. In this case, the sound will not appear, since the listed interfaces transmit only the video channel. In this case, you need to additionally run a cable for sound input.
For example, you can output audio from the headphone output of your computer. And connect it either to the mini Jack 3.5 connector on the TV, or with two tulips (white and red). Then 3.5-3.5 or 3.5-2RCA cables are used (Fig. below), respectively.
It turns out that for sound and display of images on a television screen you will need to run two cables. One for broadcasting pictures, the second for sound.
To avoid using two cords, you can use a Display Port-HDMI adapter.
If the sound disappears, but it worked before
A sudden loss of audio indicates a problem. Audio transmission cannot simply stop. This means that the cause needs to be identified.
- First, make sure that the HDMI cable is not damaged. The cable may have been severely bent or squeezed, resulting in damage to the internal conductors. The plug contacts may also be damaged. Visually inspect the contacts to ensure that all metal parts are intact and clean. Frequent use of connectors and sudden inaccurate pulling of the cable can lead to wear and breakage of the connectors.
- Some program caused the crash. Remember what programs have been played recently. If the added software is small, try fixing the sound by removing programs.
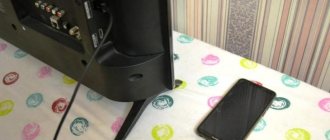
Laptop and TV
Instructions on how to output sound from a laptop to a TV. The user needs to purchase an HDMI-to-HDMI cable or a JACK-2RCA cable.
JACK–2RCA
- Turn on the laptop and LCD panel.
- After loading the laptop OP, open the sound setup program.
- Select the system type "FRONT SPEAKERS".
- In the TV menu, select the “SOUND SOURCE” tab.
- Open the player and play any music composition.
- Set up the equalizer.
HDMI-HDMI
- Connect the laptop and plasma using an HDMI cable.
- In the panel settings, specify HDMI as the main signal transmission source.
- On your laptop, open the control menu and go to the “HARDWARE AND SOUND” section.
- Select the “Manage sound devices” link; in the “Playback” section, the “SPEAKER” item should be activated.
- Click on the HDMI Output icon, select “Properties”, activate the “Use this device” tab.
- In the previous menu, activate “DEFAULT”.
- Play any musical composition to check the sound operation.
- The setup is complete.
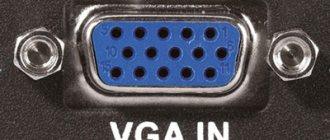
VGA cable
This method of dividing the sound signal between a TV and a computer is outdated. It is inferior to the first two options in terms of playback reliability and ease of connection. It is used in outdated devices where it is not possible to connect using other cables.
Quite often the VGA output is occupied by a computer monitor. To connect another device, you should buy a special adapter, as well as a cord to play sound.
The VGA interface is not designed to transmit audio. It is used as an additional element to which another special cable should be connected. Compared to other methods, this option is more expensive and complex.
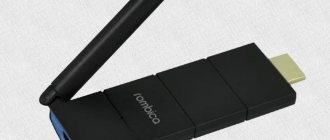
RJ45
Are you connecting your computer audio to your TV using RJ45, but nothing works? Then check whether the TV supports DLNA data transfer technology.
A router is also used here, which must be configured in the same way as when connecting via Wi-Fi. The use of the device can reduce the transmission speed of the data. Therefore, it is better to use an additional network card.
The same principle is used as via Wi-Fi. The connection is made through a media server.
More tips
Sometimes it is not possible to transmit sound to a TV connected to a computer for reasons unknown to the average user. Therefore, if the instructions above did not help you turn on the sound, try these tips:
- disconnect all external devices from the TV;
- Turn off all programs that start up automatically when Windows starts. In the task manager (keyboard combination Ctrl+Shift+Esc) on the “Startup” tab, change the state of programs to the “Disabled” status. Restart your computer and check the sound.
Some users simply forget to exit this mode. If the crossed out speaker icon lights up on the screen, then press the “Mute” button on the remote control.