Modern TV receivers are sophisticated, technically advanced products. They are designed for supply voltages that vary widely, as well as other parameters. There are practically no defects in TVs out of the box. The user is not required to troubleshoot any abnormal operation of the device. However, this does not mean that a TV malfunction cannot occur in principle. It is not recommended to try to fix serious problems yourself. It is better to immediately take the TV to a service center or call a specialist for professional diagnostics at home.
How LCD TVs work
The average user is sure that the main part of LCD TVs is the screen. Yes, this functional unit is indeed complex. But the image on it is formed thanks to signals supplied by the central processing platform, roughly speaking, the device’s motherboard.
The main role in the design of LED TVs, despite its relative simplicity, is played by the power supply . It is this that allows a particular model to work with a wide range of voltages, while simultaneously supplying all functional units with a controlled level of energy supply necessary for their stable and correct operation.
If any structural unit fails, the TV stops showing. In particular, it is impossible to understand from the image on the screen how its backlight works. But when it fails, you can see the picture only by shining a flashlight on the matrix. So, the main failures of LCD TVs can occur:
- in the matrix, the area where controlled translucent cells are located;
- in the power supply;
- in the backlight inverter assembly;
- due to failure of electronic components of the motherboard and timing control unit.
What can you repair yourself?
Since an LCD TV is a fairly complex electronic device, you can fix only some problems yourself, and only if you have minimal knowledge and skills in radio electronics. So, you can do it yourself:
- troubleshoot problems with the remote control or lack of TV signal;
- repair the power supply;
- replace the backlight bulbs.
Replacing the matrix itself, if it is damaged, is not always justified from a financial point of view, since its price is approximately 80% of the cost of the device.
Problems with the remote control
If you try to turn on the device from the remote control, but it does not respond to your actions, then first of all, you should check the validity of the batteries. Dead batteries should be replaced. If dirt has accumulated under the remote control buttons, you will also not be able to use it. Disassemble it and clean all dirt from the contacts. Another reason that the remote control has stopped working is that it has been dropped, resulting in damage to the quartz emitter that will need to be replaced. If the remote control was filled with liquid, and drying it did not help bring it back to “life,” you will have to throw it away and buy a new one.
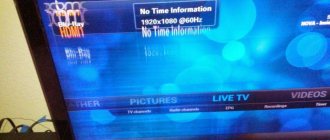
No TV signal
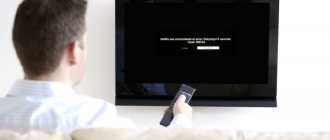
A situation often arises when a working TV refuses to turn on. But not everyone immediately realizes that this behavior of the device can be caused by a banal lack of a TV signal. This fact is explained by the fact that modern TVs use a noise reduction function. If there is no TV signal, protection is triggered and the TV switches to standby mode . Therefore, if your TV receiver stops turning on, first check the presence of a TV signal, and only after that look for other reasons for the equipment failure.
Power supply repair
To generally understand how to troubleshoot a power supply, the whole process can be followed using the example of repairing a DAEWOO TV.
Before proceeding with repairs, make sure that the device is unplugged from the outlet.
Next, do the following.
- Unscrew the screws holding the back panel and remove it (if the panel is held on by latches, try not to break them).
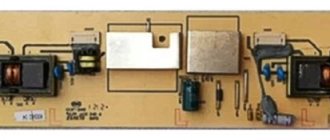
- After removing the cover, you will see the PSU on the left and the motherboard on the right.
- If you look closely at the power supply board, you will notice 3 transformers on it. The one located at the bottom is the mains rectifier choke, the top (large) one supplies power to the inverter, and to the right (of the large transformer) is the power supply transformer, used in standby mode. Diagnostics should begin with the latter, since thanks to it the device’s standby mode is activated.
- Typically, during normal operation, this transformer should produce a voltage of 5V at the output. You can use the diagram to find the desired contact. But if you look closely at the board, you will notice that opposite the required contact there will be a 5V marking.
- First, you need to eliminate an open circuit. Touch the contact (5V) with the probe of the device, and touch the cathode of the diode located on the radiator with the other probe. The next photo shows that there is no break in the circuit.
- After this, attach one probe to the metal case, and with the other touch the same contact (5V) to measure the voltage (the TV must be plugged in). If the device shows a value less than 5V, then we can conclude that the transformer is not operating at full capacity. A decrease in voltage can be caused by swollen or “dried out” capacitors that need to be removed for replacement.
- Before replacing capacitors, you will need to remove the board. But first, carefully pull out the cables going to the power supply from the main board, and also disconnect all the wires connecting the board to other TV components. To avoid confusion when assembling and connecting the cables, it is recommended to photograph their initial placement.
- Unscrew the screws holding the power supply board and remove it. Be careful: Since the capacitors on the board are charged, you may receive a severe electric shock. Therefore, after removing the board, you need to discharge them, for example, using a screwdriver.
- Next, you need to unsolder the defective parts and solder new capacitors, observing polarity.
- Assemble (in accordance with the photos taken earlier).
- Measure the voltage again after assembly (turning on the device). Now it is within 5V, which is normal.
Replacing capacitors is the simplest operation that a home mechanic can perform. In other cases, you cannot do without special knowledge, and it is better to entrust the troubleshooting to a specialist, since your incorrect actions can cause the motherboard to burn out.
Replacing backlight bulbs
You can also replace burnt-out backlight lamps installed in the matrix yourself. The process of replacing lamps will be demonstrated using the example of a Sharp device. Using this description, you can change the lamps in the LCD matrices of TVs of other brands.
- Unplug the TV and remove the back panel of the device.
- Using extreme caution, disconnect all cables connected to the matrix.
- Next, you should disconnect the control panel. There is no need to remove it completely, since you will have to use the panel to turn on the lamps.
- Check that all cables are disconnected, then remove the case with the boards screwed onto it. It is recommended to photograph all actions during disassembly of the TV so that there are no difficulties during reassembly and connection of all components.
- Before removing the matrix, unscrew the front frame. Carefully unclip the fasteners and remove the filters and matrix.
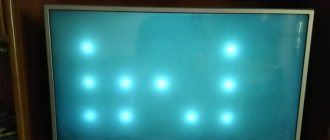
- Turn on the device and press a few keys on the control unit to enter the service menu. These steps will help turn on the lamps.
- The next photo shows that the fifth lamp from the top does not light and requires replacement.
- Replace the lamp and reassemble.
- When assembly is complete, you need to reset the lamp error counter. To do this, you will need to find the required line in the TV service menu, and then reset by selecting “OK”.
Main causes of breakdowns
The reasons for a TV breakdown can be different. In a large number of cases, these are power surges, static breakdowns along the antenna cable (or due to lightning strikes), and emergency situations on connected equipment. There are also purely technological failures of hardware components due to their manufacturing defects.
Important! A huge number of cases of contacting service centers are TV malfunctions caused by its improper operation.
Trying to fix TV problems yourself can be dangerous. In most cases, inexperienced actions can cause additional troubles. Among other things, such user operation voids the manufacturer's warranty. However, the causes of a TV breakdown, correctly diagnosed by visible failures and cases of abnormal behavior of the device, will allow you to quickly call a technician or deliver the product to a service center.
Matrix faults
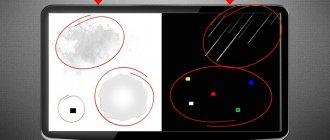
Malfunctions of LCD TVs associated with incorrect operation or damage to the light-transmitting display matrix can be easily identified by the user by visible signs. There are two groups of breakdown options. One includes malfunctions of the signal transmission system. Secondly, physical damage to the matrix itself.
- Factory dead pixels. It is recommended to find them while purchasing a TV in the store. According to the standards, there should not be more than 5 dots on the entire screen plane that do not change color when the image is reproduced. If there are more of them, the device is not worth buying. Dead pixels cannot be repaired.
- Damaged pixels. The LCD display matrix is quite fragile, and in most TVs it is covered with a thin plastic plate. As a result of an impact, pixels (cells of liquid crystals with controlled light transmission) can be damaged over a large area. As a result, a spot is formed, most often black (on some matrices it is white).
- Results of exposure to vibration, moisture, hypothermia. In all these emergency situations, a wide variety of spots and stains form on the TV display. These may be areas with irreparably damaged pixels. Or they stop handling normally, distort colors, and cannot reproduce the correct range of shades.
The group of options for abnormal behavior of a TV screen is more diverse. If the cable tracks on the matrix are damaged, the picture may malfunction, from stripes and interference to breaking into squares and incorrect colors .
It is simply impossible to describe all the cases; they are chaotic and largely unique.
Why can't TV be sent to a landfill?
Every day from 8 to 23
We also repair refrigerators in the cities: Lyubertsy, Dzerzhinsky, Vidnoye, Podolsk, Odintsovo, Krasnogorsk, Dolgoprudny, Mytishchi, Balashikha, Reutov, Elektrostal, Noginsk, Zhukovsky, Ramenskoye, Domodedovo, Odintsovo, Zelenograd, Lobnya, Korolev , Solntsevo, Zheleznodorozhny, Khimki, Serpukhov, Chekhov, Malakhovka, Troitsk, Sergiev Posad, Barybino
IP VASILIEV M.V. INN 434581625973 OGRNIP 309503126500014
| Home Documentation Certificate of technical condition |
Some enterprises still feel the need to write off Soviet-made equipment. To correctly register the decommissioning of equipment, a certificate of technical condition of the device , which can be issued by an equipment repair shop that has permission for this type of activity, i.e., to conduct examinations (at least at the time of writing this article) no special license is required.
The reason for refusal to carry out a technical condition examination, as a rule, is the workshop management’s ignorance of how to correctly draw up the report.
Below we will look at an example of an act for writing off a Soviet-made TV:
The act is printed on the workshop’s letterhead or on an A4 sheet
Power supply failure
TV malfunctions associated with a breakdown or incorrect operation of the power supply occur only as a result of network voltage surges.
Advice! It is recommended to connect all TVs without exception via stabilizers. Or, at a minimum, surge protectors that eliminate interference and voltage surges.
Typical signs that the TV power supply has stopped performing its functions include:
- the device does not turn on;
- the TV starts to work, but after a while it turns off on its own;
- the device turns off when trying to program or call up the on-screen menu, when switching channels;
- When you try to turn on, the readiness indicator lights up and goes out, blinking.
If there is insufficient output power on individual circuits, the TV screen may not light up. At the same time, the device regularly reproduces sound, switches channels, and responds to other commands from the remote control and body buttons. What exactly to repair in the power supply should only be decided by a qualified technician after thorough testing. Including reading data from internal service statistics of the TV’s self-diagnosis.
Failure of the backlight inverter
If the TV screen does not start up during normal sound playback, it is recommended to pick up a flashlight and shine it on the matrix . In the event that the inverter board is broken or malfunctions, the user will see a completely normal image on it at the place where the light falls.
The backlighting system of a modern TV is relatively simple. It is linear in inexpensive models; LEDs operate in the same color spectrum. In advanced products, a more complex system of light cells is installed. But in any case, this set of light emitters requires a precisely controlled, stabilized power supply.
The inverter board performs two tasks. On the one hand, it increases the motherboard signal voltage to the level necessary to trigger the backlight. On the other hand, it stabilizes the output current. The following may indicate board failure:
- completely dark screen;
- uneven illumination, from zonal (different at the bottom and at the top) for inexpensive Edge LED systems, to spotty for Direct LED;
- Instability of LED start-up, individual areas of the screen flash, flicker, light up and go out.
Important! Most TVs have the inverter board located at the bottom of the display. The user's hand will feel warm in this area if the node fails and makes multiple attempts to start.
If this situation occurs even during normal TV operation, it is recommended that the device be thoroughly tested. Perhaps the inverter is holding on, as they say, with all its strength, and its breakdown is very close.
The motherboard is faulty
On the motherboards of modern TVs there are many linear electrical components (resistors, capacitors, diodes, etc.) and complex microelectronic chips installed. This block is responsible for most functions. Including the interface for communicating with the user, the programming system and monitoring the operating parameters of other system modules.
If the motherboard is seriously damaged, the TV will not even turn on. However, if no problems were detected during self-diagnosis, but the module is malfunctioning, they may appear when watching TV.
Important! It is worth understanding that a separate motherboard chip is occupied with servicing the peripherals (input and output ports). If it breaks, everything works except the inputs and outputs of the TV.
Problems with the motherboard can be identified by the following signs:
- the TV does not respond to commands every time, it does it slowly, for example, it switches channels;
- There is noise on the display;
- the TV suddenly turns off or goes to the on-screen menu;
- settings fail;
- When attempting to access the OSD menu or programming, the TV turns off or goes to the GUI home page.
The motherboard must be repaired if any signs of malfunction appear. If this is not done, even a minor breakdown can cause a cascade of failures, leading to complete failure of the module.
Less significant problems
Also, problems with the LCD monitor can arise due to the following breakdowns:
- Antenna and receiver - in this case the screen is fully operational, the problem is in the additional equipment. In some cases, you just need to tighten the contact or reconfigure the antenna, and the interference and problems will be eliminated.
- The cooling system is a common problem with LCD monitors; it can be fixed with the help of specialists, but DIY repairs are also possible.
- Video processor – if the video processor fails, stripes appear on the screen. Before repairs, diagnostics are usually carried out using special equipment.
Damage to the timing control board (T-con)
The timing controller board is one of the most reliable components of the TV. It works in completely safe modes. On the one hand, it receives commands from the motherboard. At the output, it transmits a signal to the display matrix control system. However, you should not think that this module will not break. The board may overheat, dust and cockroach droppings accumulate on it. Don’t forget about humidity fluctuations and banal factory defects.
Signs of a T-con board failure can be determined by the image on the screen . It may become uniformly colored, gray or white. Typical symptoms include various image artifacts, blocks of image construction failure, stripes and temporary snow, and interference. Often there is a violation of the color scheme or the transition of the picture to black and white format.
Many manufacturers offer standardized timing control boards in their device series. As a result, the user has no problems with either the availability or the excessively high cost of these modules. Therefore, at the first signs of problems detected, you should definitely contact a service to repair your TV.
Disassembling the device and fixing the problem
It is very important to carry out the disassembly procedure very carefully so as not to damage other components of the device and not make TV repair prohibitively expensive. It is especially important to be careful when removing the screen itself, because breaking the cable leading to it will require, as in the case of physical destruction, a complete replacement of the matrix.
Alas, such repairs cannot always be called a profitable solution, because taking into account its cost, it would be much more reasonable to purchase a new model. The exact price depends on the features of the matrix, the presence of other defects, as well as the availability of a new screen for sale.
Before disassembling the TV, you need to prepare enough space on a large table. The space should be at least 2.5-3 times larger than the dimensions of the device. This is necessary for conveniently rearranging different elements, such as screws, boards, as well as the matrix itself. It is also recommended to place a piece of cardboard or thick soft cloth on the place where all procedures will be carried out, which will protect the display from scratches, chips and other damage.
Then the TV is placed on the table with the screen down and the screws holding the cover are unscrewed around the perimeter of the case. After this, it should be easy to remove, but sometimes you will also need to find an additional lock and set it in a different position. After completing this procedure, turn the TV over and remove the front frame from the latches, which will help you gain access to the matrix. In some cases, you can access the insides of the TV not from the back, but from the front, which depends on the design of the device.
If you accidentally spilled a drink (coffee, soda, etc.) on the TV, after which image artifacts appeared on the screen, then sometimes to restore the TV’s functionality it is enough to clean the cables leading to the display. In this case, in addition to screwdrivers for disassembly, you only need a regular eraser. However, this method will not help with physical damage.