It would seem that choosing and buying a TV - what could be simpler? The modern market of household appliances offers an incredibly large assortment. But how not to make a mistake and buy a quality device? The product is technically complex, returning it to the seller is often difficult, and some screen defects are not even considered defective. How to properly check a TV without taking it out of the store - in our article today.
In order not to buy a “pig in a poke”, you need to prepare for the purchase at home. And the matter here will not be limited to viewing numerous Internet resources. The presence of good reviews about the model only indicates that their authors came across successful copies. Nevertheless, a certain percentage of defects is present even among the most famous manufacturers. And not every seller will be willing to test the device for the buyer. Therefore, even having decided on the model, we first of all arm ourselves with knowledge of the hardware to check the TV before purchasing.
Ears on top of head
Packaging is the second face of the product. And it’s not just about the design: if it’s noticeable that the packaging has already been opened and the protective films have been removed, it’s time to refuse the purchase. Most likely this is a used TV or a display unit. Special attention should be paid to TVs with polished metal panels or chrome elements - they should not have scratches or other damage.
When receiving the package with the TV, you need to check:
- condition of the packaging (especially traces of moisture);
- complete set of accessories (remotes, cables, documentation);
- the presence of original protective films on the TV body and stand;
- no traces of dust (a clear sign that the product has been used).
Often the list of standard accessories is not limited to the remote control: for example, Samsung UE43M5513AUXRU is equipped with a corner adapter for the antenna, which allows you to hang the TV close to the wall. To avoid unnecessary costs and loss of time, it is better to immediately check whether everything is in place. If at this stage everything turns out to be in perfect order, and the case is shiny from protective films and seals, you can proceed to the main part - testing for functionality.
Broken and hot pixels
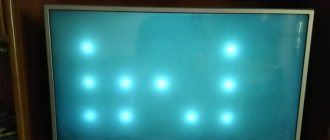
The TV matrix consists of many pixels. They turn on/off alternately and can glow in different colors. If a pixel is damaged, it will not be able to display all colors or light up at all. It’s easy to check for dead pixels - just download uniform fills of different colors to a USB flash drive, and turn them on one by one to fill the entire screen on the TV. If you see a black dot on the screen on any of the colors, this is a dead pixel.
If dead pixels are black dots that are not burning on the screen when the screen is turned on, then “hot” pixels are pixels that are constantly burning in the same color. You can turn on a dark scene, a light, uniform fill - a hot pixel will always glow with one color.
Let's go deeper into details
Defective pixels
It seems that it’s not difficult to check the TV - turn it on and watch. But it’s not that simple—some display defects will only appear under certain conditions. Moreover, it may turn out that, by the manufacturer’s standards, they are not considered defects. The most obvious example of such reinsurance against the return or exchange of goods is the notorious dead pixels. A certain number of them is allowed by various standards, so if you discover this defect already at home, it will be extremely difficult to return the TV back. Therefore, it is better to check before purchasing.
It is quite easy to identify a completely non-working pixel, but a partially defective one is much more difficult. Each pixel is formed from three subpixels (red, green, blue). If one of them stops working correctly, then the dot on the screen will glow in the wrong color. Moreover, in order to catch the “saboteur”, sometimes you have to tinker - try to see the unfortunate point, for example, on the 50-inch LG 50UK6510PLB screen! Fortunately, you don’t have to arm yourself with a magnifying glass: it’s enough to prepare a flash drive with test pictures in advance that will identify the pest in any color range. Rarely, but still there are pixels that work incorrectly only periodically (when a neighboring point lights up in a certain shade). You can catch them using patterned pictures: with stripes, a grid, evenly alternating figures. Incorrectly functioning elements will stand out in the general row. To test a 4K display, this selection of images will be useful.
Illumination uniformity assessment
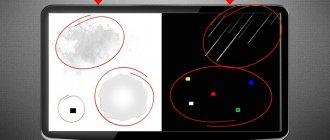
A full-screen black fill will allow you to evaluate the uniformity of the backlight. It is necessary to pay attention to the presence of “exposed” areas in different parts of the display. On LCD TVs, some differences are allowed, but if white spots are clearly visible on the black screen, this is a reason to look for a better copy or another model. As with dead pixels, most manufacturers do not consider this a defect, so it will be almost impossible to exchange a TV based on uneven backlighting.
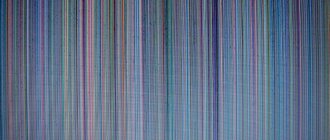
Detection of colored "spots"
The white fill is no less important. Here you need to evaluate the presence of colored “spots” on the screen - most often they look like pinkish or greenish areas on a flat white color (the so-called tint). This “coloring” that appears in the matrix will remain on top of the main image, so devices with such a defect should be avoided. As in previous cases, many manufacturers will not consider the presence of “stains” a sufficient reason to exchange or repair the TV. At the same time, it wouldn’t hurt to check for banding, which appears in the form of stripes of a different shade. When watching regular TV shows, it will be noticeable in uniform areas when moving the camera. To identify this flaw, you need to send a uniform field of any color (gray, green, purple) to the screen from the same flash drive.
Technically, tint, highlights and banding are not defective or broken. It is almost impossible to find an LED TV without them. But the intensity of the interference varies; you should choose a device with minimally pronounced image defects.
"Pencil" test
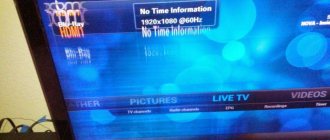
Despite the assurances of marketers who depict cosmic refresh rate figures in the technical specifications, finding an “honest” 100 Hz TV today is still not easy. If before purchasing it was not possible to accurately determine the model of the matrix and find out its real capabilities, the popularly known “pencil” test will come to the rescue. To carry it out, you will need to present a very light picture, preferably white, to the display. Then take a pencil or any long and thin object and wave it in a semicircle 10-15 centimeters from the screen. If the individual contours of the pencil are not visible, there is no flicker. If several “pencils” are visible, the manufacturer has clearly added a zero to the real scan frequency, and the flickering of this instance will tire the eyes during prolonged viewing. You can verify the effectiveness of such a test using the example of the 100 Hz Samsung UE40MU6103UXRU display, placing it next to any 50 Hz model.
Sound check
You shouldn't have high hopes for ten-watt acoustics squeezed into the thin body of a modern TV. Of course, the bass reflex speakers Sony Bravia KDL40WD653BR sound quite decent for their size, but they cannot promise home theater level. Therefore, it is enough to simply check the sound for rattling using high-quality samples. At the same time, it makes sense to test the smoothness of volume control from the remote control along with the instant mute function.
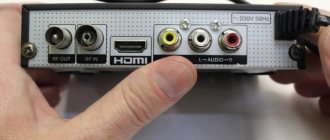
Checking the connectors
It is very problematic to check the antenna input in a store, but if at least indoor antennas are on sale in the next department, you should not neglect this opportunity. Of course, the chance of running into a non-working TV tuner is small, but you can take your TV home with peace of mind.
USB ports are simply tested with the same flash drive with pictures to identify dead pixels. If the TV has two or more connectors (such as the LG 43UJ630V), nothing prevents you from checking them all one by one. If you plan to use Smart TV with a keyboard and mouse, it is better to take them with you. It may turn out that even with known-to-be-good USB connectors, the existing set will be incompatible with the TV. Here you will have to either come to terms with it or find a suitable replacement without leaving the cash register.
HDMI connectors are easy to test: most stores have demo stands with a bunch of cables that display the image on the display case. We just insert the cable into each of the ports one by one, nothing complicated. At the same time, it will become clear how conveniently they are located - this is important when planning connections for home devices.
Impact of the problem
Banding affects television pictures when they show gradual changes in shades of a single color. One of the most striking examples of this are shots of the sky, in which the blue color changes from light blue at the bottom to dark blue at the top. When banding occurs, the transition is not smooth and that area of the image appears to be broken up into stripes, each of which is a solid shade. These stripes create a sharp boundary between shades of blue instead of a smooth transition.
conclusions
The main thing is to behave confidently in the store and understand that half an hour spent checking will save you a lot of nerves and time in the future. With this approach, you will definitely be able to make a successful purchase: there will be no dead pixels, screen glare or other troubles. And to avoid any problems with the ability to check, contact Citylink - for a symbolic amount, the store’s specialists will not only check your device, but will also give you time to get to know it yourself. And if necessary, they will also help with the setup.
It would seem that choosing and buying a TV - what could be simpler? The modern market of household appliances offers an incredibly large assortment. But how not to make a mistake and buy a quality device? The product is technically complex, returning it to the seller is often difficult, and some screen defects are not even considered defective. How to properly check a TV without taking it out of the store - in our article today.
In order not to buy a “pig in a poke”, you need to prepare for the purchase at home. And the matter here will not be limited to viewing numerous Internet resources. The presence of good reviews about the model only indicates that their authors came across successful copies. Nevertheless, a certain percentage of defects is present even among the most famous manufacturers. And not every seller will be willing to test the device for the buyer. Therefore, even having decided on the model, we first of all arm ourselves with knowledge of the hardware to check the TV before purchasing.
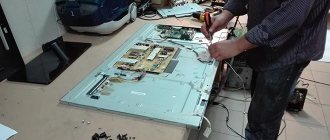
Manifestation of a malfunction - how to identify a broken TV unit
Whatever the breakdown of the power supply, it will certainly affect the operation of the TV. Damage to this element is primarily indicated by the following signs:
- The TV does not turn on;
- the indicator light does not light;
- You can hear the whistling of the pulse transformer, while the TV does not work because the power supply protection device is activated (this may also be a sign of failure of the LED backlight).
When the TV is turned on normally and various abnormalities in sound or image appear, these disturbances are most likely caused by some other reason, and not by a breakdown of the power supply. At the same time, there are some exceptions to this rule when the problem that arises is in one way or another connected specifically with the power supply:
- the indicator lights up, but the TV does not start in operating mode;
- when you press the power button on the device itself, the TV does not start;
- At first only sound appears and only after some time does the image appear;
- normal picture display and sound playback appear only after the TV is turned on and off repeatedly;
- the appearance of stripes, background sound, and a broken image are observed.
Ears on top of head
Packaging is the second face of the product. And it’s not just about the design: if it’s noticeable that the packaging has already been opened and the protective films have been removed, it’s time to refuse the purchase. Most likely this is a used TV or a display unit. Special attention should be paid to TVs with polished metal panels or chrome elements - they should not have scratches or other damage.
When receiving the package with the TV, you need to check:
- condition of the packaging (especially traces of moisture);
- complete set of accessories (remotes, cables, documentation);
- the presence of original protective films on the TV body and stand;
- no traces of dust (a clear sign that the product has been used).
Often the list of standard accessories is not limited to the remote control: for example, Samsung UE43M5513AUXRU is equipped with a corner adapter for the antenna, which allows you to hang the TV close to the wall. To avoid unnecessary costs and loss of time, it is better to immediately check whether everything is in place. If at this stage everything turns out to be in perfect order, and the case is shiny from protective films and seals, you can proceed to the main part - testing for functionality.
Visual inspection
Before purchasing, you need to carefully inspect the product to make sure there are no scratches or other defects on the TV:
- pay attention to the box - it must be intact and dry;
- check the equipment according to the instructions (remote control, power cord, glasses, warranty card, etc.);
- carefully inspect the TV and make sure that there are no scratches or chips on it;
- look at the back wall and make sure the screws are intact and there are no dents;
- look at the screen - it should be covered with a protective film.
If the visual inspection was successful, proceed to task No. 3 - checking the screen.
Let's go deeper into details
Defective pixels
It seems that it’s not difficult to check the TV - turn it on and watch. But it’s not that simple—some display defects will only appear under certain conditions. Moreover, it may turn out that, by the manufacturer’s standards, they are not considered defects. The most obvious example of such reinsurance against the return or exchange of goods is the notorious dead pixels. A certain number of them is allowed by various standards, so if you discover this defect already at home, it will be extremely difficult to return the TV back. Therefore, it is better to check before purchasing.
It is quite easy to identify a completely non-working pixel, but a partially defective one is much more difficult. Each pixel is formed from three subpixels (red, green, blue). If one of them stops working correctly, then the dot on the screen will glow in the wrong color. Moreover, in order to catch the “saboteur”, sometimes you have to tinker - try to see the unfortunate point, for example, on the 50-inch LG 50UK6510PLB screen! Fortunately, you don’t have to arm yourself with a magnifying glass: it’s enough to prepare a flash drive with test pictures in advance that will identify the pest in any color range. Rarely, but still there are pixels that work incorrectly only periodically (when a neighboring point lights up in a certain shade). You can catch them using patterned pictures: with stripes, a grid, evenly alternating figures. Incorrectly functioning elements will stand out in the general row. To test a 4K display, this selection of images will be useful.
Illumination uniformity assessment
A full-screen black fill will allow you to evaluate the uniformity of the backlight. It is necessary to pay attention to the presence of “exposed” areas in different parts of the display. On LCD TVs, some differences are allowed, but if white spots are clearly visible on the black screen, this is a reason to look for a better copy or another model. As with dead pixels, most manufacturers do not consider this a defect, so it will be almost impossible to exchange a TV based on uneven backlighting.
Detection of colored "spots"
The white fill is no less important. Here you need to evaluate the presence of colored “spots” on the screen - most often they look like pinkish or greenish areas on a flat white color (the so-called tint). This “coloring” that appears in the matrix will remain on top of the main image, so devices with such a defect should be avoided. As in previous cases, many manufacturers will not consider the presence of “stains” a sufficient reason to exchange or repair the TV. At the same time, it wouldn’t hurt to check for banding, which appears in the form of stripes of a different shade. When watching regular TV shows, it will be noticeable in uniform areas when moving the camera. To identify this flaw, you need to send a uniform field of any color (gray, green, purple) to the screen from the same flash drive.
Technically, tint, highlights and banding are not defective or broken. It is almost impossible to find an LED TV without them. But the intensity of the interference varies; you should choose a device with minimally pronounced image defects.
"Pencil" test
Despite the assurances of marketers who depict cosmic refresh rate figures in the technical specifications, finding an “honest” 100 Hz TV today is still not easy. If before purchasing it was not possible to accurately determine the model of the matrix and find out its real capabilities, the popularly known “pencil” test will come to the rescue. To carry it out, you will need to present a very light picture, preferably white, to the display. Then take a pencil or any long and thin object and wave it in a semicircle 10-15 centimeters from the screen. If the individual contours of the pencil are not visible, there is no flicker. If several “pencils” are visible, the manufacturer has clearly added a zero to the real scan frequency, and the flickering of this instance will tire the eyes during prolonged viewing. You can verify the effectiveness of such a test using the example of the 100 Hz Samsung UE40MU6103UXRU display, placing it next to any 50 Hz model.
Store Policy
Unfortunately, the “customer is always right” formula does not work everywhere, so you should clarify the following points before purchasing:
- The TV has a PCT or STB certificate and a manufacturer’s warranty
- Possibility of returning or exchanging the TV
Yes, yes, you heard right. Despite the fact that televisions belong to technically complex goods, many retail chains accommodate the buyer halfway and give the opportunity to exchange the television within 14 days or exchange it for another model with an appropriate surcharge. When buying a TV, you can make a mistake with the dimensions, discover a defect after a week of use, or simply make a bad choice. It will be of great help if you have a couple of weeks at your disposal to correct your mistake - it is precisely the availability of such an opportunity that should be clarified before purchasing.
Triple mask using the “Banding” method
Stage 1: Cleansing (photo 1)
To remove makeup and prepare for the subsequent use of masks, we use Milky Clean & Pure, which contains white oak bark and birch bark extract. Whip 1 ml of milk with a damp fan-shaped brush, apply to the skin with massage movements, and rinse with warm water.
Stage 2: Layer-by-layer application of enzyme masks (photos 2–4)
Mix Enzyme Masque No. 1 with Aqua D ́Herbs activator to a creamy consistency and distribute over the skin of the face, neck and décolleté in broad strokes. Mask composition: albumin, soy flour, corn starch, aspartic and glutamic acids, lysine, proline, lecithin, amylase, lipase. Mix Enzyme Masque No 2 with the Aqua D Herbs activator to a creamy consistency and apply to the skin using the “banding” method. The mask contains aspartic and glutamic acids, the copper-chlorophyll complex, lysine, proline, glycine, amylase, lipase, methionine. The drug is an enzymatic myostimulation: acting on motor control points, it causes muscle contraction and increases their tone, which makes it possible to prevent and correct signs of aging. Mix Enzyme Masque No 3 with the Aqua D Herbs activator until it becomes an airy foam and apply it with light movements on top of the two previous masks. Ingredients: aspartic and glutamic acids, Chinese cassia powder, lysine, niacin. The exposure time of the masks is 45 minutes.
Stage 3: Removing enzyme masks
We dissolve the masks applied to the skin using the Milky Clean & Pure cleanser and, already softened, remove them with a damp hot towel.
Stage 4: Restoration of the epidermal barrier (photo 5)
We apply serums with beta-glucans Beta Gel and 10% vitamin C Direct Delivery Vitamin C. Composition of Beta Gel: beta-glucans (have an immunomodulatory effect, improve angiogenesis), magnesium ascorbyl-2-phosphate (antioxidant, has a whitening and regenerating effect), safflower oil, witch hazel extract (have a calming effect, moisturize the skin), tocopherol (antioxidant). Ingredients of Direct Delivery Vitamin C: magnesium ascorbyl-2-phosphate, ascorbic acid (whitening and antioxidant properties). We irrigate the skin with Herb & Mineral Spray Plus. Plant extracts in the preparation provide the skin with vitamins and minerals, have a cleansing, antiseptic, moisturizing, toning, regenerating effect. The spray enhances the transdermal activity of creams. Finally, we apply Biogen C Creme Plus, which has an anti-inflammatory, soothing, whitening effect. Ingredients: eucalyptus oil, oleic niacinamide, arnica, valerian, Roman chamomile extracts.
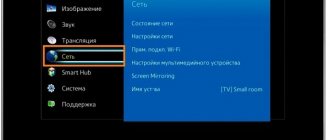
Installing the CI module
Correct self-connection is based on a detailed study of the instructions and compliance with the requirements of the device manufacturer’s recommendations.
Attention! Before installation, the television receiver must be disconnected from the power supply.
The CAM module can be connected via:
- Common Interface slot
- CI adapter
Work algorithm for the first option:
- Turn the TV over so the back side is facing you.
- Insert the card into the module.
- Insert the module into the slot.
Work algorithm for the second option:
- Turn the TV over so the back side is facing you.
- Conduct a visual inspection of the connector. If it is sealed with film, it should be carefully removed.
- Pick up the module with the front side facing you.
- Using the feet, insert the module into the hole.
- Check the installation tightness (it should not wobble).
- Install a smart card into the module.
Attention! The electronic chip on the card should be on top.