Does the TV stutter when playing channels through a set-top box or directly from a cable? This problem is faced by users who abandoned analogue broadcasting and switched to a digital signal. Often the problem can be solved independently by correctly connecting the equipment and setting it up correctly. Sometimes it is necessary to flash a TV receiver or set-top box, which can only be done by an experienced TV technician.
Service engineers provide services for setting up and repairing TV receivers and related equipment at the customer’s home. We work from 7:00 to 23:00 without holidays and weekends. To order TV repair in Moscow, leave an online request on the website with contacts for feedback or call us by phone.
Why does audio and video playback fail?
Digital television is increasingly replacing analogue broadcasting due to its high image quality (up to FHD). To watch programs in high definition, you can enter into an agreement with a cable/satellite TV provider or purchase a special digital set-top box.
In some cases, the picture and sound on digital channels do not correspond to the declared parameters, which makes viewing impossible.
Visual signs of a malfunction:
- the image is unclear, static or intermittent (layering of pictures, “cubes”);
- everything is fine with the picture, but the sound began to stutter;
- Problem with video and audio signal.
Sometimes the malfunction is of a “wandering” nature, appearing and disappearing when switching channels or changing audio/video settings. Let's look at the main causes of defects and ways to eliminate them.
Problems with the console
If the sound on the TV through the set-top box stutters, there are two possible reasons:
- old or “pirated” software;
- Incorrect connection of the device to the TV receiver.
The use of unlicensed firmware downloaded from unofficial sites and forums can be the main reason for the failure to correctly decode the audio signal. The problem also affects owners of cheap Chinese devices that have software of unknown origin installed. In order not to aggravate the situation, it is better to call a teleworker who will configure the equipment correctly.
Before connecting the set-top box to the TV receiver, you need to carefully study the instructions. Often, when using a standard RCA cable, the user does not observe the color matching of the plugs and sockets. When connecting via an HDMI interface, you need to specify this type of connection in the equipment settings.
Old software on TV
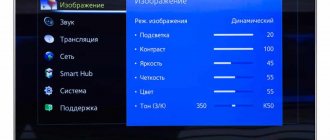
When the TV sound is interrupted, but the picture remains stable, the source of the problem should be sought in incorrectly installed or outdated software of the device itself. In this case, the issue can be resolved by updating the software yourself. To do this, you need to go to the TV settings and check for the latest version of the software. Most modern models are updated over the air (for example, Samsung SMART-TV with Wi-Fi connection), but older models need to install the firmware yourself.
How to do it:
- on the manufacturer’s official website you need to select the device type and model (in some cases you need to indicate your region);
- make sure that new software is available and download it to a USB drive;
- Insert the USB flash drive into the TV connector and load the firmware through the main menu.
Sometimes the TV sound stutters after installing the latest software version. Owners of Sony TVs especially often encounter this problem when updating the firmware. The Japanese manufacturer produces software that does not always work correctly with digital signals from regional providers. In this case, it is necessary to “roll back” the model to an older firmware version. If you can’t do this yourself, call a teleworker.
The antenna power is not enough
A weak signal is one of the factors that means that the equipment does not produce high-quality images and sound. If the gain is less than 40 dB, audio or video may not play back correctly. If the sound on the TV stutters due to a weak signal, it is enough to purchase an indoor antenna with an amplifier that can correctly broadcast over-the-air broadcasts.
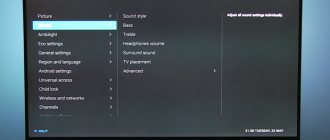
The sound does not match the image on the screen.
To find out why the sound does not match the image on the screen, use the following procedure.
IMPORTANT:
- Not all Blu-ray Disc players and home theater systems allow you to synchronize sound and video using the Audio/Video Sync (A/V Sync) feature. To find out if your Blu-ray Disc player or home theater system has the Audio/Video Sync (A/V Sync) feature, refer to the specifications for the device or its instruction manual.
- If any of the operations described below require additional information for your specific model, please refer to the instruction manual that came with your model.
Depending on the button on the supplied remote control, select the appropriate procedure to adjust the delay between picture and sound using the A/V Sync function.
- For the included remote control with SYSTEM MENU button:
- Press the SYSTEM MENU button on the supplied remote control.
- Press the up arrow button or the down arrow button until A/V SYNC appears on the front panel display.
- Press the Enter button.
- Press the up arrow or down arrow button to adjust the delay between picture and sound.
NOTES: - Adjustment is made from 0 milliseconds (ms) to 300 ms.
- If the sound is ahead of the picture, adjust the A/V Sync function, starting at 0 ms and increasing towards 300 ms until the problem is resolved.
If the sound lags behind the picture, set the Audio/Video Sync (A/V Sync) setting to 0 ms.
- When the BD/DVD, USB, HDMI 1 or HDMI 2 function is selected, use the following procedure.
- Press the OPTIONS button on the included remote control.
NOTES:
- Adjustment is made from 0 milliseconds (ms) to 300 ms.
For other Blu-ray Disc players or home theaters with a Blu-ray Disc player, the latency can only be adjusted from 0ms to 120ms. For more detailed information, please refer to the operating instructions.
- Press the OPTIONS button on the included remote control.
Press the up arrow button or the down arrow button until A/V SYNC appears on the front panel display.
NOTES:
- Adjustment is made from 0 milliseconds (ms) to 300 ms.
For other Blu-ray Disc players or home theaters with a Blu-ray Disc player, the latency can only be adjusted from 0ms to 120ms. For more detailed information, please refer to the operating instructions.
NOTES:
- Make sure your Blu-ray Disc player or home theater system with Blu-ray Disc player has the latest software (firmware) update downloaded and installed.
- If the sound and picture are still out of sync or inconsistent when you listen to TV audio on a home theater system with a Blu-ray Disc player, connect the optical audio cable from your cable or satellite box directly to the home theater system rather than to the TV.
- To get the most out of your audio signal, connect an optical or HDMI cable.
Why you should contact the specialists of our service center
Our advantages:
- We troubleshoot problems of any level of complexity.
- We repair and configure TVs of all well-known brands (Philips, Samsung, Panasonic, Toshiba, LG and others), regardless of model and year of manufacture.
- We serve all areas of Moscow, visiting homes at a time convenient for the client.
- We work without intermediaries, so we guarantee the best prices for all services.
Many years of experience and knowledge of the design features of television equipment from each manufacturer allow us to quickly eliminate any malfunctions.
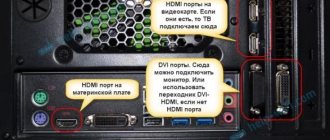
When using an HDMI connection, there is no sound, no picture, or both.
Use the following steps to troubleshoot the cause of audio, picture, or audio and picture loss when using an HDMI connection.
NOTE: Because each of the steps below represents a possible solution to this problem, check the audio or video of each step to ensure that the audio or video no longer drops out.
- Check that the cables are securely connected to all components.
- Make sure the HDMI cable is not kinked or near any power cord. Power lines or other high voltage cables may interfere with the HDMI signal, so it is best to route HDMI cables separately from other lines or cables during installation.
- If the audio system is connected to an input device that is not HDCP (High bandwidth Digital Content Protection) compliant, you will not be able to output any images. In this case, check the specifications of the connected device.
- For STR-DN1060 and STR-DN860? If you cannot output 4K content to your TV, check the following:
- When connecting an HDCP 2.2 compliant device to output 4K content, be sure to connect the device to the HDMI IN SAT/CATV jack and the TV to the HDMI OUT (ARC) jack on the AV receiver.
- 4K content may not be displayed depending on the TV or video playback device. Check the capabilities and settings of your TV and video playback device.
- To play 4K content, be sure to use a High Speed HDMI cable.
- Try connecting a different HDMI cable.
NOTE: The quality of the HDMI cable can also cause signal loss. We recommend using an HDMI cable made by Sony or purchasing a high-speed HDMI cable from your local electronics store. - Make sure the correct input is selected on your home audio system.
- Initialize or reset your audio system to factory default settings.
NOTE: Refer to the manual that came with your model for initialization or reset procedures for each specific model. - Reset the HDMI connection: With the TV and external device turned on, unplug the power cords from the electrical outlet.
- Disconnect the HDMI cables from the TV and other device.
- Wait 60 seconds.
- With the HDMI cables unplugged, plug the power cables back into the electrical outlet.
- Turn on the TV.
- Connect the HDMI cables.
- Turn on the external device connected with the HDMI cable.