First multiplex (RTRS-1)
Launched in 2011. 10 federal channels.
In Moscow, RTRS-1 broadcasts on frequency 546; in other regions the frequency may be different. You can find out more on the broadcast coverage map
| TV channel | Frequency, MHz |
| First channel | 546 |
| Radio Russia | 546 |
| Match TV | 546 |
| Russia 1 | 546 |
| Channel 5 (St. Petersburg) | 546 |
| Lighthouse | 546 |
| Russia 24 | 546 |
| Carousel | 546 |
| OTR | 546 |
| TVC (TV Center) | 546 |
| Vesti FM | 546 |
| Russia K (Culture) | 546 |
| NTV | 546 |
Algorithms for setting up channels by brand
Before you start directly searching for channels, you need to make sure that the TV supports a digital signal. Many series and models of TVs, although they have a built-in digital tuner, may use the outdated DVB-T standard instead of the new DVB-T2, which is used everywhere. This can be done in two ways:
- find out the model code on the factory sticker and find out about it on the Internet;
- Check the information in the TV menu in the help tab.
Samsung
For Q, M and LS series:
- Find and press the “Home” button on the remote control, a menu will open.
- Select the “Source” sub-item, in which you should indicate “TV”.
- Return to the menu again using the same button and select “Settings”.
- Go to the “Broadcast” item and select “Auto Configuration”.
- Click on “Start”. A pop-up notification will notify you that the current channel list will be erased based on the scanning results.
- Select the signal source - in this case, “Antenna”.
- Select the type of channels - “Digital” or “Digital Analogue”. The difference is that in the second option there is no need to additionally configure the connection of each territorial TV channel, if broadcasting is carried out on it.
- Specify the search mode - select “Full”, in which case the system will find everything that comes from the signal source.
- Start the process by clicking the “Scan” button.
- All found TV channels will be displayed on the screen (both TV, digital and analogue). A scale will also be displayed showing the scanned part of the range.
- After completing the procedure, press the “Close” button and exit the search menu by pressing the “Return” key on the remote control.
For F, E, J and H series:
This range of devices involves a slightly different search process:
- Turn on the TV and immediately press the “Source” button.
- In the window that appears, select “TV”.
- Open the menu (using the button of the same name, or “Keyboard”, select the “Menu” item).
- Select “Broadcast”, and then “Auto-tuning”, similar to the list for Q, M and LS models.
- Reactivate autotuning.
- In the notification about changing the channel list settings, click the “Start” button.
- Select the origin of the signal - DVB-T2 or “Antenna” (depending on the version) to connect to free broadcasting.
- Specify the type of channels - you should give preference to the “Digital and Analog” category, in order to avoid re-tuning the remaining analog channels in the search.
- Select scan type. Click on “Full” to add more programs.
- Click on “Scan”.
- At the end of the procedure, click on the “Close” button and leave the menu.
LG
Automatic search for TVs with Smart TV option:
- Press the “Settings” button on the remote control.
- Select the “Menu” sub-item (picture with a gear symbol).
- Open the “All settings” item.
- Select the “Channels” column, then go to “Search for channels and settings”.
- Select "Auto search". Make sure that in the “reception mode” column there is the inscription DVB-T2 or DVB-T/T2.
- Mark the required signal reception path and click “Next”.
- Set scanning parameters. To search for over-the-air channels, just check the box next to the “Digital only” line.
- After the search indicator reaches 100%, a window with a “Done” button will appear. You need to move the slider to the button and click “OK”.
- This completes the auto search process. You can use digital television.
Auto search on a TV without Smart TV
- Also click on “Settings”.
- In the “Settings” menu that appears, select “Channels”.
- Go to the “Autosearch” window by pressing the “Right” key on the remote control. Click "OK".
- Select the “Antenna” sub-item and click “Next”.
- Check the box “Digital only” and secure it by clicking on “Run”.
- Based on the search results, the “Done” button will appear on the screen.
Philips
In this brand, the auto search order depends on the year of manufacture of a particular TV.
On an old TV made before 2011:
The setup process for an old Philips digital TV is as follows:
- Open the settings menu using the “Home” button (in some models it is indicated by an image in the form of a house).
- From the menu you need to go to the “Configuration” column. If the system does not support the Russian language, it can be recognized by its gear icon.
- In this tab you need to open the “Installation” sub-item and confirm by clicking on “OK”.
- In the same thread, select “Setting up TV channels”, and then “Automatic installation”. Confirm the action with the “Start” button.
- If you are required to select a country, indicate “Russia”. If this is not supported, choose Finland or Switzerland: the countries' broadcasting standards are the same.
- Select “Digital” settings mode.
- After which the TV will offer a choice of signal source for scanning. Specify “Antenna” or “Air”.
- The software will offer a choice of search options - “Manual” and “Auto Search”. Select the second one and click the “Start” button.
- After the scanning process is completed, click “Finish”. The TV will automatically save the channels found.
During the setup process, the software may request a PIN code. If nothing has changed, you need to dial one of the standard options - 1111, 1234 and 0000. In the future, it can be changed to a custom option.
On a modern TV
The auto-tuning procedure for a newer TV looks different:
- Open the menu using the Home button.
- Select the “Installation” sub-item.
- Go to the next folder and click “Search for channels”.
- After “Reinstalling channels”.
- Select country. As in the previous case, if Russia is not on the list, you need to indicate Finland or Switzerland. In new versions, Germany will also fit. If the name of the TV contains the combination PFL, this will be the best option.
- Select digital broadcast mode (DVB)/
- Determine the origin of the signal - “Antenna” for over-the-air channels.
- Select the “Scan frequencies” item, select “Quick” in the drop-down menu and secure it with the “Start” button. The search will take 10-20 minutes.
In cases where you plan to alternately use the antenna and television cable/wireless network, it is highly advisable to configure it at this stage. To do this, you need to manually enter the value of network frequencies and transmission speed - this data can be obtained upon request from the cable network operator.
For TVs with Smart TV function, additional network settings will be required:
- Launch the WI-FI router, or connect the network cable to the TV connector.
- Open the menu and select “Network Connection”.
- Specify the connection method: via Wi-Fi network or wire.
- When using a router, you need to enable WPS - automatic interconnection of devices without passwords. If this function is missing, you will have to scan the network and enter the password yourself.
- After connecting the smart TV to the network, it will most likely start the update procedure.
- Then just select “Set up channels”, and then click “Search”. No additional manipulations are required: the idea of the Smart TV function is that the TV can turn into a multimedia platform that does not require excessive human attention.
Sony
Autosearch will still be the easiest way. The exact algorithm varies greatly depending on the model and specific software, however, the general procedure is similar and intuitive:
- Open the menu using the button of the same name on the remote control (In some cases it is signed as “Home”).
- Then select the “Settings” tab, then “Settings”.
- In the settings menu, select the “Digital Configuration” sub-item.
- In the pop-up menu, you must activate the sub-item “Automatic search for digital stations”.
- As in all other cases, select “Antenna” as the signal source.
- An automatic scan of the frequency range will start, storing all detected channels in memory.
- At the end of the process, a notification will appear prompting you to familiarize yourself with the list of TV channels. After viewing, click “OK” and exit the settings menu by pressing the “Back” button.
Important! Some TV models (for example, a number of Sony Bravia) provide two search methods - “Fast” and “Full”. The second option is to scan the entire frequency range several times, eliminating the possibility of an unsuccessful search. However, this method takes up to 60 minutes.
Other brands
It is not difficult to notice that the procedure for automatically searching for TV channels is almost identical on a device of any brand. Based on any of the above guides, you can set up auto search on TVs from other companies. The only difficulties may be:
- password requirement. As a rule, it is indicated in the instructions and is a simple combination of zeros or ones;
- absence of Russian language - just choose Sweden or Germany.
Second multiplex (RTRS-2)
Added recently, not yet available (as of September 21, 2019) in all regions, but is being gradually implemented. Connection schedule.
| TV channel | Frequency, MHz |
| Saved | 498 |
| TNT | 498 |
| STS | 498 |
| Home | 498 |
| World | 498 |
| Friday! | 498 |
| Star | 498 |
| TV3 | 498 |
| REN TV | 498 |
| Muz TV | 498 |
General procedure for setting up broadcast channels
Automatic search is the easiest way to tune in to receive digital television channels available in your region.
At the same time, in addition to digital channels, local analogue channels are also displayed in the search. The automatic search and installation method has the advantage of high speed of the process. To do this, just set a couple of parameters, and the rest of the work will be done by the system. All you have to do is wait for the scanning and installation to complete. The operating principle is the same for all TV models:
- Connect the antenna to the TV. The first should be located strictly opposite the nearest repeater - compared to the UHF antenna, the UHF is very sensitive to the vector of the incoming signal.
- Open the menu (the corresponding button on the remote control).
- Go to the “Options” or “Settings” subsection, depending on the company and software interface.
- In this sub-item, select “TV”, “Reception” or “Signal”.
- Indicate the origin of the signal: “Antenna” - for terrestrial TV channels.
- Select automatic search. In the case of an over-the-air signal, you do not need to indicate the frequencies of the provider.
- During the search process, the found TV channels will be displayed.
- At the end of the process, confirm the recording by clicking on “OK”; the TV programs will be saved in the TV’s memory.
- Leave the menu by pressing the “Return” or “Back” button.
The TV is now ready to broadcast TV programs.
Reference! In order to be sure that the process was successful, you need to restart the TV.
Manual setting
In cases where the auto search did not produce results, or did not show a complete list of available channels, you need to scan manually:
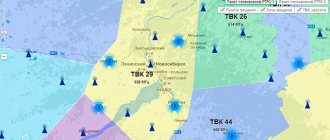
- Find your location using the RTRS service and click on it. The parameters window that opens lists the broadcast frequencies of digital channels, taking into account two nearby repeaters. You should remember these values.
- Open the menu and go to settings mode.
- Select the “TV” sub-item, but unlike the previous method, select manual settings.
- Select an antenna as the signal source.
- Enter the frequency value (MHz) and channel number (TVK) for one multiplex recorded in the first paragraph.
- Start scanning.
- Wait for saving after detecting channels.
- Repeat the scanning process for the second multiplex using the appropriate values.
- Reboot the TV and make sure the process is successful.
Third multiplex (RTRS-3)
Operates in test mode in Moscow and the Moscow region. About 40 channels. Broadcasts on frequency 578.
| TV channel | Frequency, MHz | Broadcasting time, h/week |
| Sports 1 | 578 | Around the clock |
| Sports 2 | 578 | 00:00-06:00 (42) |
| Fight club | 578 | 06:00-12:00 (42) |
| My planet | 578 | 12:00-18:00 (42) |
| Science 2.0 | 578 | 18:00-00:00 (42) |
| Russian novel | 578 | 00:00-05:00 (35) |
| Russian bestseller | 578 | 05:00-10:00 (35) |
| Russian detective | 578 | 10:00-15:00 (35) |
| Story | 578 | 15:00-20:00 (35) |
| Cartoon | 578 | 20:00-00:00 (35) |
| Sundress | 578 | 00:00-12:00 (84) |
| A country | 578 | 12:00-00:00 (84) |
| Living Planet | 578 | 00:00-06:00 (42) |
| IQ HD (SD quality) | 578 | 06:00-09:00 (21) |
| 24 Doc | 578 | 09:00-12:00 (21) |
| Techno 24 | 578 | 12:00-15:00 (21) |
| Mother | 578 | 15:00-18:00 (21) |
| NST | 578 | 18:00-21:00 (21) |
| Amusement park | 578 | 21:00-00:00 (21) |
| Moscow. Confidence | 578 | 00:00-12:00 (84) |
| euronews | 578 | 12:00-00:00 (84) |
| Music of the First | 578 | 08:30-01:30 (119) |
| Home Cinema | 578 | 01:30-02:30 (7) |
| Time | 578 | 02:30-04:30 (14) |
| TV cafe | 578 | 04:30-06:30 (14) |
| Beaver | 578 | 06:30-08:30 (14) |
| 365 days of TV | 578 | 00:00-02:00 (14) |
| TNT-Comedy | 578 | 02:00-04:00 (14) |
| Lots of TV | 578 | 04:00-06:00 (14) |
| HD Life (SD quality) | 578 | 06:00-08:00 (14) |
| STV | 578 | 08:00-10:00 (14) |
| India TV | 578 | 10:00-12:00 (14) |
| Fighter | 578 | 12:00-14:00 (14) |
| Comedy TV | 578 | 14:00-16:00 (14) |
| La Minor | 578 | 16:00-18:00 (14) |
| Men's cinema | 578 | 18:00-20:00 (14) |
| Kitchen TV | 578 | 20:00-22:00 (14) |
| Auto Plus | 578 | 22:00-00:00 (14) |
| LifeNews | 578 | Around the clock |
| Our football | 578 | Blocked |
Common problems and their solutions
Channels are not picked up at all, “no signal”
In this case, you need to check:
- equipment for breakdowns (TV, antennas and connecting cable). If you discover a problem, you should contact a specialist;
- antenna adjustment. The UHF antenna is extremely sensitive to the vector of the incoming signal. In most cases, changing the orientation of the antenna helps;
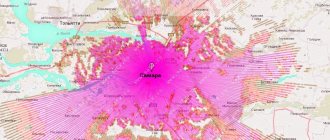
- distance to the repeater and signal strength. This information is provided by the RTRS service. Most likely, your receiver is in a “dead zone” that is not covered by television broadcasts. Unfortunately, until new towers are installed, reception in this area is impossible. You will have to resort to satellite broadcasting, available anywhere open to the south;
- being in a radio silence zone. The passage of the signal may be hampered by a nearby natural object (hill, mountain, etc.) or a man-made obstacle (main walls and ceilings). The situation can be corrected by changing the position of the antenna (for example, installing it on the roof), which allows you to get out of the radio shadow. The second option would be to connect to another repeater located within a radius of 30-35 km.
Only part of the channels are caught
Here you need to check:
- setting up a broadcast from a nearby tower. It is necessary to configure each multiplex on a separate frequency manually;
- setting up the tuner in the system itself. A number of channels may not have been preserved. Repeated automatic or manual TV tuning will help correct the situation.
There were channels, but they disappeared
If the signal was previously received reliably, but then the channels disappeared, the reason for this may be:
- the appearance of new obstacles on the way to the antenna from the repeater. You need to explore the surrounding area using a reception map;
- technical problems with the repeater. It is customary to cover such events with the help of alerts, which can be found in the regional media, local forum or public page.
- antenna malfunction. When using collective, you need to contact the service company. If you are using an individual one, it is worth checking the position of the antenna cable for a break and the position of the antenna itself.
Weak signal
The reasons are similar to the case of a complete absence of signal:
- long distance between receiver and repeater. The only solution to the problem is to purchase a new active antenna capable of receiving weak signals;
- radio silence zone. The antenna position needs to be changed.
Frequencies of DVB-T2 digital channels
| TVK | Frequency, MHz |
| 21 | 474 |
| 22 | 482 |
| 23 | 490 |
| 24 | 498 |
| 25 | 506 |
| 26 | 514 |
| 27 | 522 |
| 28 | 530 |
| 29 | 538 |
| 30 | 546 |
| 31 | 554 |
| 32 | 562 |
| 33 | 570 |
| 34 | 578 |
| 35 | 586 |
| 36 | 594 |
| 37 | 602 |
| 38 | 610 |
| 39 | 618 |
| 40 | 626 |
| 41 | 634 |
| 42 | 642 |
| 43 | 650 |
| 44 | 658 |
| 45 | 666 |
| 46 | 674 |
| 47 | 682 |
| 48 | 690 |
| 49 | 698 |
| 50 | 706 |
| 51 | 714 |
| 52 | 722 |
| 53 | 730 |
| 54 | 738 |
| 55 | 746 |
| 56 | 754 |
| 57 | 762 |
| 58 | 770 |
| 59 | 778 |
| 60 | 786 |
| 61 | 794 |
| 62 | 802 |
| 63 | 810 |
| 64 | 818 |
| 65 | 826 |
| 66 | 834 |
| 67 | 842 |
| 68 | 850 |
| 69 | 858 |
List of digital TV frequencies for setting up TVs and set-top boxes
| № | frequency, kHz | Modulation | Symbol rate, MS/s |
| 1 | 386000 (SK30) | 256 QAM | 6750 |
| 2 | 394000 (SK31) | 256 QAM | 6750 |
| 3 | 402000 (SK32) | 256 QAM | 6750 |
| 4 | 410000 (SK33) | 256 QAM | 6750 |
| 5 | 418000 (SK34) | 256 QAM | 6750 |
| 6 | 426000 (SK35) | 256 QAM | 6750 |
| 7 | 434000 (SK36) | 256 QAM | 6750 |
| 8 | 442000 (SK37) | 256 QAM | 6750 |
| 9 | 554000 (31TVK) | 256 QAM | 6750 |
| 10 | 546000 (30TVK) | 256 QAM | 6750 |
| 11 | 562000 (32TVK) | 256 QAM | 6750 |
| 12 | 570000 (33TVK) | 256 QAM | 6750 |
| 13 | 578000 (34TVK) | 256 QAM | 6750 |
| 14 | 610000 (38TVK) | 256 QAM | 6750 |
| 15 | 618000 (39TVK) | 256 QAM | 6750 |
| 16 | 634000 (41TVK) | 256 QAM | 6750 |
| 17 | 642000 (42TVK) | 256 QAM | 6750 |