Connecting the GLOBO XC 80 set-top box to a television receiver
If the receiver is equipped with the connector shown in Fig. A, and the signal cable is equipped with a permanent connector for connection to the connector shown in Fig.
B, it is recommended to use an adapter (Fig. C) (sold separately). Attach it to the RF input of the receiver, and the signal cable, in turn, connect to the input of the adapter. If the signal cable is equipped with detachable connectors (F-connector/TV-connector), it is enough to remove the television connector (as in the figure). Attention: in order to avoid damage to the set-top box, we strongly recommend connecting the set-top box to the TV with the set-top box disconnected from the power supply.
7. Turn on the TV. Connect the input of the TV receiver to which the set-top box is connected (see the operating instructions for the TV receiver). After some time, the received channel to which the set-top box is tuned will appear on the screen. If the channels are not displayed, the wrong external image source may be selected.
Check the connection with the instructions for your TV. If the message “channel encrypted” or “service unavailable” appears, check whether the conditional access card is installed correctly in the receiver (chip down), wait 5-15 minutes, the image will appear on the screen.
When connecting to a digital set-top box, it is transferred to the subscriber already configured for channels
, which are currently broadcast on cable TV networks. If you change broadcast parameters, reset the receiver settings, or add new channels, the digital set-top box must be configured again.
Digital channel broadcast parameters
| № | Frequency | Flow rate | Modulation (QAM) |
| 1 | 738 000 | 6875 | 256 |
| 2 | 746 000 | 6875 | 256 |
| 3 | 754 000 | 6875 | 256 |
| 4 | 762 000 | 6875 | 256 |
| 5 | 770 000 | 6875 | 256 |
| 6 | 778 000 | 6875 | 256 |
| 7 | 786 000 | 6875 | 256 |
| 8 | 794 000 | 6875 | 256 |
| 9 | 802 000 | 6875 | 256 |
| 10 | 810 000 | 6875 | 256 |
| 11 | 818 000 | 6875 | 256 |
| 12 | 826 000 | 6875 | 256 |
—>
Brief instructions for setting up the GLOBO XC80 digital set-top box
- Press the “Menu”
on the remote control of the set-top box. - Select “Install”
and click “OK” - Select “Quick Search”
and click “OK” - Set search parameters:
- Frequency
Transmission speed
- Scan mode
- Network search
- LCN sorting
- To start searching
- Select “Start Search”
and click “OK” - When the search is complete, click “OK”
474.00 MHz
(value is entered using numeric buttons)
6875 KS/s
(value is entered using numeric buttons)
256 QAM
(value is selected using the “” button)
YES NO
After the scanning is completed, click “OK” and then click “Exit”
to exit the Menu.
Note: If the set-top box has already been configured before, then it is advisable to delete all channels (reset to factory settings) before setting it up.
If you have any questions related to, please contact the technical support service by phone (24 hours a day)
Automatic and manual setup of DVB-T2 digital channels can be done independently; for this it is not necessary to seek help from specialists.
- Sign in OK
Installation and connection of the set-top box
In addition to the receiver for connecting digital television, we will also need some parts. First of all, you need to think about how exactly the decoder will be connected, or more precisely, through which port.
First we look at the ports that are on the TV. Let's explore the inputs we can use in the future:
- HDMI is the most preferable, as the image will be of the highest quality. We will be interested in “HDMI” with the prefix “IN”. Also, do not use the DVI adapter input.
- AV – has three multi-colored inputs: Video, audio-L, audio-R. If there is no HDMI, then you can use it.
- VGA is used extremely rarely, but you can try it. We are interested in the “IN” input.
- If there is nothing at all, then you can try using “SCART”. Present on very old TVs dating back to the early 2000s.
- S- Video is also a good option to replace AV bells.
It is on the basis of the inputs (IN) on the TV that you will need to select a set-top box. Let's look at my model as an example:
By entrances from left to right:
- Antenna input – this is where we will connect our antenna.
- Antenna output – necessary for connecting another set-top box.
- Digital audio – we don’t need it yet.
- HDMI - ideally it is better to use it.
- AV are the same bells that can be used if the TV does not have HDMI.
Some digital set-top boxes may have other outputs, which I wrote about earlier: SCART, S-Video, VGA, etc. A
There may be additional inputs and outputs:
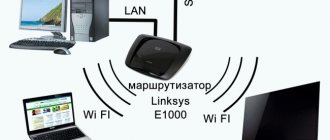
- LAN – needed to connect to your home router. This way you can go online from the console and watch movies from there.
- USB – Some people think that it can be used to connect to a TV, but this is not true. This port performs the same function as on the TV and is intended only for connecting external media, flash drives and hard drives.
Once you have found the ideal port option, then you need the appropriate cable in order to connect the TV set-top box. There are also adapters like this:
- SCART-AV
- S-Video-AV
They can also be easily connected in cases where there is no corresponding port on the TV or receiver.
On very ancient TVs, you can try using the same “RF OUT” antenna output. That is, we take and directly connect the coaxial cable to the old TV.
Now all that remains is to make the usual connection: connect the TV via tulips, HDMI or any other cable that I talked about earlier.
Connection diagram
And of course, we connect the antenna cable itself to the input on the receiver, which must have the “IN” prefix. If you bought an antenna, the cable should be included. You can also buy it of a certain size in a specialized store.
Now a digital signal will go through the TV set-top box and send an impulse to the TV in analog or digital form. Also, do not forget to connect the console itself to the outlet. All we have to do is turn on the receiver, TV and tune in the channels.
NOTE! It doesn’t matter what kind of TV you have: Samsung, LG, Philips or Sony - the setup is still done through the set-top box, and the screen will act as a display device. Please see the following step-by-step instructions for more details.
- To set up digital channels, turn on both devices.
- Now on the TV you need to turn on the display from the input to which the set-top box is connected. To do this, take the remote control from the TV and find the button that turns on or switches the “Input Ports”. It may be called "Input" or "Sources". It may simply have a square icon with an arrow inside.
- Next you can see this menu - just select our port. On very old TVs there is no such menu, so here you just need to scroll until you see images of the set-top box menu.
- We succeeded in installing the receiver, now we need to catch the necessary channels. The receiver's systems are different, but the principle itself is the same. In the menu you need to find “Settings” and turn on “Search for channels”.
- The system will automatically search for channels and tune them. You can also do manual setup.
How to set up digital television
How to set up DVB-T2 on your TV? The setup process is suitable for almost all receiver models. The design of windows, the names of buttons and menu sections may vary, but the general algorithm is approximately the same for everyone.
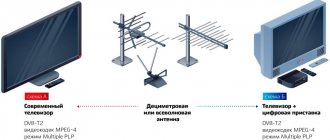
Connecting a device that supports the DVB-T2 standard to digital television and setting it up is not at all difficult. To do this, just insert the cable into the appropriate connector and perform some simple manipulations to configure the channels. If you are using an outdated TV model that does not support receiving this type of signal, you will need to purchase a special set-top box.
The TV must have a special input for connecting an antenna, as well as a tulip-type connector and an input with a video output (scart). If your TV has an HDMI input instead of a SCART connector, then this is a better option.
If you can make a double connection – both via the “tulip” and via HDMI, you will be able to switch from one cable to another. It is best to watch via HDMI, because... In this case, a higher quality image is obtained.
The distance to the transmitting station (tower) matters. Most often, to effectively tune a TV, it is recommended to install an outdoor antenna with an amplifier, and in city houses on the 4th-5th floor you can use an antenna with a “mustache” or in the form of a frame without an amplifier, but with the “signal amplification” option on the TV set-top box.
A receiver is a device designed to receive a signal and transmit it to a TV. The signal source can be a satellite dish, antenna, or the Internet. Connecting a digital set-top box to a TV can be done either directly or via DVD or via a monitor. But in this case you may need a special adapter.
How to connect to a TV and set up a receiver (digital receiver)
- Remove the device from the box and remove the protective film. The film must be removed, otherwise the device will constantly overheat.
- Cut off the protective sheath from the TB cable approximately 1.5 cm long from the end (both ends). Stripping the sheath must be done very carefully so as not to damage the shielding film that protects the central conductor.
- Carefully peel back the shiny protective film and screw the “F” connectors to the wires.
- Connect the cable to the TV and set-top box.
- Insert a bunch of “tulip” wires into the connectors of the TV and set-top box.
- Connect the antenna to the TV. The antenna must be installed on an external wall of the house or on a balcony. After this, you need to move on to the actual setup.
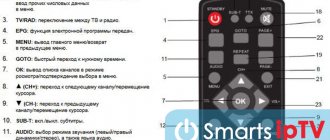
To configure the DVB-T2 set-top box, you need to click on “Menu” on the control panel, and then go to settings. If the country is not specified by default, you must select it. You also need to select the region, language, image format, search mode.
- 144 instead of 120. Cable TV reboot for Ulan-Ude residents will take place this night
After that, select the signal standard. By default, DTV-T/T2 is installed - this is analog and digital television. If this setting is not changed, the TV will search for both channels.
The program will prompt you to choose automatic or manual settings. You need to select automatic and click on the “Ok” button.
After this, the TV itself will search for all available paid and free channels. After completing the search, click on the “Save” button.
If “DVB-T/T2” is set in the “Search mode” item, then the device will independently find all those channels that are available in your region. But this is only possible if you already have a working antenna installed, which is directed towards the transmitter.
Instructions for TV tuner GLOBO GL100 - free instructions in Russian, forum
If the instructions are not complete or you need additional information on this device, if you need additional files: drivers, additional user manual (manufacturers often make several different technical help documents and manuals for each product), the latest firmware version, then you can administrators or to all users of the site, everyone will try to quickly respond to your request and help as quickly as possible.
Your device has the following characteristics: Type: digital TV tuner, Version: external, Connection type: standalone, capture: no, FM tuner: no, HD support: 720p, see the next tab for full specifications.
| GLOBO_gl100_0.pdf | User guide |
| GLOBO_gl100_1.pdf | Download certificate of conformity |
| Download Report broken link |
Useful files and software
For many products, various additional files may be needed to work with GLOBO GL100: drivers, patches, updates, installation programs, a list of error codes, an electronic circuit or photo. You can download these files online for a specific GLOBO GL100 model or add your own for free downloading by other visitors.
| Drivers | Found (0) |
| Electronic circuit | Found (0) |
| Photo | Found (0) |
| Installation diagram | Found (0) |
| Datasheet | Found (0) |
Instructions for similar TV tuners
If you have not found files and documents for this model, you can look at the instructions for similar products and models, as they often differ in slight changes and are complementary.
Reviews of GLOBO GL100
Be sure to write a few words about the product you purchased so that everyone can read your review or question. Be active so that as many people as possible can find out the opinions of real people who have already used the GLOBO GL100.
sdadsasd
Gugu
Very good console
awwwa
The green LED is on, on the ASH display, the set-top box does not respond to the remote control
Very convenient attachment
Eee
Characteristics of GLOBO GL100
Text describing the characteristics of the device.
| General characteristics | |
| Type | digital TV tuner |
| Execution | external |
| Connection type | autonomous |
| capture | No |
| FM tuner | No |
| Video characteristics | |
| HD support | 720p |
| Digital standards | DVB-T2 |
| Inputs and outputs | |
| Exits | audio, HDMI, composite |
| FireWire | No |
| Other features and functionality | |
| Teletext | There is |
| Recording timer | There is |
| Delayed viewing mode | There is |
| Additional Information | |
| Dimensions (WxHxD) | 165×35x90 mm |
| Weight | 500 g |
| Peculiarities | USB port; media player mp3/mkv/wma/avi/jpeg/bmp |
Digital terrestrial television channels of the DVB-T2 standard
If you bought a TV, antenna and set-top box just now, then when you open the welcome window, you need to click on the “Menu” button on the control panel. Next: “DVB-T setup” -> “Channel search” -> “Search mode”. Here you can both find the channels themselves and set the frequency.
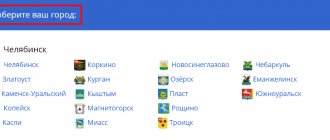
To simplify the search process, you can first go to a special website with information to find out what frequencies the channels are broadcast on in your city.
If the antenna is directed correctly, then after a few seconds the “Signal Strength” and “Signal Quality” scales will be filled. If the level is good, then you need to click on “Search”, and the device will perform the adjustment itself.
If you do not know the correct direction of the antenna, you can rotate it very slowly and smoothly. In this case, you need to carefully look at the scales of intensity and quality. Once these scales are full, secure the antenna in this position and perform a search.
- Sorting channels on a Samsung TV
This is one of the easiest ways to set up a digital TV yourself. If automatic tuning turned out to be ineffective - the set-top box found few channels (or even did not find them at all), then you need to use manual tuning.
To do this, you need to delete all those channels that were found earlier. After that, select the manual search mode in the same way. A window will appear on the screen. In it you need to set the frequency on which all channels in your city are broadcast. You can find out the frequency on the Internet or from your service provider.
After the channels of the first multiplex have been found, you will need to find out the frequency for the second multiplex and start the manual search again. You can find many channels this way.
Checking the signal quality
To make sure that everything is done correctly, you need to find the “INFO” button on the receiver. (In some models, this button has a different name. To determine which button is intended for checking the signal quality, you need to look at the instructions.) This button must be pressed 3 times, as a result of which a window should appear on the screen with information about the signal quality, number channel, frequency and encoding. If the first two parameters are greater than 60%, this means that the signal level is acceptable.
If the signal is of poor quality (constantly changes its level) and shows 30% of the full signal, then the image quality will be very poor. In such cases, it is necessary to either raise the antenna higher, or install it in another place, or simply strengthen the signal.
If the TV can receive several multiplexes, you need to check the signal quality on each of them, because they work with different transmitters. It may well be that the signal will be good in one multiplex, but not in another.
» GLOBO TV tuners » GLOBO GL60
Setting up sharing via the receiver port
Here you must first make sure that you are connected to the Internet and have installed firmware that supports sharing. Further instructions look like this:
- Setting up an Internet port. If the modem or router is configured to automatically distribute parameters via a DHCP server, then you just need to click “on” in the menu. This way, automatic network settings will already be received by the receiver. If this is not the case, the parameters are registered manually.
- Setting up a sharing server. The receiver can support up to eight different servers or eight ports of one sharing server. Among other things, the server domain and IP address of the device from which the connection is being made must be specified, as well as the username, password, key, etc. The entered sharing parameters must be saved.
- After the sharing server parameters have been specified, if everything is done correctly, you can watch the channels included in the package.
- If the Request timed out message appears, it means that the setup or its individual elements were performed incorrectly. It is necessary to check everything again step by step, or even better, repeat the entire procedure from the beginning.
To know for sure whether the settings are correct or not, a ping is done for sharing. In the settings menu there is a blue button, by clicking on which you need to enter the ping parameters. The number of the server for which the configuration was made will be sufficient.
One of the most stable for sharing on receivers 4100c, 9600, etc. At the moment the firmware is ver.1.4.34.
Globo is a brand whose all models are popular and approved by users (gl100, 4100c 9500, 9600, etc.) By the way, gl100 also broadcasts using the dvb standard. In many ways, the functions of the 4100c, gl100, 9500, 9600 are similar to the x403p.
Description and instructions GLOBO GL60
Terrestrial digital receiver Globo GL60 (menu, setup, recording)
Unpacking the digital terrestrial receiver DVB T2 Globo GL30. In this video I review the digital set-top boxes DVB T2 Globo GL30. I installed it, connected it and configured it. Setting up is searching and scanning channels. I found 20 HD channels of the first and second multiplex. The TV itself is included in the package tuner, remote control, batteries for it, bell cable, setup instructions and warranty. On the back panel we have three outputs for bells, ASHDIMAY or HDMI and an antenna input. On the side there is a USB connector for connecting flash drives from which you can watch photo and video files. I connected this receiver and the image quality satisfied me. You can call this a review - a review. Review of the Globo gl 30 receiver and setting up free digital channels Did you like the review?
Don't forget to like and repost! Tags:
GLOBO GL60, external TV tuner, reviews, photos, instructions, video, price, review, buy GLOBO works without a computer
Rating of GLOBO GL60 on TV-Priem.ru:
5 out of 5 based on 358 votes.
Frequently asked questions that we are tired of answering:
- What comes with GLOBO GL60?
- What does a digital external TV tuner mean? What and where to connect it to?
- Help, I'm a complete idiot, the GL60 won't turn on?
- I want to learn how to take photographs correctly, I’m looking for a photography school in St. Petersburg or some photography courses for beginners. Tell me the addresses.
- In what format does it save records? And where?
- We are urgently looking for native software for GLOBO GL60. Please share the link
- How to record a TV program using this tuner?
- Does it support stereo sound in NICAM and A2?
- I need to fix the antenna connector, I’m looking for an adequate service in St. Petersburg. Repair cost?
- I studied all the GLOBO models, re-read the reviews, but I still can’t decide. Which external standalone TV tuner should you choose?
- I will buy a used GLOBO GL60 or something similar in terms of characteristics in St. Petersburg. Urgently!
Try to find
- how to connect digital set-top box Globo 60x
- setting up gl 60 channels
- GLOBO GL60 receiver manual
- globo gl-60 No. 6 instructions
- globo gl60 how to set up 20 channels on a dvb-t2 set-top box
- how many channels does the DTV2 Globo 60 set-top box fit in the Kurgan region
- how to configure the Globo gl 60 receiver for 20 channels
- hd dvb-t2 gl60 setup
- digital terrestrial receiver globo gl60 malfunctions
Link to this page
Sources used:
- https://mo.divo.ru/television/dit-tv/321.html
- https://sputnik.guru/263-ruchnaya-nastrojka-resivera-dlya-tsifrovyh-kanalov-dvb-t2.html
- https://tv-priem.ru/290-kupit-globo-gl60/
