Setting up digital TV
There are two main formats of digital TV, cable digital and terrestrial digital TV.
To set up cable, you need to enter into a service agreement with the provider, after which your apartment will be connected to the network.
After this, you can begin setting up cable channels.
DVB-C setup.
DVB-T2 setup
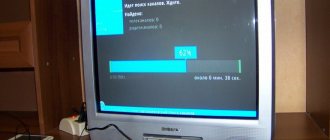
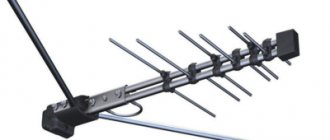
In order to set up twenty digital terrestrial channels without a subscription fee on your Orion TV, you only need a digital TV and an antenna. Which can be either outdoor or indoor, it depends on your distance from the TV tower.
After you have connected the antenna to the TV receiver, you can begin searching for digital channels.
To do this, take the remote control and press the button.
- Use the left or right buttons to find the Channel item.
- There are several points here; we need the Tuner Type to be set to Ether.
- Next, go to the Auto search item.
- We set DTV to search for digital channels and start searching for channels.
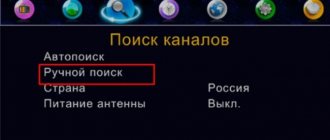
You can also use Manual Search, for this you need to know the multiplex frequency.
Using the Channel Editor, you can sort the found channels in a different order or delete unnecessary channels.
If after tuning the channel picture is scattered, check the signal level in the Signal information section.
Digital format
In order to watch digital television on your TV, make sure that your TV receiver supports the DVB-T2 broadcast format. This is necessary to receive terrestrial digital TV. Check the documents on the TV; it should indicate the characteristics of the TV. You can also check your TV on the Internet. To do this, go to the website See the Russian Federation Digital Code where a list of all TV models that support DVB-T2 is provided.
Digital set-top box.
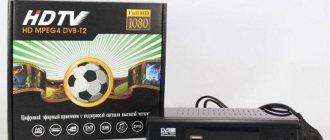
If your Orion TV does not support digital format, do not despair, just purchase a set-top box for viewing digital. The cost of such set-top boxes is not high and they cost around one thousand rubles.
To connect the set-top box to the TV, use the cord that comes with it.
If these are tulips, then connect them to the appropriate connectors according to their light.
The cable from the antenna must be connected to the set-top box itself.
After that, press the button on the TV to output video signal.
After that, take the remote control from the set-top box and search for channels.
Often, user problems can be solved without calling a technician to your home. For your convenience, a consultation on setting up TVs has been organized.
Possible problems and their solutions
Sometimes users encounter unexpected problems while using the Oriel set-top box. Often the reason is hidden in a system failure. Most problems can be fixed on your own, but if they happen constantly, then it is better to go to a service center.
Oriel box does not find channels
If the set-top box refuses to detect TV broadcasts, check for updates. Remember that any system requires regular updates. Go to the official website of the developer and check the latest patches in the appropriate section. Download the file to a flash drive, insert it into the set-top box, go to the menu and select “Update via USB”.
If the error persists, try resetting the settings. The function is located in the “System and TV” category. After the procedure, all information will be deleted and settings will be reset.
Does not respond to the remote control or the button does not work
Initially, make sure that the reason is not due to dead batteries. The second reason is the long distance, that is, you are trying to use the remote control while being too far from the console. Are you doing everything right? It may be time to replace the remote control with a new one or send it in for repair.
No signal
The lack of a signal is often due to technical work by the provider. Call the hotline and clarify the question; maintenance work is probably underway and therefore the broadcasts are unavailable. Also, the reason may be due to unfavorable weather or a damaged cable.
How to set up your Orion TV
TV operating instructions
The television instructions for the Orion OLT-32202 model describe the following connections:
1) Connecting the antenna - before connecting the antenna, you must turn off the device from the network. If a thunderstorm is approaching, you should disconnect the outdoor antenna from the TV.
2) Connecting to AV connectors - connect the CVBS cable tulip, observing the color of the plugs and connectors. On the remote control, press SOURCE and select AV in the window that opens.
3) Component input connection - connect the outputs of the YPbPr/YCbCr DVD player to the corresponding inputs of the TV. Simultaneously connect the audio output of the equipment to the audio input of the TV.
4) Connecting to a computer via VGA - connect one end of the cable to the output of the video card of your computer or laptop, and the other to the VGA input on the back of the TV.
5) HDMI connection - connect the TV input to an external source. With an HDMI connection, both video and audio are transmitted simultaneously.
How to connect an Oriel digital set-top box to your TV
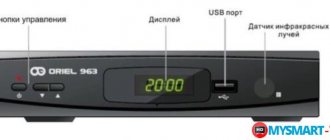
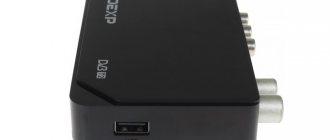
The connection process itself is not complicated, especially if you follow the detailed instructions. An RCA cable is included with the receiver. But, if you have an HDMI cable, it is better to use it, because... it provides better sound and image transmission. You should also initially familiarize yourself with the console itself. The front part contains the main control keys and display:
The rear panel has built-in connectors for:
- Antennas.
- HDMI.
- SCART.
- RCA.
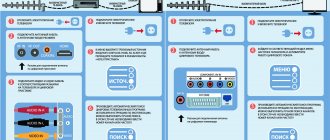
Connecting the device
The connection instructions are suitable for all device models, including 4030, 4150, 403d, 415d, 740, 213, 101, 314, 421ud, 963, 4210. First of all, disconnect all devices from the power supply. Then, depending on the cable used, make the connection. The diagram clearly shows the process for different connectors.
Initial settings
The second step is to make sure there are working batteries in the remote control. When you turn on the TV with the set-top box connected, a welcome window will appear on the screen where you will need:
- Specify country.
- Select language.
- Set the optimal resolution and aspect ratio.
How to connect the Selenga set-top box to a TV to receive digital channels
To save and continue the initial settings, click on “Ok”. Next, an auto search for channels will start, the list of which will be displayed on the screen. The search will be carried out according to the DVB-T2 standard.
If you have any questions or complaints, please let us know
Ask a Question
Orion TV remote control
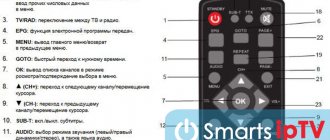
The Orion TV remote control has the following remote control buttons:
1 - POWER: Turns on the TV and switches to standby mode.
2 - MUTE: Mute or unmute the TV sound.
3 - SOURCE: Pressing the SOURCE button displays a list of signal sources. The selection of video equipment connected to the TV inputs is carried out using buttons. Click OK to confirm your selection.
4 - Button block - P.MODE: Select the image mode. S. MODE: Selects sound effect options. AUDIO: Button for selecting audio settings. P.SIZE: Switches image size options.
5 - 0-9: Pressing one of these buttons selects the corresponding channel.
6 - FAV.CH: Pressing the FAV.CH button displays your favorite channels.
7 - SLEEP: Set the sleep timer.
8 - JUMP: Switches between the channel you are watching and the previous channel, and back.
9 — : Displays the OSD menu.
10 - EXIT: Exits the OSD menu.
11 — : Press once to display various information such as current channel and input source.
1 2 — The cursor buttons allow you to navigate between OSD menu options and perform system settings. The selection of the appropriate menu options is confirmed by pressing the OK button. When you click the OK button, a list of channels is displayed.
13 - V+/V-: Increase and decrease volume.
14 - P+/P-: Scans the frequency range up and down to search for channels.
15 - Colored button block - Use the corresponding color buttons to directly access functions in TELETEXT or EPG OSD mode D.SETUP - In DVD mode, press this button to enter/exit the DVD settings menu. ZOOM — Enlarges/reduces the displayed frame. REPEAT: Pressing the REPEAT button will replay all selected tracks/individual songs, or cancel repeating tracks. A-B: Press the button to repeat playback between marks A and B. GOTO: Playback from a specific point.
16 - DTV/RADIO: In DTV (digital television) mode, pressing the DTV/RADIO button switches to DTV (digital television) mode or RADIO (radio) mode. Freeze frame of multi-page switching in teletext mode
17 - PVR LIST(lndex): In DTV mode, the running PVR and List (Index) are displayed. Displaying the main list in teletext mode
18 - SHIFT: in DTV mode. Click this button to activate the delay function, click the play button to start the program with a delay. Press the button to end the delay function. Display hidden information, such as answers to quizzes in teletext mode.
19 - REC: In DTV mode. When you press the REC (record) button, recording begins. Press the button to stop recording.
20 - USB: Press this button to switch to USB mode. Display the top, bottom of the page, and the entire page.
21 - In mode (mode of working with data storage devices), accelerated playback is used for reverse scrolling/moving. In mode, press to go to the previous section or track. In mode, press to go to the next section or track. In mode, press to stop playback of a section or track. In mode, press to start playback or pause.
22 - DVD : This function is not available for non-DVD models. TEXT: Turns the teletext function on or off. SUBTITLE: Displays the subtitle menu on the screen in DTV mode. Use buttons to select subtitle settings. GUIDE: Displays the TV guide on the screen in DTV mode. To turn off the TV guide, press the button again.
The DVD (DVD menu) and OPEN/CLOSE buttons are only available on TVs with a built-in DVD player.
On our website you can download the TV remote control
location and designation of remote control buttons, as well as instructions and User Guide
Setting up your Orion TV
Initial setup
The initial setup of the Orion TV consists of selecting the menu language, selecting the country of location, the type of antenna for DVB-T digital television or DVB-C cable.
Before starting the auto search, you must select a search mode: analogue television ATV, digital television DTV, or combined ATV+DTV.
Main menu functions
Image settings menu: brightness, contrast, sharpness, hue, saturation
Color temperature: standard, cold, warm
Aspect Ratio - Select the Orion aspect ratio
Additional settings: noise reduction, MPEG noise reduction, dynamic contrast,
Sound menu
Sound Mode: Treble, Bass, Balance, Surround, EQ Settings, SPDIF, Audio Description, Sound Mode, Sound Type
Channel settings menu
Manual search—tuning TV channels manually.
ID network identification number, select with left or right keys, or enter a numeric value.
Symbol speed - selection using cursor keys.
Modulation - select from Avto, 16QAM, 32QAM, 64QAM, 128QAM, 256QAM
Color system: AVTO, PAL, SECAM
Sound system: AVTO, DK, BG, I, L
Auto Frequency Control AFC: On, Off.
Basic Operations
Further configuration will also be carried out using the remote control. You should familiarize yourself with all the button assignments.
Basic operations include setting up the following sections:
- Program Manager.
- Picture parameters.
- Search for broadcasts.
- Setting the time.
- System parameters.
Each item implies several categories. Any user without special knowledge can perform the setup; just follow the instructions.
Program Manager
This section allows you to edit the list of channels. It is located at the very top of the menu. Here you will find a list of broadcasts, radio channels. You can also delete an unnecessary channel or add it to your favorites.
In the broadcast list, editing is carried out as follows:
- To block a specific broadcast, press the red key on the remote control.
- To skip - green.
- To move the channel to another position - yellow.
- Rename the broadcast - blue.
- To move a channel to the list of favorites, use the FAV button.
If you plan to delete all channels at once, you will need to enter the password 1234 (default).
Image Settings
Adjust the image in the third section “System Settings” in the “TV System” tab.
Select the optimal screen resolution. It is recommended to set automatic detection, but sometimes you have to do it manually. In this case, the image resolution depends on the type of connection:
- 480r/i.
- 576i/p.
- 1080p/i.
The aspect ratio must be selected for your TV:
- 4:3 PS.
- 4:3 LB.
- 16:9.
Search channels
The “Channel Search” section is second in the main menu. The following options are available here:
- Automatic channel search. Activate the "Open Only" function to have the system search only for open channels. Leaving this option untouched will detect all broadcasts, including encrypted ones.
- Manual search. Start discovery by channel or frequency. Specify the range in which the search will be carried out - MV or UHF. Next, enter the broadcast number or frequency. Below you will notice visual information about the quality of the incoming signal and intensity.
- In the next tab, indicate the type of broadcasts to be scanned - all, free or encrypted.
- Activate the antenna power point if you are using an active device with a built-in amplifier.
Why doesn’t IPTV Player show on the computer and TV: reasons, how to fix it?
Setting the time
Time settings are located in system settings. Here it is configured:
- Shit. Select the one where you live.
- Application of GMT. By selecting the “By region” option, the system will automatically set the time. By disabling it, you can independently specify the time and time zone.
- Timer. Allows you to record broadcasts and set reminders to watch a specific broadcast.
Setting options
Edit the main menu:
- Select the demonstration time – 1-10 seconds.
- Set transparency – 0-40%.
System Settings
This section includes the following functions:
- Information about installed software.
- Parental control. When using, the system will ask for a password, enter 1234. The function allows you to lock the main menu, specify age restrictions, and change the password.
- Reset parameters to factory settings. This feature is often used to fix serious system errors.
- Software update via USB. Go to the official website of the set-top box manufacturer and download the latest software patch to a flash drive, then insert the drive into the set-top box and in this section select “Update via USB”. Wait for installation.
Answers to questions on Orion TV
Orion PT-50zhk-100 no digital television signal
Orion PT-50zhk-100 TV, when connecting an antenna for digital television, the message “no signal” is displayed on the screen, what is the reason? 09/14/2018, Irkutsk.
The “No Signal” message may appear on the screen for several reasons:
1) Due to incorrect settings
2) Due to lack of signal in the antenna
3) Due to a TV malfunction
However, the Orion PT-50zhk-100 TV does not have a built-in digital television decoder and does not provide viewing of DTV channels.
Orion Olt 32102 there is a picture but no sound
I connected the TV, there is a picture but no sound. 11/22/2018, Protvino.
If you connected your TV to a set-top box, you should check that the audio cables are connected correctly. If there is no sound when watching regular television channels, try turning on the initial setup mode and selecting the correct sound system (country).
Greetings dears. I received this ORION t20ms without instructions. We need instructions for setting up channels (there were 3, but they expanded to 60). Thanks in advance for your help. What is a chassis?
- Login or register to answer
photo of a similar remote control
press preset, then use the program plus and minus buttons to select which channel to set, then use the band select button to select a range (there are three of them, and skip means that the channel is erased when you press preset), then press the button, the search begins, finds the program, the color of the graphics changes, if that is what you need, press preset and the program is remembered, if not, then so on. The color standard is switched by the PAL-SECAM button
You can do it a little differently: press preset then auto memory and wait a few minutes for the auto search to finish, press preset
076l078090-2_190.jpg
How to set up your Orion TV
TV operating instructions
The television instructions for the Orion OLT-32202 model describe the following connections:
1) Connecting the antenna - before connecting the antenna, you must turn off the device from the network. If a thunderstorm is approaching, you should disconnect the outdoor antenna from the TV.
2) Connecting to AV connectors - connect the CVBS cable tulip, observing the color of the plugs and connectors. On the remote control, press SOURCE and select AV in the window that opens.
3) Component input connection - connect the outputs of the YPbPr/YCbCr DVD player to the corresponding inputs of the TV. Simultaneously connect the audio output of the equipment to the audio input of the TV.
4) Connecting to a computer via VGA - connect one end of the cable to the output of the video card of your computer or laptop, and the other to the VGA input on the back of the TV.
5) HDMI connection - connect the TV input to an external source. With an HDMI connection, both video and audio are transmitted simultaneously.
Orion TV remote control
The Orion TV remote control has the following remote control buttons:
1 - POWER: Turns on the TV and switches to standby mode.
2 - MUTE: Mute or unmute the TV sound.
3 - SOURCE: Pressing the SOURCE button displays a list of signal sources. The selection of video equipment connected to the TV inputs is carried out using buttons. Click OK to confirm your selection.
4 - Button block - P.MODE: Select the image mode. S. MODE: Selects sound effect options. AUDIO: Button for selecting audio settings. P.SIZE: Switches image size options.
5 - 0-9: Pressing one of these buttons selects the corresponding channel.
6 - FAV.CH: Pressing the FAV.CH button displays your favorite channels.
7 - SLEEP: Set the sleep timer.
8 - JUMP: Switches between the channel you are watching and the previous channel, and back.
9 — : Displays the OSD menu.
10 - EXIT: Exits the OSD menu.
11 — : Press once to display various information such as current channel and input source.
1 2 — The cursor buttons allow you to navigate between OSD menu options and perform system settings. The selection of the appropriate menu options is confirmed by pressing the OK button. When you click the OK button, a list of channels is displayed.
13 - V+/V-: Increase and decrease volume.
14 - P+/P-: Scans the frequency range up and down to search for channels.
15 - Colored button block - Use the corresponding color buttons to directly access functions in TELETEXT or EPG OSD mode D.SETUP - In DVD mode, press this button to enter/exit the DVD settings menu. ZOOM — Enlarges/reduces the displayed frame. REPEAT: Pressing the REPEAT button will replay all selected tracks/individual songs, or cancel repeating tracks. A-B: Press the button to repeat playback between marks A and B. GOTO: Playback from a specific point.
16 - DTV/RADIO: In DTV (digital television) mode, pressing the DTV/RADIO button switches to DTV (digital television) mode or RADIO (radio) mode. Freeze frame of multi-page switching in teletext mode
17 - PVR LIST(lndex): In DTV mode, the running PVR and List (Index) are displayed. Displaying the main list in teletext mode
18 - SHIFT: in DTV mode. Click this button to activate the delay function, click the play button to start the program with a delay. Press the button to end the delay function. Display hidden information, such as answers to quizzes in teletext mode.
19 - REC: In DTV mode. When you press the REC (record) button, recording begins. Press the button to stop recording.
20 - USB: Press this button to switch to USB mode. Display the top, bottom of the page, and the entire page.
21 - In mode (mode of working with data storage devices), accelerated playback is used for reverse scrolling/moving. In mode, press to go to the previous section or track. In mode, press to go to the next section or track. In mode, press to stop playback of a section or track. In mode, press to start playback or pause.
22 - DVD : This function is not available for non-DVD models. TEXT: Turns the teletext function on or off. SUBTITLE: Displays the subtitle menu on the screen in DTV mode. Use buttons to select subtitle settings. GUIDE: Displays the TV guide on the screen in DTV mode. To turn off the TV guide, press the button again.
The DVD (DVD menu) and OPEN/CLOSE buttons are only available on TVs with a built-in DVD player.
On our website you can download the TV remote control
location and designation of remote control buttons, as well as instructions and User Guide
Setting up your Orion TV
Initial setup
The initial setup of the Orion TV consists of selecting the menu language, selecting the country of location, the type of antenna for DVB-T digital television or DVB-C cable.
Before starting the auto search, you must select a search mode: analogue television ATV, digital television DTV, or combined ATV+DTV.
Main menu functions
Image settings menu: brightness, contrast, sharpness, hue, saturation
Color temperature: standard, cold, warm
Aspect Ratio - Select the Orion aspect ratio
Additional settings: noise reduction, MPEG noise reduction, dynamic contrast,
Sound menu
Sound Mode: Treble, Bass, Balance, Surround, EQ Settings, SPDIF, Audio Description, Sound Mode, Sound Type
Channel settings menu
Manual search—tuning TV channels manually.
ID network identification number, select with left or right keys, or enter a numeric value.
Symbol speed - selection using cursor keys.
Modulation - select from Avto, 16QAM, 32QAM, 64QAM, 128QAM, 256QAM
Color system: AVTO, PAL, SECAM
Sound system: AVTO, DK, BG, I, L
Auto Frequency Control AFC: On, Off.
Answers to questions on Orion TV
No digital TV signal
Orion PT-50zhk-100 TV, when connecting an antenna for digital television, the message “no signal” is displayed on the screen, what is the reason? 09/14/2018, Irkutsk.
15/10/2019 Orion PT-50ZhK-100 St. Petersburg I can’t connect digital TV
12/10/2020 Orion OLT-22950 Kursk region It is not possible to configure channels; when searching, it finds only 10 channels instead of 20. Moreover, there are 10 channels starting from channel 11 to channel 20, but the first ten are missing.
12.3.2020 7:49:53 ORION OLT-24502 Republic of Altai Chemal district I can’t set up cable channels, free
The “No Signal” message may appear on the screen for several reasons:
1) Due to incorrect settings
2) Due to lack of signal in the antenna
3) Due to a TV malfunction
However, the Orion PT-50zhk-100 TV does not have a built-in digital television decoder and does not provide viewing of DTV channels.
There is a picture but no sound
I connected the Orion Olt 32102 TV, there is a picture but no sound. 11/22/2018, Protvino.
24/10/2020 Orion OLT-32950 V1U09 Tatarstan We bought a TV, connected it, there is an image, but no sound at all, and I found one analog channel, there is sound on it
If you connected your TV to a set-top box, you should check that the audio cables are connected correctly. If there is no sound when watching regular television channels, try turning on the initial setup mode and selecting the correct sound system (country).