You don't even need a TV to watch modern television. But we are accustomed to the fact that it is in every home and everyone should use it, so we do not deviate from tradition. However, it’s the 21st century and it’s high time to forget about prejudices. Here's an example of how far technology has come - watching programs is possible even without a satellite dish or a regular antenna. This technology is called IPTV. That is, television tied to the device’s IP address.
To watch it, you need an IPTV Player. By the way, an IPTV player is a television broadcast player that was created using the VLC player as a prototype. But the IPTV player is specially designed for watching IP television. Here are the main features of the player:
- Background recording of a huge number of channels (hundreds and more);
- It is possible to record streaming video and audio;
- Programs in JTV and LUA script are supported;
- You can watch unencrypted Http, Librtmp, rtmp, udp-multicast streams;
- Can find multicast channels.
Where can I find playlists?
To start watching IPTV, you will first need to download a playlist. This is a special list of interactive broadcasts that contains links to channels. Looks like a list, saved in m3u format. On the Internet you can find and download many collections focused on various topics.
In fact, these are the same broadcasts about sports, animals, music, only broadcast via the Internet. You can download the current playlist here: https://smarttvapp.ru/tag/iptv-pleylist/. Sometimes such services are kindly provided by the providers themselves. Just enter “m3u”, “IPTV” or “playlist” in the search bar. And then save the file.
Structure of M3U playlists
An M3U file is usually UTF-8 encoded and contains paths to one or more media files or streaming streams, as well as additional information such as display name, sorting, graphic elements, etc.
The first line of the M3U file must include the #EXTM3U directive - this is a subtitle that makes the playlist format understandable to the system. The header is followed by the string #EXTINF, which contains information about the media file.
In addition to the duration and title for each entry, M3U playlists have a number of additional parameters:
- “tvg-name” — indication of the displayed name;
- “tvg-logo” — channel logo;
- “audio-track” — audio track of the channel (languages);
- “Group-title2”: name of the group (sports, educational, etc.).
Recording a playlist to a flash drive
There are different ways to load channels into the receiver. Including from a USB drive. Mandatory requirement: m3u list format and no other. The step-by-step process looks like this:
- We save any playlist you like using a PC on a flash drive. The designation type is playlist.m3u, where the name is indicated instead of the playlist.
- We safely remove the drive from the PC port and insert it into the set-top box.
- Go to the “Settings” menu, there we find the “External playlists” section. Create a new playlist. The path to it should be usb://playlist.m3u.
- A shortcut to the list you just added should appear on your home screen. If it does not appear, refresh the page.
Sometimes you need to download a new firmware version. Other requirements include the type of file system on the flash drive (FAT32).
How to connect m3u channel list for free
If this is a person’s first acquaintance with the benefits of IPTV, then, naturally, he does not want to pay yet, since he does not know what he will get in the end. But it’s still worth remembering that running television for free, without connecting to a service from a provider, is fraught with various troubles, from poor quality channels to a black screen on the entire list.
To prevent this from happening, download worksheets only from trusted resources, even if they are free. In addition, providers regularly close more and more loopholes, so it becomes more difficult to watch television for free. Here's how to download it:
- We work with the installed IPTV program, finding in its settings “Add playlist” - “Add URL”;
- Select the m3u sheet and grab its URL;
- Click confirmation of the procedure and get acquainted with the list of TV channels that will now be available on your device.
But users may be in for an unpleasant surprise - to watch channels they will need to install an additional program. To do this, you just need to follow the instructions. The download will take place automatically, but if not, then you need to go to the Smart TV menu and select the desired program manually. But it is important that it reads the m3u format, otherwise the procedure will be meaningless.
How to install IPTV m3u on a T2 set-top box
To record a playlist into the memory of the Tiger digital set-top box, another similar DVB T2 device, you must first download it. The easiest way to do this is on a computer. We find the required selection on the network and load it onto a USB drive. Next, you should transfer the playlist to the set-top box. To do this, connect the flash drive to one of the connectors.
It is desirable that this be a port on the front panel (it is not known why, but it has priority when connecting peripheral devices). After connecting, go to the set-top box menu.
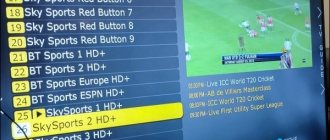
You will need the “Internet - IPTV” section. Next, press the blue button on the remote control, which gives access to the list of playlists. Choose the one you need.
If there are active links in the selection of channels, you can start watching your favorite broadcasts.
Setting the channel list for IPTV
Even if you already have a player and it works, this does not yet make it possible to use this television format on your TV. To do this, a playlist must be in m3u format. This is what allows you to watch your favorite programs. But even if there is a list, this does not mean that it will work without interruption. In fact, the problems turn out to be so complex that there is no way to watch the TV program for which this matter was started.
But there is a way out. In particular, it consists of using other channels that are available on the Internet. All the user needs to do is download them and install them using the instructions.
There are several options on how to do this:
- Download playlists from open sources, which offer a fairly extensive list of applications for almost free. There are many such sources on the Internet, which is why most users choose the option in question;
- Download the playlist from an official source, naturally, by paying for it to the provider that connects the service in question. As a rule, this option is more reliable, the provider works officially, so there should be no problems with this connection.
You can download the playlist here: music.m3u(9.3 Kb)
But even though the subscription fee is minimal, our people never tire of looking for freebies and continue to give preference to free lists. In principle, among them there are quite decent ones, but the signals often disappear or the picture is not of the highest quality, although it is stated that this is an HD channel. But otherwise, it’s a shame for users to complain.
Possible problems
Setting up a set-top box does not always happen immediately and without any problems. More often than not, users experience difficulties loading the playlist, complaining that the device “does not see” the list. Although it is saved on a flash drive according to all the rules. Or when you press the blue button on the remote, nothing happens.
First, you should make sure that the file system of the drive is FAT32. Experienced film experts claim that without fulfilling this condition, nothing will work. Then the playlist format is checked. It should be of the form playlist.m3u (where the first part before the extension is the name). And, if the list is created with any other extension (not m3u), it will also not be played.
Often the solution is to update the set-top box software, downloading the latest, most recent firmware version. Many questions are related to unstable playback of the playlist file. To avoid having broken links, it is important to download collections from trusted sources. Use self-updating sheets.
SS IPTV
This section describes directives and attributes that are only applicable to SS IPTV; third party applications may not interpret these parameters correctly
In addition to the traditional directives and attributes of the Extended M3U format, SS IPTV provides additional ones. Using the attributes described here allows you to very flexibly customize the appearance of playlists on the main screen by manipulating the display of individual tiles.
Directives of the M3U format always start on a new line and have the hash “ # ” as the first character; the attributes are written on the line with the directive (usually #EXTINF) and are presented as an attribute = “ value” . The attribute value must always be enclosed in double quotes
Additional directives:
#EXTBG defines the background of the tile associated with the playlist element being described. #rrggbb or rgba format can be specified
#EXTSIZE specifies the size of the tile associated with the playlist element being described. Possible values: small, medium, big
#EXTCTRL after the directive can be specified the url at which the request will be made when clicking on a tile related to the element being described. The request is sent before the content is loaded. This function can be useful for owners of satellite receivers; when using it, the application will send the receiver a command to switch the channel.
Additional attributes of the #EXTINF :
description – defines the description displayed on tiles of medium and large sizes
content-type – allows you to specify to the application the type of content being described. Possible values: stream, video, playlist. In most cases, the application automatically detects the content type and there is no need to use this parameter.
Additional attributes of the #EXTM3U
The #EXTM3U directive can contain description, size and background attributes as attributes. In this case, the values set for the listed attributes are applied to all elements of the playlist, unless they are overridden in the #EXTINF directives
Below is an example of an M3U playlist using additional directives and attributes and how it would look in the application.
#EXTM3U #EXTINF:-1, MTV Dance #EXTSIZE: Big #EXTBG: #11609e https://example.com/stream1 #EXTINF:-1,MTV Hits #EXTSIZE: Medium #EXTBG: #046f55 https://example .com/stream1 #EXTINF:-1, Russia 24 #EXTSIZE: Medium #EXTBG: #046f55 dtv://cabel:11/dvb/8 #EXTINF:-1, Channel One #EXTSIZE: Medium #EXTBG: #046f55 dtv ://cabel:11/dvb/2 #EXTINF:-1, MTV Live HD #EXTSIZE: Small https://example.com/stream3 #EXTINF:-1, MTV Rocks #EXTSIZE: Small https://example. com/stream4
What is IPTV?
IPTV (Internet Protocol Television) is a technology that allows you to transmit video content over IP (Internet Protocol). In simple words, this is watching television channels over the Internet.
IPTV can be used both on TVs with SMART TV support and on regular computers. Today, as I already noted, I will tell you how to watch IPTV on a computer.
I’ll say right away that in order to use IPTV on a computer, you don’t need to perform any complex actions. To watch IPTV on a computer, you just need to install and configure an IPTV media player, in other words, even an ordinary ordinary computer user can handle it. I will, of course, show you how all this is done a little lower.
What is an IPTV playlist?
An IPTV playlist is a selection of channels for playback. This playlist looks like a regular file. The most common format is M3U (a regular text file with the .M3U extension). Thus, if you only need certain IPTV channels, for example, with a topic that is interesting to you, then you just need to download the playlist you need and connect it to a media player that plays IPTV. I will also show you below where to download the IPTV playlist and how to connect it to your media player.
Setting up IPTV on a computer - step-by-step instructions
Now let's look at the process of setting up IPTV on a computer. It only involves a few simple steps.
Step 1 – Installing and setting up an IPTV player
To watch IPTV on your computer, you need a special player with IPTV support. As an example, I will give two such players: VLC Media Player and IP-TV Player (this is a VLC shell).
Today I will show an example of watching IPTV on a computer using VLC Media Player, since this player is very popular.
The note!
VLC Media Player is a free and open source cross-platform media player. It supports almost all multimedia files, allows you to play DVD, Audio CD, VCD and streaming unencrypted video, and VLC also has a lot of additional functionality, for example, this media player can convert video from one format to another very efficiently, I talked about this in detail in article “How to convert WMV to MP4 for free and without loss of quality?”
First we need to install VLC Media Player.
Note! If you already have VLC Media Player installed on your computer, then you do not need to perform the steps below, you can immediately proceed to the next step.
In this particular case, I am showing installation on the Windows 10 operating system, although VLC Media Player is implemented for both Linux and Mac OS X. I talked about how to install VLC Media Player on Linux in the article - Installing VLC Media Player in Linux Mint .
First, download VLC Media Player from the official website videolan.org. Then run the downloaded file.
The VLC installation process is simple and is no different from installing other programs on Windows.
After starting the installation program, first select the language and click “OK”.
Then in the welcome window click “Next”.
In the next step, accept the terms of the license agreement and click “Next”.
Then, we are asked to select the VLC components that we need and we want to install them, if you don’t need something, you can uncheck the corresponding box, I leave it as default and click “Next”.
Then, if you want, you can change the program installation directory. Click “Install”.
As a result, the installation will begin, this process will take literally a minute, it will be completed when the corresponding message appears, to immediately launch VLC Media Player, leave the checkbox and click “Finish”.
Step 2 – Download IPTV playlist
After the IPTV player is installed on the computer, in our case VLC Media Player, we need to download the IPTV playlist that is interesting to us. It’s good that there are playlists of IPTV channels freely available on the Internet. For example, a lot of IPTV playlists can be found using the service https://iptv.live (by the way, on this service you can add an IPTV playlist yourself).
All you need is to go to the above site, go through a simple registration, and you will have access to many IPTV playlists for downloading.
Next, open the playlist you like and click the “Download” button.
Then we select the format, for VLC we select, as I already noted, the most popular format M3U, click “Download”.
As a result, a file will be downloaded, which is an IPTV playlist.
Step 3 – Connect the IPTV playlist
Now that the IPTV player is installed and the IPTV playlist is downloaded, we need to open this playlist using the player.
To do this, launch the IPTV player, in our case VLC Media Player. In the “Media” menu, select “Open file”.
Then we find and specify the playlist file (i.e. open the folder into which we downloaded the IPTV playlist and click on the playlist file).
You can also simply open the .M3U playlist file using the file’s context menu, which can be called up by right-clicking on the playlist file “Open with ->VLC”.
After that, IPTV playback will begin in VLC Media Player. To view the list of available channels in the playlist, you can click on the “View -> Playlist” menu or the keyboard shortcut “Ctrl+L”.
To start watching a particular IPTV channel, just click on it.
That's all, now you know how to watch IPTV on a computer, I hope the material was useful to you, bye!