The use of IP TV playlists is currently justified for many reasons. The main one is, of course, cost savings. You don't need to pay extra to your cable or satellite operator. Essentially, you only need broadband Internet access and equipment capable of receiving it. The playlist can be viewed either via a computer or downloaded directly to a smart TV.
Moreover, in this case, it is you who determine: the list of channels, their quality, topics, etc. This is very convenient, because operators often offer their own list of broadcasts, of which, at best, you will watch 10-15. The rest will remain uninteresting or even be like TV shopping, which only a few people watch. Today we will tell you in detail how you can download playlists to an iptv player on your computer or TV.
Where can I find playlists?
To start watching IPTV, you will first need to download a playlist. This is a special list of interactive broadcasts that contains links to channels. Looks like a list, saved in m3u format. On the Internet you can find and download many collections focused on various topics.
In fact, these are the same broadcasts about sports, animals, music, only broadcast via the Internet. You can download the current playlist here: https://smarttvapp.ru/tag/iptv-pleylist/. Sometimes such services are kindly provided by the providers themselves. Just enter “m3u”, “IPTV” or “playlist” in the search bar. And then save the file.
Free IPTV Forever playlists
Introduced in 2021, IPTV Forever quickly gained popularity thanks to regular updates, the removal of non-working channels and the addition of working broadcasts. For ease of use, the Playlist is divided into 3 categories, each of which has its own access link:
- General library with channels from Russia, Ukraine, Belarus and other countries for the whole family - https://webhalpme.ru/if.m3u.
- Library exclusively with Russian channels – https://webhalpme.ru/rif.m3u.
- General 18+ containing adult content – https://webhalpme.ru/if18.m3u.
Smart TV owners on forums note that this IPTV playlist is one of the best. By adding it to the Forkplayer start page, you can quickly find the library and open the desired content.
Slynet playlist
SlyNet TV has a huge library that contains a variety of content. For convenience, each sheet has a separate access link:
- Library of Russian and Ukrainian broadcasts – https://iptv.slynet.tv/FreeSlyNet.m3u; https://iptv.slynet.tv/FreeBestTV.m3u; https://iptv.slynet.tv/PeerstvSlyNet.m3u.
- Library of channels from the countries of the former CIS - https://slynet.pw/FreeBestTV.m3u; https://slynet.do.am/FreeBestTV.m3u.
- A rich collection of films and cartoons - https://iptv.slynet.tv/KinodromSlyNet.m3u; https://iptv.slynet.tv/KinodromSlyNet.m3u.
- IPTV Playlist with foreign broadcasts – https://iptv.slynet.tv/FreeWorldTV.m3u; https://iptv.slynet.pw/FreeWorldTV.m3u; https://slynet.do.am/FreeWorldTV.m3u.
- Broadcasts for adults (18+) – https://iptv.slynet.tv/AdultsSlyNet.m3u.
- More than 100 IPTV radio stations – https://iptv.slynet.tv/RadioSlyNet.m3u.
There is another general link to Slynet - https://urlcut.ru/FreeBestTV.m3u. Here the channels are arranged in alphabetical order without division into categories.
Recording a playlist to a flash drive
There are different ways to load channels into the receiver. Including from a USB drive. Mandatory requirement: m3u list format and no other. The step-by-step process looks like this:
- We save any playlist you like using a PC on a flash drive. The designation type is playlist.m3u, where the name is indicated instead of the playlist.
- We safely remove the drive from the PC port and insert it into the set-top box.
- Go to the “Settings” menu, there we find the “External playlists” section. Create a new playlist. The path to it should be usb://playlist.m3u.
- A shortcut to the list you just added should appear on your home screen. If it does not appear, refresh the page.
Sometimes you need to download a new firmware version. Other requirements include the type of file system on the flash drive (FAT32).
Advantages
The player has the following advantages:
- Simple and convenient navigation, clear interface.
- To install the application, a minimum amount of memory is required - 5 MB.
- The player has a convenient feature - a playlist manager, which allows you to add any number of desired lists.
- The service supports automatic playlist updating. If desired, this action can be performed manually.
- Displays the TV program. Thanks to this, it is possible to see what is being broadcast at the moment, as well as what will be on next.
- There is a “Favorites” folder in which frequently used channels are saved. This is convenient in case of a large list.
- The application is equipped with useful and convenient features such as searching for the desired channel, reminders and viewing history.
- You can download the program on the Internet absolutely free.
The image quality is excellent - channels can be watched in SD and HD quality.
How to install IPTV m3u on a T2 set-top box
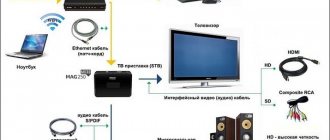
To record a playlist into the memory of the Tiger digital set-top box, another similar DVB T2 device, you must first download it. The easiest way to do this is on a computer. We find the required selection on the network and load it onto a USB drive. Next, you should transfer the playlist to the set-top box. To do this, connect the flash drive to one of the connectors.
It is desirable that this be a port on the front panel (it is not known why, but it has priority when connecting peripheral devices). After connecting, go to the set-top box menu.
You will need the “Internet - IPTV” section. Next, press the blue button on the remote control, which gives access to the list of playlists. Choose the one you need.
If there are active links in the selection of channels, you can start watching your favorite broadcasts.
Installing a channel list for IPTV on your computer
So, in order for interactive TV to be available on a computer or laptop, you need to download a player that supports the technology to the device. We will look at how to install a playlist using the example of popular applications - VLC Media Player and IP-TV Player (a VLC shell focused on watching IPTV). Downloading and installing the software is standard, as is the case with other programs on Windows, you just need to download the installer from the official website of the application, run it, and then the Installation Wizard will get involved. Installing a media player on a device is extremely simple and there is no point in describing the process in detail.
Installing a playlist in VLC Media Player
VLC is a multifunctional media player that supports all modern media formats, with a huge number of capabilities, including converting, video editing, creating web broadcasts, etc. You may already have it on your computer, but if not, we recommend installing the software. After installing the player, we find and download a suitable object in M3U format. Channel lists can be downloaded from an official source or open network resources; downloading is carried out as standard by clicking the corresponding button located next to the file.
Now let's look at how to connect a selection of TV channels:
- Launch VLC Media Player.
- In the “Media” menu, select “Open file” (or press Ctrl+O).
- We indicate the path to the object that should be opened, find it in the explorer that opens, select it, and click the “Open” button.
- VLC Media Player will start playing TV (provided that the links in the playlist are working). To view the list of channels, select “View” – Playlist from the menu (or press Ctrl + L), the desired option from the list can be selected by clicking on it.
An alternative way is to right-click on the playlist and select the “Open with” option from the context menu - VLC. You can also associate the program with this file type so that elements with this extension are always opened by it by checking the corresponding box.
Installing a playlist in IP-TV Player
Download the application installation file from the official website and install it in standard mode. When you launch IP-TV Player, you will be given the opportunity to choose to play TV broadcasts - using the provider or from a downloaded playlist.
To work with the built-in player lists, you need to click on the list to expand it and select the appropriate operator. On the right side of the media player you will see a list of available channels. Providers can block access to TV channels and also change the addresses of direct sources, but when you select the first option for working with IP-TV Player, the program will detect the changes that have occurred and download updates for this broadcast stream.
Adding new TV channels to the M3U playlist
To play an IPTV list in the player, perform the following steps:
- Click the settings icon on the bottom panel (in the form of a gear).
- ABOUT.
- In the “Channel list address” field, enter the current URL or, to insert an M3U playlist, look for it on the computer, to indicate the path, click the corresponding button on the right (“…”), and click the “Update” button in the form of a round arrow.
- Playback will start automatically, and a list of TV channels that you can navigate through will also be available in the player window.
Possible problems
Setting up a set-top box does not always happen immediately and without any problems. More often than not, users experience difficulties loading the playlist, complaining that the device “does not see” the list. Although it is saved on a flash drive according to all the rules. Or when you press the blue button on the remote, nothing happens.
First, you should make sure that the file system of the drive is FAT32. Experienced film experts claim that without fulfilling this condition, nothing will work. Then the playlist format is checked. It should be of the form playlist.m3u (where the first part before the extension is the name). And, if the list is created with any other extension (not m3u), it will also not be played.
Often the solution is to update the set-top box software, downloading the latest, most recent firmware version. Many questions are related to unstable playback of the playlist file. To avoid having broken links, it is important to download collections from trusted sources. Use self-updating sheets.
Installing a playlist for IPTV on TV
For those who like to watch TV channels traditionally, using a TV for this purpose, there are also special applications that allow you to install channel collections and enjoy the benefits of interactive television. Thus, if you have a device that supports Smart TV and you have entered into an agreement with the operator to connect to the service, all that remains is to install the necessary utility, where you then download the selection. All models of smart TVs have their own nuances in this regard, for example, you can download the software directly to the device or download it first to your computer, and then transfer it using a flash drive; the TV menu for different devices can also differ and sometimes dramatically, but the principle of operation is still similar .
https://www.youtube.com/watch?v=LCdS4NnUZMM
In addition to downloading and installing the program on your device, in order to watch IPTV on your TV, you also need to install a playlist. We will analyze this point in more detail using the example of the Simple Smart IPTV application, which offers the ability to install internal playlists from the software developer’s website, and external ones from other sources. At the same time, external IPTV lists can be edited, sent to other users and disposed of at your own discretion. Custom playlists will be saved in the “Settings” section (gear icon) and presented in the form of tiles, when you click on them you will be able to see a selection of TV channels.
So, the TV is connected to the network using a LAN connection or via Wi-fi, the SS IPTV software has been downloaded from the application store (in the smart menu of the TV receiver) and installed on the device. Now you can start integrating the collection into the program:
- Open SS IPTV and go to the “Content” menu section to download external playlists, open the “External” subsection, click “Add”, assign a name to the collection and indicate its address, and save.
- To download the internal playlist, go to “Settings”, open the “General” subsection and click the “Get code” button, after which a one-time password will be generated, you will need to enter it when downloading (the code is valid for a day from the moment of receipt, then a repeated request is possible). Next, you need to go to the SS IPTV website in the “Playlist Editor” section, enter the code in the appropriate form and click “Add device. Then we open and save the document, as a result of which a tile called “My Playlist” will appear in the “Settings” section.
In addition to the software discussed, there are other applications for watching interactive TV on a TV, for example Peers.TV, Vintera.TV or ForkPlayer. The settings for these programs are similar, although they differ in some respects.
Downloading an IPTV playlist for TV
The main advantages of IP television over other types of TV broadcasting.
- There is no need to purchase additional devices in the form of antennas, receivers or cam modules. Internet access is sufficient.
- The presence of a timeshift function (delayed recording), that is, the ability to pause the channel for a while and continue watching from the same place.
- Additional (English: Video on Demand (VoD) (IP-UNICAST) - a system for personal delivery of TV programs, videos and films to the subscriber via the Internet or iptv channel from a media server in a variety of quality and media formats - MPEG, AVI, FLV, MKV or QuickTime )
As a rule, there are currently two main ways to receive IP television:
- Using an IPTV set-top box, which is usually rented by the Internet provider itself or you purchase it at your own expense.
- Through installation on smart devices such as personal computers, tablets, smartphones, Android set-top boxes and smart TVs, etc. specialized applications, setting them up and adding a list of iptv channels to them. To watch IPTV on various devices, the following applications are usually used: -Player, IPTV Player, PC Player, OTT-Player, etc.
How to set up iptv on a computer
First, install the latest version of VLC player on your computer from the official website
The tool for viewing iptv channels on a PC is the IPTV Player program. For trouble-free use and troubleshooting connection and configuration problems, you need to add it to the antivirus exclusion list, allow the program all network connections through the antivirus firewall, or, as a last resort, disable it completely.
A well-proven IPTV player with a good shell and easy navigation is suitable as a basic program for watching IP-TV on a computer. Link for downloading and subsequent installation on a PC: .
When installing an IPTV player selectively, do not forget to uncheck additional checkboxes from the installation items “Yandex browser”, etc.
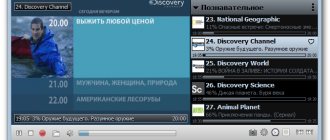
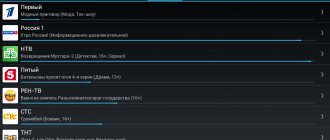
The general view of the player and its interface is shown below:
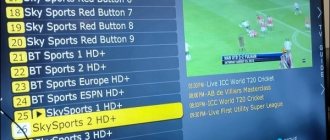
List of IPTV channels
The most common IPTV channel list format is m3u. This file is a playlist of iptv channels for playing them, for example, through a basic Windows Media player. The list and content of playlist channels does not always correspond to the user’s interests, but it can be easily edited through a regular text editor - for example, “notepad++”. Through this editor, you can easily remove unnecessary channels, leaving only what you need. This is basically what setting up an IPTV channel list in m3u format is all about.
When you first launch the IPTV player, you will need to select a provider from the list or load a list of IP channels from the Internet into the IPTV player by selecting the following item in the player menu:
“I have a web address for a list of channels”
And insert the url of playlists of iptv channels. Let's start in descending order from stable paid channels to less stable free ones:
Resources where you can get paid m3u playlists of iptv channels:
1. — paid iptv, on-demand tariffication - about 2-3 rubles per hour.
2. is another paid IPTV resource with high-quality channels of various genres. Registration is required; a link to the playlist will be available in the user account after payment.
Resources where you can download free m3u playlists of iptv channels:
Free playlists are frequently updated, so it is advisable to register on the websites that provide them or join closed communities in VKontakte groups, which can be found through a search.
- . This resource provides the ability to search and download IPTV playlists from various cable operators in Russia;
- . The most current and free IPTV playlists with descriptions;
- . A well-known forum with a large number of custom IPTV playlists;
- . Updated free IPTV playlists with descriptions;
- . A good resource with free playlists. According to some information, the information on the resource has not been updated since 2021, but it’s worth a try. Go to the site, then select the “Russia” tab, then click on the green “Download Russian.m3u” button. We save the resulting playlist and add it to the iptv player (for example, an IP-TV player, this is done by going to Settings - General, selecting the downloaded playlist file, or adding a self-updating list of channels in a special URL field);
- Ukrainian resource dedicated to IP television, which contains links to iptv playlists of numerous Russian Internet and iptv providers;
- . This resource has a self-updating iptv playlist of 400 TV channels, Russian and foreign television with channels of various genres and topics..
To change the list of channels in this IPTV player, you need to check the “all settings” box in the settings (gear icon)
Then, in the “channel list address” column, add the url of paid or free, self-updating or static playlists that are available on specialized Internet resources.
Setting up a router to watch IPTV
The main problem that users may encounter is the correct configuration of a wi-fi router for stable operation of IPTV. Note that not all router models natively support this feature.
List of routers with IPTV support
Important! To clarify the models of routers that support Multicast or IGMP (Internet Group Management Protocol) functions, you can contact the support service of your Internet or iptv provider or find the information you are interested in on the router by visiting the manufacturer’s official website.
Routers for IPTV over Wi - Fi
Currently, for stable operation of IP-TV via Wi-Fi, wireless routers with Wi-Fi data transfer speeds from 54 Mbit/s series-G, from 150 Mbit/s series-N and from 300 Mbit/s series-N are suitable, as well as even more modern models.
It is worth immediately taking into account that connecting IP-TV via Lan cable and via a wireless connection are methods of different implementation of IPTV connection in a house or apartment.
Your router is entirely responsible for the ability to process and transmit IPTV over a wireless connection. There are a huge number of routers that theoretically can and should support the ability to watch IPTV via a WI-FI network, that is, over a wireless connection and without an IPTV set-top box, but in reality, for more or less stable and uninterrupted operation of the router, it is recommended to update its firmware to the latest or alternative software from independent authors - firmware from tomato or from oleg, etc.
Sometimes it is possible to watch IP television via Wi-Fi only without encryption, that is, only when the Wi-Fi signal is not encrypted and the connection to the network is made without a password, but this option is very risky, since there is a possibility of your local network being hacked with subsequent using your personal data and passwords. Therefore, it can only be used if the Wi-Fi signal from your router has a limited radius within your apartment or house.
Another important factor is stable wireless network coverage. Some may need to fine-tune the Wi-Fi network and activate the appropriate functions, while others may additionally have to move the router to a more favorable location in an apartment or private house to avoid “glitches” and “image artifacts.” » with a significant distance of the IPTV client - laptop, tablet, Android TV set-top box, etc., from the source of the wi-fi signal, that is, the router.
Activating Muiticast or IGMP function on a router or ADSL modem
Having configured the list of iptv channels and launched the program, you can immediately start watching them since no additional settings are required - the program itself will build a list of channels from the playlist and update the TV guide, except for a small but - you may need to enable broadband broadcasting support in the settings of the router or multicast.
IP TV operates on the principle of multicast broadcasting. The media data stream is sent to all lan network devices connected to the router, router or adsl modem simultaneously. For stable operation of a router or adsl modem, eliminating problems with overloads and freezes, it must support the Muiticast or IGMP function.
This function may have different names for different devices: Multicast broadcasting, Multicast routing, IGMP Proxy, Multicast streaming, MultiStreams, etc. Certain models of routers may have a setting such as “broadband broadcasting over wi-fi”
The IGMP standard is designed to work in IPv4 networks. IPv6 networks usually use the Multicast standard.
If you are sure that the router model supports the Multicast function, but there is no corresponding item in the IPTV/IGMP settings in the router or modem, then you need to update the device firmware from the official/unofficial website of the manufacturer.
The table below shows examples of activating this function on various router models.
Setting up a router for an IPTV set-top box
If, when using a computer, broadcasting of video images and decoding of the signal is carried out using the installation of IPTV players, then in IPTV set-top boxes, for these purposes, hardware is used for electronic decoder circuits, the task of which is to convert the digital signal into an analog image for TVs or monitors.
Therefore, if you use an IPTV tuner to watch IPTV channels, you need to set a separate router port for the IPTV set-top box, and then add a playlist of IPTV channels to its settings.
Allocation of a LAN port for connecting an IPTV set-top box
- Delete the WAN connection/connection;
- Select the “WAN” connection in the “Connections” submenu in the “Network” menu tab;
- Click the “Delete” button at the bottom of the window that opens for the selected connection;
- If everything is done correctly, this connection will no longer appear in the list of available connections. Be sure to save all changes;
- Then we need to connect the LAN port to the WAN port - select an unoccupied LAN port, then in the “VLAN” section of the “Advanced” menu, activate the “VLAN LAN” item;
- For convenience, we select the 4th LAN port, although you can choose any one at your discretion and delete/uninstall it;
- After this, we will have all other LAN ports as active ports, which will correspond to the numbers on the back of the router/router, save these changes and reboot the device;
- The next step is to add the selected and uninstalled LAN 4 port to the WAN VLAN;
- Next, select the “save changes” button. After all changes made to the device settings are saved, we reboot the router/router. Then we will have the option to add and configure port No. 5;
- Now ports 4 and 5 are in the VLANWAN subnet and to create a WAN connection just click the “Add” button
This router/router setup is available if your Internet provider supports the DHCP function, which will automatically assign an IP address to the client. The DHCP function is available on almost all modern cable Internet providers. After completing all the settings described above and connecting to the Internet provider’s network, LAN 4 port has now become available for connecting an IPTV set-top box since it duplicates the WAN port.
The procedure for configuring specific router models for IPTV broadcasting when using an IPTV set-top box.
TP-link models:
- Enter the default login address into the router's web interface in the browser line.
- Username – admin, password – admin.
- Section "Network", subsection "Bridge".
- Line – “LAN port, in “Bridge” mode with WAN” select the desired port for the IPTV set-top box.
ZyXEL models:
- In the browser line, enter the default login address to the router’s web interface.
- Username – admin, password – 1234.
- On the left in the menu, select “Home Network”, subgroup “IP-TV”.
- “Assign LAN connector”, item “TV port mode”.
- Then, in the “Receiver Connector” menu, set the desired port.
NetGear Models:
- Enter the default login address into the router's web interface in the browser line.
- Username – admin”, password – password.
- On the left side of the “Quick Jump Menu”, select the “Settings” submenu, and then “Internet Port Settings”.
- In the sub-item “Redirect the stream for the set-top box to”, enter the desired port.
ASUS models:
- In the browser line, type the standard login address to the default router web interface.
- Username is admin, password is admin.
- On the left side of the page, select “Local Network” from the list.
- In the window that opens, select “IPTV”. In the “Select STB port” line, select the required port for the IP Set-Top-Box from the possible ones.
The username and password settings correspond to those set in the default router. If the passwords for logging into the router’s web interface were changed by the user independently, then they must be used.
IPTV on Android devices
As mentioned above, more and more Internet providers are giving their potential and actual clients, in addition to the Internet, the opportunity to watch television via the Internet, namely, they provide an IP television service. Setting up IP television and viewing it on a computer is described above and does not cause any particular difficulties in setting up, while for viewing IPTV on wireless Android devices such as Android TV players, tablets and smartphones, there are certain configuration nuances for comfortable viewing of IPTV.
In order to view IP television channels provided by your Internet provider or add playlists with paid or free channels from any other source on the Internet, you need to install a special application on your smartphone, tablet or any other Android device - IPTV player .
You can download it from Google Play (Play Store, Android Market). This application works without problems with m3u format playlists, allows you to download them both from the Internet by adding links to the playlist with channels, and by specifying the playlist file with channels on local media, an SD card, etc. After adding a file and downloading channels, they are played using video players such as MX Video Player, VLC media player, etc. installed on an Android device. After installing this application, you need to configure it.
Setting up an IPTV application on Android devices.
IPTV service from the provider
When connected to an IPTV service from an interactive television or Internet provider and viewing it on wireless Android devices, in addition to installing an application and player for IPTV, a URL or playlist file from the provider, an important condition for stable viewing of iptv is the correct configuration and connection of the Android device via WiFi network to a router that is connected to the network of the provider providing this service.
Adding an address or playlist file with a list of channels.
To add a playlist with channels from an Internet provider or IP-TV provider, you need to select the “Playlists” section in the program menu and add the URL of the file provided by them.
If you want to add your own playlist with a list of channels to the application, then this can be done in two ways:
- Add a link to a free playlist with channels from Internet sources in the same way as adding a playlist with channels from an Internet provider or add your playlist file in the “Select file” item of the application menu from the flash memory, SD card of the flash drive of the Android device, having previously created it or by downloading it from the Internet and saving it in the device’s memory. You can also place the downloaded or created playlist file with channels in m3u format into a regular folder created on a flash drive or SD card, for example, with the name “iptv channels”. And in order to ensure that our file is not deleted after exiting the Android IPTV application, you need to create an empty file in the same folder with the name .nomedia (dot required)
- use, for example, the Yandex Disk by uploading a file with a playlist there and copying the public link to it to the clipboard. Then add the link address as in the case of a playlist from an Internet provider.
What is a UDP-HTTP proxy
Sometimes it becomes necessary to convert a UDP multicast into a TCP unicast , that is, you need to configure a UDP proxy . This is usually done if there are viewing problems when playing IPTV - freezes, image artifacts, picture loss, sound distortion, etc.
UDP-to-HTTP Proxy is used to convert UDP -Multicast ( multicast, multicast , multicast ) IPTV traffic
in TCP - U nicast (unidirectional or one-way data transmission), and specifically transmission to a single recipient - an IPTV client via http traffic.
This procedure is necessary for stable viewing of IP television via Wi-Fi , NAT, smartphones and PDAs, household and Android TV players and game consoles.
This traffic conversion can be accomplished using the UDP to HTTP utility. The application is installed on a PC and activated on it with the obligatory connection of the computer via a local network and a wireless connection of IP clients. The main condition for such a connection is that the computer is always on (client computer or server on the local network), or you need a router with the function of traffic conversion technology - udpxy . In this case, the conversion of UDP to HTTP traffic will occur in the router itself if it is correctly configured and this function is activated .
If you own a Wi-Fi router with built-in UDP proxy support, then just activate this function in the router settings and the problem with wirelessly watching channels through the IPTV application on a tablet, smartphone and other devices will be solved. But in practice, for this function to work as it should, you may need current or even alternative router firmware, which not every entry-level user can do.
If, when watching IP television via wi-fi on Android devices, image and sound artifacts appear, the stream playback is unstable, the picture freezes and freezes, then most likely the router cannot cope with its task and does not have UDP proxy support . Therefore, for comfortable viewing of IPTV, we will need to create a UDP proxy using any computer on the local network connected to the LAN connector of the router via an Ethernet cable. To implement this function, a special application “UDP-to-HTTP Proxy” is installed on the computer.
Setting up a UDP-to-HTTP proxy in the application on a PC
The UDP-to-HTTP proxy program for Windows is available at: download and run.
The UDP-to-HTTP proxy application for Linux can be downloaded here:
In the main program window, for proper configuration, just enter 2 IP addresses in the “UDP multicast interface” and “HTTP server interface” columns:
Typically, the multicast interface is determined automatically by the application, and then an identical HTTP server interface must be selected. In this case, the values of these two fields coincide and correspond to the IP address of your computer on the network through which it is connected to the router.
If the computer's IP address is not determined automatically by the program, then to correctly determine the IP address of your computer on the local network, depending on the installed Windows OS, do the following:
How to find out the IP address of a computer on a local network?
In Windows 7, right-click on the network connection icon (next to the clock), select the pop-up menu item “Network and Sharing Center” and then “Change adapter settings”. Then in the context menu of your connection, select the “Status” item and in it the “Details” button:
In Windows-XP, click on the connection icon, select “Status” in the context menu, then the “Support” tab:
To final configure and activate the application, select the IP address of the network connection of our computer in the HTTP Server Interface , then the “Save” and “Run” buttons
When launched, a window with a black screen will appear, which we simply minimize.
Good to know:
To run the UDP-to-HTTP proxy program on your computer as a service with automatic start when the computer boots, you must click the “Install” button in the program.
If any problems arise when running the UDP-to-HTTP proxy program on your computer, you need to make sure that it is not blocked by an antivirus or firewall. To do this, it is advisable for the program to “Add a firewall exception” and add it to the exceptions of your antivirus. Yandex or Google will tell you how to do this.
Setting up a UDP proxy in the IPTV application for Android devices:
After you have installed and configured the UDP Proxy program on your PC, in the parameters of the IPTV application on your Android device, in the “UDP Proxy Settings” item, you must check the “Use proxy” box and enter the identical IP address and port that are specified in the UDP program -to-HTTP Proxy on PC, and then select the type “UDP-to-HTTP proxy (Windows)”. If you are using a proxy on a router or Linux, then select the “UDP-to-HTTP proxy (Linux)” type.
Now all the settings are complete, you can start watching your favorite channels.
Sometimes when you try to watch an IPTV channel, a message may appear stating that you do not have MX Player installed. To fix this problem, just click on the “Install” item and select “Play Market” if the Android system asks what to use. The MX Player application page on Google Play will open, then select “Install”.
You don't need to use MX Player to watch channels. To do this, in the application settings in the “Video Player” item, you can select another player or a specific application with which you will watch the video.
Also, using the “Selected by the system” item, you can provide a choice to the system so that you can select a video player every time you start watching the channel.
In previous articles about IPTV television, we analyzed and explained the procedure for setting up channels from various Internet providers providing IPTV services. Now we will look at how to set up IP-TB channels on a computer if the provider does not provide a service for broadcasting iptv channels. Moreover, the channels can be either federal, by analogy with the channels of the first and second multiplexes of digital terrestrial television, or thematic VIP channels from paid or free services providing these services.
Setting up IPTV channels on SmartTVs
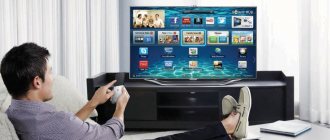
With the advent of TVs with Smart TV functions, their owners have the opportunity to watch TV programs not only via cable, satellite or terrestrial broadcasting, but even via the Internet using IPTV applications or widgets, and absolutely free.
Below we will try to explain in general how you can install an IPTV application on your TV and set up viewing IP channels on it.
Using the example of one of the popular and shareware IPTV applications - Simple Smart IPTV (or SS IPTV ), we will look at setting up iptv television on a SmartTV TV.
How to connect and configure free iptv channels on a SmartTV?
If you already own a Smart TV, then to set up iptv channels you need the following:
- Connect the TV to the Internet via LAN cable (preferred) or WiFi
- Computer or Notebook for setup
- Register in the catalog/app store for your Smart TV
- Install applications to watch iptv channels
- Add playlists with channels
The number of iptv channels can only be limited by your imagination as there are a huge number of options for free and paid playlists on the sites listed above.
Installing and configuring the IPTV application on SmartTV TVs
First, you need to make sure your TV is properly connected to the Internet. Connecting to the Internet can be done via a LAN cable or via a Wi-Fi connection. Then you can start installing and configuring the IPTV application.
- In the catalog/app store in the smart menu of the TV (registration may be required), download and install the SS IPTV application.
- Select the gear icon in this application and get to the settings menu.
- Add the previously downloaded channel playlist using the links above and enjoy watching.
Initially, the SS IPTV application does not contain any channels or playlists with them. This is how it should be, since channels and playlists with them must be added to it yourself.
There are two options here:
- Enter the playlist URL in the settings yourself
- Connect a Smart TV via a local network via a router or via Wi-Fi to a laptop or PC and add/edit/delete playlists through it.
There are no restrictions on the number of channel playlists added from external sources, while only one playlist is provided for internal purposes. Adding external playlists occurs by analogy with other devices and applications for iptv - from sites that provide these lists of iptv channels for free or from the sites of IPTV providers on a paid basis after registration. An internal playlist can be added using a code directly from .
Added playlists will be stored in the “ Settings ” menu and displayed on the screen as tile icons. When you select the icon at the bottom of the screen, a list of IP channels appears.
To download a playlist via an external link, in the “ Content ” menu subcategory of the SS IPTV application, select “ External ” and then “ Add ”. After that, come up with a name for the list and indicate the URL to it.
You can do whatever you want with external playlists - edit, delete, transfer to friends, post for free access, etc.
To obtain an internal address for a list of iptv channels, you must select the “ General Settings and click the “ Get code ” button.
The validity period for the activation code and its entry using the “Add” button in the playlist editor is one day, after which you can request the code again.
You can also use programs such as PeersTV Vintera.tv or forkplayer to watch IPTV on Smart TVs. Installing and configuring all these applications for IP-TV is similar to the settings for SS-IPTV, with the only difference being that there may be differences in the download server address (on Samsung) and other minor details that are easy to figure out on your own.
IPTV Player does not show: possible causes of the problem
There can be quite a few problems with using this software. And they can, oddly enough, relate to a variety of situations that are in no way connected with each other.
But why doesn't IPTV Player show? Among all the reasons that occur today, the most basic are the following:
- the program is blocked by system protection tools and anti-virus software;
- the version of the DirectX platform does not meet the stated requirements;
- the player has incorrect graphics settings;
- The network protocol parameters are incorrectly set in the system;
- support for IGMP traffic is not enabled;
- problems with bandwidth on the part of the provider.
Structure and correct sequence
The ID is always listed first. Next is a description of the TV program and the address of the specific broadcast. A correctly composed link begins only with a hash symbol (#), then a tag is entered, followed by a digital indexing of the duration. In the case of online TV channels, this is 0, less often -1. Last comes the name.
To create your own m3u playlist, all data must be entered without spaces and always separated by commas.
If it is necessary to use tags, then the data is entered after the “=” sign and everything is indicated with a space after the digital value of the duration, and the words themselves are only in quotation marks.
Now all that remains is the broadcast address. It usually consists of an IP address, port and link, and looks like the screenshots.
All channels are entered one by one, without spaces or paragraphs.
Setting up and adding a playlist
Since Lazy IPTV does not contain built-in playlists, the main setup at the beginning of work is adding a playlist.
To do this you will need to follow these recommendations:
- Install the additional video player first. It can be “MX Player”, “VLC” or any other.
- After installing the additional program, launch Lazy IPTV and go to the “Settings” section. In the “Video player” section, indicate the one you installed.
- The program has a “+” button in the upper right corner. Click on it. It performs the “Add Playlist” function.
- After clicking, a new window will appear on the screen containing adding methods. These are “From a file on the device”, “From the Internet (via link)”, “From the clipboard”, “Empty playlist”. Let's take a closer look at how each option works:
- Upload the file with the created playlist from the device itself. To do this, use a file you prepared in advance.
- On the Internet, just find “Android TV playlists”, copy the link and paste it into your application. The advantage of the presented method is that it will be a self-updating playlist.
- It is possible to paste the channel list itself into the application using the copy function.
- By choosing to add a new (empty) playlist, you can create your own from many others.
- Having selected the desired settings, you will then need to click the “Save” button.
Having completed the presented settings for adding a playlist, we proceed to pleasant viewing.
Thanks to the built-in playlist manager function, it is possible to create any number of desired lists. If one of them fails, you can switch to another in a few clicks.
Why IPTV Player does not show: antivirus and firewall
The protection installed in the system, as practice shows, can block this software package. IPTV Player sometimes does not show for this very reason.
How to get rid of this problem? First, you should try to completely disable the protection. For the antivirus, you can use at least a minimum interval, for example, ten minutes, and disable the firewall altogether. Then you can see what exactly is causing the problem.
If IPTV Player does not show due to the firewall, in its settings, using administrative templates, you need to create a new rule for the application, and then add the desired program to the list of exceptions. To do this, at the final stage you will need to specify the location of the main executable EXE file. In the antivirus you will have to specify in the exceptions either the provider’s resource, or the website of the program itself, or the address from which television programs are broadcast.
Problems with the provider
Problems with subscriber equipment are not the only reason why access to digital television is limited. In some cases, temporary problems that appear on the provider’s side also interfere.
- The service is not available due to technical limitations, is not activated or connected. Support specialists will help you understand the situation in more detail.
- There is not enough bandwidth on the line to play video streaming and connect to live broadcasts. Statistics show that downloading channels in HD quality will require at least 6 Mbit/s.
m3u file - how to open it?
M3u is a playlist format that can be opened even with simple players. Not all players are able to work with it; for example, MPC-HC x64 can download video, but it does not have convenient navigation for switching between channels. The only thing you have to do is use the transition to the next channel inside the player. VLC player is more functional in this regard, but it does not allow you to work comfortably with playlists. The best way to process m3u files is to use IPTV players.
Best IPTV players:
- Kodi;
- IPTV Player;
- SS IPTV;
- Lazy IPTV;
- Peers.TV.
How should I fill in the data?
The main line in any file has a signature - #EXTM3U. There is no need to insert additional words. Next, click on enter and proceed to further instructions. Playlist with music tracks are formed in this way:
- #EXTINF:100,
- Singer - Music Track
- Example-audio.mp3
- #EXTINF:300,
- Another singer - Another song file
- New/Track.ogg
Other instructions for TV channels:
- #EXTINF:-1, Channel name www.address-of-site-with-file.m3u8
- As an example:
- #EXTM3U #EXTINF:-1,STS;
- #EXTINF:-1,First HD channel;
- #EXTINF:-1,112 Ukraine HD.
The rest are created according to this principle.