We are on the threshold of digital television. However, I myself have been using Tricolor at my dacha for about 8 years now - I haven’t been able to catch other analogue channels in acceptable quality. But now they will soon be turned off altogether, and broadcasting will only be digital. And this is great, since even in my outback there are already 20 free digital channels. And, note that the picture quality they provide is excellent. Probably many people, like me, have a large number of old, but fully functional TVs and monitors accumulated in their dachas. Personally, I have so many of them that it is quite possible to watch TV in every room and even in a street toilet :) Yes, they are old and not designed to receive digital television, but this can be easily and cheaply fixed by purchasing set-top boxes for receiving DVB-T2. This is exactly the format that is being introduced in Russia. We begin our transition to a new format by surveying our neighbors. Surely someone has already tried it and set up a digital number at home. We can do it too!
And the first discovery is that a regular external antenna is quite suitable for receiving digital television. I just got it out of the attic - it got there when I switched to satellite Tricolor. As you can see, I assembled a temporary structure on the second floor of the house. This made it easier to experiment and find the correct orientation to the signal. I also bought a BBK console - I chose the simplest and cheapest one, so that I wouldn’t regret it later if it didn’t work out. The most important thing is to correctly orient the antenna towards the transmitting station. Both the strength of the signal and the quality of the signal greatly depend on this (if the quality is low, the picture begins to “disintegrate”). An interactive map will help us here, which we find on the website of the Russian Television and Radio Broadcasting Network (RTRS) - https://map.rtrs.rf/
In my case, I oriented the antenna towards the transmitter in the city of Chekhov, which is located 26 km from my dacha. Even taking into account the fact that the antenna was without an amplifier and was located in the house, I received a satisfactory result. Using the map, I not only found the transmitter, but also managed to orient the antenna. More precise adjustment occurs according to the indicators of signal quality and its strength, which the set-top box gives after searching for channels.
Connection
I connected the antenna to the set-top box, and the set-top box with a “tulip” to the TV. If your TV has an HDMI connector, then it is logical to use it to connect to the set-top box, since then the signal will be sent to the TV in digital quality. Tulnan is an analog signal. But the quality, due to the lack of interference, still pleased me. If we use “tulip”, then on the TV we select the AV signal source. All that remains to do on the set-top box is to search for channels and watch!
Features of BBK consoles
Despite the fact that digital TV is significantly inferior to satellite TV in terms of the number of channels, receivers for both types of television may not be inferior to each other in functionality.
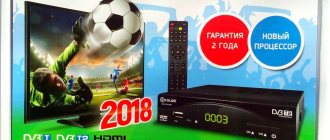
This also applies to BBK set-top boxes for digital TV. Their features include:
- high-quality image;
- playback of content from USB media in FHD resolution;
- recording of broadcast programs;
- the ability to pause or rewind the broadcast if necessary;
- the presence of a TV guide function;
- fast channel switching due to modern processors;
- clear interface.
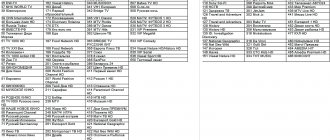
Comparative analysis of popular BBK brand models
Given the variety of offers, it is difficult to understand which model is better, so we will provide a comparative analysis of the most popular devices in the user environment.
| Name |
The functionality of the considered bibike consoles is generally similar; the devices differ in some details:
- external design, number and placement of communication connectors;
- range of supported video and audio formats;
- data flow rate
- additional options.
Best models
Like any other company, BBK offers a fairly wide selection of digital receiver models. Among those available on the market, the ones presented below have received positive ratings from users and are recommended for purchase more often than others.
BBK SMP240HDT2
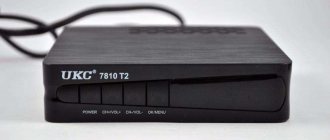
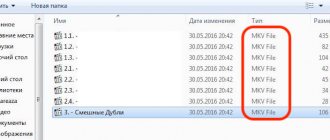
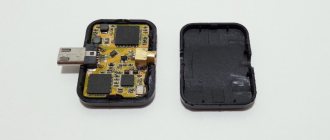
The BBK SMP240HDT2 digital receiver is a model made in a metal case with a display, control buttons and a USB output on the front panel. It has a built-in DVB-T/T2 tuner, supports MPEG-2/4 and plays video from small-capacity external drives in MKV format.
The BBK digital receiver is based on the ALI 3821 chipset, which, according to reviews, behaves quite decently and responds quickly to requests. On the rear panel there are antenna input and output, composite video output and HDMI. Audio codec: Dolby Digital. Maximum video resolution is FHD. The delivery set includes the device, power supply, RCA cable, instructions and remote control with batteries. Cost - from 1,100 rubles.
BBK SMP015HDT2
The BBK SMP015HDT2 receiver has a plastic case without a display. The device runs on the MSTAR 7T01 chipset, which is installed in many Russian TV set-top boxes. There is support for DVB-T/T2, MPEG-2/4, Dolby Digital, electronic program guide, teletext and Shift function.
On the front panel there is a USB 2.0 connector without support for powering large-capacity drives (hard drives larger than 500 GB cannot be read, formatted as FAT32). On the rear panel there is an antenna input, RCA, audio output, composite video output, HDMI. Maximum video resolution is FHD. Includes RCA cable, power supply, set-top box, remote control with batteries and instructions. Cost - from 800 rubles.
BBK SMP001HDT2
Model BBK SMP001HDT2 is made in a plastic case without a display. All connectors are located on the rear panel - USB 2.0, antenna input, AV output, composite video output, HDMI. A distinctive feature of this model is its support for the PVR function - recording broadcasts to external media.
In this case, the USB connector cannot become a power source, which implies the use of small drives up to 500 GB formatted in FAT32, or hard drives with their own power. The model has a built-in DVB-T/T2 tuner and MPEG-2/4 support. Functions include teletext, electronic guide, Timeshift. Maximum video resolution is FHD. Cost - from 800 rubles.
MEDIA PLAYER
Enter the main menu. Go to the " Media Player " menu.
The media player allows you to play and manage media content recorded on an external USB drive, which is connected to the receiver via the USB connector located on the front panel. According to the manufacturer's specifications, the USB port only supports Flash drives. Some users have been able to connect mobile hard drives (HDDs), but this probably depends on the power consumption of the drive. NOTES • The number and color keys on the remote control operate according to the information on the screen. • The number key (5) on the remote control is used to navigate between submenus.
Healthy:
key 5 allows you to switch between the type of media content - video, music, photo. This is especially necessary if you access content management using the “MEDIA” or “USB” button (they are almost identical).
Lifehack:
you can arrange a wonderful slide show if you first find suitable music on the flash drive, and then use button 5 to go to the “Image” menu and display the photo there. At the same time, the music will continue to play and create the right mood when viewing the photo! The Media Player menu contains:
—PVR
This is a menu item for playing back video recordings made using the PVR function (TV program recordings, “RECORD” button).
- Music
This is a menu item for playing audio recordings. — Number key (6) for sorting audio tracks. — Number key (7) to select the playback mode of audio tracks (one-time repeat/repeat all tracks/random playback).
- Image
This is a menu item for playing digital images.
— Number key (6) for sorting images. — Number key (7) to configure image playback. — Number key (8) to view images in multi-format.
- Video
This is a menu item for playing video files.
— Number key (6) for sorting video files. — Number key (7) to select the playback mode of video tracks (one-time repeat/repeat all tracks/random playback)
Recording and playback of television programs
It is very convenient that the set-top box can also work as a VCR. By the way, the recording is carried out in a format that can be easily reproduced on a computer (unlike the similar Tricolor function). To record, you must have a flash drive, preferably at least 4 GB, but it is better, of course, to have more memory, since if the free space on the drive runs out , then the recording of the TV program stops. The recording and playback process itself is no different from what we are used to using VCRs. While watching a program, press the RECORD key to start recording. • If the RECORD key is pressed again, the recording will switch to a mode that allows you to set its duration. • Press the STOP key: “⏹” on the remote control to stop recording. A confirmation window will appear. Select “Yes” to stop recording. Select "No" to continue recording. • If the recording is not stopped, you cannot perform operations with it in the “PVR Recordings” section of the “Media Player” menu. NOTES • USB2.0 storage devices up to 500 GB with FAT32 file system are supported. Larger storage media or those with the NTFS file system may not work correctly. • The connected hard drive may not operate correctly if there is no external power.
Recording and timer activation
In order not to miss the program you are interested in and record it, you need to set the corresponding task in the list of timer tasks. Call up the electronic program guide using the EPG key on the remote control, select the program of interest using the direction keys and press OK. In the menu that opens, check the correctness of the date and time settings, adjust them if necessary and set the activation mode for this task: once, daily, etc., as well as the required action: “Record” or “View”. Confirm the settings with OK. You can view installed tasks, add a new one, edit or delete tasks in two ways: press the Timer key or call up the electronic program guide using the EPG key on the remote control and then press the green key.
"TimeShift"
How to stop a TV show?
TimeShift is a very useful feature.
How often does it happen? The movie has reached its climax, and at this time the phone rings. So all the movies are gone. But not with digital television! Here you just need to press one button and the image will stop. We talk calmly - the movie is recorded on a flash drive (without it the trick won’t work). Then we press the play button and calmly watch the movie. At the same time, you can also skip advertising. I personally have to use this quite often. • TimeShift can be performed in viewing mode by pressing the Pause/Play key ⏯. To continue viewing, press this key again. • Press the Pause/Play key ⏯ and then the GOTO key or the direction keys > or < to move to the desired time period to watch. Press the OK key to confirm. During playback, you can do the following: • Press the Pause/Play key ⏯ to stop playback. • Press the “⏩” key to fast forward. • Press the “⏪” key to play back quickly. Turning off TimeShift Press the STOP key: ⏹ to turn off TimeShift.
WARNING: Safely removing USB media
The “USB” button on the control panel is used to switch to file manager mode, but does not allow you to correctly remove the USB device itself. This, of course, is inconvenient, since to safely remove the drive you need to go to the main menu, select “System Settings” there, and in the new menu select “Safely Remove Hardware”. Be careful!
Discussion
Tricolor or free TV?
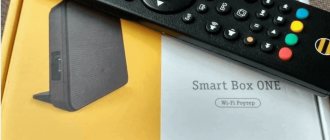
One thing is clear today. With the introduction of free digital television, many cable and satellite television operators will have to face serious competition. So far, there are many more channels on my collective antenna, but the picture quality that I get over an old coaxial cable cannot be compared with a digital one, especially if it’s HD. Text services such as program guides or program contents are not and cannot be here. As for Tricolor, there is only one drawback - the price. It’s true that you can’t install a plate everywhere in the city. Everything else: menu appearance, programs, texts in the latest models of receivers look much more attractive than on the BBK set-top box. So I definitely vote for continued improvement of consoles. Here Tesler, for example, in its Tesler DSR-710 set-top box, implemented not only nice menus, but even a multiview mode, when you can see pictures from several channels at once. By the way, I also liked the remote control from Tesler. However, if you see Tesler and BBK in a store nearby, I strongly advise you not to look at the simple text menu of BBK and buy that one. Why? We will talk about this in our review of the Tesler set-top box.
Personally, I hope that the number of free TV channels will grow rapidly, and competition will lead both to the improvement of the set-top boxes themselves and to the emergence of new, interesting channels from Tricolor.
ADVANTAGES AND DISADVANTAGES
Advantages
Reliable operation Digital tuners in DVB-T and DVB-T2 standards Ability to record TV programs Multimedia functions with support for the MKV format HDMI connector FULL HD support Good sensitivity.
Flaws
Remote control without a button to go to the previous channel
CHARACTERISTICS
| Chipset | Ali3821 |
| Display | No |
| Dimensions | 100Х25Х80mm |
| Weight | 300g |
| USB Flash | 2.0 |
| Remote control | RC-SMP712 |
| Dolby AC3 support | There is |
| Antenna output | No |
Types of supported formats:
| Container/File extension | Video codec | Audio codec | Resolution/Bitrate |
| AVI/*.avi | MPEG2, H.264 | MP2, MP3, AC3,ADPCM, AAC,HEAAC (stereo) | 1920x1080 up to 20 Mbit/s |
| AVI/*.avi | MPEG2, H.264 | MP2, MP3, AC3,ADPCM, AAC,HEAAC (stereo) | 1920x1080 up to 20 Mbit/s |
| MKV/*.mkv | H.264 MP and [email protected] ,MPEG-1,2,4 SP [email protected] | MP2, MP3, AC3,AAC,HEAAC | 1920x1080 up to 20 Mbit/s |
| MPG/*.mpg | MPEG1, 2 | MP2, MP3, AC3 | 1920x1080 up to 20 Mbit/s |
| ts, m2ts | MPEG-2, H.264, AVS | MP2, MP3, AC3,ADPCM, AAC,HEAAC (stereo) | 1920x1080 up to 20 Mbit/s |
| MP3/*.mp3 | MP3 | up to 320 kbit/s | |
| Vorbis OGG/*.ogg | OGG | up to 192 kbit/s |
RECOMMENDATIONS FOR ENSURING HIGH-QUALITY DIGITAL TV SIGNAL RECEPTION
Before purchasing a digital tuner, check that the receiving location is within the service area of the transmitting center. The digital television receiver provides reception of signals only from open, unencoded digital broadcasting. To receive a digital terrestrial signal in a reliable reception area, you will need a UHF antenna. When the distance to the transmitting station is 10–15 km or in the absence of direct visibility due to buildings located around or difficult terrain, it is necessary to use efficient indoor antennas with an amplifier or use outdoor antennas. Due to the higher placement height and larger size, the use of outdoor antennas is always preferable to indoor ones. If the distance to the transmitting station is more than 10–15 km, an outdoor antenna with high gain is required. It makes sense to use outdoor antennas with an amplifier in rural areas at a large distance (more than 20 km) to the transmitting station. Active antennas in urban environments may be ineffective due to the high sensitivity of the built-in amplifiers to industrial radio interference. The use of passive outdoor antennas in this case may be more effective. The existing antenna, which receives UHF channels of analogue terrestrial television, can also be used to receive digital broadcasting signals. Please note that a collective cable television antenna may not be suitable for receiving digital television signals, since the signal comes into it from the regional television studio and there are no on-air digital television signals in the cable network. Please note that the digital television system is rapidly developing and, due to technical work, short-term signal outages are possible. Information about them is on the RTRS website. I personally tried to set up the antenna for a long time until I realized that just at that moment the station was being adjusted. The most important thing is to position the antenna correctly. I already wrote that a map with stations allows you to achieve success. This is approximately how it is in this historical tale from the time of the Russian-Turkish War of 1877-1878.
The main thing is to find the right direction
It was said about General Lazarev, to whom we owe the capture of Kars (1877), that at one meeting of the military council, at which various opinions and judgments were expressed regarding the assault on this fortress, the officers of the general staff spoke especially a lot. Finally, it was Lazarev’s turn. The presiding officer, turning to him, asked Lazarev: how will he, who is entrusted with commanding the assault, after listening to all these opinions, dispose of the troops, how does he think to accomplish this feat? Then Lazarev asked to be shown a map that had been lying on the table all the time and from which the generals made their instructions, expressing their opinions on how, in their opinion, the assault on Kars should be carried out. When Lazarev was shown the map, he asked: “Where are we?” He was shown the place where they were; he asked; “Where is Kars?” They showed him Kars. Then he said: “I will go from where we are to where Kars is, and I will take Kars.” His whole explanation was this. A few days later he actually did just that. He ordered to take Kars, he himself was at the head of the troops, he went and took Kars. (S.Yu. Witte, memories)
How to set up an antenna to receive digital terrestrial TV. Possible problems and solutions
This instruction is also suitable for other BBK digital television set-top boxes built on the Ali chip. The control panel and menu system are unified. For example, check out the SMP132HDT2 review.
Other receivers from BBK
We have already mentioned that many BBK receivers have the same control panel and the same menus as in my model. So this instruction is for them too.
When choosing a model, you should pay attention to some differences in characteristics. For example, BBK SMP131HDT2 has Dolby AC3 support, but BBK SMP023HDT2 does not. But if you want to connect several receivers from one antenna, then you need a model with an RF antenna output, for example, BBK SMP016HDT2 (Mstar7t01 chipset).
Connecting and setting up the set-top box
The BBK set-top box is connected to the TV through the available connectors in both devices. First, the antenna cable is connected to the set-top box into the RF IN connector. Next, select a suitable cable for the TV - tulips or HDMI.
Advice! If the latter is available, it is recommended to choose it due to the higher quality of the transmitted content.
After connecting, you need to configure the BBK digital set-top box. To do this, you should perform the following sequence of actions.
- The set-top box is connected to an outlet and turned on by the power button on the remote control or case.
- On the TV, the broadcast switches to the socket selected for connection.
- When you turn it on for the first time, you must enter the requested data (region, time, date, language, etc.).
- After completing the initial setup, you should start an automatic channel search. The system itself will ask you to perform this action, just click on “OK”.
- After searching for channels, they are automatically saved.
- If you need to re-configure the BBK set-top box, you should first go into its settings and select reset to factory settings, and then repeat step 4.
BRIEF INSTRUCTIONS
Getting to know the receiver
| 1 USB2.0 port | 5 HDMI connector |
| 2 Infrared sensor | 6 Composite video output |
| 3 Operating/standby indicator | 7 Stereo audio output |
| 4 Antenna input | 8 Power adapter connector |
The device body is compact, only 100x25x80 mm, ventilation holes are made at the bottom and sides. As it turns out, with such a small size, good ventilation is very important. The device heats up, but the processor temperature remains within the acceptable range of 60-70 C°
Remote Control
The control panel is quite convenient, although the location of the channel switching buttons at the bottom of the remote control does not seem uncontroversial. For me, the main drawback was the lack of a return key to the previous program.
Turning on the device
Make sure the receiver is properly connected to other devices according to the instructions. Connect the receiver to the power supply and press the “ON” key on the remote control.
Switching on the console for the first time
If this is your first time using the receiver, the “Welcome” menu will appear when you turn it on. Select your country and language. Set the picture format and picture mode to match your TV's settings. Press the OK button to start automatic channel search. These settings can then be changed by restoring factory settings
1. Press the MENU key to go to the main menu. 2. Select System Settings/Factory Defaults. Click OK. 3. Restore factory settings by following the on-screen prompts.
NOTE
• The default password is “0000”. 4. After the factory reset is complete, turn the receiver off and on again, wait until the “Welcome” menu appears and set the initial settings. 5. Press the EXIT key to exit the main menu.
How to update software
The BBK digital television receiver, like any equipment, can malfunction. In this case, updating the software or its firmware will help solve the problem.
Updating the BBK digital set-top box is done as follows.
- On the official website, you should select “firmware” and enter the serial number, by which the corresponding software will be found.
- In the “support” menu, you can go to the “downloads” item and download the operating instructions, which contain a description of the update procedure for a specific model.
- In most cases, to update the software, you need to unzip the downloaded firmware onto a USB drive formatted in FAT32 and with a capacity of no more than 8 GB.
- The drive is inserted into the USB connector; on the set-top box using the remote control, enter “system settings” and select “update via USB”.
- The device will begin updating, but you cannot touch it or switch anything.
- After updating, the receiver should be rebooted.
Source
DVB-T/T2 SETUP
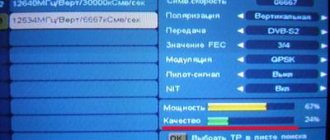
VERY IMPORTANT! You see two signal parameters in this menu: “Level” and “Quality”. These indicators help you correctly configure the antenna - choose its location and orientation. For indoor antennas, especially if they are far away from the transmitting station, this is very important. So, my indoor antenna allowed me to receive a signal only with the same orientation to the station as the experimental, larger one, but even taking into account the amplification, the signal level was lower. In the city, reception practically did not depend on its location.
Auto search – automatic channel search
Channel sorting – select a channel sorting method. – LCN – sorting by unique numbers assigned to channels (LCN); – Sorting by Service ID in the order of their transmission in the stream specified by the broadcaster; – Disable sorting. TV channel list is a menu item that displays the entire list of found television channels with the ability to edit. List of radio channels - a menu item that displays the entire list of found radio channels with the ability to edit Delete all - deletes all configured TV and radio channels. Antenna power – menu item for turning on power to the active antenna from the receiver. When using a passive antenna or if the antenna has an external power supply, it must be set to " Off". » Display channels – select the type of channels displayed in the list. Possible values: All, Open, Encrypted.
Necessary equipment
A gradual transition from analogue to digital broadcasting is taking place throughout Russia. Some channels can still be viewed using the TV's built-in tuners that decode the analog signal. But it will be possible to receive a larger number of consistently broadcast television channels with improved parameters of video and audio signals only by switching to the new DVB-T2 standard.
Reference. DVB-T2 is an abbreviation for Digital Video Broadcasting-Second Generation Terrestrial, which translates from English as Digital Video Broadcasting-Terrestrial of the Second Generation.
What's already included: standard equipment
Most modern TVs from well-known electronics manufacturers have a built-in DVB-T2 tuner. Information about this can always be found in the instructions for your existing television receiver.
For earlier models and older TVs, to receive a signal in digital format, you will have to purchase a DVB-T2 set-top box (receiver), of which there is currently a wide variety. They differ not only in appearance, case material and equipment, but also in the processor and the functionality of the tuner itself.
The standard receiver model usually has the following equipment:
- packaging box with user instructions and warranty card;
- DVB-T2 set-top box, which decrypts and converts the digital signal into analogue;
- IR remote control with two batteries;
- network adapter for converting AC mains voltage into 5 V DC, if the set-top box itself does not have a built-in power supply;
- connecting cable 3 RCA-3RCA (“tulips”), allowing you to connect the set-top box to most televisions of old and new generations.
What else is needed: additional equipment
To receive a digital signal, in addition to the set-top box, you need a television antenna with a decimeter range of received frequencies (UHF, frequencies from 300 MHz to 3 GHz).
Attention. If a centralized antenna with apartment wiring is installed in the house (not to be confused with cable television), then there is no need to purchase an individual one.
When choosing an antenna, the most important factors are:
- distance to the repeater;
- the number of obstacles between the repeater and the receiving antenna.
If the TV tower is in direct line of sight, and the number of wall partitions to the outer wall is not large, it is best to purchase an indoor antenna.
If the distance to the repeater is large, and the house is located in a low-lying area or is blocked by tall buildings, you need to buy an external active (with a built-in amplifier) antenna, which can be installed on the roof or on a special mast. In this case you will need:
- connecting coaxial cable of the required length with two plugs;
- external current source to power the amplifier.
Important. In some set-top boxes, a constant voltage can be supplied to the antenna input jack (turned on in the receiver menu), and in such cases an external power supply for the antenna amplifier is not needed.
To connect the set-top box to the TV, instead of the standard analog RCA connection, you can use an HDMI cable if these devices have the appropriate connectors.
Its use, thanks to its high bandwidth, allows it to support the transmission of multi-channel digital audio signals and high-definition digital video signals.
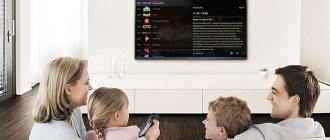
Program guide - EPG
EPG (Electronic Program Guide) is an interactive program guide for digital television. Using this function, you can easily find the programs you are interested in. You can call up the program guide from the remote control using the EPG key.• While watching a TV program, press the EPG key on the remote control. The TV program guide will appear on the screen. • Select the desired TV show for more detailed information.
Access to the program guide (EPG)
1. Press the EPG key to enter the EPG (Electronic TV Guide) menu. 2. Use direction keys to navigate through the channel list and program schedule of the selected channel. 3. Press the green key to set the on timer or program recording. 4. Press the red key to bring up the time panel, which allows you to navigate through the program guide.
How to view the program summary
1. Press the EPG key to enter the EPG (Electronic TV Guide) menu. 2. Find the desired gear 3. Press the “OK” button
“Info” button - information about the current channel
Unfortunately, the set-top box does not have alternative access to the content of the TV show. By pressing the “info” button once, only the name of the program is displayed, and when pressed again, information about the signal: level and quality.
Purpose of connectors: what is needed for what?
To transmit a signal between electronic devices that work together (in this case, an antenna, a receiver and a TV), they must have input and output connectors, as well as connecting cables.
Device connectors and cable plugs may have different standards, and the user must clearly understand their connection.
Standard connectors
With all the variety of set-top boxes, the main connectors located on the rear panel are similar:
- DC5V - socket for connecting the network adapter (5 volts DC, in the absence of a built-in power supply);
- RF IN - socket for connecting a receiving antenna;
- RF OUT (LOOP) - pass-through output of the receiving antenna (through it you can connect a second receiver, as well as a TV or VCR, which will receive an analog signal through an external antenna);
- VIDEO - composite video output for connecting a TV;
- FUDIO L/R - stereo composite audio output (L - left channel, R - right);
- HD OUT - high-quality digital video and audio outputs (HDMI).
There may also be a USB port on the front panel, providing the user with the following options:
- play media files from external drives;
- record video and audio files;
- connect USB-HUB and USB-WiFi adapters (the latter with a built-in antenna provides Internet access and allows you to watch IPTV, listen to music, and use other SMART TV functions);
- update the receiver software.
Rare connectors
Some DVB-T2 devices may also have other connectors:
- SCART is a “Euro connector” (they are usually found in receivers from European manufacturers), which performs the same functions as 3 composite RCA connectors;
- D-SUB - output, most often used in computer technology, transmits only a video signal when connected to a TV;
- DVA is a connector that can also be used to transmit only digital video signals;
- S-VIDEO - output for a component analog video interface; when connected to a TV receiver, it transmits a standard definition video signal.
Main characteristics
The black DVB-T tuner SMP023HD2 supports a large number of codecs.
The device has a beautiful, strict, stylish design, small dimensions (12x2.6x6.8 cm), and light weight (200 g). There are two versions - dark gray and black.
The kit includes: device, remote control, 2 batteries, RCA AV cable, power supply, instructions.
Connecting a digital set-top box
The choice of set-top box, as well as its connection, very much depends on the year of manufacture of the television receiver, and, consequently, the presence of input ports of a certain standard on it.
To a modern TV
When connecting a modern television receiver to a DVB-T2 device, of all the input connectors it has, it is best to use HDMI, since this interface is designed for high-definition multimedia, and using one cable you can immediately transmit digital video and stereo audio signals.
Reference. An HDMI-to-HDMI cable is usually not included as standard and must be purchased separately.
Connect the receiver to the TV in the following sequence:
- a central, external or indoor antenna is connected to the set-top box via the RF IN jack;
- The output of the HD OUT set-top box and the HDMI input are connected with a cable;
- both devices are connected to the electrical network (receiver via adapter);
- on the remote control of the television receiver, use the “SOURCE” button to select the desired signal source (in this case, HDMI);
- Using the menu that appears on the screen, the DVB-T2 device configures television channels.
To the old TV
Old TVs mean models that already have 3 RCA input connectors, but do not have an HDMI port.
The connection is made in the same way as the previous one, but using a cable with “tulips” included in most receivers, and the colors of the sockets on both devices and on the cable plugs must match each other.
If the TV has one speaker, and therefore one audio input, a white plug is connected to it, and a yellow plug is connected to the video input.
After turning on the set-top box and the TV, use the “SOURCE” button on the remote control of the TV receiver to select the AV signal source.
Attention. You can also connect modern TVs with a 3 RCA-3RCA cable, but the image quality will be worse due to the transition of the digital signal to analog.
Owners of television receivers that have only SCART, D-SUB, DVA or S-VIDEO connectors at the input will face an even greater problem. To connect them, DVB-T2 devices must have similar outputs. You will also need to purchase connecting cables.
After connecting both devices to the network, depending on the selected connector, on the TV using the “SOURCE” button on the control panel, select the desired signal source SCART, PC or AV.
A TV that only has an antenna input cannot receive a digital signal directly from the set-top box. When connecting the HD OUT output to it with a piece of coaxial cable, only an analog signal will be received, which is equivalent to connecting an ordinary antenna. This problem can be solved by using an additional device - an RF modulator.
How to connect and configure the BBK receiver
There are several options for connecting the receiver to a TV receiver, and first of all you should pay attention to the input connectors. On older TVs, the connection is made using a tulip-type connector.
A more modern receiver can also be connected using the component AV output, but it would be more logical to do this through the HDMI connector. A special socket is provided for the plug of an indoor or outdoor antenna. Setting up the BBK digital set-top box involves performing the following steps:
- Make sure that the equipment is connected to the TV receiver.
- Connect the DVBT2 set-top box to the network and use the start button located on the case to start it. If there is no power button on the case, you can start it using the remote control.
- After the first turn on, the software will be automatically installed, and the user will see a welcome message on the TV screen. You can select the broadcast region, interface language and define other settings.
- The next step is setting up channels. After completing the first settings, you need to press the OK button, and the tuner will begin searching for channels on its own. Upon completion, the found TV channels will be saved automatically.
During the operation of the receiver, malfunctions may occur in its operation. The reason is the failure of the control panel, software failure, etc. If your device does not receive digital channels, you can try rebooting.
You will need to press the power button twice, the first time to turn off the equipment, and the second time to start it. If the problem persists, you can perform an automatic channel search. Resetting and restoring factory settings should be used when the first two methods do not bring satisfactory results.
Setting up channels
After all devices are correctly connected to each other and power is supplied to them, you can begin setting up TV channels. For this:
- From the remote control of the set-top box, go to the main menu (press the “ ” button on the remote control), and windows with icons appear at the top of the screen;
- using the right “VOL” button, select the window with the image of a magnifying glass and press the “OK” button;
- By pressing the lower “CH” key, select “Auto search” and confirm the selected action by pressing “OK”.
After this, the device will go to the “Auto Search” submenu and will automatically find all digital television and radio channels transmitted from the repeater and save them in memory.
Important. On this Search page, in the Antenna Power line, you can turn on or off the DC power supply to your external active antenna amplifier.
Checking the signal quality
It happens that the number of TV channels received by the purchased set-top box is less than that broadcast by the nearest TV tower.
Most often, the reason is not in the receiver, but in the quality of the signal coming to it.
There are special instruments to check the level (power) of the signal and its quality (signal-to-noise ratio), but this can also be done using one of the receiver’s functions.
When you click on the “ ” button, two indicator strips with percentages appear in the right corner of the screen. The top one shows the signal level, the bottom one shows its quality. If the signal level is below 50%, care should be taken to increase the input signal power. This is achieved as follows:
- direct the receiving device to another repeater;
- install the antenna on a high mast;
- buy an active antenna with a powerful amplifier.
Checking the signal level and calibrating it
If you need to check the signal quality, do everything as described below:
- Press the " Options "
on the remote. - Then click on “ System information
”. - You will see an information screen showing the signal strength. A red bar indicates that the signal level is poor; if it is yellow, it is average. A green bar indicates good quality of the digital signal.
If you have poor signal quality, the tips below will help you:
- If you have an external antenna, place it as high as possible. It is best to install it on the roof of the house;
- Check the antenna connections - they may have rust;
- Connect the antenna cable tightly to the TV;
- Change the antenna position until the signal quality improves.
Connecting multiple TVs to one set-top box
There are 2 ways to connect two or three TVs to one set-top box:
1. Another receiver is connected to the through antenna output of the RF OUT (LOOP) set-top box via a piece of coaxial cable, and a second television receiver is connected to it. The main advantages of this connection:
- use of one antenna for two DVB-T2 devices without purchasing an antenna divider;
- possibility of individual viewing on each television receiver.
The disadvantage is the need to buy another receiver.
2. Since the set-top box usually has an HDMI port, RCA output jacks, as well as some rare connectors (SCART, D-SUB, DVA, S-VIDEO), you can also connect several TVs to them using cables.
There will be one advantage - you won’t need to spend money on another console. But there is also a very significant drawback - the same channel will be broadcast on all receivers.
Possible problems and their solutions
Problems can arise with any electronic device, and when they work together, the number of possible problems also increases. The user should be able to identify them and, in simple cases, correct them independently.
Channels are not picked up at all
There can be many reasons:
- coaxial cable break;
- poor contact in the RF IN connector or at the junction of the cable with the antenna;
- use of an antenna of inappropriate design;
- failure of the antenna amplifier;
- lack of power at the amplifier input (may not be included in the menu on the “Search” page);
- incorrect orientation of the receiving device towards the television tower;
- malfunction of the console itself.
It is necessary to check each of the possible faults step by step and, having identified it, repair or replace one of the devices that is suitable for reception or serviceable.
Only part of the channels are caught
- the repeater to which the receiving device is directed does not provide a full package of channels;
- weak signal level due to non-directional antenna.
The receiving device must be redirected.
Weak signal
The level (power) of the signal can be influenced by various factors:
- great distance from the television tower;
- location of the receiving device in a lowland or in the shadow of tall buildings;
- rain or snow.
To fix this you need to:
- purchase a more powerful amplifier;
- raise the antenna higher;
- try to catch the reflected signal.
In the latter case, wait it out.
No signal
This problem may arise due to unfavorable weather conditions:
- strong wind can turn or overturn the antenna, break the coaxial cable;
- During a thunderstorm, the antenna amplifier may be damaged.
In this case, the user:
- finds a fault;
- makes repairs;
- buys a new device.
Due to repair or maintenance work, the repeater may be temporarily turned off. All we can do here is wait.
The image slows down or freezes
If home electronic equipment works without any problems most of the time, then slowdowns in broadcasting and freezing of the image are the fault of malfunctions in the repeater.
There were channels, but they disappeared
This can only happen for two reasons:
- Transmission repeater malfunction. In this case, you will have to wait, filling your information hunger by reading a book.
- Failure of the DVB-T2 device itself. In this situation, there are more options: change if the receiver was purchased recently; submit for warranty or routine repair; buy a new console.
In any case, in the near future everyone will have to switch to the digital standard, and it is better to find out what digital DVB-T2 set-top boxes are, how they are connected and what problems arise due to the incompatibility of the purchased device with the existing TV before purchasing a receiver.
Source