How to connect Lumax Electronics to your TV and set up channels
Connecting the set-top box depends on the tuner model. The developers offer three connection options for Lumax Electronics. Before you start the process, you need to examine the panel for connectors:
- Ant IN - required to connect the antenna to the tuner;
- HDTV - used to connect not only TV, but also PC;
- Loop Out - connects two receivers;
- RSA - there are only three of them and each has its own color; they are responsible for sound and speaker.
Correct setting is the correct determination of the console model and its capabilities.
Connecting the device
The easiest connection method is using HDMI. Please note that not all manufacturers provide such a cable when purchasing a set-top box. You will have to purchase it additionally. Also keep in mind that the more interesting the characteristics, the better the signal quality. Insert HDMI into the appropriate connector and connect the receiver. Connection also occurs using RSA.
Initial settings
The search for channels begins, depending on the method of connecting the necessary wires. When you connect for the first time, the system will automatically display all possible options. If you are connecting via an HDMI cable, then in the proposed list, click on its name. SCART is a function that is typical only for older TVs. If you connected via tulips, then set the mode to AV. And only then begin the step-by-step installation.
Basic Operations
When you turn on the receiver for the first time, you need to specify the language, and then configure the antenna. If the design assumes an active model, then set the mode to “On.” in the “Nutrition” section.
Program Manager
This function will enable:
If you have any questions or complaints, please let us know
- channel editor;
- EPG;
- sorting;
By choosing these categories, the user can easily determine the channels they want to watch and sort them at their own discretion.
Image Settings
Setting up the Lumax set-top box also includes working with image quality:
If you are not satisfied with the image settings, you can easily change the basic parameters.
Search channels
One of the important stages is the search for channels carried out independently by the system. The device independently determines the frequencies necessary for automatic search. Upon completion of work, it is recommended to save the changes made.
It is possible that the search for the system did not give the expected result. Then you need to run manual configuration.
Next, follow the simple instructions:
- press “” on the remote control;
- click on the frequency and channel number found earlier on the map;
- make sure that after entering the data the signal indicators change;
Next, the device will begin searching and display all the channels that were found as a result.
Setting the time
To set the time, you need to open “Settings” / “Time Zone”, select your region. The system will automatically update the information and also change it independently when switching to summer and winter time.
Setting options
Basic options of Smart TV on the Lumax set-top box:
- OSD language;
- subtitle language;
- audio language;
- digital audio;
- transparent.
The device supports many languages. Including Russian, English and others.
System Settings
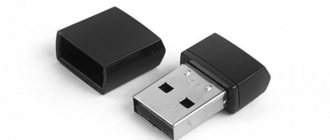
Lumax DVDs, thanks to the Wi-Fi function, provide users with access to the network. Keep in mind that for the Internet to work you need to buy a special antenna - an adapter. Outwardly it looks like a flash drive that is installed in a USB connector. By installing the Internet, you can download the latest firmware version. The files must first be unpacked and then transferred to a flash drive. After inserting the flash drive into the USB input, install it on the device. Wait until the device finishes installation before opening the interface.
Then open the “System” section, click on “Software Update”. Make sure that the “Update via USB” box is checked. Once completed, click OK. Don't stop the process suddenly. Wait until the system completes it on its own. After the device reboots, you can freely use the device.
Search by frequency in manual mode
If the automatic search finds too few broadcast TV channels or their quality of display does not suit you, you can try to independently select the required reception frequency from the TV tower and find the corresponding channels on it.
- Setting up and connecting the Lumax set-top box to your TV - step-by-step guide
To control menu items, you need to use Vol +/- on the remote control of the set-top box and the OK button to select the parameter
The sequence of searching channels in manual mode is as follows:
- First you need to find out the frequency of digital signal transmission from your nearest television tower. This can be done using the CETV interactive map.
- Then you need to press “Menu” on the remote control. In it, select the channel search section.
- We proceed to a manual search and set the channel number that was taken earlier for your area, according to the previously specified map. We wait a few seconds and look at the signal level, it should change. Click OK.
The device will search for the reception frequency you set and find all available programs on it. This must be done for DVB-T and DVB-T2 parameters.
Possible problems and their solutions
Installation of the set-top box may be accompanied by minor problems:
- the image disappears;
- small number of channels;
- Long download of updates;
- The device is constantly updated.
If the image appears intermittently, then most likely there is a problem with the cables. Check the tightness of the plugs in the tulips. If all channels are not found, check the antenna, make sure it is pointed towards the tower. The update speed is equal to the Internet speed. If the set-top box takes a long time to update, then the problem is in the router.
A permanent reboot requires a full factory reset and re-installation. Perhaps the firmware has not been updated for a long time and the device thus reports the need to update the OP. The instructions are suitable for the following models: dv1120hd, dv4205hd, dv2108hd, dv2120hd, dv3206hd, 41103hd, dv1110hd, dv2107hd, dv1108hd, dv2115hd, dv2118hd, dv1120hd, dv32 10hd, dv4201hd.
Source
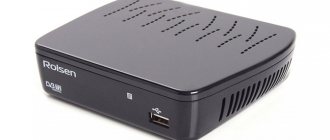
Review of tuners from the manufacturer Lumax
A digital TV receiver is a useful and indispensable device that can turn even an old TV into a multifunctional multimedia gadget. Today, users can watch two free packages of 10 TV programs, one containing informational content and the other containing entertainment.
If you study the ranking of the best and most popular consoles of 2018-2019, you can see that Lumax tuners occupy the highest positions in it. It is noteworthy that in terms of price, these devices even outperform their direct competitors in many ways. Also, the technical characteristics of Lumax do not differ much depending on the model.
Most Lumax digital set-top boxes are equipped with a Wi-Fi module, which makes it possible to access the Internet and download the latest version of the software. All set-top boxes have an HDMI connector; some models also have an RSA input. Support for AVI, MP3, MP4, DivX, WAV formats means that the receiver can be used as a media player.
For those looking for an inexpensive tuner with rich functionality, the DV-1108HD is a good choice. Supports the modern broadcasting standard, as well as the DVB-C format. Equipped with a powerful processor that ensures fast operation of the device. The model is complemented by a small display, has a built-in Wi-Fi module, and supports the Shift function.
Specifications
The receiver has good characteristics, which makes it popular among users:
- maximum throughput – 150 Mbit/second;
- supported wireless protocols – 802.11b/g/n;
- range of action – up to 180 meters;
- security methods – WEP/TKIP/AES/WPA/WPA2;
- operating frequency – 2.4 GHz;
- Dimensions – 8.5 x 16 x 26.1 mm.
Wi-Fi USB adapter Lumax DV0002HD is supported by various operating systems. Thus, the manufacturer has provided drivers for it for the Windows/Linux and Mas OS operating systems. With a power consumption of 5 V, the device consumes minimal electricity.
A related model, the Lumax DV0001HD USB Wi-Fi module, is equipped with a dongle indicator that displays the status of the connected network.
How to connect a set-top box for digital broadcasting
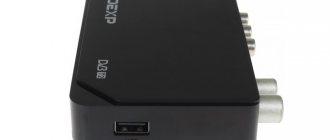
The procedure for connecting and setting up a tuner depends largely on the TV model. There are three main methods for connecting a device. Among the most popular models from the manufacturer Lumax are the DV1108HD and 2105HD receivers. Using their example, it is proposed to consider several of the most effective connection schemes. First of all, it is recommended to study the rear panel of the device and see what outputs there are. The following connectors should be available:
- Ant IN output. Used to connect the antenna to the receiver.
- HDTV. Using this connector you can connect not only a TV, but also a computer.
- Loop Out. The connector is provided for connecting two receivers to each other or for receiving a signal from one antenna structure.
- RSA outputs. There are only three of them - R, L and CVBS. Each is designated by a specific color. The yellow connector is responsible for the image, and the white and red connectors are for the two speakers of the TV receiver.
The simplest solution is to connect the tuner to the TV using an HDMI cable. It may not be included in the kit, so it is often purchased separately. Its price varies from 100 to 600 rubles, and the higher its technical characteristics, the better the image will be. If the cable is already connected, all you have to do is plug the antenna plug into the corresponding connector and start the receiver.
The connection can be made using RSA cables, they are also called “tulips”. If the TV does not have an HDMI or RSA connector, connection will only be possible using the SCART input. You will have to purchase a special adapter to convert the signal.
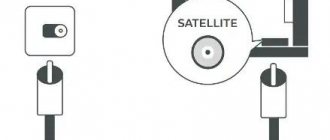
Purpose of connectors: what is needed for what
To connect the set-top box to the TV, you need to connect the antenna, receiver and TV itself with cables. To connect cables, you need appropriate connectors, and now more than one standard is used. Where and what plugs should I plug in?
Standard connectors
Each set-top box, regardless of its type, must have two connectors:
- Antenna input. May be labeled "RF IN" or "ANT IN". The plug from the over-the-air antenna or cable television distribution board is connected here.
- Input for power supply. Marked as “DC-5V”, “DC-IN”. The included power supply is inserted into it. In some models, the power cord is made non-removable.
In addition to the mandatory ones, there are a number of connectors that you will almost always encounter:
- Antenna output. May be called "RF-OUT", "RF-LOOP", LOOP-OUT". Designed for serial connection of another set-top box. On models that have a built-in RF modulator, the signal from this port can be sent to the antenna input of the TV and catch local analog TV.
- RCA output. From it, video and audio signals enter through the corresponding plugs (marked red, white and yellow) on the TV. Used for most older television receivers, but no longer provides high image quality.
- HDMI. High definition digital output. If the TV has a corresponding input, then we recommend using this particular connector, and leaving RCA only for outputting sound to external speakers.
- USB. A connector familiar from computers. Used to connect external storage devices (from flash drive to HDD). As a result, it becomes possible to record programs or view video and audio files of a supported format. In addition, if the set-top box has such a function, you can connect a Wi-Fi module through this connector.
Rare connectors
In addition to the common ones, digital set-top boxes may also have rare types of connectors. These include:
- VGA. This is an old connector, developed back in 1987 to connect computer monitors to a video card. Later it was sometimes used to connect DVD players. It is commonly used for plasma and LCD TVs. HDMI is now outdated and is being actively replaced. Additionally requires audio connection via a separate cable.
- SCART. This is a standard connector for equipment used in Europe. Therefore, it is often found not only in televisions, but also in set-top boxes aimed at the European market.
- S-Video. An old connector, actively used for video players and game consoles. Now it usually requires purchasing an adapter. Provides high quality TV signal, but only for standard definition: it does not transmit HD images.
Setting up Lumax devices
Searching for channels and setting up the DVB-T2 receiver will depend on the method of connecting the devices. When you launch the tuner for the first time, a list of all device display modes on the TV receiver will appear. To connect via an HDMI cable, select the mode with the corresponding name. SCART is usually only available on older TV models, and if the connection takes place using tulips, it is recommended to switch to AV mode. When you have decided on the display channel, you can proceed to further actions:
- After starting the receiver from the remote control, the main menu window will pop up. The first step is to specify the language settings.
- Next, you need to set the antenna settings. If the design is equipped with an active module, the “Power” column should be set to “ON”.
- The next step is to automatically search for channels. The device will independently select the necessary frequencies at which the highest quality digital TV reception is observed.
- After completing the search, it is recommended to save the list of found programs.
If the automatic search does not provide satisfactory results, you may need to perform manual adjustments. Searching for channels manually involves performing the following actions:
- Each television tower has its own frequencies for transmitting channels in digital format. These parameters can be found using the interactive CETV map.
- On the remote control you will need to press the “” button and select the channel search section in manual mode.
- Then set the channel number and frequency found on the interactive map for the area in which the user is located. After entering the necessary parameters, the signal level should change.
- Next, the device will automatically search for the specified reception frequency and display the entire list of channels found.
Sorting
After setting up digital programs, you may have trouble sorting. In order for the found programs to have normal positions and numbers and not start with number 800, it is necessary to perform some manipulation.
- To do this, go to the settings menu.
- We are looking for the Programs section.
- Here you need to turn off LCN autonumbering.
- Next, go to the Sort section and select by multiplexes.
- After that, exit the settings and look at the list of channels, everything should be in order.
How to update software
Thanks to the fact that many Lumax tuners are equipped with a Wi-Fi module, users have access to the Internet. It is worth considering that to access the network you will need a special device that is not supplied with the set-top box. You need to buy it separately, but such an antenna-receiver costs about 600 rubles. Externally, the product looks like a regular flash drive and is connected accordingly (USB input).
The built-in Wi-Fi module on Lumax set-top boxes allows you to download and install the latest firmware. To update the software, you need to download the firmware for a specific device model. The files will be encrypted in the archive, so they will need to be unpacked and then written to a flash drive.
After connecting the tuner to the TV receiver, you need to insert the drive into the USB port and wait until the download begins. When a message appears indicating that the device has been successfully installed, you need to open the set-top box interface.
The next step is to go to the “System” section, and from there to “Software Update”. You need to make sure that the “Update via USB” column is selected. If files with firmware appear on the screen, it is recommended to click “OK” and wait for the software update.
The process cannot be interrupted, as this can harm the system. Once the process is complete, the device will reboot on its own and the flash drive should be removed.
Source
User guide
Download the complete instruction manual HERE.
The Lumax DV0002HD Wi-Fi module connects to TVs, as well as computers and laptops. There will be 2 instructions.
TV connection
Here's the step-by-step procedure:
- Insert the adapter into a free USB port on the Lumax receiver;
- The OS will automatically detect the new device;
- Open the “System” menu, go to the “Network Settings” section;
- Find your network in the list of available ones, connect to it (if necessary, enter its password);
- Go to the “USB” section, then to “Internet”. Here you can configure your TV so that it will only connect to your home router.
Now you can use all available applications, including the unique Lumax cinema. The Cinema Hall interface is simple: you just need to connect to the Internet, go to the application and follow the prompts.
PC connection
Instructions for laptops and desktop PCs running Windows XP/2000/Vista/7:
- Connect the device to the USB port;
- Download drivers for Lumax DV0002HD from the adapter support site;
- From the downloaded files, select Setup.exe and run it;
- The Installation Wizard will open, where you need to accept the terms of the user agreement;
- Click NEXT, then Install;
- After installation is complete, click “Finish”;
- The “Configuration and Monitor” icon will appear in the system tray. If not, restart your PC;
- Now find your network in the list of available ones and connect to it.
If even after rebooting the computer does not see the device, remove the downloaded software and install it again.
Content
Digital television is widely distributed in Russia. It is natural that people willingly take advantage of the opportunity to obtain a higher quality video image and audio signal. Digital TV allows you to watch many more channels than analogue. There is also an option to select the broadcast language or subtitles, this is useful when learning foreign languages.
All TVs released in 2013 already support the DVB-T2 standard. If your TV is an earlier year of manufacture, then you can solve the issue by purchasing a DVB-T2 digital set-top box. It is also called a receiver or TV tuner.
The DVB-T format is outdated and not suitable for digital broadcasting. This information must be taken into account.
Setting up the antenna via the receiver connection is easy. To do this you need:
- choose a suitable antenna;
- select a TV tuner with the desired set of options;
- make connections according to the connection diagram.
Why is the module needed?
In addition to the ability to connect the receiver to a PC, the Lumax Wi-Fi adapter can be connected to a DVB-T2 television receiver from this manufacturer and various web services. This will allow you to connect the TV to the Internet “over the air”, and will make it possible to launch the “Megogo Cinema” or “Lumax Cinema” applications on the TV, which are a library of films (more than 20,000 in the first and 500 new products in the second). Moreover, you can watch them completely without advertising.
Also, with the receiver you can use the YouTube video streaming service or launch services from Google (Maps, Weather and others).
The device is recommended for working with Lumax DV2118HD tuners via USB connector or other models from this line. In this case, there is no need to install drivers, and the connection speed will be maximum.
For an overview of the console, watch the following video:
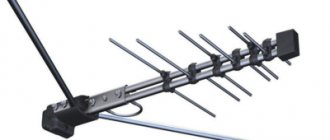
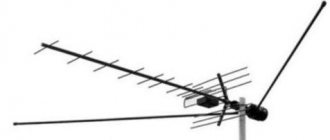
What antenna is needed for digital TV
It was easy to pick up analogue channels; any metal stick would do. Some craftsmen made them with their own hands. With digital broadcasting, things are not so simple. You will have to buy an antenna, but choosing one is easy. We need one that perceives signals in the decimeter range (UHF) 300-850 MHz.
Antennas can be indoor or outdoor. For residents of large residential complexes, it makes sense to chip in with their neighbors and install one antenna per house. In private houses within the city, you can use an indoor antenna, but only with direct visibility of the TV tower.
When the landscape interferes with signal reception, even in the city, it is better to choose an external antenna. For residents of houses located in the suburbs, areas remote from towers, an outdoor antenna is also suitable.
An important parameter is gain, which is measured in decibels (dB). The higher it is, the better the image quality. The main thing is not to overdo it, because everything is good in moderation. The measure in this case is a parameter of no more than 30 dB. This is quite enough to get a high-quality picture.
The antenna requires an antenna coaxial cable with a characteristic impedance of 75 Ohms, with plugs at the ends. One plug is inserted into the antenna, the other into the receiver. This cable comes in different lengths, so measure in advance the distance from the TV with the set-top box to the antenna installation site, taking into account all bends. The higher the antenna, the better the signal, but then more cable will be required.
Which digital TV receiver is better?
The choice is large, but to solve the problem of connecting digital TV, only one fact is important, the DVB-T2 standard. Otherwise, receivers differ in connection methods (RCA, HDMI, SCART, etc.), as well as additional options.
- ANT IN or RF IN - antenna input to connect a coaxial cable from the antenna to the tuner. You either already have this cable in your apartment, if the apartment building is connected to a common antenna, or you need to buy it separately. The length should be sufficient to reach the location of your external antenna.
- RCA - three sockets: red, white, yellow - for connecting the “tulips” cable connecting the set-top box to the TV. This cable is included with the device in most models. It’s better to make sure of this in advance so you don’t have to buy more later.
- HDMI is an elongated connector for a special cable that provides increased clarity of signal transmission. An HDMI cable must be purchased separately if you want to get a better image on the screen. It is important that your TV in this case must also have this connector. Old TV models before 2014 do not have it.
The receiver may have a USB connector, which is convenient for playing audio and video files from a flash drive, external hard drive, or smartphone. To watch video from external devices with sound, you still need Dolby Digital support.
Additional options: Wi-Fi, watching movies from the Internet, child control, recording to external media, HDTV, are optional, but depending on your tasks they may be useful.
The complete set of the set-top box also includes a power supply, remote control, and instructions. The power supply can be external or built-in. The external one can be replaced in case of breakdown. Built-in is less practical in this vein.
A small thing, but important! Now you will switch channels using the remote control of the set-top box, and not the remote control of the TV. This means it must be comfortable. Pay attention to this.
Necessary equipment
If theater begins with a hanger, then digital broadcasting begins with the purchase of equipment. What will the user need?
What is already there: standard set-top box equipment
The set-top box for DVB-T2 (the broadcasting standard used in European countries and Russia) usually includes the following:
- The console itself. A digital tuner (receiver) that receives and converts a signal to transmit it to the ports of a TV receiver. Modern set-top boxes often have additional functions (recording to a flash card, delayed viewing, Wi-Fi support, etc.).
- Power unit. It can be either internal, built into its body, or external. In the latter case, the kit includes an adapter that connects to an outlet and a connecting cable, from which power is supplied to the receiver.
Remote control. Almost all modern set-top boxes, starting from the middle price class, are equipped with IR remote controls.
What else is needed: additional equipment
In addition to the set-top box itself, to connect you will need:
- Antenna. It is needed to receive a terrestrial or satellite signal. To watch digital TV from terrestrial repeaters, it is necessary to purchase a separate UHF antenna. It is not needed only in cases where “digital” is broadcast via cable broadcasting or if there is access to a community antenna with apartment wiring.
- Antenna cable and connecting plugs.
Needed for . The rule usually applies: the higher the antenna is installed, the better the reception. But to connect it to the tuner you need a special coaxial cable. Since it is sold by the meter and cut to the length ordered by the buyer, you will need at least 2 more plugs to connect it to the antenna and TV receiver. - RCA cable (bells).
It transmits the signal from the set-top box directly to the input connectors of the TV. It usually has three plugs at the end: 1 for video and 2 for the right and left audio channels. This cable is used to connect the receiver to older TV models. The cable may be included with the set-top box, but sometimes it is missing. Then it will have to be purchased separately or replaced with the next type. - HDMI cable.
It is used for the same purposes as the bell, but is used in the latest models of receivers and television sets. Provides much better signal transmission, but cannot be used everywhere and therefore is usually not included in the kit.
Setting up the antenna and DVB-T2 digital set-top box
The first step is to determine the location of the nearest tower. To do this, use online services. The nearest broadcast point for TSETV (digital terrestrial television) can be found on the RTRS website.
Using the DTV coverage map, you can also see the TVC (transmission frequency of your channel package), the status will be indicated next to it (broadcasting, waiting).
After this, decide on the location and method of mounting the antenna. Outdoor antennas must be pointed clearly at the signal source to improve transmission quality. When you have found the best location, secure the antenna with the ability to move it slightly for more precise tuning in the future. In apartments, you can attach the antenna to a balcony, window frame, the nearest wall or on the roof (if it is the top floor). In a country house you will need a mast (a pipe with a diameter of 4-5 cm) and a bracket for fastening. Next, we run the cable through the house to a digital set-top box; it looks aesthetically pleasing if you hide it in a cable channel.
D-Color DC1002HD mini - review of the new product
Details Category: Reviews of receivers and antennas Author: Vitaly
The range of terrestrial digital television set-top boxes is constantly updated with updated devices. Following the emergence of more modern radio components, the “filling” of DVB-T2 receivers and the design of their housing are changing. Moreover, this process occurs continuously, and it affects almost all brands represented in Russia.
The D-Color company is also constantly improving its digital television receivers; as a result, the entire range of devices of this brand meets all the latest requirements that apply to such digital set-top boxes.
The above can be confirmed by the evolution of one of the DVB-T2 D-Color receivers. For example, in the summer of 2013, the DC1001HD receiver appeared; in 2014, the company introduced a modification of this set-top box, in which the MStar 7816 processor was replaced with the then latest generation MStar 7802 processor. The model became known as the DC1002HD. And more recently, the 7802 chipset was replaced by the MStar MSD7T01 combined processor, which includes a demodulator and RAM. And D-Color now has a receiver based on it - the DC1002HD mini digital television receiver. This review will be dedicated to him.