Since the entire country switched to digital broadcasting, some subscribers need to switch their TVs to receive the new format. Problems more often arise among owners of old TV receivers manufactured before 2013.
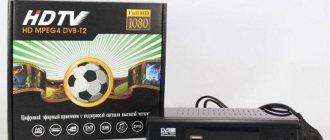
An alternative solution in this case would be to purchase a special set-top box. The choice is complicated not only by the huge number of manufacturers on the market, but also by the variety of devices in terms of functionality and technical capabilities. One of the most popular and inexpensive consoles is Rolsen. How to connect the receiver to the TV and, moreover, do it correctly?
Setting up a Rolsen TV
Due to the fact that the country switched completely to digital broadcasting and analog television stopped broadcasting in many localities.
Therefore, you need to switch your TVs to receive DVB-T2 digital broadcasting; if the TV does not support this format, you need to purchase a digital set-top box to continue watching your favorite TV channels. You also need a UHF or All-Wave antenna to receive digital signals. There are more advantages in switching to digital, after the disadvantages that arose due to the need to switch to a new broadcasting format. Firstly, it is a high-quality picture and clear sound. The number of TV channels has also increased. There are currently 20 free digital terrestrial channels available.
The following are instructions for setting up a Rolsen TV. This brand is not as popular as Sony or Samsung, but is purchased quite often.
Necessary equipment
To watch digital broadcasting, as opposed to analogue, you will need a receiver that decodes the signal. Many modern TV models (Philips, Samsung, Sony, Toshiba, LG, Panasonic, etc.) are equipped with such a unit. To make sure of this, you should refer to the user manual, this brief instruction is included with each product. At the same time, check whether the built-in tuner supports the DVB-T2 format; if not, you will need to purchase a receiver.
Receiver Supra
Depending on the set of functionality, the cost of such a device can vary from 800 to 3000 rubles. Note that many digital cable television providers provide receivers for rent to subscribers.
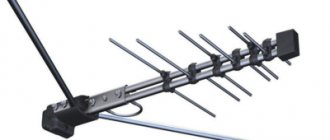
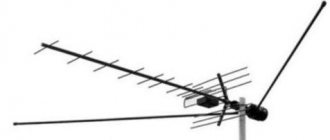
In addition, we will need to receive a digital signal. In cities and large towns this will not be a problem; just contact your local providers. Residents of rural areas will need to install a UHF antenna or satellite dish. The latter is preferable, since it is not a fact that your home is within the coverage area of the nearest digital repeater. In addition, the option with a satellite dish provides a wider selection of television channels.
Checking reception capability
DVB-T2
Before starting the channel search procedure, you need to make sure that your TV receiver supports the DVB-T2 digital broadcast format.
To check the ROLSEN TV for the ability to receive digital television, you need to study the product instructions. If there are no documents or instructions indicating the characteristics of the TV, then the Internet will help you.
On the website Look at the Russian Federation figure, there is a table where all Rolsen TV models with a DVB-T2 tuner are listed.
We find our model and look at the third column, where it will be written whether there is a digital tuner. This is the easiest way to quickly check your TV.
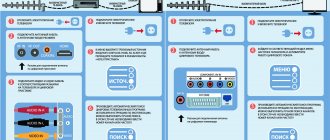
Setting up digital TV
Connect the antenna cable to the TV socket on the back of the TV.
After this we will need a TV remote control.
There are two ways to configure channels.
- Automatic search.
- Manual search.
Auto channel search
For cable TV there are a few more steps you need to take.
- Select Search Mode Full or Advanced. The last method is much faster, but you need to use it if you know the network parameters.
- Frequency.
- Modulation.
- Speed.
- You can obtain this information from your provider.
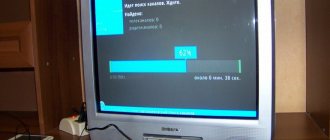
Setting up your Rolsen TV may take some time, so wait until the search is complete. Do not stop searching until the scale shows one hundred percent.
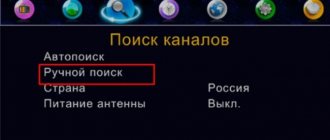
Manual setting
This is the fastest way to install channels. To use it, you need to know the frequencies of the multiplexes. You can view these frequencies on the RTRS website by selecting your locality on the interactive map of the region.
- Go to the TV menu.
- In the Channel item, select Manual search.
- Enter the frequency and click on Start, after that we save the found channels.
There are about ten TV channels in one multiplex; at the moment, only two multiplexes are broadcasting in the Russian Federation.
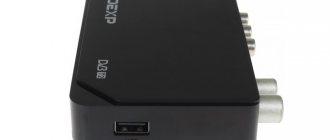
Connectors and their purpose
There are various connectors on the back of the device; we’ll briefly explain what they are for.
Figure 3. Connectors of the SDT-96 receiver from the SUPRA range
Explanation of the picture:
- Antenna output.
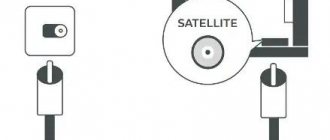
- Connector for connecting a satellite dish, UHF antenna or cable from a local provider.
- A socket for an HDMI cable allows you to connect a monitor or TV equipped with such an input (digital output can transmit sound and image).
- Sockets for the “Tulip” cable (transmits an analog video signal, as well as stereo sound).
Some devices may be additionally equipped with a “SCART” connector; a TV, VCR or DVD player with a video recording function can be connected to it.
Receiver with SCART connector
In addition, you may find devices that have D-SUB (Fig. 5) or DVI outputs instead of an HDMI jack.
Fig 5. Digital set-top box with standard VGA (D-SUB) output
Please note that such interfaces do not transmit sound, so an additional connection using “tulips” will be required to transmit it.
Connecting the set-top box
If your Rolsen TV does not support DVB-T2, additional equipment is required to view HD digital TV channels. The cost of a digital set-top box is about one thousand rubles. Price depends on additional features. Which you may not need.
- Disconnect the device from power.
- We connect the antenna to the set-top box.
- We take the PCA tulip cable that came with the set-top box and connect the set-top box and the TV according to the lights.
- Yellow is video, red and white is audio.
- After that, on the TV, turn on the AV video channel mode.
- We take the remote control from the console.
- We are searching for channels.
Source
Standard equipment for digital set-top box
Let's look at what is included in the standard set of the receiver; this information may be useful when connecting it to a television receiver.
Standard equipment for digital set-top box
Let's list what is shown in the figure:
- A – user manual, we recommend that you carefully read this manual to get a complete understanding of all the functionality of the device and its connection to the TV and antenna.
- B – “Tulip” cable (RCA) with characteristic connectors allows you to connect the set-top box to almost all modern models of television receivers.
- C – a device for decrypting and converting a digital signal into an analogue one (receiver).
- D – packing box.
- E – remote control for the device.
- F – batteries for the remote control.
- G – network adapter for connecting the device to a household power supply.
- H – warranty service coupon.
The basic configuration may differ slightly from what is shown in the photo (for example, the “Tulip” is replaced by an HDMI cable).
Instructions and guide for
Rolsen RDB-101 in Russian
26 pages of detailed instructions and user manuals
Resetting the TV DVB T2 over-the-air receiver to factory settings. Searching and setting up channels
How to install, connect and configure a digital terrestrial receiver TV DVB T2.
Repair of the Rolsen RDB-530 receiver does not turn on
Repair Rolsen RDB-509N
DVB-T2 set-top box CADENA does not turn on
DVB-T2 receiver ROLSEN RDB-525
Repair World Vision T34A (T2 tuner box)
Do-it-yourself troubleshooting and repair of a T2 set-top box or satellite tuner
Precautionary measures
1) Before installing and connecting the digital set-top box, please read carefully
this manual and do not forget about it during operation. Follow everyone
instructions and pay particular attention to warning signs.
2) Turn off the device from the power supply if you do not intend to use it
for a long time. During rain and thunderstorms, you must turn off the device from the network
power supply, as well as the antenna wire. Do not touch the antenna wire plug.
3) Do not cover the ventilation openings with newspapers, tablecloths or other items.
there so as not to interfere with heat dissipation and avoid overheating. To avoid
overheating, do not install the product or power cord near heat sources.
radiation such as batteries, heating devices.
4) Do not place foreign objects on the product: containers containing liquids and
small objects that may get inside the product. If ingested
devices of foreign objects, contact the service center for qualification
5) Power cord: The outlet must be grounded. It is necessary to provide easy
access to the outlet and power cord. Before turning on the set-top box to the mains, please
Make sure that the power cord and electrical outlet are not damaged and ensure that
provide reliable contact. The power cord must not be deformed or bent.
Do not place any objects on the power cord or antenna cable. Prohibited
connect the set-top box to an electrical network whose voltage is lower than 90V or higher than 242V and
AC frequency other than 50/60Hz.
6) Protect the device from excessive vibration or drops, which may cause
lead to damage to the housing and electronic components, thereby reducing the service life
device services. Supervise children to prevent them from damaging the device.
7) To avoid damage to the device and electrical injury to people, keep the
the product is protected from the effects of rain, spray guns, and high humidity.
Do not attempt to disassemble the device yourself. Conduct technical
Maintenance and repairs are only permitted to service specialists!
Source
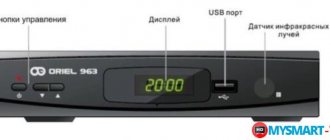
Receiver for 20 free channels
Russia has completely switched to digital broadcasting, so you can forget about interference and complaints about weak antennas. Your favorite programs are available in perfect quality without any subscription fee, but for normal reception you will need special equipment. Two free multiplexes are broadcast throughout the country, each of which includes a list of 10 TV channels. Broadcasting in the updated format can be received by both new and some older TV models. In this regard, the question arises: how to choose the right receiver for 20 free channels? It is worth considering that not all regions can count on receiving both packages; everything will depend on geographical features and the distance to the nearest TV tower.
What equipment is needed to receive digital TV?
Setting up modern receivers should not be a problem, since most models are equipped with a built-in DVB-T2 tuner. Otherwise, you will need to purchase a tuner, connect it to the TV and configure it. In addition, you will need an antenna and connecting cables. If the receiving structure is of the decimeter type, then it is suitable for “digital”.
The main component is still the set-top box, but to connect it you need a tulip-type connector. Not all old receivers have such a connector, but there is no need to rush into buying new equipment; a regular adapter for a SCART socket can also come to the rescue. Even if there is none, there is only one way out - use the antenna input. You need to purchase a special modulator that has the ability to convert frequency.
DVB-T2 set-top boxes were popular in previous years, this is due to their technical capabilities and advantages. The main task of such a device is to receive data from a TV tower, subsequent decoding and playback on the screen. Connecting a DVB-T2 set-top box does not require special knowledge, and most subscribers can complete this process.
In addition to ideal quality and sound, digital tuners have other advantages. With their help, you can view videos and images from external media. Many models allow subscribers to access the Internet and connect to various online services.
DVB-T2 set-top boxes are classified according to the breadth of their functional features, from economy and middle-class devices to expensive premium modifications. The most budget models, with which you can catch free packages, cost from 1000 rubles, and SMART-TV devices - from 3000-4000 rubles.
Connectors and their purpose
There are various connectors on the back of the device; we’ll briefly explain what they are for.
Figure 3. Connectors of the SDT-96 receiver from the SUPRA range
Explanation of the picture:
- Antenna output.
- Connector for connecting a satellite dish, UHF antenna or cable from a local provider.
- A socket for an HDMI cable allows you to connect a monitor or TV equipped with such an input (digital output can transmit sound and image).
- Sockets for the “Tulip” cable (transmits an analog video signal, as well as stereo sound).
Some devices may be additionally equipped with a “SCART” connector; a TV, VCR or DVD player with a video recording function can be connected to it.
Receiver with SCART connector
In addition, you may find devices that have D-SUB (Fig. 5) or DVI outputs instead of an HDMI jack.
Fig 5. Digital set-top box with standard VGA (D-SUB) output
Please note that such interfaces do not transmit sound, so an additional connection using “tulips” will be required to transmit it.
Instructions for setting up digital television
Since the entire country switched to the new broadcast format, subscribers can watch TV programs included in two basic packages. The first multiplex includes information content, and the equipment will pick up either all channels or none.
The package is available in any locality. The second multiplex belongs to the entertainment category. The most popular programs among subscribers are collected here. Today, the package is available to approximately 67% of the country's population. The composition of entertainment television programs changes every year. The list is selected based on a competition held by the state. A third package has recently appeared, but it requires a fee.
Step-by-step instructions on how to set up a digital receiver with 20 channels are as follows:
- First of all, you need to connect an indoor or outdoor antenna to the TV receiver.
- After turning on the TV, press the “Menu” button on the remote control and go to the automatic settings section.
- A window will appear on the screen in which the subscriber will need to select a transmission source. The specified value should be "Cable".
- After clicking on the “Start” button, another window will open in which you need to select the “Digital” command.
- In search mode, it is recommended to select “Full” and wait until the equipment finds a list of all available TV programs.
Some receiver models have a network search function. The user will not need to enter any data, just start the search mode and wait until the available multiplexes are found. Digital receivers with 20 channels can also be configured manually. To facilitate this process, it is recommended to go to the website map.rtrs.rf and familiarize yourself with the list of packages available in the region. Each channel will have its own broadcast frequency and serial number. These values are entered during manual search; the modulation value is also indicated - 256 QAM.
A useful step is to check the signal quality. This can be done by pressing the “” button on the remote control. A message will appear on the screen indicating the reception level. If its value is above 60%, then the signal is stable. Otherwise, the situation will have to be corrected, and the following options can help:
- place the antenna in another place, it is advisable to take the device outside, securing it to a special high mast;
- orient the receiving installation as accurately as possible towards the nearest TV tower;
- buy an antenna amplifier that will increase the power factor.
In large cities, the signal can be received from several repeaters. On the Internet, it is recommended to look at a map of the nearest TV towers, as well as find out which multiplexes they broadcast.
Standard equipment for digital set-top box
Let's look at what is included in the standard set of the receiver; this information may be useful when connecting it to a television receiver.
Standard equipment for digital set-top box
Let's list what is shown in the figure:
- A – user manual, we recommend that you carefully read this manual to get a complete understanding of all the functionality of the device and its connection to the TV and antenna.
- B – “Tulip” cable (RCA) with characteristic connectors allows you to connect the set-top box to almost all modern models of television receivers.
- C – a device for decrypting and converting a digital signal into an analogue one (receiver).
- D – packing box.
- E – remote control for the device.
- F – batteries for the remote control.
- G – network adapter for connecting the device to a household power supply.
- H – warranty service coupon.
The basic configuration may differ slightly from what is shown in the photo (for example, the “Tulip” is replaced by an HDMI cable).
What to do if there is no signal
Signal loss problems can be divided into two main categories. The first is when the signal level is weak. Possible solutions to this problem were discussed above. The second category includes the difficulties encountered by the user in obtaining high quality reception. If all 20 TV channels work without interruption, then the setup was done correctly. But when operating the equipment, problems of a different nature may arise:
- The receiving equipment worked well during analogue broadcasting, but when switching to digital, access to favorite channels was limited. There are several options: perhaps an MV antenna is used or the device does not have enough gain.
- The new format is not accepted at all. The reason must be sought in the console. Make sure it accepts DVB-T format
- Not all of the 20 available TV shows are shown. It is worth trying to change the direction of the receiving device. The cause of the problem may also be a failed active module.
- Previously, 20 channels were available, after some time there were only 10 left. The tuner may need new settings or it may be due to technical faults.
The RTRS-1 multiplex includes the following TV channels: First, NTV, OTR, Match TV, Russia 1, Russia 24, Fifth, Karusel, TV Center and Russia K. Some radio stations are also available, including Radio Russia, Vesti FM, Mayak and other.
Lists of channels included in the RTRS-2 package: RenTV, MuzTV, TNT, Spas, Pyatnitsa, Zvezda, TV3, Domashny, Mir and STS.
Source
How to connect the Rolsen set-top box
Since the entire country switched to digital broadcasting, some subscribers need to switch their TVs to receive the new format. Problems more often arise among owners of old TV receivers manufactured before 2013.
An alternative solution in this case would be to purchase a special set-top box. The choice is complicated not only by the huge number of manufacturers on the market, but also by the variety of devices in terms of functionality and technical capabilities. One of the most popular and inexpensive consoles is Rolsen. How to connect the receiver to the TV and, moreover, do it correctly?
Connecting to an old TV
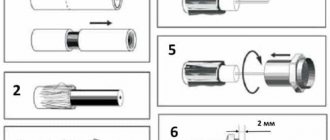
The signal converter can work even with older models of television receivers when connecting them to the antenna output (1 in Fig. 3). To do this, you will need a piece of antenna wire of the appropriate length and two antenna plugs. In order not to bother with soldering, you can take special F-connectors; the procedure for installing them on the cable is demonstrated in Figure 8.
Installation on the F-connector cable
Procedure:
- We remove the insulation from the antenna cable, carefully so as not to damage the braiding (it is enough to clean 15 mm).
- We bend the braid as shown in the picture.
- Carefully remove the insulation from the central core.
- It is necessary to expose 10 mm of the central wire.
- We screw the connector clockwise.
- We do this until the central core protrudes 2 mm from the connector.
Connecting and configuring Rolsen digital receivers
Before buying a decoder for digital TV, it is recommended to make sure that the TV does not have a built-in tuner. First, you should study the instructions for the TV receiver. You can also go to the site smotritsitru.rf: at the bottom there is a table where you can select Rolsen from the list and see whether a particular model supports the DVB-T2 format. If not, you will need to buy a receiver.
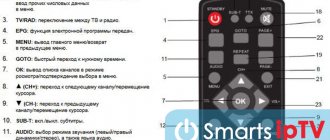
How to set up the Rolsen console (using the RDB 406 and RDB 405 models as an example):
- Connect the tuner to the network, and then press the power button on the remote control, making sure in advance that the batteries are inserted into it.
- The set-top box must be connected to the TV receiver via one of the interfaces. This could be an HDMI cable, an RCA cable, or an outdated SCART cable. If the interfaces on the devices do not match, buy an additional special adapter.
- Depending on the selected connection, the display mode is selected on the screen.
- When the set-top box is launched for the first time, the user is immediately taken to the main menu. Moving through its sections using the “Down” button, reach the “Installation” item.
- To enter the “Channel Settings” tab, press the “OK” button twice.
- To begin, activate the “Autosearch” command. A new window will open where you need to select a country or region, and enter network parameters. In the second field, enter the values 6.875MS - QAM256, after which you can proceed to the “Search” item.
- The device will automatically find all available channels in digital quality. Before pressing the “Exit” button and exiting the search mode, save your actions.
To find out what level the quality of the received signal is, you can go to the “section” by pressing the corresponding button on the remote control three times. The following information will also be displayed: channel number, encoding and frequency. If no channels are found, you should connect another antenna. In cases where these manipulations do not bring results, the reason should be sought in the console itself. The problem often lies in the firmware. To update the software, just go to the developer’s website, download the new firmware, copy it to a USB drive and install it.
Necessary equipment
To watch digital broadcasting, as opposed to analogue, you will need a receiver that decodes the signal. Many modern TV models (Philips, Samsung, Sony, Toshiba, LG, Panasonic, etc.) are equipped with such a unit. To make sure of this, you should refer to the user manual, this brief instruction is included with each product. At the same time, check whether the built-in tuner supports the DVB-T2 format; if not, you will need to purchase a receiver.
Receiver Supra
Depending on the set of functionality, the cost of such a device can vary from 800 to 3000 rubles. Note that many digital cable television providers provide receivers for rent to subscribers.
In addition, we will need to receive a digital signal. In cities and large towns this will not be a problem; just contact your local providers. Residents of rural areas will need to install a UHF antenna or satellite dish. The latter is preferable, since it is not a fact that your home is within the coverage area of the nearest digital repeater. In addition, the option with a satellite dish provides a wider selection of television channels.