Having worked as a television technician for about 10 years, I noticed that Dexp digital TVs do not have normal step-by-step instructions on how to set up channels. And according to statistics, this company is one of the 10 best-selling in Russia. Popularity among the population is high. What can I say if my neighbor has a Dexp TV and I set up channels for him (hi, Andrey). I’ll help you too, read – DEXP setting up digital channels!
The main advantage of these TVs is the price. For a diagonal of 50 cm, you will pay on average 7,000 rubles, which is very budget-friendly compared to Samsung or LG.
Now I will share my experience and we will look in detail at how to set up channels on a dexp TV. Let's look at setting up the numbers step by step using a real example. You will learn not only the purpose of certain TV buttons, but also the connectors.
Checking for digital TV support on DEXP
Before proceeding directly to the setup, let’s make sure that your equipment supports digital terrestrial TV reception. This function is only available on models that support the DVB-T2 broadcast standard.
Note! Some DEXP TVs only operate in the DVB-T range. In 2021, such equipment does not have the ability to receive digital television.
To check for DTV support, enter your TV model number in the Search box in the table below. If it is found, feel free to start setting it up - your receiver can pick up “digital” without additional attachments.
| Model | Diagonal | DVB-T2 support |
| 22A7100 | 22 | + |
| 22A7200 | 22 | + |
| 24A7100 | 24 | + |
| 28A3000 | 28 | + |
| 32A3000 | 32 | + |
| 32A3100 | 32 | + |
| 32A3200 | 32 | + |
| 32A7000 | 32 | + |
| 40A7000 | 40 | + |
| 40A7100 | 40 | + |
| 42A7000 | 42 | + |
| 42A8000 | 42 | + |
| 42A8100 | 42 | + |
| 42A8200 | 42 | + |
| 42A9000 | 42 | + |
| 46A7000 | 46 | + |
| 49A8200 | 49 | + |
| 50A7000 | 50 | + |
| 50A7100 | 50 | + |
| 50A8000 | 50 | + |
| 55A8000 | 55 | + |
| F22B7000C | 22 | + |
| F22B7000E/B | 22 | + |
| F22B7000E/W | 22 | + |
| F22B7100EE | 22 | + |
| F22B7200C | 22 | + |
| F22D7100E | 21.5 | + |
| F24B7000C | 24 | + |
| F24B7000E | 24 | + |
| F24B7100EE | 24 | + |
| F24B7100K | 24 | + |
| F24B7200C | 24 | + |
| F24B7200VE | 24 | + |
| F24D7100E | 23.6 | + |
| F24D7200C | 23.6 | + |
| F32C7000B | 32 | + |
| F32C7100B | 32 | + |
| F32C7100B/W | 32 | + |
| F32D7000B | 32 | + |
| F32D7000C | 32 | + |
| F32D7000C/W | 32 | + |
| F39B7000VD | 39 | + |
| F39B7100E | 39 | + |
| F40B7000C | 40 | + |
| F40B7000E | 40 | + |
| F40B7000H | 40 | + |
| F40B7000K | 40 | + |
| F40B7100K | 40 | + |
| F40B7200C | 40 | + |
| F40B8300K | 40 | + |
| F40C7100C | 40 | + |
| F40C7100K | 40 | + |
| F40C8000H | 40 | + |
| F40D7100C | 39.6 | + |
| F40D7200C | 40 | + |
| F40D7200C/W | 40 | + |
| F42B7000ED | 42 | + |
| F42B7000M | 42 | + |
| F42B7000T | 42 | + |
| F42B8000H | 42 | + |
| F42B8100K | 42 | + |
| F42C7000E | 42 | + |
| F43B7200С | 43 | + |
| F43B7200S | 43 | + |
| F43B8000H | 43 | + |
| F43B8000K | 43 | + |
| F43C7000C | 43 | + |
| F43C7100K | 43 | + |
| F43C8000H | 43 | + |
| F43D7000K | 43 | + |
| F43D8000K | 42.5 | + |
| F43D8100H | 43 | + |
| F46B7000MD | 46 | + |
| F48B7000M | 48 | + |
| F48B7000V | 48 | + |
| F48C7200K | 48 | + |
| F48D7000K | 48 | + |
| F48D8000K | 47.6 | + |
| F49B7000T | 49 | + |
| F49B7200C | 49 | + |
| F49B8000K | 49 | + |
| F49B8100K | 49 | + |
| F49B8200K | 49 | + |
| F49C7000C | 49 | + |
| F49C8000H | 49 | + |
| F49D8100H | 48.5 | + |
| F50B8000H | 50 | + |
| F55B7000T | 55 | + |
| F55B7200C | 55 | + |
| F55B8000H | 55 | + |
| F55B8000K | 55 | + |
| F55B8100K | 55 | + |
| F55B8200K | 55 | + |
| F55C7000C | 55 | + |
| F55C8000H | 55 | + |
| F55D7000E | 54.6 | + |
| F55D7000K | 54.6 | + |
| F55D8000K | 54.6 | + |
| H19B7000С | 19 | + |
| H19B7000E | 19 | + |
| H19D7100E | 19 | + |
| H20B7200C | 20 | + |
| H20C7200C | 20 | + |
| H20C7200C/W | 20 | + |
| H20D7000E | 19.5 | + |
| H24B3000EE | 24 | + |
| H24B7000E | 24 | + |
| H24B7100 | 24 | + |
| H24C3000E | 24 | + |
| H24C7200C | 24 | + |
| H24D7000E | 23.6 | + |
| H28B7100C | 28 | + |
| H28B7100E | 28 | + |
| H28C7100C | 28 | + |
| H28D7200K | 28 | + |
| H28D7300K | 28 | + |
| H32С8000H | 32 | + |
| H32B3200CD | 32 | + |
| H32B3400ED/A | 32 | + |
| H32B7000C | 32 | + |
| H32B7100K | 32 | + |
| H32B7200C | 32 | + |
| H32B7200T | 32 | + |
| H32B7300C | 32 | + |
| H32B7400C | 32 | + |
| H32B8200K | 32 | + |
| H32C7100C | 32 | + |
| H32C7200K | 32 | + |
| H32C7300K | 32 | + |
| H32D7000E | 32 | + |
| H32D7000M | 31.5 | + |
| H32D7000Q | 31.5 | + |
| H32D7100C | 32 | + |
| H32D7100K/W | 32 | + |
| H32D8000Q | 31.5 | + |
| H32D8100H | 32 | + |
| H39D7000E | 39 | + |
| H39D7000Q | 38.5 | + |
| H39D7100E | 39 | + |
| H39D8000Q | 39 | + |
| U40B9000H | 40 | + |
| U42B9000K | 42 | + |
| U43D9100H | 42.5 | + |
| U43D9100K | 42.5 | + |
| U49B9000K | 49 | + |
| U49D9000K | 48.5 | + |
| U50B9000H | 50 | + |
| U55B9000H | 55 | + |
| U55B9000K | 55 | + |
| U55B9100K | 55 | + |
| U55D7100E | 54.6 | + |
| U55D9000K | 54.6 | + |
| U58B9900H | 58 | + |
| U65D9000K | 64.5 | + |
If your TV does not support digital TV
If your model is not found in the table, then the TV does not have a built-in DVB-T2 tuner. There are two ways out of this situation:
- Buying a new TV. In this case, it is necessary that the device works with the DVB-T2 standard. Prices for new models start from 8,000 rubles.
- Buying a digital set-top box. It allows any device to broadcast free over-the-air television. At the same time, the price of the issue is from 650 rubles. Check out our rating of digital set-top boxes. After purchase, the receiver needs to be connected and configured.
Old and new Dexp
Modern Dexp TV models have support for the digital standard from the manufacturer. They are much easier to tune because the specifications include a built-in digital tuner.
Models manufactured before 2013 are technically considered obsolete and require the purchase of a suitable decoder to broadcast the digital standard. The cost starts from 900 rubles and can be purchased at household goods stores, electronics stores and post offices in Russia.
Automatic channel search
Automatic setup of digital TV on DEXP TVs is done as follows:
- Connect the antenna to the receiver input. It is located on the back cover. If the device does not support digital TV, you must additionally connect a set-top box via the “>RCA” port.
- Press the "Source" button on the remote control. A table with a list of operating modes will appear on the screen. In the “Country” item, select Norway or Finland (Russia often does not give the desired result, this is a disease of many DEXP models). Use the “Up” and “Down” buttons to select “DTV” (digital television). Click "Ok" or "Enter". Some DEXP TV models keep this window active for several seconds after all actions in it are completed.
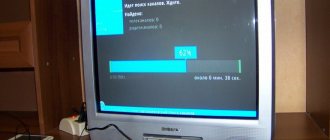
- Press the "Menu" button on the remote control. Use the “Up” and “Down” keys to select the “Channels” section and click on the “Auto Search” function. It allows you to find and connect all 20 digital channels.
- The automatic search process takes from 5 to 10 minutes. At this time, the TV will scan all available frequency ranges. At the end, the number of TV channels and radio stations found will be displayed on the screen.
Code table for entering the engineering menu
| smartphones based on MTK processor | *#*#54298#*#* or *#*#3646633#*#* or *#*#8612#*#* |
| Samsung | *#*#197328640#*#* or *#*#4636#*#* or *#*#8255#*#* |
| HTC | *#*#3424#*#* or *#*#4636#*#* or *#*#8255#*#* |
| Huawei | *#*#2846579#*#* or *#*#14789632#*#* |
| Sony | *#*#7378423#*#* or *#*#3646633#*#* or *#*#3649547#*#* |
| Fly, Alcatel, Philips | *#*#3646633#*#* or *#9646633# |
| Prestigio | *#*#3646633#*#* or *#*#83781#*#* |
| ZTE | *#*#4636#*#* |
| Philips | *#*#3338613#*#* or *#*#13411#*#* |
| TEXET | *#*#3646633#*#* |
| Acer | *#*#2237332846633#*#* |
| Blackview | *#*#3646633#*#* or *#35789#* |
| Cube | *#*#3646633#*#* or *#*#4636#*#* |
| Cubot | *#*#3646633#*#* |
| Doogee | *#*#3646633#*#*, *#9646633# , *#35789#* or *#*#8612#*#* |
| Elephone | *#*#3646633#*#*, |
| HOMTOM | *#*#3646633#*#*, *#*#3643366#*#*, *#*#4636#*#* |
Note: the table is constantly updated
Dear readers, there are also many different applications for entering the engineering menu. Here are some recommended applications that can be easily found on GooglePlay: Launching the MTK Engineering menu; Engineer Menu MTK; Shortcut Master; for owners of Sony Mobileuncle Tools
10Total ScoreIncreasing volume using the engineering menu
Setting the volume on Android. • Increase the volume on your Android smartphone. • Microphone settings for conversations and video recording. • Engineering menu. Rate us, your rating is important to us!
pros
- increase volume
- microphone settings
- improving smartphone sound quality
Minuses
- none
—>How to set up a DEXP TV
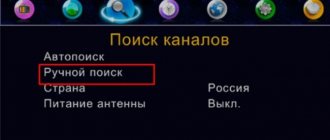
Manual setting
In some cases, automatic tuning of DEXP TVs does not give the desired result. The device may not find a single channel or connect only a small part of them. In such a situation, perform a manual search. The procedure depends on the type of television being received; we will consider all cases separately.
On-air channels
To catch them manually:
- On the TV remote control, press the “Menu” button.
- Enter the section called “Channels”, select “Manual search” in it.
- Set the parameters - frequency and TVC number for multiplexes 1 and 2. This data is unique for each region and can be found on the CETV interactive map. To set the specified parameters, use the “Right” and “Left” buttons.
- Press the “Start” button on the remote control. All available channels will be found within 3-5 minutes.
Cable channels
Manual search for cable programs occurs according to the following algorithm:
- Connect your provider cable to your TV.
- Using the “Menu” button on the remote control, open the settings window. In it, go to the “Channels” tab.
- After selecting “Manual search”, pay attention to the “Antenna” item. In it you need to select the “Cable” value.
- Start setting your search parameters. They can be obtained directly from the provider (look in the contract or call the hotline). Once the data has been entered, click on the “Start” button.
After some time, the TV channels you are interested in should be found and saved. Continue searching until all cable programs are available.
- How to connect your phone to DEXP TV?
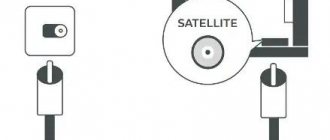
Satellite channels
When manually setting up satellite digital channels on DEXP TVs, you need to perform a little more manipulation than when searching for terrestrial and cable channels. Proceed according to the following algorithm:
- Connect the satellite dish.
- Go to the settings window through the “Menu” button on the remote control. Going to the “Channels” tab, select the “Manual Search” function. Additionally, do not forget to change the signal reception to “Satellite”.
- Set up signal reception. This can be done by entering the parameters received from the provider. This applies to LNB power supply, DiSeqC mode, upper gen. LNB and lower gen. LNB.
- Select manual setting. To do this, use the standard “Up” and “Down” buttons to specify frequency information.
- Start the search process. This will take 7-10 minutes, since the number of channels is greater than on terrestrial TV.
If the programs are not found, you should review all the settings. Most often they contain an error. Enter information in strict accordance with all instructions from the provider providing its services to the client.
Let's learn the theory of the engineering menu
So let's look at what and how you can do if you tinker a little with the “Engineering Menu”.
Before making any changes, we recommend that you read the entire article, understand it, and then experiment. Also, take a piece of paper and write down all the default values in case something goes wrong. You can launch the engineering menu using a telephone dialer: enter the following combinations on it (Fig. 1):
- Hard reset to texet. How to reset your tablet to factory settings
picture 1
*#*#54298#*#* or *#*#3646633#*#* or *#*#83781#*#* – smartphones based on MTK processor
*#*#8255#*#* or *#*#4636#*#* – Samsung smartphones
*#*#3424#*#* or *#*#4636#*#* or *#*#8255#*#* – HTC smartphones
*#*#7378423#*#* – Sony smartphones
*#*#3646633#*#* – Fly, Alcatel, Philips smartphones
*#*#2846579#*#* – Huawei smartphones
Congratulations, you have entered the engineering menu (Fig. 2). Keep in mind that the menu structure on different phones may differ slightly in structure. Find the “Audio” section and go into it. After logging in, we see a bunch of unknown lines (modes) (Fig. 3). Here's what these modes mean in Android:
- Explay how to reset to factory settings
Figure 2 Figure 3
— Normal Mode (settings section in normal or normal mode) – this mode is active when nothing is connected to the smartphone;
— Headset Mode (headset mode) – this mode is activated after connecting headphones or external speakers;
— LoudSpeaker Mode (loudspeaker mode) – it is activated when nothing is connected to the smart phone, and you turn on the speakerphone while talking on the phone;
— Headset_LoudSpeaker Mode (loudspeaker mode when a headset is connected) – this mode is activated when you connect headphones or external speakers to the smart phone, and you turn on the speakerphone while talking on the phone;
— Speech Enhancement (phone conversation mode) - this mode is activated in the normal mode of telephone conversations, and nothing is connected to it (headset, external speakers) and the speakerphone is not turned on.
It’s best not to poke your nose into the last three sections:
- Debug Info - it’s not clear why - information on backing up information or debugging it;
- Loss of sound on an Android phone or tablet: how to solve the problem?
- Speech Logger - I haven’t fully figured it out, most likely it’s logging during negotiations or recording chatter. If you check the box next to “Enable speech log”, then after the end of the phone call, the corresponding files are created in the root directory of the memory card. Their name and structure take the following form: Wed_Jun_2014__07_02_23.vm (Wednesday_July_2014__time07_02_23.vm).
What these files serve and how they can be useful to us is unclear. The /sdcard/VOIP_DebugInfo directory (which is the storage location for files with backup information) is not created automatically; if you create it manually, it will remain empty after the conversation.
— Audio logger is a good software for recording sound that supports quick search, playback and saving.
If you approach these modes wisely, you can adjust the volume of Android smartphones or tablets the way you want. When you enter any of the modes, different volume settings (Type) will become available to your view. Here is a list of the basic settings you need to know (Fig. 4):
figure 4
— Sip – settings for Internet calls;
— Mic – microphone sensitivity settings;
— Sph – earpiece speaker settings (the one we put on our ears);
— Sph2 – settings for the second speaker (I don’t have one);
— Sid – skip, if you change these parameters during negotiations on your smartphone or tablet, you can hear yourself instead of the interlocutor;
— Media – adjust the multimedia volume level;
— Ring – adjust the volume level of the incoming call;
— FMR – FM radio volume settings.
Next, under the settings selection item, we have access to a list of volume levels (Level) (Fig. 5). For a better understanding, there are 7 such levels, from level 0 to level 6. Each level corresponds to one “click” on the volume rocker of a smartphone or tablet. Accordingly, level 0 is the quietest level, and level 6 is the loudest signal level. Each level can be assigned its own values, which are located in the Value is 0~255 cell, and should not go beyond the range from 0 to 255 (the lower the value, the lower the sound). To do this, you need to erase the old value in the cell, then enter a new one (desired) and press the “Set” button (the one next to the cell) to assign (Fig. 6). When using the maximum values, be careful as the speakers may produce uncharacteristic unpleasant sounds in the form of rattling and other unpleasant effects.
Figure 5 Figure 6
Warning! Before making changes, rewrite all factory values (in case something goes wrong).
Further down at the very bottom you can see the Max Vol section. 0~160 (for example, I have Max Vol. 0~172, depending on the manufacturer) (Fig. 6). This section sets the maximum volume power value; it is the same for all levels.
You should know this!
- Rating of the best action cameras 2021 | TOP 10
- How to change default app settings on Android
- How to extract APK files from Android device. [Step-by-step instruction]
- How to change the ringtone or notification on your Android device
- How to remove the Google Search search bar from the desktop on Android
Deleting and sorting channels
After all TV channels have been found, some of them can be deleted or sorted (assign a number on the remote control):
- Use the “Up” and “Down” buttons to select the desired program from the list of previously found ones.
- To delete a channel, press the red button on the remote control. After this, its broadcast frequency will no longer be monitored by the TV.
- To rename (in ATV mode), use the green button. After clicking it, you can change the name of the element selected from the list.
- To move the channel you will need the yellow button on the remote control. The selected item from the list becomes active. Using the “Up” and “Down” buttons you can move it to the desired position.
Possible problems and their solutions
The main problems when setting up digital TV on DEXP TVs are:
- Slowing down the picture. Most often this problem occurs in stormy weather. The picture begins to slow down, the image breaks up into small fragments. In the worst case, it disappears completely. This problem occurs due to a weak signal. If channels are received through an antenna, you must first check the correctness of its mounting, direction and all elements installed on the way to the TV. If there are no problems with this, the trouble that has arisen can be corrected only by installing a signal amplifier. Read more about solving the problem with TV braking.
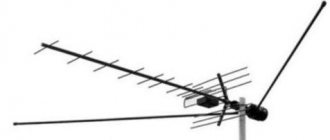
- Poor signal reception. In this case, the antenna may not be suitable for DVB-T2 reception. If this is the case, it must be replaced with a new one. Also, the reason for poor reception may be that the distance to the repeater is too great. In order to get rid of this problem, it is enough to purchase an antenna amplifier.
- Not all channels are received. The main reason for this problem is insufficient antenna gain. In addition, it may not be directed exactly at the repeater. In the first case, you will need to install an amplifier, in the second, you will need to adjust the direction. In addition, it is possible that the settings have been reset. If this happens, you need to perform the setup again manually. Read more about solving the problem with the loss of some channels.
Is DEXP a good TV?
Now you know exactly how to watch digital programs on DEXP TVs. If you have any questions, ask them in the comments, we will try to answer within 1 hour.
Statistics show that in our country the most popular models of digital set-top boxes are devices from DEXP. They are very reliable in operation, quite easy to set up, and most importantly, they cost around 1,200 rubles. The biggest questions arise when connecting the device to the TV. There are several options on the console, and few people know which one to choose. Therefore, today we will consider all the questions regarding these consoles. We will try to provide instructions that will fit the most popular models: hd 2991p, 2551p, 1812p, 1813p, 2771p, etc.
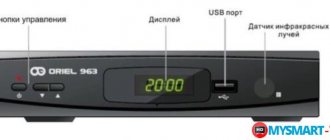
Comparison of DEXP set-top box models
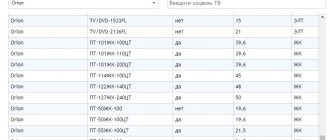
The only distinguishing features of the various models of DEXP set-top boxes are the presence/absence of a display on the body, as well as unimportant dimensions. In general, all devices are similar in parameters. The most popular console models on our market are presented in the table.
- Review: LED TV DEXP H32D8000Q - If I had known, I would not have bought it!
| DEXP models | Material | Connectors | Formats | Display |
| HD 1701M | Metal | + | ||
| HD 1702M | Metal | + | ||
| HD 1703M | Metal | + | ||
| HD 1704M | Metal | + | ||
| HD 1810P | Plastic | — | ||
| HD 1811P | Plastic | HDMI 1.3,RSA (tulips), USB | MKV, AVI, DivX, MPEG (MPEG 2, MPEG 4), FLAC, MOV, JPEG, AAC, WAV, MP3 | + |
| HD 1812P | Plastic | + | ||
| HD 1813P | Plastic | — | ||
| HD 2551P | Plastic | — | ||
| HD 2771P | Plastic | — | ||
| HD 2991P | Plastic | — | ||
| HD 2992P | Plastic | — | ||
| HD 3112M | Plastic | — |
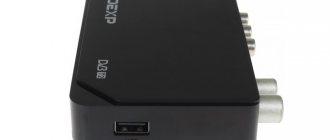
Options for connecting to a TV using the example of DEXP HD 2991P
External side of the Dexp digital set-top box
In order to clearly demonstrate to you the procedure for connecting DEXP set-top boxes, we will take one of the popular models - HD 2991P. According to reviews, this console is one of the most reliable. According to the characteristics, it has the following parameters:
- Plastic case.
- Work with modern file formats.
- 2 USB ports.
- Possibility of connecting to a TV via HDMI and RSA cable.
- EPG mode – built-in program guide.
- PVR mode – recording TV programs using a timer to a USB drive.
- Delayed viewing.
- Possibility of blocking some channels to protect against children.
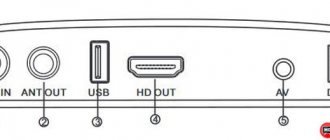
Rear panel of DEXP-HD2991P connectors
To connect to a TV, we need to navigate depending on what connectors it has:
- If there is HDMI, then preference should be given to it. The same thing should be done if you want to connect the set-top box to a computer monitor.
- If you have an RSA or SCART input, you will need to choose regular tulips.
HDMI connection
Example of connectors on the back cover of a Samsung TV
The set-top box usually comes with an RSA cable. Therefore, you will have to purchase HDMI yourself. It costs around 500 rubles.
However, if available, it will allow you to connect even to ordinary computer monitors. To connect, just connect the TV directly and then insert the antenna input into the set-top box. After that, switch to Audio-Video (AV) mode. If connected correctly, the device menu should open.
SCART and RSA connection options
In practice, older TV models usually do not have HDMI connectors. Some models only have SCART. In the first case, it will be enough to use only “tulips” when connecting. They are connected directly by color. 2 connectors usually go to Audio inputs (R and L), the remaining one remains for Video.
- Sorting channels on a Samsung TV
If the TV only has SCART, you should purchase an additional SCART-RSA adapter. It's not difficult to find. It looks like this:
Setting up 20 channels on a DEXP digital set-top box
After the device is connected, you need to perform an initial search for channels. With proper configuration and antenna selection, the device should find up to 20 free digital broadcast channels. The sequence of actions to enable and search is as follows:
- We turn on the TV and set-top box to the network.
- Select the display mode in the TV menu. It is selected depending on how the device was connected. If it is HDMI, then select the mode corresponding to it; in the case of tulips, you need to set it to AV. An example of selecting a display mode on a Supra TV
- After this, the console menu should open. In it we indicate the display language and country. After which you will be prompted to automatically search for channels. Click OK and wait for the device to independently select for you the frequencies available for reception. At the end, the set-top box will exit on its own and save the list.
Manual search
In most cases, the manual search mode copes with its task and, with the correct choice of antenna, finds the entire available list of TV channels. However, in practice, there may be times when it will be necessary to reconfigure everything manually. To do this you should:
- Find out the digital signal reception frequency for your broadcasting region. To do this, you need to go to the interactive CETV map and select the TV tower closest to your home.
- After this, in the device menu you should select the “Search for channels” section and go to manual search.
- In the window that opens, you should set the channel number and make sure that the signal strength has appeared.
- This should be done for both multiplexes.
You can change the list of found channels, set their order, etc., through the program editing section. When you log in, you will be prompted to enter a password. If you have not done this before, it will be: “ 000000“.
Editing modes in the engineering menu
Example 1. How to increase the volume of an incoming call?
To do this, you need to go to the engineering menu, select the “Audio” section, go to the “LoudSpeaker Mode” and in the volume settings select “Ring” - the volume settings for the incoming call. Then sequentially change (increase) the values of all signal levels (level 0 – level 6). Also, for greater effect, you can increase the value of the Max Vol section. 0~160, if it is not the maximum (I set it to 155, with a higher value the speaker starts to “wheeze”).
Example 2. How to increase the volume when talking on the phone? (Increasing the volume level of the small speaker that we put to the ear).
Again, we go to the engineering menu that we already know, press the “Audio” section, go to the special “Normal Mode” mode, select Sph in it - this parameter is responsible for changing the value of all signal levels in the range from level 0 to level 6. Set the desired one for us level. In the Max Vol. 0~160, can also be changed to a higher volume power value.
Example 3. Increasing the volume and sensitivity of the smartphone's conversational microphone
To adjust and set the required volume level and sensitivity of the spoken microphone, you need to go to “Engineering Menu”> “Audio”> “Normal Mode”> select Mic - microphone sensitivity settings, and for all levels (level 0 - level 6) assign one and the same value, for example 240. Now the interlocutor should hear you better.
Example 4. How to increase the audio recording volume during video recording?
Let’s say there is a need to increase the volume level of sound recording when shooting video, then in the engineering menu for our loudspeaker (LoudSpeaker Mode), change the microphone sensitivity settings (mic), increase all values at all levels (level 0 – level 6), for example, set to 240 at every level. I remind you to press the (set) button - reboot your favorite gadget and rejoice.
By the way, do not forget to press the “Set” button after each edit of a certain parameter. This action should capture and accept your command. Otherwise, the user-specified parameters are not activated. In addition, a certain number of mobile devices require a reboot for the changes to take effect (turn off and on the device).
Good luck in your experiments, if something is not clear, write in the comments. We are waiting for your answers.
If Dexp doesn't find channels
To enlarge the photo, click on it.
During operation, various difficulties may also arise, due to which the set-top box may not find channels or not see the TV. In this case, there are several obvious solutions.
Can't find channels / Searches less than 20
- Check again that the device is connected correctly. Some adapter or cable may fail.
- Make sure to select the correct antenna. The greater the distance from the TV tower, the stronger it should be.
- Try retuning channels manually, making sure that the signal strength is available.
The set-top box does not see the TV
- Check your connection method again. Check to see if you have selected the display mode correctly. If the set-top box is connected via an HDMI cable, then you should select this mode on the TV. For RSA, you need to go to AV.
- The image plug may fail. This often happens on tulips. The third wire, responsible for Video, fails and as a result the picture is not displayed.
The console constantly reboots and turns off
The reason for this problem is software errors. It should be updated and the device should be flashed. This can be done via USB. To do this you need:
- Write the firmware file to a flash drive with a capacity of up to 4GB. You can download it on the official Dexp website.
- Insert it into the device and go to the “System” section.
- Click on software update and then select the previously recorded file.
- Once the installation is complete, the set-top box will reboot on its own.
If the remote control does not work
If there is no signal at all, you should replace the batteries with new ones. If the problem does not go away, then most likely the remote control is faulty and should be replaced. On some TVs, there may be a problem in which some remote control buttons will not work. For example the volume button. In this case, you can try to flash the console.
Ways to increase volume on Android
Using the settings menu
I want to start with the basics, despite possible objections... (there’s just a little confusion with this, so it’s clearly worth mentioning).
Volume adjustment in Android (when you press the side buttons on the phone body) can be done both for a specific application separately and globally (overall volume). For example, if you are watching a video and turn up the volume, the volume in this particular application will increase, but your call volume will not increase!
Volume buttons (classic Android phone)
In general, for detailed sound settings on Android devices, you need to open the settings, the “Sounds and notifications” section and then move the slider to the right for the desired line (for example, you can change the volume of the ringtone, notifications, music, video, alarm clock, etc.). See screenshot below.
Ringtone, alarm clock, etc. (volume adjustment on Android)
With the help of special applications
Other entries:
- How to set up and use torrent on Android (or how to download torrent files from your phone)
- I can't log into my Steam account, what can I do?
- 5 ways to take a screenshot on a laptop
- CPU load when the computer or laptop is idle (the MsMpEng.exe process loaded the CPU up to 30-40%)
- The fastest and most reliable antivirus for Windows 10 - according to independent tests
- The router does not distribute the Internet via Wi-Fi [solution]
- How to enter BIOS/UEFI on HP laptops
- How to find out what video card I have: determining the model to search for drivers
Sources used:
- https://gadgetmir.org/faq/nastrojka-gromkosti-s-pomoshhyu-inzhenernogo-menyu-na-android.html
- https://telev-sat.ru/publ/kak_nastroit_televizor_dexp/1-1-0-63
- https://ocomp.info/kak-uvelichit-gromkost-na-androide.html
Reviews on the DEXP set-top box
Dexp consoles were among the first to appear on our market. With the advent of the first multiplex, their cost was slightly above 1000 rubles and for most models remains the same.
On the Internet you can find many reviews of these consoles. When choosing, we advise you to focus primarily on newer models, for example 2991 and similar ones. The fact is that not everyone can update consoles. As a result, there may be problems with the software when connecting to the TV. It will simply refuse to work with this console or will do it incorrectly.
Another advantage of the new models is more stable elements. According to reviews, some models begin to make noise or burn out after 1-2 years of operation. This is primarily due to the use of cheap components. On the same 2551p this problem has already been fixed.
Thus, in general, users are satisfied with this set-top box. If the antenna is configured correctly, it is capable of picking up all digital channels available in broadcasting.
The main advantage of the Dexp set-top box is the price-to-feature ratio. The manufacturer has equipped the receiver with wide functionality, and its setup does not require special knowledge, just follow the instructions. In this article we will look at how to connect and configure a Dexp set-top box for digital TV.
Broadcast standard
Before you start setting up digital television, you will need to determine which broadcasting standard is appropriate to use: it can be cable, satellite or terrestrial format. Since most modern TVs are already equipped with built-in receivers and decoders, you may not need to buy additional equipment. For a cable connection, you must purchase an access card and modulator from your provider and pay a monthly subscription fee.
Checking DVB-T2 on the device
Before purchasing a receiver, it is important to make sure that your TV supports DVB-T2. For this:
- Read the instructions included in the kit. All the characteristics of the TV are indicated there.
- Use the Internet by going to the manufacturer’s official website. Find your device model and view the settings.
- Via Yandex.Market. Enter the model name in the search bar, go to the page with your TV and in the parameters tab, find the “DVB-T2” item.
Internet connection
Before connecting, make sure that your DEXP Smart TV has the ability to connect to the Internet; this information can be found in the TV’s passport.
To connect the Internet to your Desktop TV, choose the convenient option of connecting Wired and Wireless using Wi-Fi technology. You must have high-speed Internet, otherwise the video you are watching will constantly freeze.
When connecting via an Internet cable, you must connect the cable from the router to the LAN connector on the back of the TV.
Press the Menu button and select the desired Settings section.
Select the Network item.
Next, go to the network configuration and do several actions.
Selecting the connection type ethernet or wireless, select the option we need. If you chose wired, the TV will automatically connect to your network.
When choosing Wireless, you will need to find your network from the list of found Wi-Fi and enter the password for your router to connect.
If you did everything correctly, you can immediately access the Internet from your Smart.
How to connect a Dexp set-top box to a TV to receive digital television
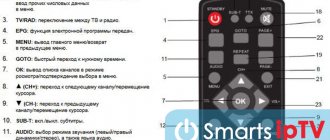
First, disconnect the devices from the power supply and check for batteries in the remote control (remote control) and familiarize yourself with the designation of the keys.
Why YouTube doesn’t work on a Samsung TV: reasons, what to do?
Connecting the device
The receiver comes with the necessary cables, with the exception of HDMI. Depending on what inputs your TV is equipped with, make the connection:
- If there is an HDMI connector, use the appropriate cable.
- If this input is not available, you will have to use tulips - RSA, they are included in the kit.
Further configuration of the set-top box is carried out using the remote control. Let's look at each stage in detail.
Initial settings
After the connection procedure, you need to select the source on the TV. When you turn on your device, select the input you want to use. For example, HDMI or AV. Next, the receiver menu should appear on the screen, where you should:
- Specify language.
- Select country.
- Click on “Auto search for channels”.
The list will display the found channels; to view and configure, use the keys on the remote control. You can also start a manual search for TV channels.
Initially, it is worth noting that the receiver is able to independently detect available channels for viewing. In some cases, a manual search may be required, then go to the settings and in the “Search” section, select the appropriate function.
How to set up Smart TV
After connecting to the network, downloaded applications for surfing the Internet will be available to you. The Dexp Smart TV TV has a remote control with a button for direct access to the YouTube application and a HOME button to exit to the Smart TV menu with available applications. This model also has a browser; you can connect a keyboard and mouse to view any website. In the app store you can install IP-TV Player and much more.
After purchasing a new TV, there is a need to configure it. Initially, you need to connect the device to power. Helpful recommendations for setting up the initial settings will appear on the screen. In the menu you will need to set the brightness, contrast, color saturation of the screen, you can also adjust the sharpness of the image and sound. After setting up the basic parameters, you should move on to connecting digital television.
How to set up your TV to receive a high-quality signal - we’ll figure it out further.
Basic Operations
Basic operations and settings include the following categories:
If you have any questions or complaints, please let us know
- Program Manager.
- Image parameters.
- Search for TV broadcasts.
- Time settings.
- Language options.
- System settings.
- USB.
Below we will analyze each category in detail. To go to a specific settings tab, press MENU on the remote control and use the keys to select the desired section.
Program Manager
In this category, you can edit the list of channels or view the TV broadcast schedule for the near future. The editor allows you to:
- Add channel to favorites. To do this, use the FAV key. To exit the settings section, press EXIT on the remote control. When you exit, the system will prompt you to save your changes. To quickly turn on marked channels, press FAV and select from the list.
- Block unnecessary broadcasts or delete them altogether. Please note that the system will ask you to enter a PIN code, enter 000000. To delete, press the blue button, and to block the yellow button.
- Move channels. Select the desired broadcast, click on the green button and move.
How to connect and configure digital channels on a Denn set-top box
In the sorting section you can sort your broadcasts by:
- Name.
- Number.
- ONID.
Image Settings
This category allows you to change the format, resolution or determine the aspect ratio of the demonstration. Use the keys to make settings. The following options are available in the aspect ratio tab:
- 4:3.
- 4:3 full screen.
- 16:9.
- 16:9 Wide.
- 16:9 Panoramic.
Available in resolution:
- 80i/480p for NTSC.
- 576i/576p for
- 720p/1080i/1080p.
It makes no sense to determine which resolution and format is the best. The user must independently select the ideal image size, taking into account the features of the TV. To exit, use the EXIT button and confirm the operation at the end.
Search channels
This category is located in the menu tab and offers the following settings:
- Automatic search. Click OK and wait until the system automatically detects all available broadcasts.
- Start a manual search. Use the arrows on the remote control to select the channel frequency, and when found, press OK.
Setting the time
In this tab you can:
- Set the time manually or set it to automatic detection.
- Specify the region of residence for which automatic time will be set.
- Set the time zone.
- Activate the TV's automatic shutdown feature.
Setting options
Built-in functions and options do not require additional settings. The system installs them by default. That is, you can easily use all the features of the device.
System Settings
The following functions are available in the “System” tab:
- Parental control. Set restrictions on viewing certain channels. When activating the option, you may be required to enter a password. Enter six zeros.
- Set a password for certain applications.
- Reset settings to factory settings. This option is only necessary in extreme cases, for example, in case of a system failure. After the reset, you will have to re-set up the set-top box and search for channels.
- Software update.
- Familiarize yourself with the basic information – software shell and updates.
DEXP 42A8100
Hello, can you tell me how to set up digital channels on a DEXP TV? We are unable to set them up and catch them.
Answers 8
Try to perform an automatic search (you have a manual search mode in the photo and for this you need to know the broadcast frequencies)
We tried auto search, but it only searches for analogue channels.
Did you switch the tuner mode from cable to antenna? In cable mode, a DVB-C tuner may be used, but DVB-T2 is needed.
What options are there in the advanced settings? The interface is just a little different
For some reason, additional settings are not available; you simply cannot enter them.
No, we haven't tried it.
you need to find the tuner mode
Yesterday I bought a Dexp F22B7000E/B LED TV, I spent a long time figuring out the settings myself and by nightfall I had more or less set up the TV, read the instructions, it helps a lot), and so, let’s go:
Settings – Channel, do an auto search for all ATV (analog), DTV (digital) channels, wait for the end of the download (search), if someone doesn’t have a TV tuner, then for digital DTV channels, in TV mode we set the cable, not the air, but the cable , broadcast for analogue ATV.
Manual search for DTV: in DTV, press enter and do a start or search, as you wish.
Channels, frequency, band, we don’t do this, we go to the search for channels, do a start or search and Digital TV channels work for us.
For Analog ATV we do the same thing, only in TV mode. business broadcast.
To search for ATV and DTV we do an auto search.
When you bought household appliances, always read the instructions, with it you will understand a lot, not everything, but a lot.
Possible problems and their solutions
Sometimes users encounter problems while using the receiver. Some faults are caused by cable damage, while others appear after a system failure. Let's look at common mistakes and solutions.
Dxp box does not find channels
The set-top box refuses to detect TV channels? The main reason is a software glitch. But first you should check for new updates. To do this, go to the “System” section in the menu and click on the corresponding item. If this solution doesn't help, try resetting the settings in the same category. But, after this, you will have to carry out the settings again - set the time, time zone, start auto search, etc.
Does not respond to the remote control or the button does not work
If the set-top box does not respond to the remote control, please note:
- The batteries are probably dead.
- At a distance. You may be trying to use the remote control at a great distance from the console.
No signal
Basically, this error occurs due to a damaged wire. Check the integrity of cables and connectors. But the reason may also be hidden in the provider. Contact technical support and find out if scheduled maintenance may be underway.
ohdpluginlibrary application error
Causes:
- The TV software does not support this application.
- A software glitch has occurred.
- A new software patch prevents the app from working.
Solutions:
- Reset parameters to factory settings.
- Deleting an application.
- Changing the TV firmware.
Can't select display mode
The DEXP set-top box for digital television has different display options in its settings. You must select a specific option depending on the supported broadcast standard. For example:
- DTV – for digital TV.
- For analog – ATV.
- When using a set-top box, as in our case, select HDMI or AV.