For those for whom the car has become a second home, for those who cannot live without a TV, and for those who like to install electronic devices in the car - DEDICATED.
Now that digital television has firmly established itself on the airwaves, watching TV shows while traveling by car does not present any particular problems; it is enough to purchase a TV for the car, a special car DVB-T2 receiver and an antenna - That’s how it is - BUT! There is always this same thing - BUT!
I’ll give just a little theory, not even a theory, but an easy excursion into the basics of digital television reception.
DVBT2 standard. Appeared in 2009, which replaced DVB-T. DVB-T2 is 2 times more efficient than the old DVB-T and 16 times more efficient than analogue television. It is understood that DVB-T2 allows you to transmit 16 programs, DVB-T transmits 8 programs, and analog - one in the same frequency range. A DVB-T signal and an analogue television signal will behave completely differently when moving away from the television signal translator. If we imagine that we are driving a car, in which digital and analog TVs are installed, connected to the same car antenna, on a completely flat area without trees or buildings, and the television tower broadcasts two signals to us - analog and digital DVB-T2. We will see how the digital and analog signal will change as we move away from the transmitting station. As long as we are in the zone of reliable reception, digital television will work stably, regardless of whether the car is moving or standing still. At a speed of 100 km/h, sometimes there may be picture disruptions (features of digital TV in a car). Analogue television works well only if the car is stationary. When moving, the image in an analog signal may become cloudy, split in two, color disappears, and other defects arise. When our car leaves the zone of reliable reception, we will find that the digital signal has disappeared and crumbled into “squares”. In this case, it will still be possible to receive an analog television signal, but as you move away from the television tower, the signal will become worse - white and black dots will appear on the TV screen, the color will completely disappear, and the sound will be disrupted. This is the peculiarity of digital television reception: either it is there or it is not. When analogue television disappears gradually, digital television stops working immediately after leaving the zone of reliable reception. When a car is driving in a city, digital television reception is complicated not only by the fact that the television signal is shielded by buildings and other cars, but also by the fact that the car changes its trajectory, turning in different directions. I would like to note right away that the so-called reflected signals (a signal that is reflected from various obstacles, a house, etc.) are not an interference for digital television receivers, unlike analog television.
Car antenna
To receive a television signal in a car, an antenna is usually used, which is mounted on the windshield or rear window. These antennas are a frame, or a two-way dipole,
If you install four such antennas on the front, rear and side windows, this will significantly improve the quality of the received signal, especially when the car is moving. You can use antennas with a circular radiation pattern - the Crown antenna. In this case, one antenna is sufficient. Such antennas include a ring dipole and a vertical rod. Here you can find tests of the most common car antennas.
In conclusion, it remains to conclude:
1. Receiving digital television in a car while driving and in a parking lot is quite possible if equipment (antennas) is installed that can provide a circular radiation pattern.
2. The quality of reception can be improved if you use active antennas ( with a television signal amplifier ).
3. The quality of reception depends to a lesser extent on the model of the digital receiver, since there is a sensitivity standard for DVB-T2 digital television receivers.
Modern life is quite difficult to imagine without television. Watching television programs has become an integral part of everyday life. Many people use auxiliary devices to follow their favorite programs and series everywhere, for which a car TV tuner was created, which allows you to enjoy your favorite channels in your car. In this case, it is necessary to consider what digital television for a car is, and also find out about a common equipment model - the dvb t2 tuner.
TV holder for car: 3 best options
Car mounts are universal and can be configured for various equipment, including televisions. We present you three popular models:
- SATELLITE-90 . Universal holder for the windshield, suitable for small-diagonal TVs, PDAs, tablets, navigators, smartphones;
- Vogels EMC 5000 . Mount for LCD TVs and DVD players , installed in the car in just a few seconds and without much effort. It is possible to adjust the tilt angle, which optimizes the ideal position for the TV in the car.
- SATELLITE-91 . Another universal mount. Suitable for iPad, Android tablets, TV and other equipment on the seat headrest.
Dear drivers, remember that the source of joy and fun in your car should not cause an accident. Use the services of car TVs exclusively in parking lots, and while driving, give this leisure time to passengers.
How to choose a TV tuner in a car
In order to choose a TV tuner for a car, you need to follow a number of recommendations. Let's consider the basic rules that allow you to choose a reliable and high-quality digital TV tuner:
- First of all, you need to select receivers that are compatible with the device present in the vehicle.
- It is also necessary to take into account the cost (good and high-quality devices will not have a low price).
- It is important to choose a device that provides a high-quality signal in any terrain.
- You should also select devices of the appropriate brand, which is well-known and enjoys at least some popularity.
- For high-quality images, it is recommended to choose devices that adhere to the dvb standard.
- You should also decide for yourself which device to choose (a stand-alone TV tuner or one that constantly consumes power).
- It is important to pay attention to the connection (some devices are made in such a way that it is extremely difficult to understand their installation).
In this video you will learn how to connect a TV tuner: In general, a device such as a TV tuner for a car radio is a wonderful device that you can connect and configure yourself, however, so that later operation does not distract from constant configuration, it is recommended that you first familiarize yourself with user manual.
Important. When choosing a car radio with a TV tuner and navigator, it is also important to take into account the built-in software, since there are often cases when you come across copies that are not adapted to the Russian language.
Digital
Before considering the connection, as well as answering the question of how to connect such a device in a car, you should familiarize yourself with the most popular digital models, namely their characteristic differences:
- for these models, both autonomous power supply and reception of electricity from the source are provided;
- digital models are equipped with a powerful signal receiver that receives a large number of television channels;
- these models come with all the necessary connectors to be able to provide power and connection to any receiver;
- there is also a fairly simple setup system that allows you to quickly find all channels and save them in memory;
- the difference between digital devices also lies in their memory (there are devices capable of storing a large number of channels);
- depending on the selected digital device model, a standard remote control is included;
- Also, if necessary, you can always use manual tuning to select the optimal broadcast range with your own hands.
All equipment settings are carried out on the monitor display, which acts as a TV. Here, a regular widescreen radio can act as a translator, provided that it is equipped with the appropriate outputs.
Important. When choosing a digital device, you should first check the outputs present on the car radio or portable TV model installed in the vehicle.
DVB t2
Modern television broadcasters are designed to receive various image formats. Here, a lot depends on the quality of the transmitted image, as well as the broadcast sound. In this case, for vehicles, a type of format such as DVB T2 is often used. This standard requires consideration in more detail, since it is characterized by the following distinctive features:
- this is an improved decoder model that replaced the previous generation format;
- This format is characterized by high channel capacity, which allows you to transmit widescreen images;
- when choosing a digital device, you should find out in advance that it supports this broadcast standard;
- Such a decoder is characterized by an improved signal with a modified architecture, which older devices cannot reproduce;
- Also, you should pay attention to the sound, since here it has improved parameters;
- It is additionally important to ensure a high-quality connection, since much depends on the power supply.
Don’t forget to find out about the broadcasting standard
. For the formats of this sample, it is important to select the appropriate conductors that will properly power all components of the system, and also allow the signal to be rebroadcast.
Important. If you are independently installing digital TV tuners with a broadcast picture in DVB t2 format, you must properly approach the installation and location procedure, since the overall performance of the entire system directly depends on this moment.
Inexpensive model with a navigator: which one to choose?
A practical option for little money is a navigator with a TV tuner . We recommend taking a closer look at the Treelogic TL-7007BGF AV ATV GPS navigator model.
The smart device can transmit information about traffic jams via GPRS connection to the Internet via a Bluetooth module. The navigator comes pre-installed with maps and an analog TV tuner. Compared to a car TV, Treelogic will cost you several times cheaper: the price of the device is only 4,500 rubles .
We advise you to buy a navigator separately from the TV: after all, the devices have different purposes, and there is no point in mixing them.
pros
- Memory card slots
- Bluetooth
- Ability to view 3D maps
- Possibility of connecting headphones
Minuses
- Inadequate operation of the tuner
- Small screen size
- Quiet microphone
- Watching TV is difficult for rear seat passengers
The satellites are held and caught with a solid four. An order of magnitude more sensitive than mobile phones. The TV receives up to 20 channels. The quality is not so great, but the picture is colorful and quite clear. At minimum volume the sound is too strong, and the microphone, on the contrary, is weak.
Installation
Installation of a TV tuner in a car is always accompanied by configuration, since installation involves the complete installation of the receiver in the car, verification and a trial test. Let's take a closer look at how this device is installed in your car in practice:
- The first thing you need is to choose a suitable place for the receiver, as well as the tuner, in the car.
- The next stage will be a test connection, as well as startup and diagnostics of all equipment for operability.
- After everything is connected and confirmation of functionality is received, you need to proceed to the installation.
- The system elements are located as far as possible from all electrical appliances of the vehicle.
- Leave enough space between equipment so that the wires do not have to be pulled.
- Next, all components are fixed using fasteners in places prepared in advance.
- Subsequently, the power and connection are pulled so that there is no easy access to it.
- After connecting the system to power, another test run and performance test are performed.
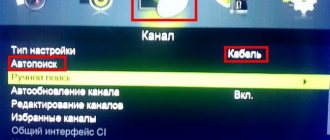
At the end of the installation, you need to configure the channels; for this, the digital receiver is converted to the appropriate format, which is also set on the radio or TV. An automatic or manual search for channels is performed, as well as their subsequent saving in the device’s memory.
Important. When setting up the equipment, it is recommended to use the recommendations of the user manual. This will allow you to complete the installation step by step without missing important points.
Few people remember the times when only wealthy people could afford a television. Today, such a “miracle” of technology is an integral element of every home, and some houses have a unit in almost all rooms. During their technical improvement, televisions have come a long way from large devices to compact, flat screens of various sizes that take up virtually no space in the house and fit perfectly into any interior. Watching TV programs and favorite films is an excellent opportunity for many to pass the time and escape from everyday problems. For busy people who have vehicles and are constantly on the move, an excellent alternative to watching TV at home is to install a TV in the car. This option is not a democratic solution, but it already has its supporters among car owners. In this article we will tell you how to install a portable TV in a car, focusing on the most convenient and practical places for its installation.
What to look for when choosing
There are certain recommendations that must be followed when choosing a car TV.
If you follow these rules, rest assured, the device will serve you faithfully for many years. TV viewing angle
Be sure to pay attention to this detail before purchasing. The device must be clearly visible from all seats of the car. Screen sizes
Car TV monitors range from 7 to 40 inches. If you choose to purchase for a passenger car, then you should purchase a device with a diagonal of 7 to 17 inches. Mobile or landline. Mobile TVs are connected to the cigarette lighter socket, and stationary ones are connected directly to the car's electrical network. Antenna. All car devices are equipped with built-in antennas; they usually receive from towers or repeaters within the city and in areas close to the city limits. During a long trip, we recommend purchasing an external antenna with an amplifier.
The need for installation and installation features of a TV tuner
Until recently, a TV in a car allowed drivers to realize the opportunity to watch exclusively analogue broadcasting, which has significant disadvantages: reception of only a few channels, low image quality, absence of a picture or its transmission with interference in places saturated with infrastructure or when the TV is turned on in high-speed driving mode. Such shortcomings called into question the rationality of installing a car TV in transport. Nowadays, the problem with the quality of television broadcasting in a vehicle is solved by purchasing a receiver designed to be able to watch TV with decent performance, a variety of channels, in digital format. Purchasing and installing a tuner allows you to solve problems with interruptions in broadcasting, the number of received channels, and the variety of receivers on the modern market allows you to make a choice taking into account the type of video system in the car and the number of monitors expected to be installed.
Professionals recommend installing the purchased car tuner in specialized service centers, however, its installation is not characterized by significant difficulties, which allows you to carry out the work on your own. The choice in favor of installing a receiver in a service center should be given to the owners of new cars: the owner will be able to receive an official certificate of installation of the device, which allows them to avoid removing the car from the warranty. Let's take a closer look at how to connect a tuner in a car with your own hands, presenting step-by-step installation instructions:
- Initially, before carrying out work that involves interfering with the electrical wiring of the vehicle, it is worth turning off the power to the battery.
- Select the location where the digital set-top box will be located. It is often mounted in or under the glove box. When choosing the location of the device, it is important to focus on the absence of the likelihood of moisture and dirt getting into the area where it is placed.
- Using the fasteners supplied with the receiver, secure the device in the designated place.
- Power to the device can be supplied from the fuse box by connecting the cable to an additional twelve-volt connector.
- It is better to place the infrared unit, designed to receive a signal from the remote control, in an accessible place so that it is convenient to turn on the device from anywhere in the car.
- If the receiver comes with antennas, they must be firmly secured to the windshield inside the car, laying wires from the tuner to the antenna.
All that remains is to decide on the model of the LCD monitor, install the TV in the car, connect it via a digital tuner and watch the desired programs and TV shows in ideal quality. To make the whole structure look presentable, all the wires used when installing the tuner and connecting the screens should be hidden under the vehicle's trim.
Best built-in TV
Many users call the Prology PCM-750T the best
The model is a motorized car TV with an LCD display, a touch panel and a TV tuner. It is distinguished by a telescopic antenna, two audio and one VGA video inputs. Color broadcasting , to the delight of film fans, is carried out in three formats at once. The PCM-750T is controlled from the panel and from the remote control . When parking, it automatically switches to the rear view camera. The viewing angle is 130 degrees vertically and 100 degrees horizontally.
The average price of the device is 12,900-13,000 rubles.
Prology PCM-750T has a cheaper analogue costing 8,000 rubles - Mystery MMT-8120S .
pros
- Mirror image function
- Fasteners included
- Monitor connected to a computer via USB
- Touchscreen
Minuses
- Calibration gets lost periodically
The best 0.5 din motorized device. I've been happy with it for two years now, no problems arise in hot or cold weather. I give it 5 points!
Location and installation of monitors inside the car
The market for automotive products, including additional equipment for cars, is very diverse, and before choosing a specific model of a vehicle monitor, it is worth deciding on the car owner’s preferred location for its placement. The most common locations for installing a monitor in vehicles are sun visors, headrests and the ceiling area of the car. Each of the placement options has both advantages and certain disadvantages. For example, installing a monitor in the headrests of the front seats is relevant for car owners who constantly drive with passengers in the back seat, however, viewing even a “glimpse” of an interesting program is initially excluded for the driver. If you want to install a monitor in this way, for ease of use and aesthetic balance of the interior, you will need to buy two screens, and the size of the display is determined by the dimensions of the headrests themselves.
The advantage of overhead monitors is a decent range of product selection based on display parameters, a wider viewing angle, which allows even the driver to watch TV, although not while driving. Another advantage of this installation is the ability to fold the monitor level with the ceiling when there is no need to turn on the TV. Sun visors are the least popular location for the monitor, since monitors of small parameters are installed in them, which reduces the ease of viewing programs for both passengers and the driver. Only after weighing all the pros and cons, having decided on the driver’s reference area for placing the device, should you begin to select it, since this criterion directly affects the monitor model required by the car owner. For a specific installation location, it is planned to purchase a suitable modification of the monitor. Let's take a step-by-step look at how to connect a TV in a car, focusing on the most popular and convenient locations: in the headrests and on the ceiling.
Mounting a TV screen in a headrest
Before purchasing a TV screen for a car that is supposed to be installed in the headrest, it is important to measure the dimensions of the headrests themselves so that the display parameters are slightly smaller than the diagonal of the area where the devices are located. Professionals do not recommend installing TVs on the headrest whose dimensions exceed the parameters of the upper part of the seat, since any unsuccessful movement by the front passenger or driver can cause mechanical damage to the screen. In addition, a larger TV screen than the seat headrest will have a negative impact on the interior of the cabin. The process of mounting a TV is not particularly complicated, however, it requires accuracy and scrupulousness from the performer so that the result of the work is not only technical success, in the functioning of the monitor, but is also positioned positively from an aesthetic point of view. To work, the performer will need, in addition to monitors, the following tools and materials:
- Felt pen or marker.
- Screwdriver Set.
- Wiring insulation tape.
- A knife, cutter or other device with a sharp blade for cutting out an opening for the monitor.
- Technical glue.
After preparing all the necessary materials, you can begin to work, carefully following the instructions for mounting the TV in a car headrest:
- The first production necessity is fitting the monitor to the headrest and applying contour markings, which predetermine the area where the screen will be installed. To do this, you will need to draw the boundaries of the future opening for the TV on the headrest, leaning the screen tightly against it.
- Next, you need to remove the headrest from its regular place, since cutting work directly in the car will be inconvenient.
- The upholstery is removed from the headrest after first making shallow punctures in the corners around the perimeter of the area for installing the screen. This can be done using a regular needle.
- According to the marks, the outline of the opening for the TV screen is drawn on the headrest and a blind hole is cut out, the depth of which should be equal to the thickness of the TV.
- After trying on the screen, making sure that it fits smoothly into the recess, it is worth making another opening, this time through, to lead the cable from the monitor to the tuner.
- The next task: cut a slot similar to the size of the screen on the headrest upholstery, according to the markings made earlier. You need to cut the hole a little smaller, leaving about half a centimeter on each side, in order to wrap the upholstery inside when mounting the TV screen directly: this approach will allow you to hide the trimmed edges of the upholstery, which will affect the presentation of the installation.
- Next you have to put the upholstery on the headrest, wrap its edges inside, after making small cuts at the corners of the opening.
- The monitor is secured in the mounting location using technical glue or reliable double-sided tape. It is important to fasten the TV screen securely to eliminate the possibility of it falling out during operation of the machine during sudden braking or extreme maneuvers.
To get an image on the TV, all you have to do is connect the cable from the monitor to the tuner, and connect the adapter to the cigarette lighter.
Installing an overhead car monitor
Installing a ceiling-mounted TV falls into the category of more complex tasks. To install the monitor, the contractor will need to partially dismantle the trim on the ceiling of the car to free up the section of the roof where the screen will be directly installed. Next, you need to start making the plate on which the car ceiling-mounted TV will be mounted, or installing it if it was prepared in advance by the car owner. The plate must be sized to match the base of the purchased device and is made of plywood or metal, with experts leaning towards the latter option to ensure sufficient stability and reliability of the final structure. It is necessary to fix the platinum on the reinforcing ribs of the ceiling with self-tapping screws or self-tapping screws, acting with extreme caution so as not to perforate the roof with fasteners. The base of the TV is attached to the installed plate using the hardware supplied with the device: the monitor itself will subsequently be connected to it.
The next stage of work is connecting and checking the operation of the device. The process is carried out according to the instructions of the TV manufacturer, using the supplied wires. You can supply power to the device either by connecting the wires in the engine compartment or from the cigarette lighter, after installing a special adapter in it. When connecting electronics, you should be extremely careful, since incorrectly connected wiring can result not only in damage to the device, but also cause a car fire. If you do not have experience working with electrical wiring, it is better to entrust this work to professionals. After connecting the device, you need to check the functionality of the TV, then disconnect the connectors and begin installing the ceiling lining in its original place. During the installation process, it will be necessary to make holes in the casing for the installed wires, which requires precise measurements and scrupulousness so as not to make unnecessary openings and spoil the ceiling covering.
The final stage of work: connecting the disconnected connectors and final checking the effectiveness of the installation. If the work on installing the casing was carried out carefully and without haste, then the likelihood of unpleasant precedents, with the device not working properly, is reduced to zero.
Choosing a ceiling TV for a car
When deciding to go with a ceiling-mounted TV, ask yourself one question: what purpose do you plan to use the monitor for?
If your weakness is TV shows and game consoles, then models with 4:3 screen sizes are the ideal solution. But for movie buffs, monitors with an aspect ratio of 16:9 are more suitable. Reviews from owners make it clear: it is equally important to have a transparent coating on the monitor, otherwise glare from the sun will begin to “play” on the TV.
We suggest you consider the Envix D3122T/D3123T model. The car TV has a DVD player and an analogue tuner, differing in resolution. The device interface consists of two composite video inputs on a coaxial cable and one output. MPEG and WMA supported. When purchasing a device for 22,990 rubles, the buyer will receive two memory cards, a remote control, headphones and lampshades.
pros
- Russified menu
- USB port
- High quality build, durable body
- Wide viewing range
Minuses
We bought the Envix D3122T recently, but we were already convinced that we made the right choice. The build quality is decent, the TV is easy to use, and the screen rotates in both directions. The device reads all popular formats. The TV tuner receiver leaves much to be desired, but that doesn't matter. No glitches were noticed, I am completely satisfied with the purchase.
Let's sum it up
Having decent quality TV in the car is no longer a myth, and modern technological solutions allow you to watch TV in excellent quality while on the go. The most relevant installation of a TV in a vehicle is for car owners who spend a lot of time in the car, regularly go on business trips in their car, or often travel with friends or family. To receive reliable and high-quality television broadcasting, the car owner will have to spend money on purchasing a tuner and a car monitor, while installation of the devices can be successfully completed independently, according to the device manufacturers’ manuals and detailed instructions presented in this article.
TV in the car on the headrest: which one is better?
AVIS AVS0944BM is a leather-covered design consisting of an LCD monitor, MP3 player and adjustable legs. Suitable for any car, although it is not attached to the headrest, but instead of it . The design of the device is elegant, presentable and will not leave almost anyone indifferent.
The AVIS interface includes a Mini Jack (3.5 mm) connector for audio and video, two RCA inputs. The system is controlled using a touch panel or remote control. The standard price for a mini entertainment center in a car is 9,600 rubles.
pros
- Catches FM waves
- Availability of games
- Possibility to use headphones
Minuses
- No DVD player
- Viewing is available for two rear row passengers
The system is convenient, presentable, I really liked it. But, unfortunately, it attracts thieves.
Criterias of choice
The choice of device should be based on the nature of its use. Its characteristics, installation location, required additional functions, etc. will depend on the tasks of the device. There are several main purposes for motorists when purchasing a car TV:
- entertainment for the driver in traffic jams or when idle for a long time;
- as a parking sensor monitor or recorder to assist the driver;
- the need to keep abreast of world events - watching news channels;
- cartoons, films, videos and games for children in the back seats;
- for the passenger next to the driver;
- for everyone in the cabin;
- only watching programs and videos;
- the ability to play games;
- working with the Internet on the monitor.
The next important selection criterion is the installation location. It depends on who will be the main viewer and for what tasks a TV tuner is needed. For example, for cartoons and children's games, a mounted, built-in headrest or ceiling-mounted car TV is enough to keep a child occupied. To work with the Internet, the passenger in front needs a monitor on the dashboard on his side. For the driver to watch movies and TV shows - on the dashboard, in the rearview mirror or sun visor, to control parking and record the recorder - on the dashboard or panel.
Pay attention not only to the price, but also to the screen parameters and antenna quality. A bad screen, on which nothing is visible in the sun, with a grainy image, which does not read half of the required formats, and which requires viewing at close range due to a small angle, will be a waste of money
A bad standard antenna will require the purchase of a remote receiver with an amplifier.
Trust companies that have proven themselves in the global market. The chance that Prology or AVEL will fail is less than that of an unknown Chinese brand. It is better to start shopping on marketplaces like Aliexpress after carefully studying the reviews, seller ratings, return policy and money.
When reading reviews, studying videos with reviews and articles with ratings of models, remember that you need to pay attention to the facts, follow the technical characteristics, remember that they often don’t write about the good - they just use it, but write about the bad. Therefore, it is necessary to filter information, separate emotions from objective data
Method of administration
- Built-in analog receiver. The weakest and most unreliable option. It perceives the signal well only near the source, and reacts poorly to movements.
- If the TV is equipped with a tuner, then the reception will be much better, clearer and will take longer. However, despite the signal amplification, the quality will not be very good, since work continues in analog mode. Various external obstacles and interference will play a big role.
- The digital receiver is capable of providing the highest image quality, stability and clarity of the TV. Of course, the new format has not yet covered the whole country, it is not equally good everywhere, but it allows you to watch a large number of channels. And literally every day it appears in new cities. Before buying a device with such a tuner, you should find out exactly how well these devices perceive digital signals in the region.
When leaving the main coverage area, for example, in the suburbs, you may need an antenna for your car TV. It will allow you to pick up signals over long distances.
KARONASTOP - herbal mixture for immunity
Today, the herbal mixture “KARONASTOP” is in great demand. The popularity is justified primarily by the fact that the collection contains 16 herbs, thanks to which the product is able to help maintain immunity, while widely affecting all internal organs. The fame of the healing effects of the drink spread quite quickly, its effectiveness was appreciated by many people, for whom it significantly improved their quality of life and provided significant assistance in supporting the immune system during viral and infectious diseases.
Now this is more important than ever!
- Supports immunity
- The collection contains 16 herbs
which will help restore immunity, provide a full charge of ALL necessary vitamins; will protect you from viruses!
- All plants are collected in the cleanest ecological places!
increases skin firmness and elasticity, eliminates and prevents stretch marks.
Go to the supplier's website
(function(w, d, n, s, t) { w = w || []; w.push(function() { Ya.Context.AdvManager.render({ blockId: 'RA-443800- 13', renderTo: 'yandex_rtb_R-A-443800-13', async: true }); }); t = d.getElementsByTagName('script'); s = d.createElement('script'); s.type = 'text/javascript'; s.src = '//an.yandex.ru/system/context.js'; s.async = true; t.parentNode.insertBefore(s, t); })(this, this. document, 'yandexContextAsyncCallbacks'); (adsbygoogle = window.adsbygoogle || []).push({});
(function(w, d, n, s, t) { w = w || []; w.push(function() { Ya.Context.AdvManager.render({ blockId: 'RA-443800-15', renderTo : 'yandex_rtb_R-A-443800-15', async: true }); }); t = d.getElementsByTagName('script'); s = d.createElement('script'); s.type = 'text/javascript '; s.src = '//an.yandex.ru/system/context.js'; s.async = true; t.parentNode.insertBefore(s, t); })(this, this.document, 'yandexContextAsyncCallbacks '); (function(w, d, n, s, t) { w = w || []; w.push(function() { Ya.Context.AdvManager.render({ blockId: 'RA-443800-11', renderTo : 'yandex_rtb_R-A-443800-11', async: true }); }); t = d.getElementsByTagName('script'); s = d.createElement('script'); s.type = 'text/javascript '; s.src = '//an.yandex.ru/system/context.js'; s.async = true; t.parentNode.insertBefore(s, t); })(this, this.document, 'yandexContextAsyncCallbacks '); (adsbygoogle = window.adsbygoogle || []).push({}); (adsbygoogle = window.adsbygoogle || []).push({}); (function(w, d, n, s, t) { w = w || []; w.push(function() { Ya.Context.AdvManager.render({ blockId: 'RA-443800-3', renderTo : 'yandex_rtb_R-A-443800-3', async: true }); }); t = d.getElementsByTagName('script'); s = d.createElement('script'); s.type = 'text/javascript '; s.src = '//an.yandex.ru/system/context.js'; s.async = true; t.parentNode.insertBefore(s, t); })(this, this.document, 'yandexContextAsyncCallbacks '); (function(w, d, n, s, t) { w = w || []; w.push(function() { Ya.Context.AdvManager.render({ blockId: 'RA-443800-7', renderTo : 'yandex_rtb_R-A-443800-7', async: true }); }); t = d.getElementsByTagName('script'); s = d.createElement('script'); s.type = 'text/javascript '; s.src = '//an.yandex.ru/system/context.js'; s.async = true; t.parentNode.insertBefore(s, t); })(this, this.document, 'yandexContextAsyncCallbacks '); (function (w) { function start() { w.removeEventListener('YaMarketAffiliateLoad', start); w.YaMarketAffiliate.createWidget({containerId:'Televizormarket',type:'offers',params:{clid:2372448,searchSelector: 'title',sovetnikPromo:false,searchInStock:true,themeId:2 },rotate:{marketToBeru:false } }); } w.YaMarketAffiliate ? start() : w.addEventListener('YaMarketAffiliateLoad', start); })( window);
Symptoms of teratoma
Symptoms of the disease can remain latent for a long time, and only become noticeable when the tumor grows actively or becomes malignant.
The large size of the tumor creates a certain pressure on neighboring organs, which as a result are compressed or displaced. For example, a mediastinal teratoma provokes discomfort behind the sternum, a tumor in the lungs causes shortness of breath.
Ovarian teratoma in women is manifested by a feeling of heaviness in the lower abdomen. When the pedicle of the cyst is torsed, symptoms of an “acute abdomen” are observed. In men with a testicular tumor, you can visually notice an enlargement of the scrotum on the side of the tumor. If the pathology is accompanied by pain, then most likely the teratoma has a malignant course.
In children, coccygeal teratoma occurs, as well as teratoma of the sacrum or perineum. The first type of tumor can come in different shapes and sizes. Such neoplasms interfere with the child’s normal life, since it makes defecation and urination difficult, and over time, teratomas can lead to serious complications.
The earlier the formation of the coccygeal teratoma occurred, the more the intrauterine development of the baby is disrupted. When the child is born, he will have noticeable skeletal damage and soft tissue defects.
Tips for choosing
When choosing, we recommend paying attention to several key indicators:
- Viewing angle. The wider it is, the better quality the image will be from many angles. The idea is for the screen to be clearly visible from all seats in the car.
- Screen sizes. Today, the choice of TV ranges from 7 to 40 inches. Try to choose the best option, since devices with a diagonal of 7 to 17 inches fit best into passenger cars. The rest will be too massive and inconvenient, first of all, for the driver.
- Mobility, stationarity. The TV is connected to the cigarette lighter socket, and the main electricity is taken from there. But stationary ones are sent directly to the car’s electrical network.
- Antenna. The built-in ones pick up universal signals. Outside the city they periodically fail. We recommend purchasing additional amplifiers.
Criterias of choice
The choice of device should be based on the nature of its use. Its characteristics, installation location, required additional functions, etc. will depend on the tasks of the device. There are several main purposes for motorists when purchasing a car TV:
- entertainment for the driver in traffic jams or when idle for a long time;
- as a parking sensor monitor or recorder to assist the driver;
- the need to keep abreast of world events - watching news channels;
- cartoons, films, videos and games for children in the back seats;
- for the passenger next to the driver;
- for everyone in the cabin;
- only watching programs and videos;
- the ability to play games;
- working with the Internet on the monitor.
The next important selection criterion is the installation location. It depends on who will be the main viewer and for what tasks a TV tuner is needed. For example, for cartoons and children's games, a mounted, built-in headrest or ceiling-mounted car TV is enough to keep a child occupied. To work with the Internet, the passenger in front needs a monitor on the dashboard on his side. For the driver to watch movies and TV shows - on the dashboard, in the rearview mirror or sun visor, to control parking and record the recorder - on the dashboard or panel.
Pay attention not only to the price, but also to the screen parameters and antenna quality. A bad screen, on which nothing is visible in the sun, with a grainy image, which does not read half of the required formats, and which requires viewing at close range due to a small angle, will be a waste of money
A bad standard antenna will require the purchase of a remote receiver with an amplifier.
Trust companies that have proven themselves in the global market. The chance that Prology or AVEL will fail is less than that of an unknown Chinese brand. It is better to start shopping on marketplaces like Aliexpress after carefully studying the reviews, seller ratings, return policy and money.
When reading reviews, studying videos with reviews and articles with ratings of models, remember that you need to pay attention to the facts, follow the technical characteristics, remember that they often don’t write about the good - they just use it, but write about the bad. Therefore, it is necessary to filter information, separate emotions from objective data
PS
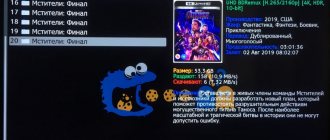
The images on the smartphone screen shown in the topic are only an illustration of the capabilities of the tuner and smartphone display and in no way reflect the political views of the topicstarter or any explicit or implicit pro-Russian propaganda.
Just as the topstarter physically cannot receive broadcasts of non-Russian channels on the monitored device, since the topstarter lives in the Russian Federation and there are simply no non-Russian channels in the 2 Russian multiplexes. This review is pure DIY.
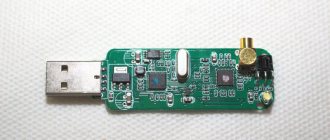
. How to: a) from several components and one finished product (tuner) synthesize a new product with added functionality (external power supply to the tuner, the ability to operate from ≥12 V) b) integrate the resulting new product into the target device (car), as much as possible ensuring that the product meets the requirements of the target application (temperature range and vibration resistance).