Services
There are several options for obtaining a stable TV signal in a car that is in motion.
We will look at 3 main options. 1. Digital television in the car in the DVB-T2 broadcast format.
We install only specialized car TV tuners that work with signals in the DVT-T2 digital standard. This digital format allows you to receive a television signal while the car is moving in good quality.
Broadcasting in this format began several years ago and already covers a fairly large part of Russia and Europe. In the next few years, significant development of coverage in Russia and an increase in the number of free channels are planned.
Advantages of digital television DVB-T2:
- Stable signal reception in urban environments.
- Constant expansion of the DVB-T2 network into the region and regions.
- About 30 free channels (the composition of channels changes periodically).
- Relatively low cost of equipment with installation.
- High reliability of the equipment we install.
- Ability to connect to most standard displays without interfering with the vehicle electronics.
Disadvantages of DVB-T2 digital television:
- Lack of reception in some regions and away from large populated areas.
- Possibility of disruption of reception in dense urban areas due to a large amount of external interference.
- Limited number of channels.
The cost of installation is from 35 to 90 thousand rubles on a turnkey basis, depending on the car. (The price depends on the need to install additional interfaces connecting the TV tuner with the standard system).
2. Digital TV based on signals from mobile operators 3G, 4G (LTE).
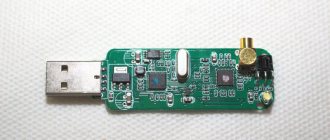
In order to connect mobile TV based on signals from mobile operators, we install a special media player that can be connected to a phone or router via a Wi-Fi connection. The media player has an additional USB input, so, in addition to the mobile TV function, you will be able to view almost any audio-video files from flash cards and hard drives. The device can be controlled from a standard remote control and using devices based on iOS and Android.
Advantages of digital TV based on 3G, 4G (LTE):
- Stable signal reception wherever there is 3G and LTE cellular signal coverage.
- Rapid expansion of 3G, 4G (LTE) coverage network.
- A huge number of channels.
- Relatively low cost of equipment with installation.
- Ability to connect to most standard displays without interfering with the vehicle electronics.
- The ability to view almost any digital content using the installed media player. Reading information from portable hard drives.
- Possibility of replacing the media player on Apple TV.
Disadvantages of digital TV based on 3G, 4G (LTE):
- Subscription fee for using traffic (unlimited Internet traffic is now provided by almost all cellular operators. The estimated cost at the beginning of 2021 is 1,500 rubles per month).
- Limited number of channels.
Digital TV in the car
Digital television means ideal picture quality and noise immunity. The digital tuner connects to both the standard monitor and additionally installed ones. It is possible to organize control via the touchscreen of the standard monitor, without any additional remote controls. As an additional free option when installing a digital TV tuner, an HDMI cable is provided with which you can watch DVDs from any media (flash drive, hard drive) also through a standard monitor.
Installing a TV in a car today has long ceased to be some kind of outlandish concept. This benefit of civilization allows you to “keep up to date” with all the latest events, even if you had to hold the steering wheel in your hands all day or several days in a row. And in conditions of constant traffic jams in a big city, when you have to uselessly spend not only minutes, but sometimes even hours in the car, television in the car is a significant help and interesting entertainment.
Installation of the device begins with the installation of a TV tuner
How to do it right:
- Before starting work, we check the compatibility of the tuner with the car video system.
- We select tools for work according to the operating instructions for the transport.
- We choose a good place for the tuner, usually where it will not be touched.
- We mount the power supply to the device, to do this we stretch the cable to the fuses.
- We connect the power cable to the connector.
- We install the indicator to which the remote control will respond in the location specified in the instructions.
- We stretch the wire from the video output.
- If there is an antenna, we attach it to the windshield and connect it to the antenna connector in the tuner.
- We connect the battery.
Analogue or digital television in a car?
Car TVs are presented in the car market today in a wide range. They have an undeniable advantage - affordable cost, which is why they are popular among car owners. However, installing a TV in your car is not the only thing you need to do. After all, it’s not the TV, but the quality of the TV programs received that is the ultimate goal of installing a new device. Especially when it comes to receiving transmissions in traffic or dense urban areas, when the signal is reflected from surrounding objects.
Compared to analogue, digital television in a car has a significant advantage.
Connection and setup: instructions
If you decide to use a regular TV device in your car, a number of difficulties will arise: how to install it, how to connect it, which antenna to choose. Here are some brief tips and instructions:
- Nutrition. If the device has an internal power supply, then you will need to buy an inverter from 12 to 220 V. This way you can connect the device to the cigarette lighter.
If the power supply is external, then a charger with suitable parameters is suitable, for example, car chargers for phones running from a cigarette lighter should be suitable. You need to check the parameters indicated on the case or power supply. Another option is to re-solder the device. You will need knowledge about the structure of the console, or you can turn to the craftsmen. This is a more expensive option in terms of time and effort, but you can get a real car TV set-top box for digital television.
- Antenna. This is the most important point to get reliable digital signal reception. For digital TV you need a decimeter antenna. In the city, simpler options are also suitable. Even the AM antenna from the radio will provide signal reception when the car is not moving. This is where you can start to experiment. Outside the city and at significant speed, more expensive and complex receivers will help “catch” the signal.
- Accommodation. All TV set-top boxes are compact devices. Installing a TV set-top box in the car and finding a place for it is not difficult. If you have the time and desire to tinker with the console, then you can even hide the device under the casing, route the wires to the required locations, making control even more convenient.
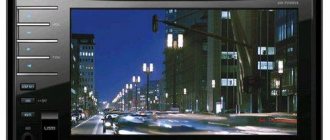
- Screen. Before connecting your car TV to a TV set-top box in your car, choose an option that can be powered by 12V and has HDMI or RCA inputs. This is enough to use it. The size or location can be selected based on your preferences - on the dashboard, in the back of the seats, and so on.
- Sound. The set-top box's audio connectors can be connected directly to the car's audio system, making TV viewing even more comfortable.
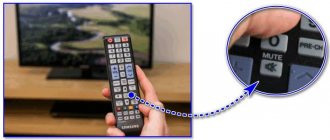
- Control. Use the remote control, touchpad, air mouse, keyboard. The infrared port or remote control controls can be placed in a convenient location inside the car.
A car set-top box for digital TV in a car is really simple. Following the instructions above, you can choose the appropriate option for yourself and install it. Until recently, functions such as TV, games and voice control in a car were considered either science fiction or the preserve of the premium segment. Now almost any car owner can afford all this.
Placing and installing monitors in a car
Placing a mobile device in a car is possible in almost any convenient place, as this video clearly demonstrates:
This opportunity is provided by a special stand with Velcro. Additional comfort is the ability to adjust a convenient angle of tilt and rotation of mobile equipment. By the way, you should not confuse car displays with monoblocks - these are significantly different devices and the latter are distinguished by the presence of a built-in TV tuner. It is important to note that a monitor has almost the same properties as a TV.
When installing a mobile TV, you have to take several steps: install the display in a convenient place and connect the tuner.
Digital DVB T2 antenna.
The antenna may be different. Special car antennas with magnets are quite expensive, and their effect is weak. This means that you can attach an indoor decimeter antenna with an amplifier or even an ordinary wire. Inside the city, this option will do (for starters).
Why do you need a digital DVB T2 antenna with an amplifier? Firstly, it is more sensitive. This will be important when moving. Secondly, it does not need a separate power source; the antenna amplifier will be powered by a DVB T2 TV tuner, via the same cable through which the signal travels.
But the active antenna has its weak point. If moisture gets on the amplification unit, it will burn out. Therefore, try to immediately (or after the first test) seal possible cracks in the antenna structure with plumbing sealant or other moisture-resistant compound.
Other connection methods
If there is an HDMI input on the laptop, the module is connected using an HDMI cable. Unfortunately, a significant part of mobile computers are equipped only with HDMI outputs, through which you cannot connect a TV tuner for a laptop. You can find out about the type of connectors from the detailed description of a specific laptop PC model on the manufacturer’s website, the store where the laptop was purchased, or the paper instructions that come with each new laptop.
3 RCA connectors are needed to output video and audio through separate channels. Typically the video cable is yellow, the left audio cable is white, and the right cable is red. Since new video cards do not have the necessary sockets, special adapters are used to transmit images, and sound is output through one mini jack connector, to which headphones or speakers are usually connected. In the latter case, you may need an RCA to 3.5 mm jack adapter.
The cables are plugged into the required connectors when the laptop is turned off, and after turning it on and loading the OS, drivers and the necessary software are installed.
Wireless communication channels - Bluetooth and Wi-Fi - are needed to expand the capabilities of the compact receiver. With their help, the DVB T2 module for a laptop connects to an access point to play audio and video from the network, and not just broadcast digital TV. To do this, you will need to purchase an external wireless adapter. The tuner must have a USB connector, since external Wi-Fi and Bluetooth modules are connected through it.
The adapter is inserted into the port, then the tuner itself is turned on, after which drivers are installed if necessary. Then you need to enter the password for the access point in the communication module settings. It is important to remember that the tuner must support the ability to play content from the Internet. This is evidenced by the receiver's software, where in addition to searching and viewing channels there are network applications, for example, YouTube, Megogo, IPTV and others.
Features of satellite TV
Unlike equipment for other broadcast formats, the satellite kit had a receiver from the very beginning. It was used as a carrier of physical channels and also supported payment cards. However, even without it, it was possible to watch open channels that were located in the TV memory.
At the same time, the broadcast in its usual form is closed and there are almost no channels left that can only be watched using an antenna.
Tuner types
Today, two devices are used as decoders - a previously known receiver, as well as a DVB-S2 tuner built into a digital TV. Both of these devices cope with the task in the same way, but in a particular situation it is preferable to choose only one of them.
To make the right choice, you need to consider each type of decoders separately.
All DVB-S2 satellite receivers are divided into two types of devices:
- Branded consoles. They are supplied in the basic kit as a DVB-S2 tuner. They already have basic characteristics built into them for a specific operator and a built-in CAM module for his own card. Such receivers are an order of magnitude cheaper than other analogues, but can only work with a satellite dish from a specific provider. In particular, the built-in CAM module cannot be replaced with another device.
- Universal attachments. They are the most expensive devices, because... can support full-fledged television of any operators and even accept other broadcast formats. Among the unique components is a universal CAM connector for modules for cards of any type. With such a receiver, to change provider it is enough to purchase only a dish.
Consequently, the cost varies greatly.
Advantages
With the advent of HD channels, conventional output devices were replaced by televisions with a built-in satellite receiver that decrypts digital data.
Such devices are designed to receive a signal from a specific receiver:
- DVB-T/T2 (terrestrial UHF antenna);
- DVB-C (cable);
- DVB-S/S2 (satellite).
The latest types of tuners are used to watch satellite TV. because such television provides for unlocking a paid package and receiving hundreds of programs; a TV with a DVB-S2 tuner always has a universal CAM connector and a thousand (or more) physical channels in memory.
Compared to a satellite receiver, connecting a digital TV with a DVB-S2 tuner provides the user with a number of advantages:
- Low costs. The user will only have enough plates and does not need to purchase a whole set.
- Minimum communications and devices. To connect, you only need an antenna cable, and the TV is used as a universal device (transcription, channel recording, content management). In some cases (for example, when installing on a wall) this is very convenient.
- Convenient setup and management of channels. For all software options, only the TV remote control is used.
Some models support decoding of all types of digital signals. A common RF IN socket is provided for reception, and the broadcast standard of the received signal is switched in the system settings.
Selection order
If you have a modern digital TV that supports HD television, then you should only buy a satellite dish and connect directly. However, before this you need to figure out whether the device is really suitable for modern television. In addition to the mandatory presence of a CAM connector with a decoder.
The device must meet the following requirements:
- high matrix resolution;
- the presence of a huge number of physical channels.
In these cases, you will need to purchase a new TV, but for satellite TV it is enough to purchase a dish.
When the TV meets all technical requirements, but does not have a built-in tuner, it is much more profitable to purchase a receiver, because it's much cheaper. In such a situation, it is most profitable to purchase a branded DVB-S2 set-top box as part of the purchase of the entire set.
Connection and setup
For all devices, the principle of connecting and searching for programs is similar and consists of the settings for the satellite. The easiest way is to connect a branded set-top box, because it already contains settings for all transponders from which the operator’s channel packages are broadcast.
In general, the process of connecting a satellite tuner includes several stages:
- Connecting to a TV. The connection is made using RCA or HDMI cables, which output image and sound separately. A VGA cable is used for a laptop or computer.
- In the system settings of universal receivers, you need to select a broadcast satellite and transponder frequency from the list, and also set its characteristics (modulation, speed, polarization). Data can be obtained from the operator.
- The entered characteristics are confirmed by starting a scan, after which channels will be found.
- Insert the payment card with the module into the CAM connector and activate it, after which the list of found programs will expand and all content under the contract will become available.
If desired, the list of scanned channels can be sorted.
Setting up your TV
- To connect a satellite dish, you need to select a socket marked DVB or DVB-S2.
- If you use a universal jack for all digital TV formats with a tuner, select “Satellite” or DVB-S2 in the system settings.
Next, the characteristics are set according to the same principle as when setting up the receiver. Upon completion, the auto search starts (analogous to scanning in the receiver) and the operator card is activated. The television is ready to watch.
To do this, other receivers are connected along with the satellite dish, and in the system settings you need to select both sources (for example, “Antenna and satellite” or “Cable and satellite”).
After scanning, the ETV will be overwritten and they will need to be returned to their original places by sorting.
Loading…