In addition to providing access to cable, digital and interactive television of various versions, Rostelecom also connects subscribers to analog television. Moreover, this option is very popular throughout the country, including in the capital, Moscow.
And today we want to pay attention to the nuances of using the analog TV service from Rostelecom, information on how to connect and disconnect it.
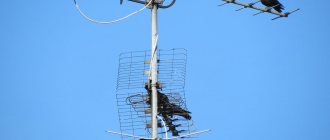
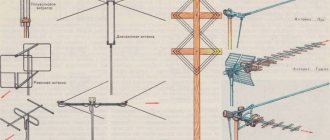
What is a collective TV antenna
A collective antenna in an apartment building is a set of devices interacting with each other, aimed at receiving over-the-air television broadcasts and subsequently transmitting the signal to televisions and other playback devices of the residents of the building, with whom a contract has been drawn up for the use of digital TV services.
Connecting this design includes:
- A set of antennas directed towards repeaters located on the roof of an apartment building.
- Broadband amplifiers, the main purpose of which is to provide a high-quality signal for each connected user.
- Wiring of elements and a cable system that connects all structural elements to each other and transmits the signal via cable to the apartments of connected subscribers.
This design must constantly receive power, it is necessary to enhance the power supply.
What to do if you only want DVB T2
In the above cases, the user finds himself in an unpleasant situation. He cannot get optimal conditions and is forced to accept restrictions or pay for cable TV.
But there is an alternative. An antenna for individual digital TV reception can be installed on a balcony, near a window, or on the roof. Even inside the apartment, if it is located near the base station. The main thing is to choose the right device. The DVB T2 antenna will pay for itself fairly quickly. It will allow receiving at least 20 free channels in large cities and about 10 in remote regions with undeveloped base station infrastructure.
Does the design work with digital TV?
There is no physical difference between digital and analog TV. A distinctive feature is the principle of encoding the data transmitted over the channel. If previously it was possible to find a channel in the UHF range, this can also be done through a common antenna.
If your TV still shows analog channels, then you need to make the main changes. To connect digital channels to an old TV, you need to purchase receivers that work with the DVB-T2 standard. Or buy a new TV that supports digital standards.
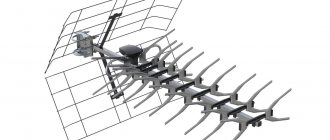
Determining whether a common house antenna and digital television is compatible is simple:
- If it has UHF and all-wave antennas, then there will be no problems with playback.
- If the antenna is meter (MV), then the TV will not be able to play channels, and the message “No signal” will be displayed on the screen.
Two or three receivers are usually placed on the roof, which pick up both meter and decimeter waves. This signal arrives at a single device, in which it is summed, amplified and transmitted via the main cable through splitter elements to each subscriber, providing a high-quality TV signal.
Advantages of analogue television
- Just connect and make payment.
To connect to a collective antenna, you just need to contact the operator by telephone. And TV bills will be automatically included in a single payment document; there will be no need to pay them separately.
- The cost is one of the lowest in this category.
A well-known fact is the low price of analog TV compared to interactive TV. For those who want to save money without losing the opportunity to efficiently organize their leisure time related to watching TV, connecting to Rostelecom will be the optimal solution. For example, at the moment the cost per month of using Rostelecom television is a little more than 200 rubles.
- Providing benefits for certain categories of citizens.
People of retirement age, disabled people and their families who have received subsidies for utility bills; heroes of Russia and the USSR; Full holders of the Order of Glory are entitled to a 50% discount on monthly rent bills.
At the current time, subscribers connecting to Rostelecom collective antennas get access to 51 channels, a full list of which is presented on the operator’s official website for review.
Discussing company
Shared antenna in the house, who maintains it? This question is often asked by apartment owners in a building where a common antenna structure is located on the roof. The management company is responsible for the condition of the house. She also deals with other housing and communal issues, including maintenance of the antenna structure with a cable outlet.
But most often, the housing and communal services of the house enters into an agreement with any telecommunications service for the installation and maintenance of a common house antenna. But all responsibility still lies with the company managing the house.
How to switch to digital and analog together?
In some regions it shows only one multipack, which includes 10 channels. In such situations, the collective antenna is not capable of providing digital broadcasting. The problem can be solved by setting up analog channels.
Setting up digital and analogue broadcasting depends on the release, configuration and model of the antenna. In practice, it was found that collective antennas allow simultaneous viewing of analogue and digital TV channels .
Having both digital and analog signals is preferred by viewers who want to watch both local and federal channels. To do this, the antenna must be able to receive signals in two bands: meter and decimeter.
To configure analog channels, you need to purchase a cable . It connects to the antenna input of a digital set-top box (or TV). If the subscriber has a set-top box, then use an additional cable to connect the device to the television receiver. Then the signal is set in analog format using the control panel.
Now you can start searching for TV channels. You can also switch to digital broadcasting using the remote control, but in AV mode.
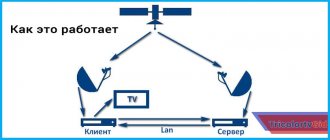
How to connect to a common house antenna to watch digital TV
To become a subscriber to digital TV received from a public antenna, you need to enter into an agreement with the company that services the facility. After this, the company's service personnel connects you to the distribution panel. Usually, subscribers do not do such work themselves, but simply accept the work done on a turnkey basis. At the same time, all work is most often carried out free of charge, which is specified in the contract.
The physical television tuner does the following:
- Unwinds a reel of coaxial cable to a size that is equal to the distance from the panel to the TV, with a margin of three meters.
- A slot is drilled next to the doorway into which the required television cable is inserted.
- An F-plug is installed at the end of the cable (for pairing with a receiver or TV). This is done independently by removing the insulating layer and wrapping the foil screen outward. Also remove the insulation from the inner core and attach a plug to the end.
- Having connected the plug to the receiver or TV, the tuner searches for channels.
If you need to connect several TVs in an apartment, you can always use a divider.
In this case, the setting looks like this:
- Open "Menu" using your remote control.
- Go to channel settings or an option similar in name.
- Select the signal source for TV (the source is the antenna) and start auto search.
- After scanning the range, a list of found channels will be displayed on the screen.
- Save it in your memory.
- Later, you can sort it as you wish.
Useful: How to connect and configure an antenna for digital TV
Connecting the antenna plug to the cable.
To prepare and connect the TV to the antenna cable, it is not at all necessary to invite a specialist. You can do the work yourself if you follow the connection instructions below. The television signal has a very low voltage and is not dangerous to humans. You can safely work with the cable, even if it is connected to a splitter or to a TV. A short circuit between the central conductor and the braid is not dangerous.
Connection to antenna cable F-plug.
Plugs usually come in different sizes to accommodate different cable diameters, so when purchasing an F-plug, pay attention to whether it fits your antenna cable.
There are two ways to connect the F-plug to the antenna cable: with the shielding braid wrapped, see the diagram on the left side, and without wrapping it, in the diagram on the right.
The F-plug will hold more securely if the shielding braid is twisted, but if you cannot screw it in, you can use the second method.
Carefully cut the outer sheath of the cable along a few centimeters, not pressing the knife too hard, so as not to damage the shielding braid (see figure).
After cutting the cable sheath, it is bent to the side and cut off at the start of the cut.
The aluminum foil and copper braid are turned away. The screen in antenna cables comes in three versions: one copper braid, aluminum foil and on top of it a copper braid (as in my case) and only aluminum foil.
Sometimes, to give strength, the foil is coated on the inside with polyethylene.
In this case, it is impossible to clean the plastic
.
Screw the plug onto the inside of the cable foil? There will be no contact, or it will be very weak. To get out of this situation, you need to bend half of the folded foil back, then the conductive side will be on the outside.
If it suddenly turns out that the diameter of the internal thread F of the plug is larger than the diameter of the antenna cable, then before wrapping the foil, you should wind several layers of insulating tape onto the antenna cable to adjust the size of the cable.
Next, the insulation is removed from the central core.
The F plug is screwed onto the foil “wrap onto the cable”.
The central core of the antenna cable is bitten off so that 2–3 mm protrusions remain on the core.
The second half of the plug is screwed in until it stops, and the F-plug is ready for use.
If, when installing the antenna cable into the TV socket, you have to bend it at a right angle (if the TV is installed close to the wall and it is impossible to install the cable), then it is recommended to purchase an angled connector in F.
The difference between the two described plugs is only in their shape. The technology for installing straight and angled plugs on a television cable is the same.
Attaching an old design plug to the antenna cable.
The old design plugs did not all require soldering and were connected to the antenna cable, unlike F-plugs, using their own technology.
To install an old-style plug on an antenna plug, first of all it must be prepared for use. To do this, you need to unscrew the plastic case from the metal part. It is advisable to immediately put the unscrewed plastic case on the cable. As a rule, after installation, we suddenly remember that the housing is not on the cable.
Next, we prepare the antenna cable for installation. Carefully cut the outer sheath of the cable to a length of about a centimeter, remove the sheath and trim the shielding braid by 4-5 mm. Then carefully remove the insulation on the central core (4-5 mm). The antenna cable is ready for plug connection.
We install the central core into the plug socket. Using pliers, crimp the antenna plug petals around the shielding winding. Here you should not put in more effort, so as not to break off the petals. The main thing is to have reliable contact. ATTENTION: The braid conductors must not touch the center core fasteners.
Next, screw in the screw securing the central core of the antenna cable
And finally, we screw onto the metal part of the plug the plastic casing that we previously placed on the cable. Ready. Insert the plug into the TV socket.
What is needed to connect
To connect the antenna you must have:
- Antenna cable with a characteristic impedance of 75 Ohms and a length of 10 meters.
- Splitter (tee) for 3 outputs.
- Fuse 3A.
Depending on the size and shape of the roof, you will need to cut off part of the antenna cable and run it through the roof to the antenna installation location. Then, depending on the shape and presence of windows in the upper part of the house, make holes in the roof and place the antenna cable in a groove on the ceiling or wall.
All operations with the antenna and cable must be performed with the TV's power supply turned off and disconnected from the network. If difficulties arise when installing the antenna on the roof, you can use ladders, railings and stepladders.
Antenna cable selection
The antenna cable used to transmit television signals at high speed is relatively large in size and weight.
For its manufacture, wires from the following alloys are used:
- copper-nickel alloy MNMts 43-1 (M – copper, N – nickel, 4 3 – valence);
- copper-chromium bronze BrKh – 4 (X – chromium, C – zinc);
- copper-nickel alloys with the addition of silicon (MC, MVS, MSN).
When choosing an antenna cable, you need to consider the following factors: frequency of the TV, cable length, presence or absence of an amplifier. It should be taken into account that high-frequency cables should not have high breaking strength. In addition, they must be flexible. It is recommended to use copper wires as connecting conductors.
For large distances between the television center and the receiving location, the cable must have sufficient length. If the TV is installed in a room, it is preferable to use a short cable length. Do not use stranded wires, especially when using a television amplifier.
In this case, a large level of noise arises, since the signal in such a circuit is not divided into components. The antenna television cable must have mechanical strength. Otherwise, the cable may become severely bent.
Antenna plug selection
An antenna plug is an element of an antenna connecting cord designed to connect an antenna to a connector on the corresponding device. It is a tube with a threaded connection. The choice of antenna plug depends on what kind of device and antenna will be connected to it.
If it will be connected to a television receiver, then a digital TV plug is needed. And if you need to connect the antenna to a satellite tuner, then you already need a T2 plug. In order to choose the right plug, you need to pay attention to the fact that the kit should contain not only a plug, but also fasteners for it - a clamp for attaching to the antenna. Antennas are available for various types of TVs.
If the TV is an old model with a picture tube, you need to use the TV antenna plug, since it has a pin. If the TV is LCD or plasma, you need a plug with a pin. In modern technology, either a plug with two terminals or a so-called “tulip” is used to connect to a TV.
Topic: free cable TV
OLEGJAN.83
, I work in streaming and I know what I’m saying, the signal is pumped up onto the central cable by an amplifier and this boosted signal is already divided by crabs that are on the floors, if you connect 3 TVs to 2 different taps on the crab, then the quality will be the same, but if there’s one it’s already noticeably worse
For two years I was on someone else’s cable, the price was 20 rubles. (antenna splitter). The neighbor was offered to pay in half, but due to his illiteracy, he decided that his TV would show worse. I had to connect without it. For 2 years there were no ATK inspections.
Transition order
Digital television means high quality image and sound, multi-channel and ease of equipment setup. The transition to digital broadcasting will finally be completed in 2021 . In order for the channels to be broadcast, an agreement is concluded, where the housing company acts as an intermediary. The subscriber will have access to a basic tariff, which includes federal and several regional channels.
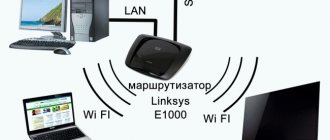
Description and connection diagram
If, after turning on the TV, a video appears on the screen with instructions for connecting digital television, then you need to follow all the prescribed steps. The absence of this certificate may indicate the following:
- The subscriber has already initially connected to digital television, but only through satellite or cable broadcasting.
- There is analog TV with automatic transition to a new broadcast format. This happens if the TV and antenna supported this feature.
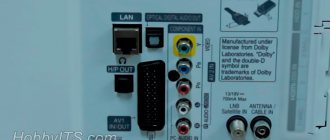
You can connect digital broadcasting to your television receiver via a shared antenna using a cable. If the TV is modern, then the cable needs to be connected directly into it. If the equipment operates from a set-top box, then the antenna cable is connected to the receiver socket.
Will the channels work if I set them up myself?
The setup scheme in the TV receiver menu is simple and does not cause difficulties . But different devices provide their own individual settings. To solve the problem that the channels do not show, you need to find the instructions for the TV and follow all the prescribed steps. Or you can use the auto-install function. This will be enough to establish signal reception from the antenna.
For digital channels to appear, you must use the automatic tuning feature. You need to go to the TV menu and select auto search. You cannot turn off the TV until all channels have been found.
You can use manual settings:
- Using the remote control, go to the menu and select the “Broadcast” section.
- Proceed to manual configuration.
- A window will open where you will need to select the settings for digital channels. Click the “Create” button.
- A window will open. In it you need to enter the channel number and its frequency. You select the frequency on the CETV map.
- Click search.
How to disable the antenna
If you decide to turn off your antenna, you can refuse services and terminate the contract. Then the “Antenna” item will be crossed out from the single payment document for utility services, and broadcasting on your cable will stop. To do this, just follow these steps:
- Call the hotline at 8 (800) 100 0 800 (all over Russia) or go to the nearest provider’s office in person.
- Inform about your desire to terminate the contract by providing your passport details or the document itself.
- Receive confirmation that the contract has ceased to be valid. If the TV stops showing for some time, everything is done correctly.
It is recommended to carefully check whether the operator’s employees have disabled the service. Quite often there are cases when people announced the termination of the contract, but the bills for the antenna continued to arrive.
It is important to note that this method allows you to disconnect from the collective antenna, but not disconnect it itself. The equipment in question belongs to . Therefore, they themselves can dismantle it if the need arises. For example, all subscribers decide to disconnect, and it will stand there just like that.
How to run an antenna from the distribution panel to your TV
The route for laying the cable is prepared as follows. Move furniture away from the baseboard. Drill holes slightly larger than the diameter of the cable in the door jambs, preferably at the bottom, at a distance of 2-5 cm from the edge of the door frame. If the required length of the drill is not available, then a feather drill is made from a steel rod ∅5. 6 mm, drill holes with this drill, and then drill out to the desired size on both sides. The entrance door to an apartment usually already has a hole in the wall. If it is not there, then drill a hole in the jamb of the front door, at the top. If the cable can be laid in the wall, then it is necessary to use steel wire ∅1-2 mm; it is passed into the wall channels, bending the tip of the wire back.
We recommend reading: If an Apartment Building Was Put into Operation in 2021, Will Real Estate Tax Be Charged?
The diameter of the cable is also important. It can be from 2 to 17 mm. The specific signal attenuation depends on the cable diameter. The thicker the cable, the smaller this value. The thick cable has good shielding and excellent resistance to mechanical stress. The disadvantages of a thick cable are its “ugliness” and lack of flexibility. The advantages of thin cable are that it is more flexible, less noticeable and easier to route along baseboards. Its main disadvantage is a colossal decrease in the signal level with a large feeder length. This is especially noticeable when receiving channels operating at higher frequencies. The second disadvantage of a thin cable is its low mechanical strength. When laying it, you need to secure it very carefully, using special holders, otherwise its outer braid may collapse. As a result, “snow” and other unpleasant distortions appear on the screen. Sometimes the integrity of a thin cable can be damaged due to careless transportation. Therefore, before laying a thin cable, make sure it is in good condition.
How to pay
As mentioned earlier, there is no need to pay separately for the antenna. The bill for it comes as one of the items of housing and communal services ]Pay[/anchor] it can be done in several ways:
- at any branch of Russian Post;
- at any branch of Sberbank;
- in any other bank;
- by using ;
- in payment terminals QIWI, Yandex.Money, RAPIDA, CyberPlat.
These are the most popular and convenient payment methods. It is recommended to use mail or Sberbank, since they do not charge a commission. The least preferred method is payment terminals. They charge the highest commission.