Almost all modern TVs have functionality that allows them to read information from USB flash drives. You can play movies, listen to music, view photos. But sometimes the TV does not see the flash drive, and this happens even with new devices. Let's figure out why this happens and how to act correctly.
Why doesn't the TV see the flash drive?
The problem may occur for the following reasons:
- external storage failure;
- The USB input on the TV panel is faulty;
- The TV does not work with file formats on the drive.
Before connecting the drive to your TV, carefully read the instructions for its use. It is necessary to carefully understand the following nuances:
- Are there any restrictions on storage capacity?
- Compatible with flash drive file system.
- USB connector performance.
It is often possible to find the necessary information about why the TV does not read video from a flash drive in its operating manual. If not, then check the performance of the drive. To do this you will need to connect it to your computer. If the flash drive works, then you will need to use the recommendations below.
What to do if there is no sound from a flash drive on a digital set-top box
Users often get lost in situations where the connection does not go as planned and there are difficulties with the video or audio track. Some give up and refuse to play movies from a flash drive, while others take drastic measures and buy new equipment. Both steps should only be considered as a last resort. If a digital TV set-top box does not reproduce sound from a flash drive, the problem lies on the surface and can be easily resolved using one of the methods discussed below.
Do an initial check
Before taking more serious steps, do an initial check to rule out common causes. Go through several steps:
check that the sound is turned on on the digital set-top box;
- make sure that the volume on the TV and additional equipment is sufficient;
- Initially format the flash drive, and after that write data onto it and insert it into a digital set-top box;
connect external equipment through the audio output on the set-top box and try to solve the problem this way.
If these steps do not produce results, and the digital set-top box does not play sound from the flash drive, the problem is more serious. In such circumstances, other actions may be required.
Change audio format
A common situation is when the set-top box is not compatible with the existing codec. You can view the audio format if you first launch the video on your computer in Media Player Classic. To do this, right-click on the image and select Propertis and Details.
If Dolby AC-3 appears in the characteristics, this indicates the presence of a multi-channel audio track. In such cases, the sound on the set-top box via a flash drive does not work due to the lack of software support. Required Audio format: MPEG Audio Layer 3 44100Hz stereo 96kbps. This inscription indicates the presence of a single-channel audio track.
If a discrepancy is identified, resolve the issue using a special converter. Alternatively, you can use AutoGK or Virtual Dub. Both applications are free and allow you to transcode audio tracks for viewing a flash drive on a set-top box. The output signal must be MP3 Stereo.
Set the correct sample rate
Another reason why there is no sound on a digital set-top box via a flash drive is the wrong sampling rate. As a rule, films are shown with a sound frequency of 48 kHz. This option is not suitable and you need to set another parameter - 44.1 KHz. To solve the problem, you can use the following programs:
- XMediaRecode;
- Virtual Dub.
The software is available online and does not require payment for use. When setting up with the MP3 Stereo format, select the required frequency of 44.1 kHz. Please note that after reducing the frequency, the audio volume when watching video from a flash drive may decrease. To solve the problem, use the previously mentioned XMedia Recode. During settings, select the maximum volume level.
Set the digital set-top box with the correct data
If the set-top box and TV work with Dolby Digital codecs, the easiest way is to activate the HDMI RAW option in the settings section and watch the video without the need for conversion. To do this, set the following parameters in the device menu:
digital audio output - RAW, BS Out or PCM+Dolby.
digital audio - RAW HDMI on;
HDMI audio - HDMI RAW.
In this case, the sound of the set-top box will be transmitted to the TV immediately without processing. It is worth considering that some modern TVs with built-in tuners may not have a Dolby Digital license
That’s why when buying a TV set-top box, pay attention to its availability (if you plan, of course, to watch videos from a flash drive)
Check the quality of the audio track
If suddenly there is no sound from USB on a digital set-top box, the cause may be recording defects. To solve the problem, check the number of tracks packed in the file. To troubleshoot the problem, use the Movavi converter. One of its functions is to analyze audio for damage and fix it.
Try connecting a different cable
Sometimes the cause of the malfunction is incompatibility of the codec and interface. In such circumstances, there is no sound in the TV set-top box when viewing via USB, but the video plays normally. If you previously connected via HDMI, try connecting to your TV using regular RCA. Often this solution will correct the problem and the audio will play normally.
In such a situation, the user has two options to choose from:
- application of a new connection interface;
- Converting audio to a simpler format.
The process of connecting equipment using such cables is simple, so difficulties rarely arise in this matter.
File system format mismatch
Often the problem is a different type of file system. If the TV is programmed to work with the FAT32 system, then it will not work with NTFS, and vice versa.
If the assumption is confirmed, the drive will need to be reformatted:
- connect the drive to the PC;
- go to “My Computer”;
- Right-click on the drive icon;
- select the “Format” section;
- in the menu that appears, set the format to “FAT32” and start the process.
The procedure takes only a few seconds. Now we install the flash drive into the TV again. If the video does not play, then move on to the next method.
Methods
If your TV has a built-in USB connector, to connect an external drive you just need to place it in the corresponding port. Unfortunately, only modern models have this interface. To connect a flash drive or other device to outdated television receivers, you can use alternative methods.
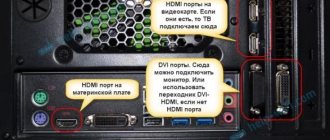
Via USB output
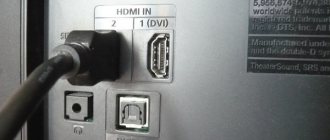
Current TV models all have a built-in USB port. In most cases it is located on the rear panel. It can also be located on the side. Connecting the gadget through this connector is as follows.
Insert the drive into the appropriate port.
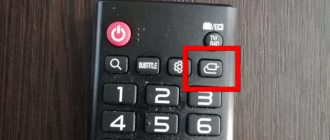
Then you need to select a new signal source using the remote control.
Launch the file manager and in the desired folder, find the movie or any other video that you want to watch. To switch between folders, the rewind buttons are used by default.
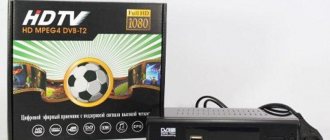
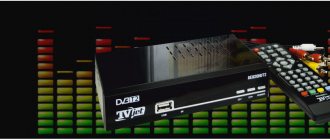
Via set-top box
You can connect an external digital storage device to your TV via a set-top box. TV boxes are in great demand due to their wide range of functions, simple controls and affordable prices. All set-top boxes are equipped with a USB port.
Modern TV models are connected to the set-top box using an HDMI cable. The gadget is connected to the old TV using “tulips”. To turn on a flash drive or other USB device, you must follow these steps.
The set-top box must be paired with the TV and turned on.
Connect the external drive to the gadget using the appropriate port.
Turn on the TV and go to the set-top box menu.
In the file manager, select the video file.
Launch it by pressing the Play button on your remote control.
Via DVD player
Almost all new DVD players are equipped with a USB connector. In this regard, this technique is actively used to connect flash drives to a TV. Synchronization occurs according to the following scheme.
Insert the digital drive into the appropriate interface.
Turn on the player and TV.
Select to receive signal from the player.
Now, having selected the required file, you can view it through the TV screen.
The main advantage of using this technique is that most TVs will automatically recognize it. If this does not happen, you need to select a new signal reception source. This can be done using the remote control by pressing the TV/AV button.
If the file you need is not visible or does not play, most likely its format is not supported by the player you are using. This method is great for reading data from flash drives, the only disadvantage of which is the connection of additional equipment.
Media file format mismatch
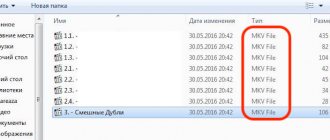
Another common problem is that the TV does not work with the file format. This is especially true for video files. Open the manual and find out what formats your TV supports. Most models do not support the MKV format, but all work with AVI. Sometimes the video plays but there is no sound.
In order not to encounter such a problem, we find a list of acceptable formats and strictly adhere to it.
The next reason why the TV does not see the connected flash drive, but the computer does, is the file name. TV accepts files signed with numbers or Latin letters, and reacts poorly to special characters and Cyrillic alphabet. To eliminate this factor, it is better to rename all files at once.
One Touch Ultra blood glucose meter: instructions for use
To achieve a more accurate result, you should strictly follow all the steps below. Before starting the test, be sure to wash your hands with any other disinfectant. If this is not possible, you should at least wipe your hands with alcohol-containing wipes to avoid the risk of infection after a puncture. This is followed by:
- Adjust the device according to the puncture site.
- Prepare all the tools necessary for the procedure: a cotton pad or alcohol wipe soaked in alcohol, test strips, a piercing pen and the device itself.
- It is necessary to fix the spring of the handle at mark 7 (for adults).
- Insert the test strip into the device.
- Treat the future puncture site with a disinfectant.
- Make a puncture.
- Collect any escaping blood onto the working part of the test strip.
- Treat the puncture site again with a disinfectant and wait until the bleeding stops (typical for patients with high blood pressure).
- Save the results.
If the results are not displayed, the following reasons are possible:
- My battery is almost done;
- there was insufficient blood;
- test strips have expired;
- malfunction of the device itself.
Problems with the drive's file system
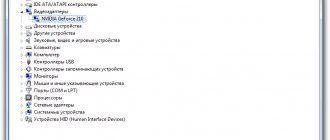
The problem is specific to a flash drive that has been repeatedly connected to the TV, but at some point it is no longer detected. This mainly happens due to wear and tear on the drive's file system. You can carry out the necessary tests on a PC using the tools built into the system:
- open “My Computer”;
- Click on the flash drive icon with the right mouse button;
- in the menu that opens, select the “Properties” category;
- go to the “Service” item;
- in the “Disk Check” section, run the scan;
- Additionally, we install automatic correction of errors and bad sectors.
Usually, after this procedure, the question of what to do if the TV does not see a working flash drive disappears.
Let's summarize:
- Most often, the TV does not see the flash drive not because of a breakdown of the TV itself, but because of the portable media itself, viruses that got from the computer to the flash card, or files loaded into its memory;
- In some cases, it is only necessary to format the memory of the flash drive;
- The problem may lie in limiting the maximum volume of media connected to the TV;
- Your TV does not have a USB connector for connecting a flash drive. Reflashing the TV can solve this issue. But it is worth remembering that you should not carry out this operation yourself. This is best handled by a professional at a service center. After all, negligence can lead to damage to your TV;
- Many TV models do not see or cannot play files whose names are written in Russian. Rename the names from Russian to English, this may help;
- You shouldn’t rule out the possibility of a broken USB connector on the TV itself.
These recommendations may help you resolve this issue. But if all this turned out to be insufficient, then this may mean that some kind of breakdown has occurred and it is worth taking the TV to a service center to have it fixed.
February 17, 2018
Dear friends, if you find yourself here, then you are worried about the following problem: what to do if the TV does not see the flash drive that you connect to it. And before we discuss the solution to this problem, it is necessary to discuss some issues.
This will help you better understand the situation and understand it. Then in the future you will have much fewer such problems.
Find out what steps to take and what to do if the TV does not see the flash drive
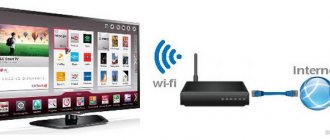
USB ports that allow you to connect flash drives are usually equipped with TVs that belong to the Smart family or were released shortly before their appearance. This means that the device may not be “smart” with Internet access via Wi-Fi, the ability to download and install various programs through the store, but with USB inputs where you can connect peripheral devices. Typically, users broadcast from a TV to a flash drive and watch movies in this way: they download them from the Internet on a computer, then transfer the data to the drive and play them on the big screen. But what to do if the TV does not see the flash drive? What could cause such a problem? We'll look at this in the next block.
USB service only
On some TV models you can see a USB port called service only. The connector is used by craftsmen when carrying out repair work or when installing firmware. You won't be able to view the contents of the flash drive through it.
However, it can be unlocked on certain LG TVs. This requires knowledge of electronics. Otherwise, it is better to abandon this idea. This method is also excluded if the TV is under warranty. Instructions can be found on the Internet.
Manufacturer's restrictions
Some models of modern LCD TVs (LG, Samsung, Sony, Philips) have parameters saved by the manufacturer that limit the size of played files. It can be 1.5, 2, 3, 4 GB, depending on the brand and build.
Unfortunately, it is impossible to bypass this limitation; to watch movies in excellent quality, get an HDMI cable and connect your computer to the TV.
In conclusion
The article explained in detail why the TV does not read the flash drive and presented the main methods for solving the problem. The main thing is to find out who caused the problems: the TV or the flash drive. Only then take action to solve the problem. If you can’t fix it yourself, then it’s better to contact a service center so that specialists can fix and configure the equipment.
Sources used:
- https://lumpics.ru/tv-does-t-see-usb-flash-drive/
- https://hddiq.ru/usb-flash-nakopiteli/televizor-ne-vidit-fleshku
- https://pomogaemkompu.temaretik.com/1357789555946424541/kak-ispravit-problemu-kogda-tv-ne-vidit-fleshku/
- https://televizore.ru/remont/samsung-ne-vidit-fleshku
- https://teleinside.ru/televizor-ne-vidit-fleshku/