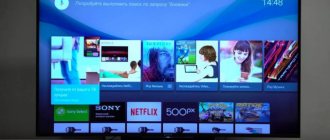
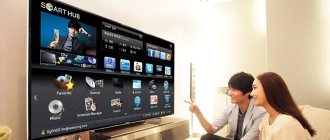
Wi-Fi significantly expands the functions of the TV. With it on your television screen you can watch not only what is shown on connected channels, but also videos, films and TV series from major hosting sites. You can connect games and enjoy good video and sound quality. Almost every computer function becomes accessible on a large screen with vibrant colors.
Big, beautiful and smart
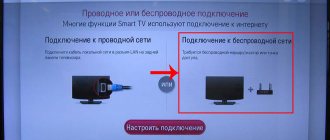
How to connect via Wi-Fi
All Sony Bravia TVs can connect to a wireless network independently or are compatible with adapters. For some models, the adapter is included, while others are subject to store promotions that allow you to buy two devices at once with a minimal additional payment. In other cases, network equipment must be purchased separately. The availability of an adapter should be checked in the store or upon delivery to protect yourself from unnecessary expenses.
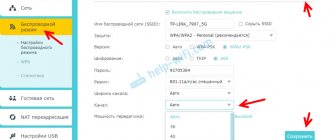
In order for the TV to be able to access the Internet, you need to go to the settings menu and perform the following steps:
- Menu item "Network".
- Network configuration.
- Configure Connections/Wireless Setup.
- Connection method from those proposed.
At the last point, instructions will appear on the screen on how to set up Wi-Fi on your Sony TV. By following it, the user will receive a stable connection to the network.
Features of Sony smart TV
Despite all the variety of Sony TV models produced today, they all have something in common:
- Firstly, this is an excellent matrix with viewing angles of 178 degrees. Thanks to this, even sitting on the side, the viewer can comfortably see the image on the screen in high quality. High response speed allows you to watch even dynamic scenes without distortion.
- Thanks to proprietary audio processing features such as BBE Digital, the music and sound effects are truly believable.
- High image quality and detail when viewing video content from Blu-ray discs and HD channels is realized in Sony Bravia TVs thanks to the support of a high-definition signal.
- This also includes standardized functions and proprietary technologies, such as sleep timer, TRUELIMINOS Display, Slim Blacklight Drive, etc., which are present in almost all modern TV models from Sony, regardless of their price range.
WPS technology
WPS is an algorithm that allows you to connect to a network without entering a security key. The button for this is located on the router (not on the TV!), and if it is not there, this option is not available.
Advantages: quick setup, no need to remember or write down the code, the connection is immediately secure and intruders will not be able to connect to it. Disadvantages - this algorithm is not provided on all routers.
Important button
Important! The WPS button on the router can be combined with the reset button. A short press activates a safe setting, a long press (5 seconds or more) resets the settings.
There may also not be a separate indicator, and the power signal will flash when the wireless setting is activated. Only on some models there is a separate button and dedicated indicator for WPS.
On Sony Bravia TVs, connecting to Wi-Fi via WPS is easy. In the menu item “Connection settings/Wireless settings” you need to select the appropriate sub-item (“connection via WPS”). Then press the WPS button on the router and follow the instructions on the screen.
Samsung
Samsung SmartTVs from 2015-2018 are supported (“J” (2015), “K” (2016), “M” (2017), “N” (2018). On models 15-16 years old, the Wink application is located in the Apps section of your SmartTV, the "Video" category. On '17 models, in the "Editor's Choice" Apps section and the "Video" category
On other models, go to the built-in application store and enter Wink in the search.
Installing the application on Samsung Smart TV (OS Tizen)
On the Home screen, you need to select the Samsung Apps application. Usually located on the bottom left. It may say App, or simply have an icon with 4 rectangles. Here are the different variations:
Then click on the search icon in the upper right corner:
Next, you need to type the word Wink on the keyboard (it’s better to type in English, if you search in Russian, Wink may not be found)
Channels do not show on Samsung “A playback error has occurred” (or “Player error not supported format”)
This problem may also be accompanied by endless loading of the application. Reason: unsuccessful firmware update for Samsung TVs, which the company released in November 2021 - version 1250. The application on firmware 1250 will not work correctly - you need to update it to 1260, at least. There is no need to update the Wink application; after installing the software, it is recommended to reboot the TV.
At the moment, an update has been released for the MU and Q series with firmware version 1260.6. There are no firmware updates for M and LT series TVs. Samsung TVs have an update function, but the latest firmware is not always available for download on the TV itself
What to do if the firmware on the TV is old?
1. Go to samsung.com. In the upper right corner, click on the search icon and enter your TV model there:
2. Download the required firmware in the download category
2. Install the firmware according to these instructions - samsung.com/ru/support/tv-audio-video/how-can-i-update-the-samsung-tv-firmware-using-a-usb-memory-stick/
Failed to load data
If you see this error when working with the application (when switching channels, or the image disappears while watching), then you need to update the application (you are using an old version). Uninstall the Wink application and install it again. Or use this instruction
Security Key
A security key is a universal way to connect to the Internet. It works on all routers, regardless of their model and year of manufacture - this is its main advantage. The disadvantage is that you need to remember the network name and security key. If you miss any of this or write it with errors, there will be no connection.
For Wi-Fi to appear, you need to select the “scanning” sub-item in the “Wireless setup” menu item. The device itself will find all available networks. You need to select yours from the list and enter the security key. There is no need to configure anything additionally.
You need to enter a key
Registration in the application
First option. Something to see.
When you launch the application, it does not automatically try to register you.
This will only happen if you want to watch a channel or buy a movie. Until this moment, you can simply scroll through the menu and “touch” the interface. As soon as you try to change the settings, watch or buy content, you will be prompted to log in to your account. You will need to enter a phone number.
The interface will depend on what you are registering for, but the essence is the same:
After which an error will appear stating that this number is not registered in the system. You will need to click on the "Register" button
Second option. Through the "Multiscreen" menu
If you already know everything, but don’t want to enable or check anything, you can simply register through the “Multiscreen” screen.
Next, everything is the same - enter your phone number and confirm registration via SMS
Upon successful completion, the following window will appear:
Why do you need network parameters?
Network parameters are a set of data that devices use to distinguish their network from strangers. This is the name of the network, security settings and a number of other network settings.
The TV saves the router settings to connect to it faster. If the network data has changed (reset or changed settings, new router, etc.), then the network settings on the TV need to be configured again - via WPS or a security key (new).
Important! Before you connect Wi-Fi to your Sony TV, you need to make sure that the wireless connection unit fits it.
The Bravia series requires the UWA-BR100 unit. The devices are not compatible with the rest, including those intended for computers. The unit is connected via a USB connector on the side surface; it is not required for models with a built-in wireless communication module.
How to add analogue channels
Although all of Russia is completing the transition to digital, local analogue TV channels still remain. To watch these programs using a TV without a built-in set-top box with a separate decoder you need:
- remove the antenna from the receiver;
- insert into the TV receiver socket.
You can also install a branched plug into the set-top box, into which a decimeter UHF antenna for digital and an antenna cable are simultaneously installed.
In television receivers with built-in decoders, an analog program is installed using the following steps: “Settings”, then selecting the ATV item, “Search for TV channels”. Sometimes such broadcasts are interrupted, so you need to use “Fine Tuning” to correct the situation. It is necessary to change the frequency indicators within small limits, tuning each found TV channel separately.
Cable analog viewing is possible through the remote control by changing the AV and TV modes, before this the TV antenna is plugged into the antenna groove, and the set-top box is connected to the video connector. If the old remote control breaks, you should definitely replace it with a new one, since settings without it are impossible.
When comparing digital and analogue television broadcasts, the quality of the image can be highlighted. With digital television, the image is clearer, without interference, since the quality of the television signal does not depend on environmental factors.
Benefits of Autoconfiguration
If you unplug your TV and then reconnect it to the same wireless connection, you can use automatic configuration.
To do this, you need to select the “Scan” menu sub-item and select yours from the resulting list of networks. The device will then connect on its own because the security key has been saved. The function is convenient when moving and unstable Internet.
If the connection suffers
Possible problems when connecting SONY TVs to the Internet
A Wi-Fi connection may fail if the provider registers a permanent MAC address of the device and verifies its authenticity each time to prevent unauthorized access. Since the MAC address of the TV is different, the provider refuses to provide services and the connection does not occur. To solve this problem, you should contact your provider and find out if you can connect Wi-Fi to your TV.
If the provider (Rostelecom) asks for a login and password to install the Internet, then before connecting the TV via Wi-Fi, you must enter the required data.
Problems may occur due to the firewall. If this is the case, then you need to contact your provider.
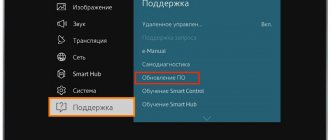
Sometimes resetting the TV helps. To do this, open the menu item “Support”, “Self-diagnosis” and “Reset”. After entering the PIN and agreeing to the terms of the license agreement, the factory settings will be restored.
Important! If you cannot connect to the Internet even after fulfilling the requirements of the service provider, you should contact specialists for help. https://www.youtube.com/embed/oiyvWK85P_0
Manual network setup
Manual setup is needed if it was not possible to connect the smart TV in other ways. Sony Bravia may have difficulty recognizing older routers and routers.
Difficulties may also arise if there is no router, and you have to connect directly from a computer or laptop. In this case, you need to go to the settings menu and set all parameters manually. If the user does not know them, you need to consult your Internet provider. Some router parameters may be written in its instructions.
ForkPlayer for Sony Smart TVs
ForkPlayer is a program or, as it can also be called, a browser that can be installed on Sony TVs that have the Smart TV function.
It can also be installed on computers, devices running Android, and Smart TVs from other manufacturers. With this application you can watch online channels, movies and other videos from various sites for free.
Important
In addition, ForkPlayer provides access to view data that is also stored on a flash drive, a connected removable device, or in the built-in memory of a Smart TV.
This application is available to any user. You can download it either from the official or unofficial website on the Internet, or from the application and widget store. Today we will take a closer look at what capabilities ForkPlayer has for Sony Bravia Smart TV, and we will also talk about the ways in which you can install and configure this application.
This application has the same operating scheme as Opera mini, which was developed specifically for J2ME phones that do not support the ability to launch a full-fledged Internet browser. ForkPlayer for Sony Smart TV receives all content directly from sites, after which it processes them and converts them into its own format.
Modern Sony Smart TVs, of course, have regular Internet browsers, but they are often stripped down, without a Flash player, and when launching some sites they can give an error that is due to the fact that there is not enough built-in memory.
- ForkPlayer is much better in this regard, as it allows you to watch videos or listen to music from any site without any problems.
- In addition, this widget, installed on Sony Bravia Smart TV, already contains a list of the most popular sites and online cinemas.
- You can also create and save your own playlists. You can view them not only from Sony Bravia Smart TV, but also from your other devices on which ForkPlayer is installed. To make this available to you, you need to register on the official website of the application, go to your personal account and add existing devices to the list.
In addition, in ForkStore you can download and additionally install other unofficial applications for your Sony Smart TV. At the same time, it is worth considering that the configuration and installation features, as well as the availability of certain functions, may differ on different TVs depending on the year of their release.
There are several ways to install the ForkPlayer widget on Sony Bravia Smart TV. Now let's look at two basic instructions for installing it.
First, you will need to go to the TV’s network connection settings menu; In the window that appears, select manual installation; After this, a window will appear in front of you in which the initial DNS will be registered. Instead, you will need to enter 46.36.218.194. If this does not work, then instead enter DNS 85.17.30.89 or 217.79.190.156; After this, the connection to the network will begin; After the connection ends, launch the now.ru Theta or Lifeshow application through the Opera Store. As a result, the ForkPlayer widget will launch on your Sony Smart TV.
Method No. 2
First, you need to go to publsh.tvstore.opera.com and register there; After registering on the above site, you can receive an ID from the developer, which will be displayed on the Sony Bravia Smart TV in the Opera Store. In order to view it, you will need to go to the Menu and go to the About tab. It is worth noting that the ID number will only be valid for 15 minutes. If during this time you do not have time to enter it in the required field, then you will need to get it again. To do this, click on #ID; The ID received from the developer will need to be entered into the appropriate field on the above site; After this, you will need to enter the name of the widget and in the URL Loader column indicate a link to the site https://operatv.obovse.ru/2.5/ and save it all; As a result, a special category called Develop will appear in the Opera Store.
If you need access to sites such as tree.tv or 6p6.to, then you will also need to change the DNS specified in the network connection settings of the Sony Smart TV. Instead of the DNS available there, you should register 46.36.218.194 or 46.36.220.208.
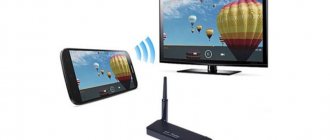
Wi-Fi Direct and Screen Mirroring
Wi-Fi Direct is a feature that solves the problem of how to connect a Sony TV to Wi-Fi if you don’t have a router. It is available on computers, laptops, phones and tablets with any operating system.
To establish a connection with a computer or laptop, you need to do the following:
- Enable Wi-Fi Direct mode on the TV and make sure there is a network connection.
- Go to manual Wi-Fi Direct setup, enter the security key if necessary.
- On your computer, go to the network settings, find the name of the desired device - Bravia, and enter the password.
Two screens - one picture
After this, you can play audio, video and photos from your computer. For laptops, the steps are completely similar. On Android tablets and phones, the required item is located in the “Settings/Network Settings” menu. On iPhones and iPads - in the “Settings/Wi-Fi” menu.
The result is that the same image will be displayed on both screens, only on the TV it will be larger and more colorful. Screen mirroring technology is suitable for photos and pictures, and to watch movies with its help, you need to turn off the sound on your phone, otherwise it will also be duplicated.
Toshiba Smart TV
All Internet services offered by Toshiba to owners of its smart TVs are available through a powerful Internet portal called Toshiba Places. It provides access to various services and entertainment on the Internet (social networks, audio and video sharing sites, photo galleries, and so on). The Toshiba Places portal can be accessed either through a computer or tablet, or directly through a Toshiba Smart TV. In any case, the viewer gets easy access to numerous multimedia files. The Personal TV service allows you to create and save custom settings for several viewers simultaneously. These settings include picture and sound configurations, as well as a personalized list of favorite TV channels.
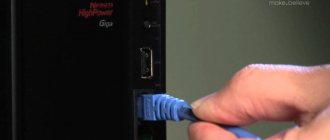
LAN cable (wired connection)
Most Bravia TVs have a backup option for connecting to the network - using a LAN cable. It connects to the TV through a connector designed for it, and through the same connector to a modem or router. In the same way, a connection to the Internet is established for those computers that do not have a Wi-Fi module.
Once the wire is connected, the TV will tune in automatically - the router will transmit all the necessary parameters to it. These can be adjusted in the settings menu to make the connection work better, but this is usually not necessary.
Advantages: quick setup and the most reliable connection possible.
Disadvantages - you need to accurately calculate the location of both devices, the length of the wire to connect them to each other.
Attention! The cable is easily damaged, this is especially true if there are children and pets at home.
Simple and reliable
How to set up Fork player on Sony Bravia
Setting up a Fork is also easy. Open the settings by clicking on the image of the three bars located at the top of the screen and you will select the “Application Settings” section.
If you have any questions or complaints, please let us know.
Ask a Question
Next, you can specify your parameters, or use the following:
- Please enter your time zone.
- Turn on Live Search.
- Near the video quality, set the maximum value – 1080p.
- Activate third party content.
- Select your IPTV sorting, or select “From Russian to English”.
- Against RemoteFork, set the value to "Auto".
The full list of parameters is shown in the screenshot. These settings are suitable for use on all TV models. Additionally, you can customize the start menu, for example, adding frequently used applications and resources. Click on the options icon again and go to the Start Menu Settings section. The system will demonstrate programs and services that can be moved to the Start screen. Mark them in green and exit settings.
Smartphone or tablet in remote control mode
Reliable Wi-Fi allows you to establish a connection between your TV and your phone. It is needed to transfer images, videos and music from a smartphone, and you can also replace the remote control using a phone or tablet. To do this, you need suitable applications (they are available for Android and iPhone).
Connection options:
- Through the general network of the house, which is distributed by the router - convenient for a smart home with a stable and powerful signal.
- Via Wi-Fi Direct - a direct connection, with weak Wi-Fi it works somewhat faster than a connection through a router.
- Through a shared router, the TV is connected by cable, and the phone is connected via a wireless network. Convenient for unstable and slow Wi-Fi.
Applications that launch TV remote mode work on one of these three connections. You need to make sure that the Internet (Wi-Fi) icon is lit on your TV, router and phone (tablet).
This is how you can change channels
What do you need to know?
The network adapter allows SONY BRAVIA HDTVs to access the Internet wirelessly. It can be integrated or connected to the TV via USB input. Using the WPS (Wi-Fi Protected Setup) option, the receiver is connected to the home network.
The built-in adapter helps you connect your Sony TV to Wi-Fi without installing additional equipment. Using this option, you can easily access the Internet and use all the features and services of Smart TV.
Reference! The availability of an adapter in the package depends on the TV model. Either it is available or purchased separately. For Sony, only the UWA BR100 model is suitable.
All about the Smart TV function here:
Setup using automatic configuration
You can set up a network using automatic configuration by performing the following steps:
- Place an access point (AP) and a TV nearby, and then turn them on. Since download times may vary, you may need to wait about two minutes. Before connecting your TV to a Wi-Fi router, you need to make sure that the network cable is connected to the router port. Otherwise, auto-configuration will only confirm the connection with the access point, but there will be no confirmation of connection to Wi-Fi.
- After a few minutes, connect the adapter to the TV. After this, a pop-up window will appear.
- After connecting, you should place the router parallel to the network adapter no further than 25 cm from it.
- You need to wait until the automatic connection occurs. Otherwise, a window indicating a malfunction will appear on the screen. To try again, you need to reboot the router, disconnect the adapter and start again from step 1. You can also choose another connection method: auto, manual or PBC.
- Place the AP in the desired location. If its parameters have changed, or a new access point is being configured, the steps must be repeated from the beginning.
SWL connection
This function makes it possible to connect modern TVs to an access point that supports PBC. It is possible to establish a connection without a Wi-Fi router.
Before connecting your digital TV to Wi-Fi, the access point must already be connected to the wireless network. Normal operation of the adapter is only possible with USB port 1. Devices using the 2.4 GHz frequency are supported. 5 GHz frequency is not applicable.
Important! Direct connection of the TV receiver to a PBC-enabled device is possible when SWL is set to Enable and the Wi-Fi adapter is inserted into the USB port.
To connect using SWL you need to do the following:
- Select SWL and press ENTER to enable it.
- Open "SWL Connection".
If the message “Hold the PBC button of the connected device for 120 seconds” suddenly appears, you must follow these steps. For more detailed information, please refer to the operating instructions.
Once the TV is connected to the network, the countdown window will automatically close. If the connection cannot be established, try again after 2 minutes.