Hi all! Today we will be setting up a router from the Dom.ru provider. Before we get started, I want to say a couple of important things. Firstly, the provider does not have its own routers. That is, these are the same TP-Link, D-link, ASUS, on which they simply stuck a sticker.
Secondly, such devices are additionally loaded with proprietary stripped-down firmware. In the article I will talk about the configuration - both with special firmware and with regular firmware. The process is quite simple, but if you have any difficulties or questions, write in the comments.
Speaking of difficulties! The question is often asked: what type of connection does the Dom.ru provider use? Answer: "PPPoE". To log in you will need the login and password specified in the agreement. If you have an “Interzet” provider, then you use: “IPoe” or also “PPPoE”. In any case, you need to keep at hand the contract, which contains the necessary data.
Connection
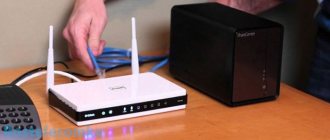
How to connect a router? The connection is quite simple. First of all, you need to find the so-called “WAN” port. It looks like a network port and always stands out from others - by color or designation (most often it is blue). You need to connect the cable provided by your provider to it.
The remaining local “LAN” ports have the same color, and you can connect any local devices there: computers, laptops, TVs, printers, CCTV cameras, etc. The connection is made using a regular network cable - a spare cord should be in the box that came with the router.
NOTE! If you use other Internet centers, then also try to find WAN and LAN ports. Typically a WAN may have a "planet" icon. LAN inputs are usually numbered.
If you configure from a phone or tablet, you can connect via Wi-Fi. To do this, you need to look under the device’s body and find the name and password for the wireless network. Usually the name duplicates the full name of the model. The password must be on a separate line. If there is no password, then find a line with an eight-digit PIN code - it can also be used for authorization.
Sequence of actions performed before configuration
Connecting the device
D-Link routers come with a power adapter, as well as an Ethernet network cable (patch cord). Before setting up, make the hardware connections:
- The patch cord must connect the Dom Ru router (any LAN port) to the network connector of the computer
- ISP cable – must be connected to the router’s “Internet” connector
- At the last stage, connect the power supply. But first, you need to check that the PC network card is configured correctly
If everything is configured correctly, turn on the router and restart the PC.
How to log into the Web interface?
How to enter the router settings? The coolest thing is that you can access the configurator using any device - be it a computer or a phone. To do this, you first need to connect to the local network to the device (see the chapter above).
Now open the browser and enter the IP or DNS address of the device in the address bar. The address can be found on the same label. The most commonly used addresses are:
- Popular IPs – 192.168.1.1 or 192.168.0.1
- TP-Link – tplinklogin.net
- D-Link – dlinkrouter.local
- Asus – asus.com
- Zyxel Keenetic – my.keenetic.net
If you have connected to the device correctly, then you will be asked to enter your username and password. By default, many routers use two combinations: “admin-admin” and “admin-*empty string*”. You can also view your login and password on a piece of paper.
NOTE! If you have difficulty connecting, or the login and password do not match, then reset the router to factory settings. To do this, find the “RESET” button on it and press it for 10 seconds. After this, the device will reboot and you can log into it.
Possible problems when setting up a Wi-Fi router
In 99% of cases, problems arise for four reasons:
- The equipment is incorrectly prepared - for example, the cable is not connected to the WAN, but dangles somewhere “between”.
- In the network settings, there are no checkboxes for automatically searching for IP addresses or DNS servers.
- Errors were made inadvertently when selecting parameters.
- The router has inappropriate firmware or is not designed to work on the specified network. It’s worth either looking for a suitable option on the forums or waiting for an update from the manufacturer for the domestic market segment.
Until recently, ASUS had a problem with L2TP, when the required provider address simply did not fit into the text field and the setup ended with an unskippable error - the problem was solved within a month.
Firmware from Dom.ru
As I said at the very beginning, if you see that the device has a sticker from this company, then most likely it has unofficial firmware from the provider.
- Select the operator: “DOM.ru” or “DOM.ru – InterZet”.
- Select the connection type. If your provider is simply “DOM.ru”, then select “PPPoE”. If “Interzet”, then select “IPoe”.
- Do not look at the connection status, you need to click on the “Change settings” link.
- First enter the “Login” and “Password” from the agreement. Below you enter the data for “Wi-Fi”. If you have a dual-band router that supports two frequencies (2.4 and 5 GHz), then the password is entered separately for each network. For convenience, you can enter the same key. To change the name of the wireless network, click “Advanced settings”.
- At the end, click “Save”.
I couldn't find the instructions for my router
You can contact me personally in the comments and I will help you with the setup. Or you can find instructions for your model on our portal. To do this, enter the name of the Internet center in the search bar. Just remember that to connect you will need to use “PPPoE” (you will need to enter the login and password from the contract).
Sources used:
- https://nastroisam.ru/kak-nastroit-router-dom-ru/
- https://help-wifi.com/nastrojka-routera-dlya-provajdera/nastrojka-wi-fi-routera-dlya-provajdera-dom-ru/
- https://wifigid.ru/nastrojki-routera-dlya-provajdera/nastrojka-routera-dom-ru
TP-Link
Setting up a TP-Link router for “Home” is done in the same way as with other providers that use this type of protocol authentication.
Old firmware
On the left, select: “Network” - “WAN”. Next, specify the connection type as “PPPoE”. Enter your login and password (twice) and click “Connect”.
To configure the WiFi network, go to the “Wireless Mode” section.
New firmware
Select “Basic setup”. Next, go to the “Internet” section. We indicate our connection type and enter additional data. At the very end, click “Save”. To change the Wi-Fi name and password, go to the “Wireless Mode” section.
Detailed connection settings
For more detailed TP-Link configurations, you can see the article here.
General information about the router
As mentioned above, this model is quite popular today. First of all, thanks to the extremely good price/quality ratio. It has removable antennas, which can be replaced with more powerful ones if desired. This budget model can transmit data at speeds of up to 300 megabits/sec, as it supports the modern 802.11n standard. Advantages of the model:
- ease of setup (you can configure the TP-Link TL-WR841ND router from the disk that comes with the device);
- reliability.
Also, this device is not without its disadvantages:
- lack of repeater mode support;
- does not support operation in the 5 GHz band.
D-Link
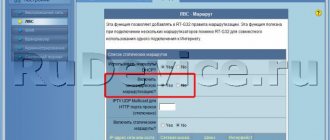
On classic firmware, you need to follow the path on the left: “Network” - “WAN”.
If you have a dark interface, then first go to “Advanced settings”. Next, you need to find the “Network” section and click on the link that says “WAN”.
If you see at least some connections, then select each one and click on the “Delete” button. After that, click “Add”.
We indicate the connection type as “PPPoE”. All you have to do is enter the “Username” and password (twice). At the very end, click on the “Connect” button, which is located in the lower right corner of this window.
The network name and password can be changed in the “Wi-Fi” section. Look at the links “Basic settings” and “Security settings”.
More detailed settings of the D-Link Internet center can be viewed at this link.
Software
You can update the firmware only in automatic mode. To do this, on the start tab, you need to click on the link in the lower left corner (titled “Update firmware”). Of course, the connection to the Internet must be configured correctly (the router will look for firmware on the provider’s website).
It is important to know! Installing any firmware yourself can be done at your own peril and risk! Do not turn off the power or disconnect the connection to the PC during reinstallation.
ASUS
Go to the “Internet” section - in the left menu. We indicate the type “WAN” as in the picture below. Enter your login and password. Click “Apply”.
Wi-Fi connection settings are located in the “Wireless Network” section. There you just have to change the name and key.
See detailed settings of the Acyc router here.
ZyXEL Keenetic
Old firmware
Click on the planet icon. Click on the “PPPoE/VPN” tab. Click “Add connection”.
You can enter any name in the “Description” line. Next, specify the protocol type, login and password. And don’t forget to specify the connection type as “Broadband connection (ISP)”. Click on the “Apply” button.
To change the Wi-Fi network settings, you need to click on the corresponding icon at the very bottom.
New firmware
Go to the “Wired” connection page. In the line “Authentication with the provider (PPPoE / PPTP / L2TP)” - indicate “PPPoE”. Enter the username and key.
To set up a Wi-Fi network, you need to follow the path: “Home network” - “Wireless Wi-Fi network”.
Detailed settings
More detailed instructions can be found at this link.
Tenda
When you first log in, you will immediately see the Quick Settings window. Specify the type of WAN connection.
Below we enter additional data for authentication. Specify dynamic “Address mode” and check the box for automatic connection.
You can change your wireless network settings in the “Wireless Mode” section.
For detailed configuration of this router, see the instructions here.
Linksys
In the “Internet Setup” line, indicate the connection type. We also enter the user name in the “User Name” line, and the password in the “Password” line.
To change the Wi-Fi name, you need to go to “Wireless” and then go to “Basic Wireless Settings”. Enter the name in the “Wireless Network Name (SSID)” line. Save the settings by clicking on the “Save Settings” button.
To change the password, go to the next tab “Wireless Security”. Specify “Security Mode” as “WPA2 Personal”. Change the password in the “WPA Shared Key” line. Save the settings again.