It happens when buying a laptop you are faced with the problem that the laptop screen is dim, or the laptop screen is not bright, displays unclearly, or lacks colors. This problem does not always come from poor screen quality, but maybe from Windows software settings during a clean installation. I encountered this problem on my home laptop Asus x554l, and I also encounter this problem on all laptops such as Lenovo, Asus, HP, Aser, Asus, DEXP.
Method 1.
To solve this problem, we will use the standard Windows setting “ Color calibration” . In order to launch it, you need to go to Control Panel - Appearance and Personalization - Screen - Color Calibration.
1. Launch Color Calibration.
2. Read the short instructions and click on Next.
Gamma Settings demo screen will open , read how the normal gamma should be and proceed to set it up.
4. The Gamma Settings opens with an adjustment slider; raise or lower the slider to adjust the gamma for your eye, or you can use the instructions in the previous paragraph to determine the normal gamma.
5. Click Next and here is the following setting step, if everything suits you, then click “ Skip brightness and contrast settings ”, if not, then you can try adjusting the brightness and contrast of the screen.
6. If you skipped adjusting the brightness and contrast, a new “ Adjust Color Balance ” screen will open, click Next to skip.
7. The final window, here you can view and compare the current setting with the previous one. If everything suits you, uncheck the box to start font settings and click done.
Method 2: Setting up a dim laptop screen using the Intel HD graphics driver.
I found this method after setting it up through the native settings, I have an integrated Intel HD graphics graphics card on my laptop, so this method is suitable for any laptop with Intel graphics, if the laptop has a different video card (AMD, Nvidea), you can find similar items in the graphics menu settings.
1. Launch Graphics characteristics , the settings for Intel HD graphics are called exactly that;
2.Go to display settings ;
3.Select the Color tab;
4.In the gamma, brightness and contrast settings field, adjust them to suit you;
5. Click change, the dim laptop screen is no more;
Sincerely, Konstantin!
More interesting things on this topic:
dim screen, dim screen on the laptop, what to do, dim screen on the laptop after installing Windows, what to do, laptop screen is dim, laptop screen is dim, laptop screen, dim screen on the laptop, screen on the laptop has become dim, what to do, screen on the laptop has become dim, the laptop screen has become dim, how to customize the screen on a laptop, the screen is dim on an hp laptop, the screen in the laptop is dim and the screen is not brightened, what to do if the screen in the laptop is very dim, “laptop you are faced with the problem that the laptop screen or screen is dim ", very dim laptop screen, why the resolution on the laptop does not change and the dim screen, dim video screen, what's wrong with the laptop if the screen is dim, the screen is dim on the computer, the laptop screen has become dim asus, the dim screen on the asus laptop what to do if the display is the laptop is very dim, the screen on the laptop is dim at full brightness, the laptop on the screen is dim ecoan, if the colors on the laptop screen are dull, when you turn on the laptop the screen is dim, the screen on the Lenovo laptop has become dim, the monitor on the laptop is dim, how to fix a dim computer monitor screen, dim text color on the AMD Windows 8.1 screen, dim screen on the Windows 10 laptop monitor, dim screen in applications, fglrx dim screen, dim laptop monitor, laptop screen color dim light, calibration setting, calibrate the monitor, monitor settings, monitor brightness, calibration program, calibration, monitor calibrator, monitor setup, monitor calibration, program + for monitor calibration, windows monitor calibration, monitor color calibration, monitor color calibration, windows 10 monitor calibration, laptop monitor calibration, online monitor calibration, monitor calibration + for photography, monitor calibration for processing, monitor calibration for photo processing, monitor calibration windows 7, pictures + for monitor calibration, monitor calibration check, monitor calibration download, dell monitor calibration, lg monitor calibration, monitor calibration setting, wallpaper for monitor calibration, windows 10 monitor color calibration , windows 10 monitor color calibration, monitor calibration test, samsung monitor calibration, automatic monitor calibration, monitor calibration with a calibrator, home monitor calibration, download the program + for monitor calibration, monitor calibration at home, how to do monitor calibration, monitor calibration price, photo for monitor calibration, software monitor calibration, spyder monitor calibration, aoc monitor calibration, monitor + and printer calibration, benq monitor calibration, device + for monitor calibration, monitor screen calibration, asus monitor calibration, monitor calibration profile, program + for laptop monitor calibration , monitor calibration, monitor calibration software, monitor color calibration program, monitor color calibration program, ips monitor calibration, monitor color calibration, hardware monitor calibration, hp monitor calibration, image +for monitor calibration, laptop monitor setup, program +for monitor setup laptop, adjusting the brightness of the laptop monitor, adjusting the colors of the laptop monitor, adjusting the color of the laptop monitor, adjusting the screen of the laptop monitor, program + for adjusting the brightness of the laptop monitor, adjusting the contrast of the laptop monitor, program for adjusting the colors of the laptop monitor, program + for adjusting the color of the laptop monitor, settings for an hp laptop monitor, setting the saturation of a laptop monitor, setting up a second monitor + on a laptop, setting up an asus laptop monitor, a program for adjusting the contrast of a laptop monitor, adjusting the brightness + and contrast of a laptop monitor
How to fix your monitor screen going dark for a few seconds
Many people are facing this problem that their PC or laptop screen suddenly turns black every few seconds while working or playing games.
Many users reported that this problem occurred either randomly or only when using graphics. Here are some comments from users who encountered this problem:
- Suddenly my monitor screen goes black for a few seconds and flashes for 5 to 10 seconds.
- My Dell monitor goes blank for a second while working or playing games.
I have mentioned some cool and easy ways to get rid of this frequent dark screen. Please read below carefully to solve this problem:
Scenario 4: Restore iPhone using iTunes
If you don't care about data loss or have backed up your data before, iTunes can be the solution to the black screen problem on iPhone.
Launch iTunes on your computer and connect using a USB cable. Please note that it is required that you have connected the iPhone to this computer before, as you cannot confirm authorization at this step again.
Click the device icon > Output > Restore iPhone.
Confirm that you want to restore your iPhone in the pop-up window again and follow the instructions to get started.
Ways to solve the problem with the screen darkening for a few seconds
Here are some methods that work when the screen goes black for a few seconds:
Method 1. By reinstalling the video card driver
Well, graphics drivers are the main parts that communicate and pass instructions from your Windows operating system to the graphics hardware. If they are damaged or outdated, you will experience intermittent and specific problems such as the screen going dark for a few seconds.
Here's how you can reinstall your graphics card driver
1. Launch the RUN application by pressing Windows + R button.
2. Type devmgmt.msc and hit Login
3. Now expand the Display Adapter .
4. Now right-click on the display adapter and click on the Remove device option.
5. Now just restart your computer.
Note. You don't need to reinstall the graphics driver, it will be installed automatically if you have Windows 10.
If you have an older version of Windows, such as 8 or 7, you will need a graphics card driver to reinstall it.
That's all, I hope that after this the problem with the monitor screen darkening for a few seconds will be solved. If the problem persists, continue to the next method.
Method 2: Use the Windows key sequence to wake up your monitor screen.
Sometimes pressing the combination Windows + Ctrl + Shift + B key works. In case Windows is responsive, a short beep will sound and the Windows screen will dim or flicker while your Windows system tries to wake up to refresh the screen.
If you still encounter the problem, move on to the next method.
Method 3: By uninstalling useless third-party software applications.
Well, some third-party programs can be the reason behind black screens. In many cases, the problem occurs when running third-party applications. So, uninstalling such apps will eventually help you solve the problems.
Here's how to do it.
1. Press Windows key + R button
2. Now type control and press Enter button to launch Control Panel.
3. Now open the Programs and Features .
4. Now you will be presented with a complete list of applications installed on your system.
5. Now select the third-party apps that are useless or those that are causing the black screen issue.
6. Now right-click on the app and select Uninstall/Change and then follow the on-screen instructions to successfully uninstall unwanted apps.
Well, I hope this will solve the black screen problem. You can also read how to fix missing Nvidia Control Panel.
Method 4: Disconnect and reconnect the monitor wire
Sometimes, due to a loose monitor cable, the screen may go dark for a few seconds. Here's what you need to do to fix this problem:
1. Turn off your computer.
2. Carefully disconnect the monitor cable.
3. Wait 30 seconds to 1 minute and then reinsert the cable.
4. Make sure the cable is properly connected to the monitor.
5. Now turn on your computer.
Now you will not see a black screen while working on your system.
Well, here is how you can solve the problem of your monitor screen being black for a few seconds, I hope you liked my article and found it useful. Feel free to comment below with any questions.
Other similar issues that have been fixed:
Scenario 1: Battery is low
Don't forget about the most obvious possibility: your iPhone battery may die. There is no harm in trying to charge your phone first. If the problem with your iPhone is a low battery, your phone's screen will light up and display a low battery icon as soon as you plug your iPhone into a wall outlet.
If it doesn't happen right away, don't panic, keep charging for a while and then check whether it appears or not. If the phone still does not answer, move on to the next situation.
Reason 1: Incorrect brightness settings
The most commonly considered failure is software, and consists of incorrectly adjusted display brightness. The solution steps are as follows:
- First, try increasing the brightness using key combinations - as a rule, the combination of Fn and one of the functional keys is responsible for this. On some laptops, in particular those made by Acer, this action can be performed by pressing Fn + right arrow.
It's also worth checking the system slider. In Windows 10 version 1903 and higher, to do this, just open the “Notification Center”: click on the button in the lower right corner, then use the “Expand” element.
Move the point on the strip to the far right position.
In older versions of “tens”, you will need to open “Settings”: use the combination Win + I, then select “System”.
Here, click on the “Display” position, and the element you are looking for will be on the right side of the window.
It also doesn't hurt to check your power settings. The easiest way to go to them is using the “Run” tool: press Win + R, enter the request control.exe powercfg.cpl,,3 in the field and click “OK”.
Open the “Screen” item and check how the brightness is set - if it is at a minimum, this is the cause of the problem.
Scenario 2: App Crash
if you launched an app overnight before going to bed, the app may have frozen. In this case, you can force restart your iPhone.
To force restart iPhone 6s and earlier:
iPad or iPod touch: Press and hold both the Sleep/Wake and Home buttons simultaneously for at least ten seconds until the Apple logo appears.
To force restart iPhone 7/7 Plus:
Press and hold the Sleep/Wake and Volume Down buttons for at least ten seconds until the Apple logo appears.
To force restart iPhone X/8/8 Plus:
Press Volume Up, then release - press Volume Down, then release - press and hold the Side button until the Apple logo appears on the screen (about 10 seconds).
Reason 2: Incorrect Intel driver parameters
In some situations, the source of the problem is the settings of the Intel HD Graphics driver, which is installed in most laptops as an energy-efficient video core. It is the same by default and works when using the system and the vast majority of applications. To fix the problem, the driver will need to be configured.
- The easiest way to open the Intel Software Control Panel is to right-click on an empty space on the desktop and select the appropriate context menu item. If there is none, check the system tray - a blue square with a white arrow (or the Intel logo for older versions) and there is a shortcut icon.
As a last resort, you can open “Search” and enter the query intel into it - the result we need is called “Intel Graphics Control Center” or something similar in meaning.
Further actions depend on the software version installed in your instance. For example, for new integrated GPUs, you need to open the screen menu item and select the “Color” tab. Use the “Increase brightness” block - here we need the “All colors” bar, the increase occurs by clicking on the “+” button.
Some driver versions have an “Extended battery life for games” setting, which also needs to be disabled.
If the changes made do not bring any effect, try restarting the laptop - when you log in, it should pick up the new settings.
Fixing a black smartphone screen by resetting settings
Getting to the main board of a mobile phone is not at all difficult. To do this you only need to unscrew a few screws. But if you do not find any damage when you open the cover and get to the board, most likely the cause of the black screen is a software failure of the smartphone. Now we will solve it with you.
For models with Android system, the steps will be as follows:
- To get to the Recovery menu, you need to hold down the buttons special for this.
Before clicking, their smartphone must be turned off. If you can’t do this through the button, remove the battery for a while; Press the buttons to get to the Recovery menu - Most often, the button to get into the menu is “Power” and a button to decrease or increase the volume.
You need to hold two buttons until your device's developer logo appears. On certain models, one of the buttons may be “Home”. Try also combining it with the “Power” button; Use Home to get into Recovery - As a result of correctly pressed keys, the logo of the manufacturer or Android system will appear.
Following it, the menu we need will be displayed; Logo when opening the Recovery menu - In this menu on the black screen you need to find the “Wipe Data/Factory Reset” item and click on it.
To select items in this menu, you need to press the “Power” button. To move through the list, use the volume buttons; Select "Wipe Data/Factory Reset" - Next, a new screen with items will open.
In it we need to select (usually) a single line called “delete all user data”. To select the item, use the power button again - “Power”; Select item with “Yes” - Next, the data recovery process will begin, which may take some time. All your data will be deleted, including settings, photos. As well as downloaded programs, application accounts and profiles.
In order for you to continue using your mobile device, you must know the login and password for your Google account. When the recovery process is complete, press the "Power" button to turn on the device. If resetting the settings to factory settings helped solve the error, you will also need to enter your username and password to log in.
Reason 3: Problems with the lid close sensor
A more serious case of a dim screen lies in problems with the matrix itself. The first thing to check is the operation of the laptop lid switch: perhaps the sensor has failed and is causing the system to think that it is closed. For these purposes, use a magnet: bring it to the frame around the screen and move it along it - some place should become magnetic. Next, find the corresponding position on the panel of the laptop with the board and keyboard and place the magnet there. If the device reacts to it (the brightness has increased), this is a sign of sensor failure. This procedure requires some specific skills, so it will be better if it is performed by professionals from a laptop repair center.
How to conduct general TV diagnostics
First of all, you need to enter the TV receiver menu, turn up the brightness, check the contrast settings. You must make sure that the display parameters are set correctly, in accordance with the operating instructions for the device. Next, you need to disable power saving if it is enabled. Also exit night mode if your device supports it.
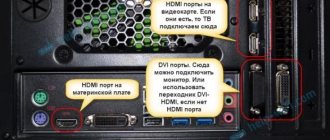
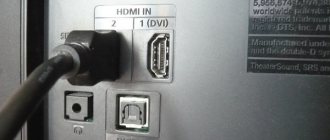
In addition, before checking the TV itself, you need to make sure that the external connections are reliable. If possible, replace the HDMI cable. Check that the source of the TV signal - digital terrestrial television set-top box, satellite TV - is functioning properly.
If there are several TV receivers in the house, you can check the operation of all peripherals by replacing the TV with a known good one . If everything is in order, you need to diagnose the device itself. To do this, it is advisable to have some skills in radio electronics or entrust the work to a master.
Reason 4: Loop defects
Sometimes the culprit is the cable that connects the motherboard and the screen matrix. In some laptop models, it is not located very well, and during active use it can fray. The latter causes a number of symptoms, and low brightness is just one of them. To check, try closing and opening the lid several times, and locking it in different positions. If the problem of a dim screen disappears in any of the positions, the problem is definitely in the cable, and it needs to be replaced. You can do this yourself, but we still recommend contacting a service center.
Scenario 5: Hardware failure
If none of these work for you, then the problem probably cannot be resolved by us ourselves, as it is likely caused by default hardware settings. You must contact Apple Service online or bring your iPhone to your nearest Apple Store for repair.
With the advent of touchscreen smartphones, display failure has become a fairly common occurrence. Depending on the cause of the breakdown, we can fix it ourselves or contact the service. A visit to a specialist is usually the last resort. In this article, you will learn what you can do if the screen on your phone is black, but the phone itself is working.
Reason 5: Backlight problems
The backlighting of the display of almost any laptop is carried out using LED strips, which are powered and controlled by an inverter. The last element is also prone to breakdowns, albeit quite rarely, compared to other components. In the event of such a failure, it is impossible to fix it yourself, since the inverter is connected to the system board, so the only solution is a visit to the workshop. Similarly, burnout of backlight LEDs can be eliminated.
Reason 6: Matrix failure
The last source of the problem under consideration is a matrix failure - for example, in your copy it is defective or damaged for other reasons. This is clearly evidenced by the ineffectiveness of attempts to restore performance using the methods described above. The panel cannot be repaired, it can only be replaced.
In addition to this article, there are 12,010 more instructions on the site. Add the Lumpics.ru website to your bookmarks (CTRL+D) and we will definitely be useful to you.
Thank the author and share the article on social networks.
What to do if Windows turns black and white
If you turn on the computer and the screen displays everything only in black and white, then you need to find the cause of the failure and eliminate it. This usually requires a few simple steps. It all depends on why Windows became black and white. There may be several reasons:
- incorrect color filter setting;
- video card driver failure;
- action of third-party software;
- broken or incorrectly adjusted monitor screen.
Troubleshooting color filter settings
In order to eliminate incorrect color filter settings, you need to go to the Control Panel in the “Options” menu and select the “Accessibility” section. Further:
- Find "Color and High Contrast" on the left side of the window.
- Move the slider under “apply color filter” to the off position.
Updated versions of Windows 10 may produce black and white images due to the Color Effect menu settings. There you can make different filters. This problem is encountered by users who have installed build 17083, which is considered an insider version. In this case, just disable “Color Filters”. You can disable this function using hot keys: Windows+C+Ctrl.
Fixing the error with black and white color through the registry
If, after disabling the effects in “Special Features,” it did not help to achieve a positive effect, then you can do a similar job through the registry. Disable black and white Windows as follows:
- Open the command line using the Win+R keys and enter the combination – regedit.
- In the window that opens, you need to follow the branch: HKEY_CURRENT_USERSoftwareMicrosoftColorFiltering.
- There you will find several keys. First, check Active, if it is enabled, then the value in the line will be 1; when not working, the number changes to 0. You can disable this key yourself by changing the value.
Two more keys also control effects; we present their parameters for general information. In the future, you can apply filters yourself through the registry. First of all, you need to determine the display type. To do this, the FilterType key has several values:
- Grayscale starts at 0;
- inverted colors – 1;
- inverted shades of gray – 2;
- impaired perception of the green spectrum – 3;
- impaired perception of red – 4;
- blue-yellow -5.
For the Win+C+Ctrl keys to work, the HotkeyEnabled registry key must be set to 1; if set to 0, their use is prohibited.
Setting up your video card will help if the Windows screen turns black and white
If the steps described above did not help, then the Windows black and white mode appeared due to the video card. Your actions will depend on the equipment manufacturer.
Nvidia
You can fix the problem using the Nvidia Control Panel. It is called up through the desktop context menu (click on the free space with the right mouse button).
- In the menu, open the “Digital Intensity” item. It can be found in the left column of the window.
- Look at the Hue scale on the right side of the screen. For a black and white image, it can be set to 0.
Typically, after adjusting the sliders on the scales, the colors return and begin to appear again. These steps can only be done if you have installed a proprietary utility for managing your video card. It can be downloaded from the official website or downloaded to your PC from the disk that comes with the equipment.
AMDATI Radeon
If you have a video card from this manufacturer, then the proprietary utility may have different names. In older versions this is Catalyst Control Center. In it, you can reset the display settings in the Display Color tab using the Defaults button.
For modern devices, the utility is called AMD Radeon Settings. It also has a reset button. It is located in the Display tab. To return all shades of image display, you must click Reset. This button will restore the default operating parameters.
General actions
Additionally, you need to update your video adapter drivers. To do this, go to “Device Manager” and right-click on the name of the video card. In the menu that appears, select “Update Driver”. Select the automatic option.
If automatic updating does not help, remove the video card drivers, then restart the computer and install them again (pre-download the files from the official website or prepare a disk with them). You can also download drivers using third-party utilities. They will help you find updated options.
Other reasons why Windows went black and white
Sometimes Windows 10 shows a black and white screen after updating or installing a program that is in startup. In order to find the reason, you need to stop the startup of all third-party services, and then restart the PC.
Proceed through the “Task Manager”, but keep in mind that in the “Configuration” tab you must first put a checkmark next to the phrase “do not display Microsoft services”. All other services can be terminated. If the problem is resolved, then the problem is one of these programs. It can be calculated using the selection method - turn on the program and restart the PC. Do these steps until you find the cause of the failure.
On desktop PCs, you may notice Windows turning black and white if the display settings are misaligned. They can be restored using the buttons on its side or front. Depending on the display model, the menu will be arranged differently. You need to find the image settings. Try adjusting the display by moving the checkboxes on the scales. In some models, it is recommended to do a full reset in case of such failures. This procedure will restore the settings to factory defaults.
If none of the described methods work, restore the version of Windows in which the color was displayed normally. It is also worth additionally checking the PC connector through which you connect the monitor. Try using a different display if you have the option. Now you know how to deal with the lack of color casts on your PC screen. You can ask questions and tell your stories in the comments. We recommend inviting friends to communicate; they will be able to learn a lot of new things from our material.
Four reasons why our computer screen color turned green
Good afternoon, dear blog readers! Remember the good old days when the cathode ray tube TV screen suddenly changed color? The hand itself reached for the slipper, just like when hunting a cockroach. But even a modern monitor can suffer the same fate. I was once asked to figure out why the computer screen turned green. A very simple and quick diagnosis followed.
To carry out a quick diagnosis I needed:
First, it was necessary to disassemble the existing circuit - monitor + VGA cable + old desktop computer.
Upon disassembly, it was discovered that the VGA cable was not a simple one, bought for three pennies in the transition, but with gold-plated contacts! Then the laptop was connected to the monitor, first through a VGA cable with gold-plated contacts, then through the cable that I brought. Which was without frills.
The result was not long in coming, but... first things first. What potential reasons could there be for an unexpected change in the color of the monitor screen? Why is the screen color now green?
- problem with computer video card
- problem with the monitor
- there is a problem with the cable, for example, there is a break or rupture in its wires
- Problem with software color settings
Let us briefly examine these hypotheses in order.
Video card problem
A malfunction in the graphics chip, for example, its partial failure, is the main reason that the video card “paints” the monitor screen a certain color at the output. We can treat GPU failure at home by warming it up with a special hairdryer. But, to be honest, I haven’t practiced this yet.
Unfortunately, video cards sometimes burn out. One of the reasons for this is connecting the computer to the TV, which in turn is connected to the antenna. There may be parasitic interference in the antenna cable, which ultimately destroys the video card.
If you have a discrete video card in your computer, then it must be inspected for swollen capacitors or other burnt parts. Swollen condensers can be replaced yourself if desired.
Overheating of the video card can lead to the result described. First, it is worth checking the temperature of the video card with the well-known GPU-Z program, so as not to waste something that is securely fastened with tape and works that way.
We should not see numbers greater than 90 degrees in the GPU Temperature field. Once I saw the processor temperature about 100 degrees, and it continued to rise rapidly.
I had to severely disconnect the computer from the network, otherwise it was in danger of self-digestion.
If it turns out that the temperature of the video card is really going through the roof, then it’s time to clean the inside of the computer using a vacuum cleaner or compressor, then, if necessary, check the functionality of the cooler on the video card and replace the thermal paste underneath it.
You can also damage the connector on the video card, especially if you pull the cable too hard. This can be checked by slightly shaking the connector itself. If it does not stay in place like a glove, then this may well be the reason for the monitor screen to turn a certain color.
The video card connector on the motherboard could become unsoldered during its life. If, when the video card is slightly shaken in the motherboard connector, something happens on the monitor - the screen tint changes, artifacts appear or disappear - then all this clearly indicates a problem with the connector on the motherboard. It is treated by re-soldering it. Or sending the motherboard to a service center.
Finally, the video card drivers could fail. This should be checked last if we suspect a hardware problem, but we must keep this option in mind. Download the latest drivers from the video card manufacturer's website and install them. I hope you don't get a blue screen!
Problems with the monitor itself
The screen color may have turned green or some other color due to a malfunction of the monitor itself. If the screen of your LCD monitor is painted in warm colors, then most likely the backlights are low. The only solution is to replace the burnt out lamp with a new one.
But still, the matrix, and not the backlight, is responsible for the color, so its malfunction leads to incorrect color rendition of the monitor. In particular, the screen may turn a certain color. Only replacing it will help.
Among the relatively light options is damage to the matrix cable. It is quite possible to replace it with another one. It’s easy to find out what gives the screen a reddish tint—the cable or the backlight—just remove the cable going to it from the matrix and turn on the monitor. If the backlight is to blame, then the backlit screen will remain reddish.
The control board may also be faulty. Just as in the case of a video card, a processor failure may occur on the monitor’s control board. In principle, this is also a curable disease with the same heating.
Cable problem
If successive changes of VGA cables had not led to a noticeable improvement in image quality, then it would not have been possible to identify the culprit so quickly. The problem was that there was not enough space on the table for the monitor, so they did this with the cable:
The rich inner world of the cable could not stand it and burst.
There is one adequate solution here - replacing the cable, and don’t do that again!
Problem with software color settings
If there is no reason to suspect the video card or anything else of a hardware malfunction, then it makes sense to reset the monitor’s color settings to default. Someone’s playful hands could well have rummaged through the screen settings. Of course, everything will be different on your monitor, but I will show you the very idea of how you can distort all the colors on the screen. Here is a slightly “collective farm” image:
It is clear that here you can creatively approach the issue of monitor color rendering. If you choose the wrong color scheme, you can then try for a long time to look for swollen capacitors on the video camera.
Or, for example, calibrate colors using the Windows Control Panel. You can ruin everything there too! To verify this, you can go to Control Panel -> Hardware and Sound -> Display, then click on the “Color Calibration” link.
The following calibration wizard window will appear:
Next, following the wizard's prompts, you can get to this page, where you can easily achieve the result below using the sliders:
If you compare the last two screenshots, the difference is visible to the naked eye, at least in the white areas of the window.
Also, do not forget that video card manufacturers supply their drivers with various control panels for them, for example, “Intel HD Graphics Control Panel”. Various profiles can be used here as color scheme settings. The profile can be configured in the “Display” section of this program.
So many enticing sliders!
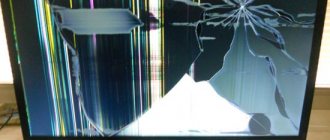
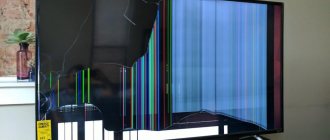
The computer monitor screen has gone dark, what should I do?
I have been using the Acer H236HLbmjd monitor for 3 years. This red darkening appeared on the screen on the left. It's not very visible in the photos, but there are very small horizontal stripes in the darkening. Toward the center of the screen, the image gradually normalizes and the rest of the screen displays normally. Also, against a dark background, the silhouette of the previous light image is barely visible. Also only on the left. Once the blackout disappeared for a minute and the screen became normal, then everything returned. Everything is fine with the video card. What's wrong with the monitor? Please tell me.
Images attached:
Adding a solution
It is forbidden to write answers that do not bring any benefit to the questioner from the series: “take it to the service center”, “contact the ASC”, “unprofitable”, etc. Such answers will be considered a rating increase, the answers will be deleted, and the account will be blocked.
If you undertake to help people, answer fully. Explain why, if you recommend, for example, to reflash the phone, then write how to do it. If you write that repairs are unprofitable, explain why.
Adding answers that essentially repeat existing answers on this issue will also be considered cheating.
It's gotten dark... it's hard to see! Why did everything change and how to return the “light” again? By the way, before this, the computer independently produced updates - the kind that it does itself from time to time. nothing special! And after rebooting, the screen suddenly became darker :((
Scenario 3: iOS system problem
If both attempts don't work, your iPhone probably has problems with its operating system.
At this point, you may have to restore it to factory settings to fix the problem. You can do this through iTunes.
Connect your iPhone to your computer and launch iTunes. If you can connect to your iPhone via iTunes, be sure to create a backup first. Otherwise, you will lose the current data on your device.
In fact, there is a way to bring your iPhone back to life without losing any data. FoneLab iOS System Recovery, a good tool to fix almost all iOS problems such as iPod stuck in recovery mode, can't slide to unlock, DFU mode or Apple logo, iPhone screen black, blue or red, iPhone rebooting problems, etc D.
More importantly, the recovery process will not modify or erase any data and will continue in a 100% safe and clean environment. Let's take a look at the step-by-step guide below to see how it works.
Download the software for free from the link below right on your computer. Install it after that.
Select iOS System Recovery on the interface. Connect your iPhone to your computer via USB cable as required.
The software may detect that the connected iPhone is in an abnormal state and will ask you to click Start to begin.
You will be asked to confirm the information on your iPhone. Click Repair if it's correct, but if not, select the exact information manually before repairing. The plugin will take some time to download, please do not disconnect or use your device during the process. Otherwise, it may cause the repair to fail.
Once it ends, you will find that your iPhone becomes alive and everything is safe as well.
If you lose data during the procedure, you can use FoneLab iPhone Data Recovery to recover iMessages, photos and more on iPhone.
TV repair cost
| Type of work | Cost, rub. |
| Replacing the power supply | from 790 |
| Control unit repair | from 890 |
| Replacing the backlight lamp | from 1090 |
| Replacing the TV tuner | from 890 |
| Reflashing the motherboard | from 790 |
| Power connector repair | from 890 |
In the case of a broken matrix, it is often more profitable to buy a new TV, so we do not do such work. We also do not accept control panels, TVs that have been flooded, or equipment with streaks or spots on the screen.
1) The exact cost is determined after diagnostics. 2) The cost of spare parts is paid separately. 3) Diagnostics are paid in case of refusal of repair.
Vagaries of technology: darkening of the LCD monitor screen
Darkening of the monitor screen is a problem that owners of LCD displays face sooner or later. The vast majority of LCD displays are produced using the following technologies:
- active matrix;
- passive matrix.
Brightness control in LCD models is carried out based on the effect of light polarization. When passing through a filter having a certain polarization angle, the light emanating from the backlight lamp decreases its brightness for the observer.
Unfortunately, nothing lasts forever, and the window to the world that has pleased you for a long time eventually breaks down. The vagaries of technology sometimes become a very unpleasant surprise, changing the usual way of life for the worse. The TV and monitor repairs offered by .
Loss of screen brightness and contrast - causes and their elimination
The loss of brightness of an LCD type screen occurs due to the failure of the lamp located behind the multilayer structure. Under fairly intense loads, the lifespan of the lamps responsible for the correct operation of the device averages from 5 to 7 years, provided there are no sudden temperature changes. To restore the previous performance of your TV or computer, sometimes it is enough to change the lamp.
If there is oxidation of the contacts or their damage, flickering occurs, loss of contrast and subsequent shutdown of the lamp. In this case, the contact is replaced or cleaned if it is not damaged. If the image goes out after a short period of operation, then the possibility of a manufacturing defect cannot be ruled out. Another nuance is that poor-quality soldering, often performed during warranty repairs, can lead to such sad consequences as the destruction of the microcircuit by the remnants of the active flux used during soldering.
Top 10 most common malfunctions of LCD monitors
Here are the TOP 10 most common malfunctions of LCD monitors that I have personally experienced. faults was compiled according to the personal opinion of the author, based on experience in the service center. You can take this as a universal repair manual for almost any LCD monitor from Samsung, LG, BENQ, HP, Acer and others. Here we go.
I divided the malfunctions of LCD monitors into 10 points, but this does not mean that there are only 10 of them - there are many more of them, including combined and floating ones. Many of the breakdowns of LCD monitors can be repaired with your own hands and at home.
1st place – monitor does not turn on
at all, although the power light may blink. In this case, the monitor lights up for a second and goes out, turns on and turns off immediately. In this case, tugging at the cable, dancing with a tambourine and other pranks do not help.
The method of tapping the monitor with a nervous hand usually doesn’t help either, so don’t even try.
The reason for this malfunction of LCD monitors is most often the failure of the power supply board, if it is built into the monitor.
Recently, monitors with an external power supply have become fashionable. This is good because the user can simply change the power source in case of breakdown. If there is no external power source, you will have to disassemble the monitor and look for a fault on the board. In most cases, disassembling an LCD monitor is not difficult, but you need to remember about safety precautions.
Before fixing the poor guy, let him stand for 10 minutes, unplugged. During this time, the high-voltage capacitor will have time to discharge. ATTENTION! DANGEROUS TO LIFE if the diode bridge and PWM transistor burn out! In this case, the high-voltage capacitor will not discharge in an acceptable time.
Therefore, EVERYONE check the voltage on it before repairing! If dangerous voltage remains, then you need to discharge the capacitor manually through an insulated resistor of about 10 kOhm for 10 seconds. If you suddenly decide to short-circuit the terminals with a screwdriver, then protect your eyes from sparks!
Next, we proceed to inspect the monitor’s power supply board and replace all burnt parts - these are usually swollen capacitors, blown fuses, transistors and other elements. It is also MANDATORY to solder the board or at least inspect the soldering under a microscope for microcracks.
From my own experience I will say that if the monitor is more than 2 years old, then 90% there will be microcracks in the soldering, especially for LG, BenQ, Acer and Samsung monitors. The cheaper the monitor, the worse it is made at the factory. To the extent that the active flux is not washed away - which leads to failure of the monitor after a year or two. Yes, yes, just when the warranty ends.
2nd place - the image blinks or goes out
when you turn on the monitor. This miracle directly indicates to us that the power supply is faulty.
Of course, the first thing you need to check is the power and signal cables - they must be securely fastened in the connectors. A flickering image on the monitor tells us that the monitor's backlight voltage source is constantly jumping out of operating mode.
Most often, the reason for this is swollen electrolytic capacitors, microcracks in soldering and a faulty TL431 microcircuit.
Swollen capacitors most often cost 820 uF 16 V, they can be replaced with a larger capacitance and higher voltage, for example, or the cheapest and most reliable are Rubycon capacitors 1000 uF 25 V and Nippon capacitors 1500 uF 16 V.
There is a cheaper decent one (but always 105 degrees) Nichicon 1000 uF 25 V. Everything else from China will not last long.
3rd place - turns off spontaneously
after the time has elapsed or does not turn on immediately. In this case, again there are three common malfunctions of LCD monitors in order of frequency of occurrence - swollen electrolytes, microcracks in the board, faulty TL431 microcircuit.
With this malfunction, a high-frequency squeak from the backlight transformer can also be heard. It typically operates at frequencies between 30 and 150 kHz. If its operating mode is disrupted, vibrations can occur in the audible frequency range.
4th place - no backlight,
but the image is visible under bright light. This immediately tells us that LCD monitors are faulty in terms of backlighting. In terms of frequency of occurrence, it could be placed in third place, but it is already taken.
There are two options - either the power supply and inverter board burned out, or the backlight lamps are faulty. The last reason is not common in modern monitors with LED backlighting. If the LEDs in the backlight fail, then only in groups.
In this case, the image may darken in places at the edges of the monitor. It is better to start repairs by diagnosing the power supply and inverter.
The inverter is that part of the board that is responsible for generating a high-voltage voltage of about 1000 Volts to power the lamps, so under no circumstances should you try to repair the monitor under voltage.
You can read about repairing the power supply for a Samsung monitor on my blog.
Most monitors are similar in design, so there shouldn't be any problems. At one time, monitors simply fell off due to poor contact near the tip of the backlight. This can be cured by carefully disassembling the matrix in order to get to the end of the lamp and solder the high-voltage wiring.
Source: https://masterpaiki.ru/top-10-samyih-chastyih-neispravnostey-zhk-monitorov.html
did the screen go dark?
#1
- Participants
- 61 messages
- Administrator
- 7,460 messages
- Participants
- 61 messages
- VIP
- 319 messages
- Participants
- 61 messages
- Administrator
- 7,460 messages
- sirota0 likes this
Suddenly the screen went dark.
Word documents are shown in white and I read the forums - a normal white field,
But the films have already reached the point where the background is solid black.
I checked the brightness settings in the monitor, they are 100%.
They also say that on your computer you can add brightness in the energy section,
but I can’t find something.
I have German Windows 7.
I googled a couple of videos showing where to look, but on Russian Windows, but I can’t find what they show.
And then I started thinking, is it a matter of brightness settings? After all, no one touched them, again, only dark films,
Could this be related to the video card?
The computer is a budget option, from the store, 5-6 years have passed.
#2
Install PotPlayer and set the desired brightness there.
#3
Install PotPlayer and set the desired brightness there.
It probably won’t help, now I’ve discovered that the desktop background has begun to darken, the bright Côte d’Azur has turned into a dark picture before a storm.
Yes, and I only watch movies from the Internet, but there is a flash player, I updated it first of all.
#4
Suddenly the screen went dark.
matrix in a laptop or monitor?
#5
#6
If in a laptop, then look at the energy saving modes.
try updating your video adapter drivers. Reset your monitor settings to default.
#7
#8
There can be several reasons for the monitor: power filtration (the capacitors are swollen and the capacity in the power supply is lost, needs to be replaced) is a very common cause, as well as scaler problems. If replacing capacitors does not give the desired result, you may have to change the firmware. You can wash the contacts of the cables with alcohol. You also need to check the soldering of the inverter, which lights the monitor backlight lamps (LEDs), hence the lack of brightness.
- sirota0 likes this
Other ways to fix your phone display if it's not working
We will continue to fix problems with a mobile device when it seems to be working, but there is no picture on the screen; it is black. Sometimes this happens when a smartphone accidentally falls into a container of water or other liquid. However, it can still work for some time. When you take your device out of the water, every minute counts. Immediate action is required from you. Otherwise, you may lose your phone forever. And not only the phone, but also all the data that was saved in its memory.
Procedure:
- There is no need to press all the buttons in a row in the hope that the water will be pumped out of it in this way.
Immediately remove the back cover as soon as possible; Remove the back cover of the smartphone - Disconnect the battery from the phone and wipe the inside of the tray with a handkerchief or dry cloth;
- Wipe the battery as well;
Wipe the battery from moisture - There is no need to blow it with a hairdryer or other similar tools. If you are outside the home, place the mobile phone parts in a visible, dry and sunny place. Weather and weather conditions permitting;
- As soon as you return home, you will need to disassemble the smartphone and wipe the areas where the liquid came into contact with ethyl alcohol.
Wipe your smartphone contacts with ethyl alcohol
This is necessary so that in the future the metal parts of the microcircuits on the board do not oxidize. Since oxidation will destroy important parts of microcircuits. The phone may not turn on at all. Thus, we have figured out what to do if your phone has a black screen, but the phone itself continues to work.