Here are the TOP 10 most common malfunctions of LCD monitors that I have personally experienced.
The rating of malfunctions was compiled according to the personal opinion of the author, based on his experience working in a service center. You can take this as a universal repair manual for almost any LCD monitor from Samsung, LG, BENQ, HP, Acer and others. Here we go. I divided the malfunctions of LCD monitors into 10 points, but this does not mean that there are only 10 of them - there are many more of them, including combined and floating ones. Many of the breakdowns of LCD monitors can be repaired with your own hands and at home.
PS: How to disassemble the monitor and TV (how to unclip the frame)
The most common questions when disassembling LCD monitors and TVs are how to remove the frame? How to release the latches? How to remove the plastic case? etc.
One of the craftsmen made a good animation explaining how to remove the latches from engagement with the body, so I’ll leave it here - it will come in handy.
To view the animation , click on the image.
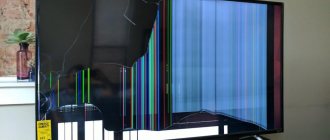
Why the LG TV screen may darken
There are a number of malfunctions that cause the screen to darken and the TV receiver to stop showing the picture. They are the same on TVs of different brands and can appear both on LG products and on a device from Samsung or another brand.
LG
If, when turning on the LG TV, the user finds that the screen has become dark and the picture is practically invisible, the cause of the breakdown may be:
- power supply defect;
- video amplifier malfunction;
- matrix backlight failure;
- broken T-con controller.
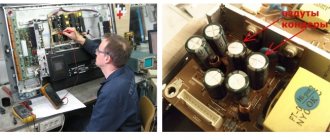
If the power supply fails due to a power surge, poor-quality soldering, swollen capacitors, or other reasons, the TV screen will stop lighting or streaks will be visible on it.
To carry out diagnostics, the device is de-energized and disassembled. Signs of failure are burnt elements, burnt holes, swollen capacitors, etc.
You need to find the damaged unit and repair it; sometimes you will need to replace the power supply completely. You can check the part after repair using a multimeter or a connected ordinary light bulb.
If the unit is working properly, it will light up brightly, then dim and burn at half power. If the unit is damaged, the lamp will constantly glow very brightly. The same method will save microcircuits from damage when connecting a faulty or incorrectly repaired unit.
If the video amplifier fails, the screen goes dark, but there is sound. The second sign is uniform white or green display light. You need to open the brightness settings and change this parameter. As a rule, a monitor with such a defect does not respond to user actions.
It is necessary to inspect the damaged unit and check the integrity of the capacitors. Broken elements are replaced; in rare cases, the entire faulty part must be replaced. A T-con board failure is similar to a motherboard failure, so it is better to entrust such repairs to specialists. Some television receivers are equipped with a special T-con board diagnostic function. It is necessary to disconnect the power supply and the LVDS cable going to it.
A test picture will appear on the screen; if there is distortion on it, this means that the part has failed. In most cases, the board will need to be completely replaced. Sometimes oxidation on the LVDS cable contacts can be the culprit of the problem. If you clean them with a regular eraser, the problem will disappear.
Samsung
Consumers often wonder why the screen on a Samsung TV has become dark and what to do to fix the problem. Equipment from this brand breaks down for the same reasons as LG devices. To fix the problem, you need to check the power supply, video amplifier and T-con board. If these parts are intact, the malfunction may be related to the matrix.
DIY LCD monitor repair
A common malfunction is when the LCD monitor lights up for a second and goes out. What to do in this case and how to use this TOP of faults.
It's simple. To repair your LCD monitor, follow these steps:
- Step 1. Disconnect the monitor from the 220 V network and from the computer and decide whether we will repair it ourselves or take it to a service center for diagnostics at an inexpensive price.
- Step 2. If you decide to figure it out yourself, then take the tools: screwdrivers, a knife or scalpel and a soft base to lay the monitor down with the matrix.
- Step 3. Disassemble the LCD display, observing safety precautions and remembering the latches. How they open is shown in the animation above.
- Step 4. Discharge the high voltage capacitor. It is necessary! Especially if you want to achieve a positive result of the repair.
- Step 5. Inspect the board for swollen capacitors, burnt transistors and microcracks.
- Step 6. If any findings are found in Step 5, replace the burnt ones and solder the cracked ones.
- Step 7. Check the functionality of the monitor, observing safety precautions. If everything is ok, then go to Step 10.
- Step 8. Take a multimeter and test the fuses, diode bridge, transformers and transistors. Replace burnt radio elements.
- Step 9. Check the operation of the LCD monitor. If the monitor continues to blink, check the voltage at the test points on the board. This requires knowledge of circuit design, as well as a service manual with an ideal circuit. Further actions are difficult to describe in general terms. This is where the creative process of the Repairman begins. To discuss, write in the comments or contact.
- Step 10: If you successfully repair the flickering LCD monitor yourself, do a test run for 2-3 hours in a disassembled state. After this, the monitor can be assembled and used.
TV repair cost
The cost of repairing a television receiver can only be determined after diagnosing the device and identifying the problem and ranges from several thousand to half the cost of the TV. To find out the exact price, you will need to contact the service center staff.
Conclusion To understand why part of the TV screen or the entire monitor does not light up, you need to disassemble the TV and diagnose it. If you don’t have confidence in your own abilities, you should call professionals for help so as not to cause even more damage to your equipment.
We exclude “harmless” reasons
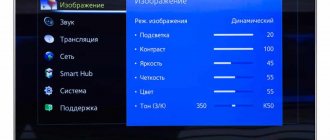
Before you start worrying about the state of the matrix or other screen components, you should rule out the possibility of incorrect settings.
- Checking the screen brightness . If the image has dimmed or disappeared completely, although everything was fine before, experiment with the brightness of the monitor. Press and hold the Fn button and then the brightness key several times. If the computer does not respond, move on.
- Check if the screen is on . We check whether the power button is stuck (in the range F1-F12). This could happen due to a foreign object getting under the key or physical wear and tear on the keyboard. You can remove “sticking” using a toothpick or other sharp instrument. The power key may have been pressed accidentally: try pressing each of the buttons from F1 to F12 in turn. If the screen works, the reason has been eliminated.
- Reset hardware settings. Try turning off the power, remove the battery (usually it is located on the side or bottom of the laptop, in a special compartment). Press the power button and hold it for 20-30 seconds. Then insert the battery, connect the computer to the network. Try starting the system.
- Updating video card drivers. If the problem is a software glitch, the drivers may be damaged and installing new ones will solve the problem.
- Connecting an external monitor to a laptop. If you have a spare work monitor, try connecting it to your laptop. This is done through a special connector. If an image appears on the external monitor when you turn it on, then the problem is much more serious than in the situations listed above. Perhaps it is associated with a breakdown of the video card, matrix, or damage to its parts. Then there is only one way out - turning to professionals.
Let's look at each problem in detail to understand why the screen on a laptop goes dark and goes dark.
As you can see, if the screen of your laptop dims after a certain period of use, there are many reasons for this and the user is unlikely to be able to figure them out on his own. A laptop display is a very fragile part that requires careful handling. If it goes out, then do not try to fix the problem yourself. And why risk the life of your device like that if there is our Telemama service center, which you can completely trust!
We will return your device to normal operation in just a few minutes, and if you need to replace any part, you won’t have to wait long for the result either, because we always have all the necessary components at hand and always at an affordable price. You can view all prices in our price list or find out by contacting our operator, who will be able to provide you with the necessary information.
The results of our work are always backed by a long-term guarantee. Contact us and you will understand what real service and quality of work should be like!
Our prices are 2-3 times lower than those of competitors - we guarantee it! For example, only we offer matrix replacement at a wholesale price. If competitors' prices are the same or lower, we will give you a discount. But let us immediately note that it is unlikely that somewhere you will come across a price at least approximately the same as ours.
How to make your laptop screen brighter?
Master's answer:
If in the past everyone knew that a monitor could harm your eyesight, now the most you can face is unnecessary eye strain. Simply adjusting the brightness of the image in accordance with your vision will help neutralize this negative factor. And if this is easy to do on a desktop computer monitor, then how can you adjust the contrast on a laptop screen, for example? For example, make the image lighter?
Required: Basic knowledge of working with a laptop.
The laptop does not have a button to call up the monitor menu. The screen and keyboard are connected exactly in the place where the desired buttons are located on a desktop computer. Press the Fn key, which is usually located in the lower left corner of the keyboard, to open the brightness adjustment window. While holding it, press the F(F5) button with the sun icon.
Why does the computer screen darken?
Developers of individual computer elements try to make the process of using the gadget as convenient as possible. So, a laptop or desktop monitor may have a sensor that analyzes lighting conditions. It works in a similar way as a similar sensor on a smartphone. And thanks to the functionality of Windows 10, the user turns on or off adaptive brightness control (changes in the backlight level depending on the ambient light).
This option is the main cause of the problem when the screen suddenly goes dark. After all, sometimes the sensor incorrectly recognizes the environment, which is why it mistakenly reduces the brightness.
Basic malfunctions of LCD (LCD) monitors
Modern LCD monitors are complex devices constructed from an active LCD matrix, a power board, an inverter board and a matrix backlight system. Since the assembly is carried out from parts from different manufacturers (there are no more of them and in different factories under different conditions, the quality, accordingly, is very different for models even from the same manufacturer. There are cases of manufacturing defects, as well as defects in soldering, assembly and errors designing the electronic circuit of the device.Repair of LCD monitors comes down to analyzing the symptoms of a malfunction, localizing the failure and debugging by replacing parts if necessary.
Typical malfunctions of modern LCD monitors
- The power supply board is faulty. In this case, the primary electrical circuits burn out, while the internal circuits often remain intact.
- Failure of the voltage inverter. The inverter is responsible for supplying high voltage to the backlight lamps. In this case, the screen will be dark, and when illuminated under a table lamp, it will be faded.
- Failure of backlight lamps. The display is either dim or completely dark. Lamps can “die” due to mechanical damage, “shrink”, or simply burn out due to their operation at increased brightness.
- Failure of the control board with the processor. In this case, the image may be geometrically distorted, a message about incorrect resolution, frequency, or parameters may be displayed, and the image may move.
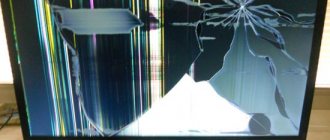
- Mechanical damage to the matrix, ingress of water or other liquids and foreign objects into the device. Part of the image, stripes, or streaks may be displayed. Objects falling inside can be fatal to the monitor.
Practice shows that most failures occur in electronics.
In particular, inverter transistors, electrolytic capacitors that were incorrectly selected by the developer and faulty and soldering defects fail. The matrix and backlight lamps themselves never fail, only due to mechanical damage. It happens that the lamps dim or one of the backlight lamps fails.
In this case, the image will be darker and faded. According to statistics, BenQ monitors, as well as Samsung and LG monitors from “unsuccessful” series and batches, are most often repaired.
Backlight system malfunctions
The backlight system is organized in approximately the same way in monitors from different manufacturers.
- An LCD matrix is a set of LCD crystals arranged in a grid matrix.
- Each matrix cell is connected to a thin film transistor (TFT), which controls the opening and closing of the LCD cells. In fact, we get a matrix of conductors.
- Behind it there is a reflective layer and at the edges there is a matrix illumination system, consisting of 2 or 3 pairs of cold cathode lamps.
When one of the lamps stops glowing, the brightness of the monitor decreases significantly and the backlight becomes uneven.
If all lamps are turned off, the screen becomes dark. The screen can go out either due to the fault of the lamps themselves or due to the electrical circuitry for controlling them.
Replacing a burnt-out lamp is quite difficult.
- Firstly, they are very fragile and crack with any careless movement.
- Secondly, a voltage of about 1000 V is supplied to the lamps, which requires removing static electricity from the lamp control circuit.
- Thirdly, it is quite difficult to find similar lamps that have failed.
The most common electronic part of the monitor that fails is the inverter board . This board contains control transistors and step-up transformers, which supply high voltage to the backlight lamps.
Lamps may also go out if the factory solder is of poor quality. In particular. This may appear after a certain period of work. Usually both lamps turn off at once, this is due to the peculiarities of their connection according to the circuit. During operation of the monitor, the boards and electronic elements heat up, and if there are soldering defects or microcracks, the contact becomes “floating” due to the different heat capacity of the elements.
Electronics malfunctions
Lately, monitors with broken or oxidized contacts, overheating of elements, as well as poor-quality factory soldering or corroded soldering are increasingly being received at our service center.
In modern soldering processes, “active flux” is used, which must be removed after soldering. At some factories, the technical process is disrupted. If the flux is not removed from the board, then after some time it begins to corrode the soldering elements. As a result, after 1.5-3 years the monitor fails.
There are also cases of malfunctions of the control board processor. These are the most difficult cases of repair. Sometimes, in case of failure, warming up the contacts, processor or board with a soldering hair dryer helps.
In particular, “glitchy” MICOM processors installed in some lines of Samsung and LG monitors are famous for this. If the processor overheats or fails, then it must be replaced with exactly the same one, which can sometimes be quite difficult.
All these electronic malfunctions require the engineer to have extensive experience and the use of special tools, and sometimes entire complexes. All this can be found in our service center.
Alexander Dudkin, service engineer
| Find out the cost of repairing LCD monitors! |