Progress does not stand still and almost every day something new appears or something already familiar to everyone is improved. The same thing happened with the TV - it is experiencing a rebirth. 10-15 years ago it was the main center of entertainment for the average family, in front of which everyone gathered, from young to old. Then, with the advent of the Internet into homes, and at high speed, it led to the fact that the younger generation moved to computers, tablets and laptops. And so, a couple of years ago, TVs first had a LAN connector, then Wi-Fi adapters (first external, as an option, and then built-in). In parallel with these TVs, multimedia capabilities were added - a built-in video player, integration into a home network, the ability to connect to the Internet and clients for popular social networks. Then the entire software complex was brought to a more or less general form and given the name - Smart TV. Thus, now the user actually receives a computer system in the form factor of a flat-screen TV. Moreover, some manufacturers use Linux and Android operating systems for their TVs as a Smart TV platform.
And despite the fact that manufacturers have made connecting a TV to a home network and the Internet as easy as possible, this procedure still causes difficulties for many people. I'll tell you about everything in order.
What do you need to connect your TV to the Internet?
First of all, to connect your TV to the Internet, you need a Wi-Fi router, and it doesn’t matter whether you connect the TV via cable or via Wi-Fi.
The thing is that home routers without Wi-Fi cost 150-200 rubles cheaper than the simplest Wi-Fi router. But for these couple of hundred rubles you will also get a full-fledged wireless network at home, to which you can connect smartphones, tablets or laptops. Therefore, I believe that it is not worth saving on this. Why do you need a router? And then, the TV itself does not know how to connect to the provider’s network - a PPPoE or L2TP client has not yet been built into it. Even if your provider uses the IPoE connection type (Dynamic or Static IP), it will still most likely use MAC address binding and you will not be able to connect so easily. The router will solve these problems - it will connect to the provider and distribute the Internet to connected devices.
How should the router be configured to connect a TV to it?!
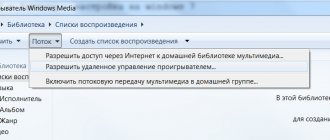
You don’t need to make any tricky settings to connect a SmartTV TV to the router - it’s enough just that the DHCP server is enabled in the LAN settings. If you connect your TV via Wi-Fi, of course you must also have a wireless Wi-Fi network configured - see here for more details.
What else might you need to connect your TV to the Internet?
To answer this question, let's decide - will you connect the TV via cable or via Wi-Fi?! Let's consider both options.
Simple steps to determine your IP address
If you need to determine the IP of your TV, then there is nothing difficult about it.
Your TV must be connected to the Internet or home network. Next, in the menu settings, you will need to find the item responsible for the network connection, and already in the network settings you can find the IP address of the TV. This procedure is universal and suitable for most modern TV models from various manufacturers. It is important to understand that an IP address can only be assigned to models whose characteristics allow you to set up an Internet connection. Our electronic catalog widely presents models with the ability to connect to the Internet.
It is worth noting that most often, difficulties for users arise precisely at the stage of connecting the device to the network. Let's take a closer look at the situation when the connection between the TV and the router is established, but there is no connection to the Internet.
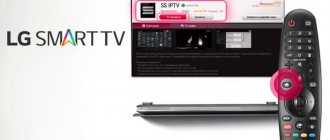
KIVI 32HK30G review
KIVI is a new smart TV manufacturer in our market. The company offers an interesting ratio of features and cost, gives a 3-year warranty on all TVs and provides 24/7 support, so its solutions are worthy of attention. I received a KIVI 32HK30G model with a 32″ diagonal and a full set of SmartTV capabilities, some of which I have already become acquainted with and want to talk about setting up here. It is important to note that this TV is completely Russified and when setting it up and using it, you don’t have to worry about translating certain menu items, and there is also an application for your smartphone that duplicates the actions of the remote control and greatly expands its capabilities. Needless to say, the application is also in Russian?
What to do if the IP address of the TV is not displayed during a wireless connection
Initially, you should determine whether your device has been assigned an IP. To do this, in the menu settings you need to select the section regarding the network, go to settings and look at the TV’s IP. An IP consisting entirely of “0” will indicate that there is no connection in the “TV-router” pair. To solve this problem, you need to double-check the TV's connection status to the network. To do this, you need to go to the wireless network settings section. If the device is not connected (“Not connected”), there is a possibility that the TV is outside the coverage area of the router. In this case, it will be necessary to reduce the distance between them or connect the devices using a cable. If the connection does not appear, then you need to test it by connecting some other device to the router. If the test shows the presence of the Internet, then you will need to contact representatives of the TV manufacturer. If there is no Internet, then you will need to seek help from representatives of your Internet connection service provider.
What to do if the IP address of the TV is not displayed with a cable connection
In a wired situation, you will need to take the time to check the cables in all accessible areas. If after restarting the problem was not solved, you should test the connection again through another device, and then contact either representatives of the manufacturer or the company that provides you with the Internet connection service.
Why do you need to know your TV's IP?
We figured out how to find out the IP of a TV and solve problems with connecting the TV and router, but why do we need information about what IP is assigned to the device? To understand the essence, it is enough to indicate that IP is a unique address of a network node and it is necessary for connecting computers with each other. For example, if the TV does not connect to the Internet, then you need to manually enter the network settings, in particular, the IP address and other parameters.
Setting up your Kivi TV
Our technicians service and configure your Kivi TV to TV channels, connect to the Internet, and adjust optimal image and sound settings. Maintenance of Qiwi TVs is carried out on-site at the customer’s location in all districts of Moscow and the surrounding Moscow region. We know how to set up channels on a Kivi TV .
TV Kiwi instructions
Kivi TVs , various models of which are presented on the website https://electrodim.ua, are very popular in Ukraine, and recently they have begun to appear in Russia. On our website you can download the instructions and the TV User Guide. By the model name you can determine the main technical parameters. For example, Kivi TV 40UR50GR: Screen diagonal 40″ U - screen resolution 4K UHD (3840×2160), F- 1080p Full HD (1920×1080), H- 720p HD (1366×768) According to the operating instructions, the Kivi TV has the following features:
- DVB-C, DVB-T2 - receiver of digital and analogue television programs from an over-the-air antenna or cable
- Monitor - viewing video from external sources, including from a personal computer
- LCD Display - Liquid crystal TV has a screen with high brightness and image contrast and allows viewing from any frontal point thanks to a wide viewing angle
- Memory - Built-in internal memory is capable of storing information about configured 100 analog and 1000 digital channels, preset and custom image and sound settings.
- USB - The presence of a port allows you to view from external devices and record your favorite TV program on them.
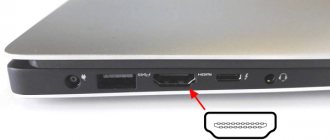
- HDMI - high-speed HDMI connectors with support for protocol 2.0, HDMI ARC combining simultaneous transmission of video and audio signals via cable, HDMI CEC allowing you to control several electronic devices connected to the TV with one remote control.
- DLNA, AirPlay - Support for DLNA and AirPlay, the presence of a Wi-Fi module and an Ethernet port allows you to exchange data with other devices in wired and wireless mode.
On the side and back of the device there are ports: HDMI x 2, Audio input x 1, Audio output (3.5) x 1, Composite video input x 1, USB x 2, LAN x 1 Optical audio output x 1. Mounting the TV to the wall carried out using a bracket that has the VESA 200×100 standard. In front, under the screen, there is a special control joystick that allows you to switch channels, adjust the volume, enter the menu and configure the necessary parameters without a remote control.
When to contact a service center
We bought a 32FR50WR today, the speaker hisses as it heats up. What to do?
If such a malfunction occurs, you should contact the warranty workshop. Since the TV was purchased literally yesterday, you can also contact the store for a return, exchange or repair.
3.6.2020 43UR50GU How to remove split screen on TV?
There should be no split screen on your TV.
Remote control for Kivi TV
The remote control for the Kiwi TV with the designation of the control buttons is shown in the figure:
1. : Turn on\turn off the TV. 2. : Turn on/off speaker sound. 3. Aspect :Change the aspect ratio. 4. OK : Confirm\Enter\Run. 5. : Arrows are used to navigate menus and change channels. 6. : Return to the main menu page. 7.: Options\Settings\Context menu. 8. : Exit \ Back. 9. VOL +/- : Adjust the volume level.
Remote pointer Kivi
For the convenience of using the functions of the Smart TV Kiwi, you can use special remote control-pointers (may not be included with the TV). To use the remote control, you first need to connect the radio module and insert the batteries.
The Kivi AK86 remote pointer is a compact and convenient device for controlling the TV cursor, operating on a radio connection. Also on the Kivi AK86 remote control there are buttons for turning on and off, switching programs, adjusting the volume, playing video, controlling the menu and confirming selections, the Home button and the Mouse button.
The Kivi K1 remote pointer with keyboard is a thin and convenient module with maximum functionality, which also works on a radio connection, has a built-in battery, backlit buttons and a QWERTY keyboard. Also on the Kivi K1 remote control there are buttons On/Off, Volume up/down, Mute, Cursor activation, Browser, Navigation and Confirmation buttons, Home, Back, KIVI TV activation, Menu/Options, Back, Picture modes, Playback control , Backlight.
On our website you can download a TV remote control, location and designation of remote control buttons.
Controlling your TV with the remote control
03/12/2020 Tell me how to connect the kivi rc 18 remote control to the Kivi 24HR50GU TV manually.
This remote control works via Bluetooth. Synchronization is required, which occurs when you first turn it on. You can repeat the first power-on mode by resetting to factory settings. It can also be connected manually through the settings menu.
22.12.2019 Kivi 24HR50GU how to switch channels for example from 5 to 62
01/09/2020 How to change the channel serial number of Kivi 24HR50GU? For example from 48 to 16
8.4.2019 How to find the Kivi 24HR50GU channel menu to quickly select channels after configuring them
40UR50GR How to quickly switch a channel, for example from 5 to 123, are there other options besides pressing one at a time? 06/03/2018, Mariupol. 4.18.2019 Kivi 32FK30G how to immediately dial a channel (for example 45)
On your remote control, you need to use the Aspect button (bottom left) on the remote control to call up the “quick menu” mode. Using the navigation keys and the selection key, select the item: “Go to channel number”.
02/09/2020 32HK30G Please tell me which remote control with a mouse function is suitable for a smart set-top box. Is it possible to replace the included remote control with a remote control with numbers and Qwerty. 12/18/2018, Losino-Petrovsky
Kiwi TVs are compatible with standard remote controls with Bluetooth or infrared control (depending on the model). You can also use your smartphone as a remote control. You need to download the Kivi Remote app from the Play Market or App Store and follow the steps to install it. For correct operation, the smartphone and TV must be connected to the same home network. There are no special requirements for smart set-top boxes; the TV is connected via HDMI or AV port to the set-top box and works as a simple monitor.
08/22/2021 KIVI 50U730GR The TV does not connect to the WiFi network, the remote control does not work and it is not possible to enter the settings
To adjust settings and control the TV, you need a standard, working remote control.
How to set up your TV
Setting up your TV
Setting up the Sources menu
This section contains the following items: Antenna, Video input, HDMI, Component input. To view channels, press OK and select “Antenna” using the arrows on the remote control. To switch to the desired item, use the arrow buttons on the remote control and the OK button.
Customizing the Files menu
This section contains the following items: File manager, Menu filters: Images, Videos, Music and Applications. These sections are intended for viewing files on internal and external media. You can display only a particular type of media content using these submenus. Use the arrows to select the File Manager section. Use the arrows to select the subsection you need and click OK to start.
Setting up Qiwi TV channels
While in the Digital or Analog TV menu, press the Options button to display the settings menu. Select the first item Channels to search and configure channels. 1.1 Antenna Type Press Left or Right to select External Antenna or Cable Connection. 1.2 Auto Setup Press OK to go to the country selection menu. Select search type: Analogue\Digital\ATV+DTV. Select the region you are interested in using the arrows and OK. After selecting a country, click OK to start the search. 1.3 Manual setup of Digital TV Press OK to enter this menu and select the required channel number, its parameters, to start searching according to the specified parameters. 1.4 Manual setup of analog TV Navigate through the menu, setting up the necessary sub-items using the arrow buttons, as well as adjusting the image. At the bottom of the menu, click “Save” after finishing the adjustment. 1.5 Editing Channels Navigate through this menu to block channels, add to favorites, change names, and more. Changes can be made using the colored buttons on the remote control. To change the order of channels, press the yellow button on the remote control on a channel and drag it to another position, then press the yellow button again. To rename a channel, use the green button.
Setting up broadcast channels
10/6/2021 Kivi 24H510KD Stopped showing channels, the internal t2 may have stopped working
This is due to the receiving terrestrial antenna. Check that it is in good working order and is correctly oriented towards the television tower.
1.6.2020 40UR50GR There is no Belarus in the channel search
Select Russia or another CIS country.
12.30.2020 Kivi 24hr52gr How to set up digital channels?
Be sure to check before setting up whether you have chosen the correct digital tuner: DVB-T for terrestrial or DVB-C for cable digital channels.
Image Settings
18/4/2019 32HR50GR “how to adjust brightness, contrast, backlight”
4.25.2021 kiwi 43u800bu When T2 is turned on through the channel replacement menu, there are two lock icons on a black background - locked and unlinked, active lock. It is not possible to switch to subordinate mode using any button on the remote control. When pressing the target, the same. How to open the view of T2?
The settings are made in the corresponding section of the Menu. You should be aware that changing the parameters of a preset setting is only possible in the “Custom” mode
Updating Kivi TV firmware
Firmware update
Updating the software firmware is a procedure that precedes contacting a service center. The TV began to act up, some functions disappeared, the controls changed, etc. - a reason to update the software. The new firmware should be taken from the manufacturer’s official website https://kivismart.ru/support-center for the TV of your brand and your serial number.
Please note that the procedure will delete all your settings and personal data. After starting the firmware, under no circumstances should you turn off the TV before the main menu appears on the screen; the procedure can last up to 15 minutes. Download the firmware file to your computer, and then write it to a flash drive previously formatted in FAT32. The file name should be renamed to “Mstarupgrade”. Turn off the TV into standby mode, insert the USB flash drive into the USB port, press the power button on the TV body and hold it until an image of the update process appears on the TV display. The end of the firmware is the appearance of the Main Menu on the screen.
If you cannot flash the device, try taking another flash drive, or inserting it into another USB port. If nothing can be done, or the update procedure went well, but problems remain, contact an authorized service center.
How to update firmware
4.5.2021 Kivi 43fk30g How to update your TV
8.27.2020 kivi 40ur50gu TV firmware.
This section is devoted to how to update the Kivi TV firmware.
12.5.2020 KIVI Version 5.1.1 (529) After updating the TV, applications do not play videos, they are constantly loading
The firmware update file should only be taken from the manufacturer’s official website.
In what cases is it worth updating the software?
9.25.2019 40FK30g Digital channels get confused, tune in and disappear after some time...
9.5.2019 32FP50GU The TV turns on, the Android OS appears on the screen, and then the screen suddenly goes dark and turns off
10.4.2019 55UC30G Videos on YouTube periodically freeze. You have to turn it off only through the outlet.
13/1/2021 Kivi 43U710KB [4K UltraHD, 3840×2160, Smart TV The provider has uhd channels, retuning does not look for these channels, but skips them. Requires H.265(HEVC) codec. Is this model compatible? And why is there a pass? For example, there is 221 DTV channel, then 222 should be uhd, but the TV skips it and the next DTV channel 223 comes out. But the uhd channel does not come out. How to fix this?
3.21.2020 40FK30g How to disable mouse mode. When you go to the Internet, the search engine throws it out and says mouse mode is off.
Simple steps to determine your IP address
If you need to determine the IP of your TV, then there is nothing difficult about it. Your TV must be connected to the Internet or home network. Next, in the menu settings, you will need to find the item responsible for the network connection, and already in the network settings you can find the IP address of the TV. This procedure is universal and suitable for most modern TV models from various manufacturers.
It is important to understand that an IP address can only be assigned to models whose characteristics allow you to set up an Internet connection. Our electronic catalog widely presents models with the ability to connect to the Internet.
It is worth noting that most often, difficulties for users arise precisely at the stage of connecting the device to the network. Let's take a closer look at the situation when the connection between the TV and the router is established, but there is no connection to the Internet.
Smart TV KIVI 32HK30G reviews and prices
The page for this model on the official website is KIVI 32HK30G
The TV can be found for sale on Yandex.Market, the price starts from 14,790 rubles. (as of the end of November 2018), and this is the most affordable model with such a diagonal and HDR support. The closest analogue - Xiaomi Mi TV 4C 32 costs 15 thousand rubles, options from LG and Samsung - 16 thousand. and higher.
Reviews on the TV are generally positive; buyers note the bright and colorful picture, the simplicity of the interface and the ease of use of the remote control.
What to do if the IP address of the TV is not displayed during a wireless connection
Initially, you should determine whether your device has been assigned an IP. To do this, in the menu settings you need to select the section regarding the network, go to settings and look at the TV’s IP. An IP consisting entirely of “0” will indicate that there is no connection in the “TV-router” pair. To solve this problem, you need to double-check the TV's connection status to the network. To do this, you need to go to the wireless network settings section. If the device is not connected (“Not connected”), there is a possibility that the TV is outside the coverage area of the router. In this case, it will be necessary to reduce the distance between them or connect the devices using a cable. If the connection does not appear, then you need to test it by connecting some other device to the router. If the test shows the presence of the Internet, then you will need to contact representatives of the TV manufacturer. If there is no Internet, then you will need to seek help from representatives of your Internet connection service provider.
Wired connection (LAN)
The easiest and fastest way to connect Smart TV is using a cable. If the router is configured in DHCP mode (that is, in the mode of automatically distributing IP addresses), then you just need to insert the Internet cable into a special LAN port on the back of the TV. Otherwise, you will need to do the following:
- Connect the Internet cable to the special LAN port on the back of your TV.
- Select “Network Settings” -> “Cable”. Here you need to manually enter the IP address (usually 192.168.1.2, but depends on the settings in the router itself), subnet mask (standard 255.255.255.1), gateway (again, often takes the value 192.168.1.1, but you need to see how the router is configured ), DNS server – (8.8.8.8).
- After entering the required data, click OK.
Wireless connection (wi-fi)
The second way to connect Smart TV is wireless, via wi-fi. If the TV does not have a built-in Wi-Fi transmitter, then you need to buy a special Wi-Fi adapter and insert it into the USB port. Problems may arise if the network has an outdated encryption type, such as TKIP, TKIP AES, or WEP.
To establish an Internet connection, follow these steps:
- Go to the menu and select “Network Settings” -> “Wireless”.
- A list of available Wi-Fi connections will appear. Select the required network. If you have it hidden, you will need to enter the identifier manually (SSID). Next, enter your password.
- In most cases, wi-fi is configured in DHCP mode and after entering the password, the TV will receive all the necessary settings automatically and connect successfully. If not, then you will need to perform similar actions as when connecting via cable - entering the IP address, gateway, subnet mask, and DNS server.
- Next, click OK and wait for the result of the operation.
How to connect the Internet to a TV without Smart?
Before you connect a regular TV to the Internet, it is worth noting that by default this is not possible. You will either need an additional device, or you can use the method of broadcasting a picture from a computer (previous method).
Method 1: via set-top box
The simplest and working method of how to connect the Internet to a TV without Smart. A special set-top box does exactly what Smart TV does. It processes the content, and the TV can only display the picture. There are a lot of good TV Boxes now.
There are a couple of ways to connect an Internet set-top box to a TV: HDMI or tulips. In addition to connecting devices, you need to set the appropriate parameters on the TV Box. Setting up the Internet differs little from the instructions described above. You will also have to open the settings, find an available network and enter a password for it, but all this is done on the set-top box, not the TV.
Method 2: via PLC adapter
The PLC adapter allows you to use the home's electrical network as an Internet signal conductor. The method eliminates the need to lay new cables. The adapter connects to an outlet (not to a surge protector or extension cord, but directly) and distributes the signal.
The principle of connecting the Internet to TV via a PLC adapter:
- We connect one Ethernet cable to the router, connect the PLC adapter to it and plug it into a power outlet.
- The second cord is connected with one plug to the receiver, and the second to the PLC adapter.
- We connect the TV receiver and TV tuner.
Method 3: using a Wi-Fi adapter (USB or HDMI)
It is important to choose an adapter specifically for a specific TV model; it must fit. It connects very simply - into one of the available USB or HDMI connectors. It allows you to replace the built-in wireless communication module, which is missing on the TV, that is, further connection is identical to the case with Smart TV.
Connecting to a network using WPS
There is also a faster way using WPS technology (TP-Link routers call this function QSS). It is necessary that both the router and the TV support this function. To connect using this method:
- Open the menu item “Settings” -> “WPS”.
- Find the WPS button on the router, press it and hold it for some time. Typically this process is completed in a few seconds, but in some cases it may take up to 1 minute.
- The connection result will be displayed on your TV screen.
As you can see, when using this technology you do not need to enter any settings at all, everything is registered automatically. This is its big advantage.
Connecting your TV to the network using Plug & Access technology
There is another option for connecting your TV to the Internet - using Plug & Access technology. This technology was developed by Samsung; not all routers support it, so first check its description to see if this function is available. To connect using this method, do the following:
- Insert any USB drive (flash drive) into the router.
- Wait for the indicator light of your access point to blink, then remove the flash drive.
- Insert the flash drive into the USB port of your TV.
- Wait a few seconds, everything happens automatically.
- After successfully connecting to the Internet, remove the USB flash drive, you're done.
After completing these steps, the TV will be connected to the Internet and it will be possible to use the Smart TV function.
Setting up IPTV viewing on Samsung Smart TV
IPTV, also called IP television, is a new technology for viewing TV channels over the Internet. The main advantage of IPTV is a certain interactivity that regular television does not have. From the list of programs and films, you can choose what to watch, you can pause the viewing, rewind the viewing, leave a review of the program, set up parental controls, etc.
To use IPTV on regular TVs, you need to buy an external set-top box. However, with Smart TV you can use IPTV by simply installing a special application from Samsung Apps from the provider. Applications for watching IPTV include nStreamLmod, 4TV and others.
Samsung Smart TV technology has proven to be convenient and is actively gaining popularity. Use Smart TV to richly expand the possibilities of your home television.
Popular services for watching free channels
There are many servers for free and paid viewing of TV channels.
But in order not to get confused in their large number, you need to understand in detail which services are popular among users today.
These include:
1. Zoomby.ru . It allows you to watch movies and TV shows for free on Smart TV.
The service is very easy to use because on the left side there is a convenient menu where the user is allowed to look at the genre of the movie and then its name.
The advantage of this server is that it actually offers users a large number of films and is completely free.
The disadvantage of such a server is that, next to high-quality films, there are also amateur films that are of low quality;
Photo server for watching movies Zoomby.ru
2. ivi.ru. This server is considered one of the largest movie repositories, since about 60 thousand different films are collected here).
In most cases they are offered for free, but there are also films that can only be viewed for a fee.
Therefore, you will often see an offer from the server to subscribe and watch your favorite TV series and movie channels in the future completely free of charge.
Subscription also makes it possible to get rid of annoying advertising. If the user continues to work with the server without a subscription, then after a while advertising will turn on, just like on a regular TV;
3. Tvigle . Also a popular site in Russia, which focuses on Russian classics, but you can also watch foreign films here.
The server is also very conveniently made and all sections on films are divided into certain categories (there are 18 in total.
The only drawback of such a server is that new products in the world of cinema will not be available to users.
Because very few of them are released here, but all other films can be watched at least 100 times.