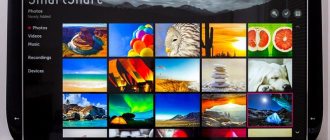
Using DLNA, you can synchronize your home computer with your TV and view various media content on the TV screen. You need to make sure that your TV supports this standard. Some TV manufacturers create their own data transfer standard based on this technology, which is why Samsung calls this function AllShare, and LG calls it SmartShare.
The setup takes place in 3 stages:
- create a DLNA server on PC
- share the necessary files
- connect your TV to this content
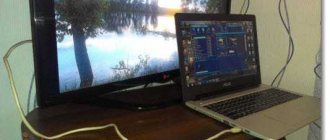
Connecting TV to PC
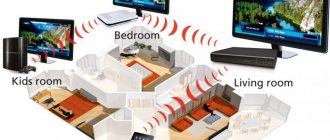
For this technology to function, you need to connect your TV and computer into one local network. This can be done either via an Ethernet network (connection via cable) or via a wireless Wi-Fi network. In the first case, insert the cable from the router into the LAN port of your TV, the connection will happen automatically. In the second, go to the TV settings, select “Network” -> “Wireless”, select the desired network from the list and enter the password for it.
You can also connect your TV to your PC directly. You need to connect the LAN ports of your computer and TV with a cable, and then set the network settings:
- On TV, for example: IP 192.168.1.2, subnet mask 255.255.255.0, gateway: 192.168.1.1
- On the computer like this: IP 192.168.1.1, subnet mask 255.255.255.0, gateway: 192.168.1.1
To create the necessary server on Windows 7 and 8, you need to install a special program (for example, Twonky, Plex, TVersity), or use the standard Windows Media Player.
About DLNA technology
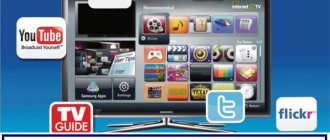
DLNA is a technology for streaming multimedia data within a local network. It is not as advanced as modern wireless Miracast and AirPlay , because it does not provide for wireless projection of device screens onto TVs and monitors that support these technologies. But DLNA technology is notable for the fact that when used, you can work with devices connected to a local network using both wireless and wired connections. All we need for DLNA to work is for all devices to which media content from the computer will be broadcast to be connected in any way to a single local network provided by the router. Another plus of DLNA: this technology is provided by many budget and outdated models of media set-top boxes and Smart TVs that do not have Miracast or AirPlay.
DLNA technology works on the principle of running a DLNA server with media content on a computer. You can connect to this server using client applications on media devices - media set-top boxes, Smart TV, mobile devices. All these devices must accordingly support DLNA, and the operation of this technology must be configured for them. And in the environment of client applications on these devices we can start playing video, music, photos from the computer. And we can run all this from the Windows environment by transferring content playback to media devices. And we can also use a mobile device in this process, in particular an Android device. If we install an application on the latter that provides special access to the DLNA server on the computer, we can play the latter’s media content on the Android device itself, on the computer, and on various network media devices that are in the room. In all processes of transferring multimedia data between network devices, our Android gadget will be a controlling intermediary - something like a remote control, with the help of which we can decide what should be played on what equipment in the house at the moment.
Creating a DLNA Server Using Windows Media Player
The first thing you need to do to deploy the server is to check all three boxes in the Stream menu item. Next, open the menu item “Arrange” -> “Manage libraries” -> “Video” and in the window that opens, add a folder for expansion.
Media files will be visible on TV in a few minutes; to speed up this process, select the menu item “Arrange” -> “Apply changes to media information.”
The only inconvenience of using Windows Media Player for these functions is that it must remain open while playing files on the TV.
DLNA client for Android
You can use any third-party client on a smart TV or Android phone. The standard one is hidden far in the menu and is not always easy to find, and the functionality may be poor. Most of all I liked this BubbleUPnP. In fact, this is a large combine that can do a lot of things, but just as a client for the same MiniDLNA it is ideal. And here you can see a list of the most convenient programs for viewing multimedia content on Android.
Watching media content on TV
The last stage is opening files on TV. For Samsung, you need to open the AllShare section; in some models there is a separate button on the remote control for this. For LG – SmartShare section. If the connection to the DLNA server is successful, the files available for viewing will be displayed.
Recently, more and more new technologies are coming into our daily lives. You need to be constantly aware of new products and implement them for yourself; they can increase the level of comfort around you. DLNA is undoubtedly such a technology.
How DLNA works
DLNA standards use UPnP protocols to receive and transmit files, as well as render various content on all connected devices. A local IP network is used as a base, allowing all actions to be performed in real time.
For correct synchronization of devices, equipment must have the appropriate protocols. Devices are connected to a common network via either a router or a Wi-Fi module.
Advice! Finding out if your TV has DLNA is very easy. The box should display the technology logo - DLNA Certified.
Settings
Install an application on your Android device that helps you create a DLNA server. Do the following:
- Launch the utility.
- Click the Plus icon and select folders or files to share.
- Click "Apply" and make sure that the path is selected for the desired folder.
- Then click on the start button (triangle).
- Wait a moment for the server to start.
It is important to understand that an active connection to the server will consume device power. Therefore, it is recommended to charge it before watching a movie on TV for two hours.
To enable media content:
- On another device, open VLC Media Player or the one you chose.
- Click "File" - "Local Network".
- Select the detected DLNA server.
- Open the shared content on it and enjoy viewing in excellent quality.
Is HMS Core needed in Huawei smartphones?
The HMS Core program is a core that acts as an intermediary between the Internet, cloud technologies and the operating system of the Huawei device. It includes a set of necessary services intended for programmers. Professionals and hobbyists use them to develop their own applications. In addition to HMS, APIs and SDKs can be used for similar purposes on the Huawei platform.
There are incentive programs that stimulate the activity of developers and their desire to develop a new platform. The company promised mobile application creators that if their product was posted on the Google store, it could be adapted for HMS in almost 10 minutes. This is possible because Android remains free and open source software.
Although Google is an American company and owns the Android company, open source software has the right to be used and distributed by anyone. Thanks to this, Android captured the world market. Almost 87% of all mobile devices sold in the world run on this operating system. Therefore, the Chinese company did not neglect the advantages that such a wide reach of potential buyers of their products can provide, and took advantage of Android’s developments. That is why this program on Huawei smartphones is quite often used and needed by users.
Huawei devices work using an Android-based shell even after the end of official cooperation
HMS Core includes a set of additional necessary tools to facilitate the development of your future application:
| Services: | Purpose: |
| Wallet Kit | System for accepting payments. |
| Ads Kit | Monetization to generate revenue from advertising. |
| Push Kit | System for displaying notifications. |
| Game Service | Game center. |
As well as analytics systems for improving applications.
Although HMS Core is actively used by software developers, it cannot be removed. It is needed for the proper functioning of some applications. If you really want to delete it, you should create a backup. For example, using Titanium Backup.
What role does HMS Core play on the phone?
You will have to create your own account in HMS the first time you turn on this mobile service. You can download it to your device and test it directly from the Google Play store. Considering the popularity of Huawei technology and the prevalence of Android operating systems, anyone can try their hand at creating HMS Core applications.
This market is still being created, so talented programmers have a great chance of early success. Since HMS Core has a built-in monetization tool, this can become an additional source of income with minimal promotion costs. Now you know everything about HMS Core in your Huawei smartphone, namely, what kind of program it is and whether it is really needed on the device.
What you need
Along with your old Android device, you'll need a home wireless network that your phone is connected to. If your phone or tablet can take a microSD card
You should add one for extra storage.
Likewise, if your phone supports USB OTG
Additional media can be transferred from an external USB hard drive or USB flash drive
,
You'll also need an app, but depending on what streaming media hardware you have at home, you'll need to decide which media streaming software to use.
Advantages and disadvantages
We figured out what DLNA is. It remains to say a few words about the pros and cons of such technologies. Briefly, the main advantage is that files can be transferred using a Wi-Fi-based wireless connection without having to download the entire file to the selected playback device. But the main drawback, by the way, similar to the Internet, is that if the connection speed is insufficient or the size of the file being played is too large, there may be delays in its playback.
Kievyan street, 160016Armenia, Yerevan +374 11 233 255
Sources used:
- https://lifehacker.ru/5-mediaserverov/
- https://hd-tv1.ru/televizor/podderzhka-dlna.html
- https://www.nastroy.net/post/dlna-chto-takoe-opisanie-i-instruktsiya-po-podklyucheniyu
Installing and configuring a DLNA home media server.
As you already understand, in order to create a network between a computer and a TV, you need to install a media server. Launch the program distribution package downloaded from the official website and begin installation.
All you need to do is specify the installation path, check the “Create shortcut” box and click on the “Install” button. The installation process will go quickly, and upon completion, launch the program.
After starting the program, you will be prompted to familiarize yourself with the list of changes. Click the “Close” button and in the new “Initial Settings” window, in the “Devices from the list” drop-down menu, select your device type. Depending on the type of media device you select, the Native File Support field will display a comma-separated list of supported formats according to the documentation.
If your device supports any other types of formats that are not in the list offered by the program, then you can switch to “Custom device” and in the extensions field (movies, music, photos), add the required format, separated by commas. Click the “Next” button.
In the next window “Media resource directories” you need to share, that is, make visible folders or local, network, removable drives for your device. Here you can add your directory with media content (specify the path to it) by clicking on the “Add” button and delete the folders already proposed by the program.
Green dots indicate what type of media content is stored in this directory. I typically share local and removable drives because it eliminates the need to download and move files to specific directories. To do this, you need to tick the necessary boxes and add your local drives. Click the “Done” button. After this, the program will prompt you to scan media resources. Click the “Yes” button.
You can also add all local drives (or selected directories) after installing the media server in the program settings on the “Media Resources” tab. To do this, click the “Add” button and select a local drive, and then “Scan”. After this, the program interface will display the entire list of video files that are stored on your hard drive (see image below). Please note that due to the large amount of media scanning during server startup, the program will take longer to load.
So, decide for yourself how much media data will be available to the server. The fewer local disks (directories) are added, the faster the media server will start.
Go ahead. After the scan is completed, the “Backup/Restore Program Data” window will appear. Here, if you wish, you can specify a different path for the backup directory and set up automatic backups on a schedule. I'll leave everything as it is.
The “Backup directory” field displays the path to save and restore program settings. After you click the “Run” button, the settings will be saved. That’s it, click the “Close” button because all the basic settings have been completed and the home computer-TV network has been created.
I recommend that in the program settings on the “Advanced” tab, check the box “Install the Windows Home Media Server service (UPnP, DLNA, HTTP)” so that the media server starts as a service. After this, confirm your changes by clicking the “Ok” button.
To start your DLNA home media server, just click on the button in the top menu of the “Run” program. Take the remote control in your hands and select your media server from the list.
Now you have your own network between your computer and TV. By the way, if you need to check your TV for dead pixels and, if possible, restore them, then read about it in detail here. That's all I have for today. Bye!
How much do TVs with DLNA cost?
Despite the possibility of using the technology on TVs with a standard set of functions, more and more users are seeking to purchase models with DLNA support. The cost of such equipment varies widely and depends on a number of parameters. The most important is the screen size.
- Compact models with a diagonal of 15-20 inches will cost buyers an average of 10-30 thousand rubles.
- High-definition television panels with a diagonal of over 50 inches are more expensive - 60-150 rubles.
Other characteristics that affect the price of TV devices include:
- availability of additional functions;
- brand;
- Country of Origin.
Domestic models will cost slightly less than their counterparts made in Europe, Asia, and the USA.
Supported devices
This technology works with an impressive, but still limited list of equipment. Developers identify three main groups of devices that can fully support the DLNA standard.
Equipment compatible with the technology:
- Home Network Devices;
- Mobile Handheld Devices;
- Home Interoperability Devices.
The first group includes televisions, stereos, multimedia players, network storage and printers. The second are all mobile gadgets: tablets, video cameras, smartphones and other portable equipment. The last group includes modems, routers, converters and other devices that support specific communication standards.
Using Plex for Android
Use the link above to install Plex for Android, launch the app when finished, and create a new account (or sign in if you have an existing Plex account). Although the paid option is highlighted, you don't need it.
Then click the Share link to allow Plex to use your photos and videos and click Allow in the dialog box. You'll then be able to expand the hamburger menu (sidebar on the left) and select Local Photos and Local Videos. These belong to the default directories on your phone, so download or move videos to these locations.
To set up your phone as a media server, open the menu and select Settings > System. Here, along with the already selected Advertise as a player and Network discovery, select Advertise as a server. You can also turn on Show Camera Media Roll if you want to view photos on your TV or other Plex-equipped equipment.
When installing Plex, install it on another device and sign in with the same account. Click the drop-down menu at the top of the screen to make sure the correct server is selected (in this case, My Nexus 5). After this, you will be able to view the contents of the server device on the player of your choice.
However, note that if library directories are not configured, the content will be marked as "Local" - if a remote device is selected from the drop-down menu, the correct media will be available.
Media Portal
Media Portal is our last media server application on this list. Like most other apps, it works great for the most part.
The media portal is designed to create a unified multimedia interface on your PC. You can connect your local library of movies, TV shows, music, images, etc. and it will curate all the metadata from the web to make it look visually pleasing and organized.
In the future, you can watch TV in sync with your local media files and record it too. Essentially, you'll have a complete multimedia entertainment center that can be accessed from all your local devices. Additionally, you can access your media content over the Internet, but you cannot stream it.
First you need to download it and then you can play it. The reason is that it does not have a cloud relay service and cannot transcode media files in real time. nevertheless.
Ex-link Samsung: what is this connector?
There are plugins, like add-ons on Kodi, that can bring tons of new content and additional functionality to Media Portal. In conclusion, this is a potential alternative to Kodi and if you are looking for some change, you can take a look at Media Portal.
Key Features:
- Free and open source media server application
- Organizing local media content
- Live TV and recording
- Acts as an entertainment center
- Access content locally
- Plugin support
- Supports a wide range of media formats
Available platforms: Windows, Android, Web
Yes it is possible
You might be a little surprised, but it's true - your Android device, once connected to your home network and loaded with your favorite music and movies, can be set up to stream content around your home to compatible devices.
You may have heard of Android TV boxes (such as those running Android TV)
) what kind of streaming video from the Internet? Well, it's a bit similar, but uses existing hardware, an Android device you've deleted - perhaps due to an update - and is much cheaper.
Very similar to using Raspberry Pi as a home media solution
this involves installing software (in this case, one or more applications) and using the device as a dedicated media server. Although it will run on battery power, you may find that plugging in your old Android phone provides a more reliable solution.
So, take your old Android phone, charge it and make it useful again. Stream content from your phone, the web and USB hard drives and forget about that expensive media center.
Using AllConnect - Play Stream
Using AllConnect is similar to casting content from Android to Chromecast, but allows you to send media from your phone on a media server to any DLNA-equipped hardware, and more. It could be a Smart TV (maybe not as secure as you think it is
); network-connected DVD or Blu-ray player; Apple TV, Roku or Amazon Fire TV; Xbox 360 or One; or Playion 3 or 4.
Once installed, launch the app and use the menu to check how your media is organized. The AllConnect app can be used as a player and server if needed, so check the Sources screen and its three tabs to see what local and online sources are available.
All you have to do to stream content to your TV is click the Cast icon in the corner and select your desired network device to cast your media.
Plex
Plex doesn't need much introduction, but if you don't have any idea about it, here's a quick overview. It is a powerful multimedia application that organizes all your media content in one place and you can access it from anywhere.
In a nutshell, this is the ideal app for users who want complete control over their collection of music, movies, TV shows, images, etc.
It works on a server-client model, where you create a server, such as a PC, where all your media content is stored and through a client, such as a smartphone, where you can access it. When you stream media content, videos are transcoded in real time, saving you time and resources.
And it's for this reason that Plex is the best media server app you can have.
Interface with modern design and excellent user experience. You can add local media as well as web sources to Plex and stream them instantly without any latency or buffering issues.
Since each user has their own dedicated media server, there is no cross-traffic, and as a result, Plex delivers excellent performance. Even with low internet speed, you will be able to stream content without any problems. There is both a free and premium version that comes with its own set of features.
With a free account, you can remotely access your local content and listen to radio and podcasts. You can also use the mobile app for Plex, but with some restrictions.
At the premium level, you can watch Live TV and record it. There is a separate library of premium music that you can access other than your local one. All in all, Plex is a complete multimedia entertainment package and you should use it to understand what it's all about.
Key Features:
- Complete client-server media application
- Organize your local media with cloud file syncing
- Live TV and recording
- Premium music and podcast library
- Access content anywhere
- Real-time transcoding; supports a wide range of media formats
- Beautiful interface
Available platforms: Windows, macOS, Android, iOS, Linux, Roku, Android TV, Apple TV, Amazon Fire TV, Chromecast, Xbox, NAS devices
Which media server application should you use?
While there are many apps you can use to create an Android media server, the main options are Plex for Android, BubbleUPnP for DLNA/Chromecast, and Server. But which one to choose? Well, it depends on your existing entertainment setup.
If you have Android TV, another Android device on which you want to watch TV, PC or any other hardware with Plex apps, then Plex for Android should be your choice.
For those of you with Smart TV or other DLNA equipment
Including Google Chromecast, BubbleUPnP for DLNA/Chromecast is your best option.
Filling the gaps with support for Apple TV, Xbox One, Amazon TV, Roku and some of the same hardware as BubbleUPnP, AllConnect - Play Stream is your third option.
Below we will look at using all three solutions. Make sure you have copied some videos or music from your PC
to your Android device before continuing.