When I bought a TV 5 years ago, my only requirement was a good Youtube client, and imagine my surprise when 3 years later Youtube simply disappeared from the SmartTV menu. You see, the TV giant is having licensing problems. Today you buy a TV for the screen and the Android platform, which does not tie you to the licensing hassles of some manufacturer. Modern television has reached such a state that you want to fill the antenna input with lead and put a seal on it: “never turn it on,” and if you spend a couple of hours on software setup, then even the simplest Android TV can be made so that you will jump with happiness, when you turn it on.
I took a budget TV Harper 55U750TS with a diagonal of 55 inches, set up YouTube on it without advertising
, brought games from the smartphone screen to the big screen, connected it to the home media library, launched games from the desktop via SteamLink, and after testing all this, I can say: you don’t need expensive TVs, you can take a simple one and upgrade it with me.
But first, a little about the choice: why Harper? Everything is very simple here: the 55U750TS model is a budget TV in which for little money you get a 55-inch diagonal on an IPS matrix with 4K resolution, LED backlighting, stereo sound and Android. Of course, for Kiselev/Solovyov fans there are also DVB-T, DVB-C antenna inputs, a DVB-S/S2 satellite tuner with a slot for a CI module, but perhaps a satellite is for country houses, and in cities Wi-Fi 2.4 is more important GHz and Ethernet.
The TV has a scanning frequency of 50 Hz, so you don’t even have to think about 3D; the only outputs are optical S/PDIF to connect a receiver or soundbar if you suddenly want to watch Youtube on your home theater. In general, the built-in stereo pair with a power of 16 W perfectly outlines the voice, but there are no deep lows here, and even the built-in equalizer is not felt at all.
Key Features of Harper 55U750TS:
- Built-in processor – 2-core ARM Cortex-A9 with a frequency of 1.2 GHz
- Video core - Mali-400,
- The amount of RAM memory is 1.5 GB,
- Flash memory capacity is 8 GB, of which 4 GB is available to the user.
With such an elemental base you can’t really go wild, but we don’t need much: all our functions, including Youtube, work perfectly, and today it’s common to access Facebook from 4-GHz gaming computers, and even then it’s slow. 3-4 people visit our site every day from Android TVs, and if you are one of them, please write in the comments what makes you watch TV reviews? I can’t imagine it, so let’s get straight to the point.
Harper TV FAQ
Connecting the antenna to the TV
05/07/2020 Harper 28R6750T Smolensk Please help me figure out how to set up the TV for the first time. I bought a Cayman L 941.10 indoor antenna. Which connector should I connect the antenna to? Or do you need a TV set-top box? I inserted where the digital input was, selected the country, language, broadcast. Didn't catch anything. Not a single channel. I don’t have satellite TV, nor cable. How do I set up my TV?
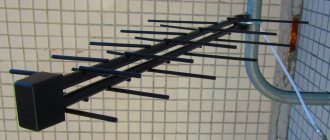
The antenna should be connected to the ANT1 antenna input. There is no need for a TV set-top box. It should be borne in mind that an indoor antenna is not always able to provide acceptable quality of a television signal.
How to install an app on your Harper TV
Please tell me how to download the MX player (video) to a Harper TV, to be honest I don’t know the model, we press the download button, but the download does not start. We tried to download both from the play market and from Google, click on the install button and that’s it, no action happens. TV “Harper” model 28R575T, cable TV, operator “Infolink”, Cheboksary.
You may need to update your software. I recommend contacting the official support service harper.ru/support/. To complete your request, you will need to provide your Harper TV model. As a rule, it is marked on the back wall of the device.
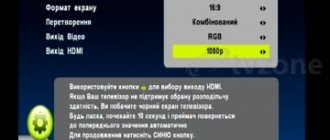
How to set the image to full screen?
How to set an image to full screen. With the given settings parameters, this cannot be done in any way. On all channels, with all parameters of possible dimensional ratios of the settings, this cannot be done. There are always wide dark stripes at the top and bottom of the screen.
Select the "Settings" option from the System Menu. Use the navigation keys to select “Cinema”. Available settings: Auto, 4:3, Wide, Super Live
We can't set up digital TV
We recently purchased a Harper 43″ TV and cannot set up digital TV. Please tell me how to do this. We live in the Moscow Region, the city of Kolomna.
2.9.2019 HARPER 20R575T Irkutsk region, Angarsk city Hello. A question. I was given a HARPER 20R575T TV. I turned it on. I went into the menu to set up channels, went through the entire menu, and there was no automatic or manual channel tuning. The entire menu was immediately in Russian (choice of country, language - nothing like that). How to tune your TV to channels.
9.2.2019 Harper 20R470T Tsiolkovsky, Amur Region Can’t set up digital TV
11/10/2019 Harper 20R575T Podolsk Digital channels have disappeared. Shows only 10 DVT channels. Connecting a common house antenna (17th floor building), output wiring for 2 TVs. TCL is in the room showing, but Harper is not in the kitchen. There was initially a problem with the purchase, we set up the channels in the service center from the store under warranty. I didn’t even go into the settings anymore, I didn’t change anything anywhere, the main thing was what I showed and okay.
1.26.2019 Harper 22f470 Krasnodar Hello. Please tell me how to set up digital channels on this TV from the fobos 2.1 set-top box
6.29.2019 harper 43f660t LCD Chuvashia How to set up channels
Digital terrestrial television can be configured in an area with reliable radio wave reception using an individual antenna. Tuning into 20 channels of two digital multiplexes is configured automatically, having previously set the DVB-T mode on the TV.
Connecting satellite channels
HARPER 40F575T After connecting the CI+ Tricolor module and auto-tuning, I got 1607 channels, although there should be 230 (Unified package), how can I configure it correctly so that there are only my 230 programs, the rest still don’t show (ENCRYPTED), is it really stupid to delete 1300 - which don’t show?
The second question - when setting up the antenna, I deleted all other satellites except EUtelsat 36A/36B, everything shows, but somehow I did something wrong, I think - can I only restore it with the factory firmware? where can I get it? Moscow Region, Fryazevo village
4.28.2019 Harper 28R6750T Cherkassy 1) How to edit satellite channels (move, delete) on this TV. 2) How to turn on the emulator to enter the Biss code on encrypted channels such as TRK Ukraine.
9.7.2019 Harper 40F575T Izhevsk How to set up tricolor on this TV model?
To sort work programs, you must enter the Menu, go to the Cannel Edit section and press the Enter button. Using the Up and Down cursor buttons, the Yellow button, you need to select a channel and move it to the desired location. Pressing the Yellow button again confirms the selection.
Factory firmware can be obtained from an authorized service center. In your case, resetting the TV 40F575T may help. Reset menu, Enter. Reset confirmation - Record button (Rectangle with a red dot).
The message appears on the screen
HARPER 32R0550T The message DTV function not available often appears on the screen. After a few minutes the TV continues, then there are short pauses in the images, but it is impossible to watch TV. Is there anything I can do to fix it? 7.20.2019 harpep 20R470 leftovers (Tver region) when you turn on the TV, “No device” is displayed, i.e. I cannot enter the menu to watch regular channels (ORT, TNT).
This situation is possible if you are watching digital terrestrial television DTV in an area of uncertain reception. In this case, you should correctly orient the antenna, install it in the optimal location, and purchase an antenna with the best reception characteristics.
Initial TV setup, reset to factory settings
4.19.2019 HARPER 40F750TS Nizhny Novgorod was in a hurry when first turned on. I chose Arabic instead of Russian and now the entire TV settings menu is in Arabic and I can’t understand anything, how can I get everything back?
2.9.2020 HARPER 32R6750TS Krasnodon Good afternoon, can you help me set up a wireless connection to the Internet? I missed it during the initial setup, but now it doesn’t work.
05/04/2020 Harper43f660fs Lyubertsy The Internet settings have gone down, I connected wi-fi, but it won’t load any further
You need to do a factory reset. This can be done in the user or engineering menu
How to connect a smartphone to a Harper TV
11.1.2019 Harper 32R6750TS Krasnoyarsk Hello, please tell me how to connect the IPhone to the TV?
Selecting an external device
6.29.2019 Harper 28R660T Harper 28R660T St. Petersburg This model has a VGA connector for connecting to a computer. I connect the computer with a cable and the TV does not see and the computer does not see. It's as if there is a VGA connector but no action. What could it be? Please tell me. Maybe the connection algorithm in this model is different or you need a vga to HDMI adapter. And another question. Via USB it does not see an external drive (flash drive).
Source
Steam Link Android
Gone are the days when we carried the PC system unit to the TV to play games. Now the computer is in one room, the TV is in another, the image from the computer is transmitted to the big screen via an Ethernet network, and in games you use a joystick connected to the TV. In general, Steam Link requires a 1-gigabit network connection, and the Harper, like all modern TVs, has a 100-megabit network. Will it work? Let's check it out! We install the Steam client from Google Play, turn on the “home broadcast” mode on the computer, pair the devices with each other and launch Counter Strike.
Well, what can we say - it’s impossible to play: too long delays are associated not so much with network speed (monitoring shows loading in the region of 15-20 Mbit/s), but with decoding. Having tried auto-simulators and RPGs from the 3rd person, I was only confirmed in the above: if you want to show your friends on the big screen how you are beating someone else’s team in a role-playing game - yes, everything is fine here, you can have fun over a glass of foam, but completely stubborn Steam -ov's controls tailored to their controller, glitches with resolution selection and 100 ms delays kill the whole idea of remote gaming on TV.
Content:
Before you can enjoy watching your favorite movies or TV shows, you need to configure the channels on your device. Setting up a TV is a rather complex and responsible procedure, which, firstly, includes searching for channels, and secondly, it will allow you to remove unnecessary things and rank the list by frequency of views.
This procedure is especially relevant in our time, when the list of channels is regularly updated, which leads to failure of all previously specified settings. When working with cable and satellite television, the task of setting up a TV becomes more complicated.
Why doesn't automatic tuning of TV channels work?
Modern models of television receivers support both manual and automatic channel tuning. Most TV viewers use automatic search, which copes with the assigned tasks perfectly; the user can only remove unnecessary channels from the presented list.
However, for various reasons, sensitive equipment may not be able to recognize the scan range or signal source. In this case, the procedure must be carried out manually.
As practice shows, there are no particular advantages in choosing one or another method of setting up channels. And if the automatic mode can save the user’s time and is suitable even for inexperienced TV viewers, then the second option will require more time and special knowledge, but at the same time provides more detailed channel settings even with poor reception quality.
In particularly difficult cases, you should use the services of a professional teleworker. The cost of his services will depend on the region of residence, distance from the workshop and the company’s pricing policy. In addition, today there are a number of volunteer organizations that help everyone switch to the new broadcast format free of charge.
Broadcasting problems and how to solve them
Sometimes after successfully connecting digital TV, the broadcast quality leaves much to be desired. Don't immediately blame your TV. Channels freeze, sound disappears, a black screen constantly appears with the words No signal . In most cases, the reason for this is a weak signal. Causes of interference. To resolve this problem, try installing the antenna in a different location. Or use a more powerful street one with an amplifier. Also check the TV cable and plug, because often the problem may lie in poor contact. The problem may lie
How to set up a new TV
In order to set up a new TV and connect it to a regular antenna, you need to select your native language on the device. To do this, you need to connect the antenna cable to the successor, then by long pressing the “OK” button on the remote control, go to the Menu, where you select the LANGUAGE item. We mark the language RUSSIAN, after which all settings will be automatically translated into Russian.
Features of automatic channel tuning
How to set up your TV automatically? To complete the procedure, you will need to perform the following algorithm of actions:
- We turn on the receiver, after which a message will appear on the screen stating that “Channels are not configured”;
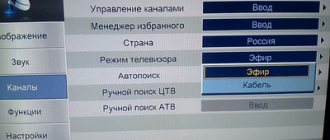
- Using the remote control, go to the Menu, where we select “Channel settings” - “Automatic tuning”;
- Don't forget to indicate the type of broadcast - digital or analogue.
- Press ENTER/OK.
After completing all the steps, the TV will begin tuning channels, scanning the frequency range available to it. On average, Auto Tuning takes no more than a few minutes, after which all saved TV channels are displayed on the screen. If nothing works out, don’t panic. We carefully study the instructions for the device. It must provide detailed descriptions of the settings for this model.
If the operator adds new channels, the setup will have to be done again using the editing option. In this case, the previously created list of TV channels is saved, new items are simply added to it. You can delete the old list using the appropriate command, after which you will have to search again.
Manual channel tuning
If the automatic tuning of TV channels does not work correctly, then you need to use the manual search option. With its help, the viewer decides which channels he wants to add to the saved list.
The algorithm for manual configuration is as follows:
- Turn on the receiver;
- In the Menu, select “Channel settings” - “Manual tuning”;
- Select the “Programs” command and assign numbers to them;
- Additionally, you need to select a color system: PAL or SECAM, sound: 2.0 (stereo), 5.1, etc.;
- We perform a “Search” for channels and save the required TV channels.
The resulting list can be updated or deleted if necessary.
Should I hang such beauty on the wall?
We really upgraded our budget Android TV and proved to you that you don’t need to buy an expensive TV receiver for entertainment. I was certainly disappointed with Steam Link for Android, but let's chalk that up to the "beta" version of the package. Perhaps, when it is finished before release, the delays will allow you to play from the screen. The question remains: should we put our Harper on the nightstand or hang it on the wall?
We took the Harper TVK-1755 bracket to check how comfortable it would be. Any man who knows how to hold a hammer drill and a tool in his hands can handle the fastening, but this should only be done as a last resort if you do not have a bedside table.
The thing is, since the Harper TV's speakers are downward-firing, they need the sound to bounce off some surface, and a nightstand is the best solution if you don't have a soundbar or external speakers. Hang the TV on the wall - the sound will become worse.
The only thing that makes sense to do is to buy a USB extension cable or even a simple hub to move the wireless keyboard and mouse radios away from the shielded area of the high-frequency part. After spending 300 rubles on wiring, you can say to yourself: “I’ve done everything,” and calmly enjoy the new digital age.
Setting up satellite channels
In general, setting up satellite channels is not difficult:
- We connect the TV and receiver using a special cable. We switch the TV to monitor mode.
- Using the remote control we set the satellite settings.
- In the menu we start scanning the satellite. The best option would be to use an automatic search, which will carry out all the necessary actions without user intervention.
- We edit the list of saved channels, remove from it TV channels that most likely will not be viewed by viewers;
When using satellite television, remember that deteriorating picture or sound may be caused by rain, wind or thunderstorms, which negatively affect reception conditions.
Adding regional analogue channels
Most regions of the country support the broadcast of regional analogue TV channels in parallel with the broadcasting of the federal multiplex. To increase the number of TV programs, you need to add them to the list of your TV, for which you need:
- Point the antennas towards the repeater and turn on the search for analog channels in the TV settings menu.
- The further procedure will depend on the receiver model. For example, on Samsung TVs you need to separately indicate that only digital channels should be taken into account in the scan: auto-tuning searches for everything that the antenna receives. In order to catch an analog signal, you need to select the appropriate sub-item.
- After successfully searching for all TV channels, you need to record them in the TV memory.
Important! Modern TV models do not support manual tuning of TV channels. Searching requires scanning the entire range using auto search.
Setting up digital channels
High-definition digital television is a modern television broadcasting standard that provides the highest picture quality under any reception conditions. To set up digital TV channels on your TV, it must be equipped with an HD viewing function. In recent years, an increasing number of TV equipment models equipped with this technology have been produced.
To configure channels on such television receivers, it will be enough to carefully study the manufacturer’s instructions. For most devices, the algorithm of actions is as follows:
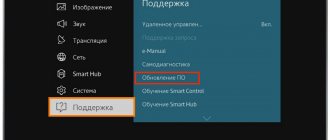
- Menu - Options - Automatic settings - Start;
- Select the Digital Channels section and press start again;
- In Search Mode, select “Full”;
- You will need to enter the following numbers in the fields that appear on the screen: frequency (kHz) - 314,000 (314 MHz), modulation - 256 QAM, speed - 6875 kS/s.
All modern TVs are equipped with a network search option. For those viewers who do not want to waste time manually setting up channels, just turn on network and search and wait a few minutes, which the receiver will need to scan and create a list of saved TV channels.
Connection methods
Next, we will look at all possible methods of how to connect a TV to the global “web”. Be prepared that some methods will not be possible to use due to the characteristics of your TV.
Direct connection via cable
The method assumes that the design has a built-in LAN input. Then you need to take a cable from your provider and insert it into the appropriate port. If the provider “distributes” a dynamic IP, no manipulations on the part of the user are needed. The TV will automatically receive its IP, and you will be able to open all Internet services.
If you are provided with a static IP, then set the settings manually. To do this, follow the instructions:
- In the Smart TV settings, find the Network/Network connection section.
- Click on the “Set up connection” button.
- Select “Manual setup” and then “Wired”.
- Set the IP and DNS provided by your ISP. Confirm the changes.
- The system will build a route map. Click "Done."
Now you can check the functionality of the services, since the Internet should work.
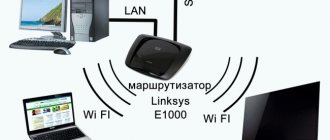
Via router
In most apartments and houses, the home network is organized using a router. It allows you to connect several devices to the network: computer, TV, laptop, and so on. Depending on the type of router, connect the TV via cable or Wi-Fi.
By cable
The method requires you to take the following steps:
- Connect one end of the LAN wire to the input on the TV, and the other to the input on the back of the router (usually marked yellow). The router has several LAN ports.
- Make sure the indicator light for the corresponding port is illuminated.
- Next, in the settings you need to select the type of IP used. If necessary, enter data manually.
- Check the TV's operation.
If problems arise, you can try updating the firmware of the router or the TV itself.
Via Wi-Fi
If you don't want to bother with wires, you can use a wireless connection. Your TV must have a built-in Wi-Fi module. To activate it, follow the instructions:
- Make sure your WiFi router is working correctly.
- Go to Settings and select "Network Connections". If you need to specify the type, then click “wireless”.
- A list of available wireless points should appear. Find yours and then click on it.
- Enter your password and wait for the connection.
Fast and convenient. Please note that some TVs support WPS technology, thanks to which you do not have to enter an access password.
What to do if there is no Wi-Fi module?
In stores you can buy special Wi-Fi adapters that will allow you to connect your TV to a wireless network. There is only one condition - the device must have a USB input. Wi-Fi adapters are visually similar to a flash drive, but they are relatively affordable. For home use, it is not necessary to buy top models.
Please note that for specific TVs there is a list of compatible adapters. As a rule, they are created by the TV manufacturer. Computer models are often incompatible. The most popular gadgets include LG AN-WF100, AN-WF500, Samsung WIS12ABGNX/NWT and PhilIPs PTA128/00.
We use WPS
If you have a login and authorization password on the router, use WPS. To do this, you need to make sure that the router supports this technology. Next do:
- On the back panel, press and hold the WPS button for 5-10 seconds. The corresponding light should light up, indicating activation.
- After a couple of seconds, activate the VPS on TV. Wait for synchronization.
- If necessary, enter the WPS PIN. You can find it in the router's web interface in the corresponding section.
This technique will bypass the entry of authorization data.
Via PC or laptop
Users can also connect the TV to a personal computer or laptop. In this case, the device can operate in two modes:
- Repeat image. The TV will act as a regular screen. You can use a browser or watch movies through it, but control will be carried out via a PC/laptop. It is enough to connect the device via HDMI or VGA.
- Reading data from a computer. When organizing a local network, you can open access to data on your computer. This allows you to watch movies or listen to music stored on your computer's hard drive.
The last point is an extremely convenient option if you do not want to watch movies via the Internet due to low speed. You can download them to your computer, and then watch them directly from the HDD without the help of a flash drive.
The setup details depend on the specific model, but in general you need to follow a number of steps:
- make sure that the TV is connected to your home local network (if using a router) or connected directly to the PC;
- you need to download and install the media server on your computer;
- add files to share and open them on your TV.
One of the most popular programs is Home Media Server. You can download it for free online. Let's look at an example of setting up this software:
- When you first start, you need to select your media device, as well as set other settings.
- In the “Media Resource Directories” window, you should make folders or local network drives visible. To simplify things, we recommend opening access to the entire local space at once. Check the boxes for the drives you want to open for reading/writing, and then click the “Scan” button.
- You can add directories manually.
- Start the server.
- Make sure the TV is detected by the program. Its name and icon will appear in the “Playback Devices” section.
- To launch a movie or other object, right-click on it (it must be in a folder with public access), select “Play on...” and specify your TV.
- To run on TV, find the AllShare item in the sources and select the directory. Run the desired file.
Try Plex, Serviio, Kodi as a media server. Each option has its pros and cons.
Via TV set-top box
Many providers offer to purchase an additional set-top box. It already has built-in services for watching TV, a browser and home theater. Essentially this is an analogue of SmartTV. The set-top box connects to the router via a LAN cable or Wi-Fi, and to the TV via HDMI. IP settings, if necessary, are already made in the sections of the set-top box itself.
You can also buy an Android console yourself. It is an analogue of a mobile phone, but with a redesigned interface for a large screen. You can download applications from the Play Market and use them from your TV. Messengers, Skype, mail and more will be available directly from TV.
Via PLC adapter
If you have a standard modem without Wi-Fi support and an STB receiver, then the connection can be made via an Ethernet cable. But this is not always practical if the wire has nowhere to hide. An alternative solution is a PLC adapter. This is a special device that transmits a useful signal through a standard electrical network. Connection using this method is offered by Rostelecom, Beeline and other companies.
The latest adapters support data transfer rates of up to 1 gigabit per second. Adapters must be inserted directly into the outlet, bypassing adapters and uninterruptible power supply devices. This will provide a better signal. The adapter and TV can be connected directly via Ethernet.
Setting up Smart TV on modern TVs
We live in the era of “smart” technology. Today, refrigerators, washing machines, dishwashers, and televisions have their own intelligence. The Smart TV feature is an innovative technology that is completely dependent on the Internet. It allows you to convert an ordinary TV into a full-fledged computer, with which you can make purchases in online stores, view news on information resources and enjoy your favorite programs in high quality.
Leading home appliance manufacturers create full-fledged operating shells for their smart TVs, while many other brands use Android, Linux and Windows for these purposes. You can configure TV channels on Smart TV using special applications.
Features of searching and tuning channels without a remote control
Don't panic or get upset if your TV remote control gets lost or stops working. You can cope with the situation and configure the equipment using control buttons, the functions of which are described in detail in the instructions for the equipment.
When setting up a TV without a remote control, consider the following nuances:
- The key is not available on all devices. Sometimes, in order to get into the settings, you need to simultaneously press the buttons that control the volume;
- To confirm the actions taken, you can use the “OK”, “” or “Vol+” buttons;
- On Sony brand TVs, you can start automatic search and tuning of channels by long pressing the “” button;
- Philips TVs cannot be set up without a remote control.
In recent years, Russians have almost completely abandoned conventional antennas, giving preference to more modern and high-tech receivers - special digital set-top boxes that receive signals from a satellite or via the Internet. Such devices operate similarly to smartphones or tablets: they have an operating shell (Android) installed, in which settings and work with channels were carried out using mobile applications. Users can download the necessary software from the PlayMarket store.
VLC
The built-in media player in Harper can play videos, music and photos from connected flash drives and external drives, but if you have a NAS installed (a normal QNAP/Synology or even a Keenetic type router with a hard drive), then you need a network player. Plex and Kodi are not suitable due to their high hardware requirements. I don’t understand how a media player can be so heavy? What did they put in there that even slows down MPEG-4, which works great on the cheapest smartphones for 2-3 thousand? VLC will solve all our problems: it works perfectly and can be installed from Google Play with two clicks of a button.
This player has a built-in equalizer, but I couldn't hear the difference between the presets. However, VLC is the perfect option: simple as a cudgel, fast, constantly evolving and has a ton of add-ons. Moreover, it will be useful for us to watch TV channels.
Setting up channels on older TV models
If desired, you can watch digital channels on an old TV; all you need to do is manually configure the TV receiver and connect a DVB-T2 set-top box to it. Perhaps the only drawback of outdated TV models is the small amount of memory for saving frequently watched channels; most often, you can add no more than six positions to this list.
To search for and configure older TV models, you can use not only remote controls, but also physical control buttons on the TV itself.
The final stage of setup is working with image quality
Quite often there are situations when, after completing the search and settings of the program, they are broadcast in poor quality. In order to improve picture clarity and eliminate other defects, you can perform the following steps:
- enable the HD option in the settings;
- select the picture broadcast mode, for example, for Samsung and LG TVs, the “Cinema” mode is considered the best option;
- manually set the contrast, brightness and colors of the image.
As practice shows, you only need to spend time and effort once to understand the TV settings and compile a list of saved TV channels, in order to subsequently comfortably watch any films and programs, without being distracted by annoying little things and problems that can ruin anyone’s mood.
Source
Connection methods
Next, we will look at all possible methods of how to connect a TV to the global “web”. Be prepared that some methods will not be possible to use due to the characteristics of your TV.
Direct connection via cable
The method assumes that the design has a built-in LAN input. Then you need to take a cable from your provider and insert it into the appropriate port. If the provider “distributes” a dynamic IP, no manipulations on the part of the user are needed. The TV will automatically receive its IP, and you will be able to open all Internet services.
If you are provided with a static IP, then set the settings manually. To do this, follow the instructions:
- In the Smart TV settings, find the Network/Network connection section.
- Click on the “Set up connection” button.
- Select “Manual setup” and then “Wired”.
- Set the IP and DNS provided by your ISP. Confirm the changes.
- The system will build a route map. Click "Done."
Now you can check the functionality of the services, since the Internet should work.
Via router
In most apartments and houses, the home network is organized using a router. It allows you to connect several devices to the network: computer, TV, laptop, and so on. Depending on the type of router, connect the TV via cable or Wi-Fi.
By cable
The method requires you to take the following steps:
- Connect one end of the LAN wire to the input on the TV, and the other to the input on the back of the router (usually marked yellow). The router has several LAN ports.
- Make sure the indicator light for the corresponding port is illuminated.
- Next, in the settings you need to select the type of IP used. If necessary, enter data manually.
- Check the TV's operation.
If problems arise, you can try updating the firmware of the router or the TV itself.
Via Wi-Fi
If you don't want to bother with wires, you can use a wireless connection. Your TV must have a built-in Wi-Fi module. To activate it, follow the instructions:
- Make sure your WiFi router is working correctly.
- Go to Settings and select "Network Connections". If you need to specify the type, then click “wireless”.
- A list of available wireless points should appear. Find yours and then click on it.
- Enter your password and wait for the connection.
Fast and convenient. Please note that some TVs support WPS technology, thanks to which you do not have to enter an access password.
What to do if there is no Wi-Fi module?
In stores you can buy special Wi-Fi adapters that will allow you to connect your TV to a wireless network. There is only one condition - the device must have a USB input. Wi-Fi adapters are visually similar to a flash drive, but they are relatively affordable. For home use, it is not necessary to buy top models.
Please note that for specific TVs there is a list of compatible adapters. As a rule, they are created by the TV manufacturer. Computer models are often incompatible. The most popular gadgets include LG AN-WF100, AN-WF500, Samsung WIS12ABGNX/NWT and PhilIPs PTA128/00.
We use WPS
If you have a login and authorization password on the router, use WPS. To do this, you need to make sure that the router supports this technology. Next do:
- On the back panel, press and hold the WPS button for 5-10 seconds. The corresponding light should light up, indicating activation.
- After a couple of seconds, activate the VPS on TV. Wait for synchronization.
- If necessary, enter the WPS PIN. You can find it in the router's web interface in the corresponding section.
This technique will bypass the entry of authorization data.
Via PC or laptop
Users can also connect the TV to a personal computer or laptop. In this case, the device can operate in two modes:
- Repeat image. The TV will act as a regular screen. You can use a browser or watch movies through it, but control will be carried out via a PC/laptop. It is enough to connect the device via HDMI or VGA.
- Reading data from a computer. When organizing a local network, you can open access to data on your computer. This allows you to watch movies or listen to music stored on your computer's hard drive.
The last point is an extremely convenient option if you do not want to watch movies via the Internet due to low speed. You can download them to your computer, and then watch them directly from the HDD without the help of a flash drive.
The setup details depend on the specific model, but in general you need to follow a number of steps:
- make sure that the TV is connected to your home local network (if using a router) or connected directly to the PC;
- you need to download and install the media server on your computer;
- add files to share and open them on your TV.
One of the most popular programs is Home Media Server. You can download it for free online. Let's look at an example of setting up this software:
- When you first start, you need to select your media device, as well as set other settings.
- In the “Media Resource Directories” window, you should make folders or local network drives visible. To simplify things, we recommend opening access to the entire local space at once. Check the boxes for the drives you want to open for reading/writing, and then click the “Scan” button.
- You can add directories manually.
- Start the server.
- Make sure the TV is detected by the program. Its name and icon will appear in the “Playback Devices” section.
- To launch a movie or other object, right-click on it (it must be in a folder with public access), select “Play on...” and specify your TV.
- To run on TV, find the AllShare item in the sources and select the directory. Run the desired file.
Try Plex, Serviio, Kodi as a media server. Each option has its pros and cons.
Via TV set-top box
Many providers offer to purchase an additional set-top box. It already has built-in services for watching TV, a browser and home theater. Essentially this is an analogue of SmartTV. The set-top box connects to the router via a LAN cable or Wi-Fi, and to the TV via HDMI. IP settings, if necessary, are already made in the sections of the set-top box itself.
You can also buy an Android console yourself. It is an analogue of a mobile phone, but with a redesigned interface for a large screen. You can download applications from the Play Market and use them from your TV. Messengers, Skype, mail and more will be available directly from TV.
Via PLC adapter
If you have a standard modem without Wi-Fi support and an STB receiver, then the connection can be made via an Ethernet cable. But this is not always practical if the wire has nowhere to hide. An alternative solution is a PLC adapter. This is a special device that transmits a useful signal through a standard electrical network. Connection using this method is offered by Rostelecom, Beeline and other companies.
The latest adapters support data transfer rates of up to 1 gigabit per second. Adapters must be inserted directly into the outlet, bypassing adapters and uninterruptible power supply devices. This will provide a better signal. The adapter and TV can be connected directly via Ethernet.