A home TV network can be compared to a chain, and any chain is only as good as its weakest link. Cable connections can be considered such a vulnerable point.
If you do not pay due attention to them, a situation often arises when, in the event of poor reception, all the blame is shifted to the antenna. And the reason for this lies precisely in an inexpensive coax with inappropriate parameters, which, moreover, is made up of incorrectly connected segments. A weak connection in a coaxial cable is where a large percentage of the signal from the antenna gets stuck without reaching the TV receiver. So let's learn how to connect an antenna cable, how to connect an antenna cable extender, and how to handle coaxial connectors so that the picture is bright and clear.
When cable connections are required
Connecting antenna lines is necessary in the following cases:
- If the cable sheath is damaged, pinched or completely torn, it can be replaced with a new one. However, for those who want to save time and money, it is easier to connect it. Sometimes, if the outer shell is damaged, the screen and the main core are not affected, you can insulate the wire. When there are gusts, both ends are stripped and connected in a convenient way.
- Extending the antenna cable also involves connecting it. Most often this is due to a rearrangement, a change of residence or a change in the location of the TV. Sometimes a coaxial cable is bought end-to-end, without taking into account updating the contacts, and over time it becomes short.
- Connecting a second TV to the same antenna. This is often done when there are children in the family or disputes arise over watching TV channels. This is not entirely convenient, but it is cheap - you don’t have to buy a receiver and a new antenna.
Sometimes during repairs, owners try to hide the TV line by laying the cable along a longer path.
How to extend the wire: 3 options
It is very inconvenient to use the Internet when you cannot move freely. Many people install network cables to make using the Internet more comfortable. There are several simple ways to extend the cable.
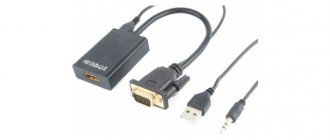
When purchasing, it is important to pay attention to the appearance of the joyner, as it is very similar to a telephone adapter. It will not be difficult to distinguish a twisted pair, since the adapter has 8 contacts, while the telephone adapter has only 7. A computer network card is inserted into the patch cord, the other end of the cord is connected to the network cable
A computer network card is inserted into the patch cord, and the other end of the cord is connected to the network cable.
Internet cable extension options:
- Router.
Convenient and reliable extension option. The router has a couple of sockets to which you can connect a network cable. A router is a “splitter” of the Internet. It allows you not only to extend the cable, but also to connect additional devices to the channel. You can skip the cable altogether if you buy a Wi-Fi router. - Purchasing a new cable.
The old cable can be replaced with a new one by simply measuring its length first. This method is time-consuming because you will have to call a technician to reconnect. But if we are not talking about a multi-storey building, but about a private one, then the method is quite suitable. - Performing twisting.
Masters do not recommend using this method. It involves cutting the cable and then inserting an additional piece of the required length into it. The two pieces need to be connected with electrical tape.
Twisting can lead to short circuits, which will lead to poor connection speed or a complete lack of Internet access. The most reliable and modern way to extend the cable is to use a router. If you are not sure that the attempt to extend it yourself will be successful, you can always turn to your Internet provider for help.
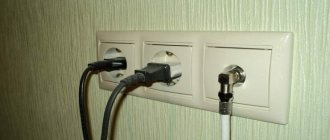
It often happens that the technician interrupted the wiring while performing repair work. While working with an angle grinder or other tools, some people may accidentally cut the electrical wire laid in the wall. Damage is indicated by sparks, power cuts, or knocked out plugs.
The wires located in the installation box may also break. Often there is not enough length to connect them correctly. It should be noted that experts advise not to repair one wire, but to replace the entire damaged section. Of course, this method is suitable for those who are not afraid of damage to finishing materials and are ready to make new repairs.
How to extend an aluminum cable:
- Twist the ends of the cable if they are long enough. The twist must be wrapped with electrical tape. This method is the most unreliable, because the twist may break again, which will return the problem.
- A special heat-shrinkable tube can be attached to the ends of the wires. This method is suitable for connecting and extending any cable. In order to carry out the plantings correctly, the tube must be heated.
- All types of wires (copper and aluminum) can be extended using a block. The ends of the cable must be stripped, and then the block must be selected.
- If the wires have broken off, they can be repaired using a coil. It is screwed onto the ends of the wires. After the required density has been achieved, you need to insulate the wires.
Extending twisted pair cables does not require special qualifications, and if done correctly can even be reliable. When twisting wires, you need to follow the one level rule and insulate each individual connection. An interesting method is the displacement of joints made by twisting or soldering.
Antenna cable device
Modern antenna cables have some technical differences, different properties and materials used in their manufacture, but they have a common design:
- The main copper or copper-clad steel core, covered with a thick polypropylene sheath.
- The screen, made in the form of aluminum foil or copper mesh, protects the conductor from electromagnetic interference.
- The plastic outer shell prevents exposure to external fields.
- Polyethylene cable covering that protects against mechanical damage.
Each of these elements has its own role, so their integrity is as important as the overall condition of the cable. When connecting two wires, both ends are carefully cut and cleaned.
This process is usually called cutting. It provides a reliable connection on which the signal quality depends.
Preparation and tools
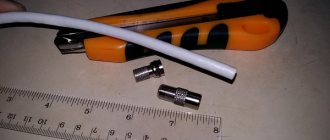
As for the tools, you and I will need ordinary side cutters and a construction knife (instead of a construction knife, a stationery knife can also do). To connect the ends of a television cable, you need special coaxial cable connectors. They are also called F-connectors.
More specifically, we need two FS-5 threaded F connectors and one straight F reducer. They are usually quite inexpensive!
If you need to extend the antenna cable when moving a TV or antenna, you must also buy a cable. To do this, before going to the store, carefully inspect your wire and rewrite the markings, or better yet, cut off a small piece from it and go to the store with it.
Cable stripping and connection methods
According to safety regulations, before you begin the procedure for connecting the antenna cable, you must turn off the power and disconnect both parts from the antenna and the TV or receiver.
The second stage involves stripping the ends of the wire that need to be connected. Given the design of the cable, you need to work very carefully so as not to damage the copper rod and screen.
A step-by-step guide will help you understand the sequence of the procedure:
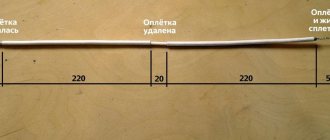
- First of all, make a neat cut in the outer sheath of the cable 1-1.5 cm from the end of the wire, and then carefully remove the cut part of the insulating braid by turning it.
- Then you need to unscrew the screen from the end of the cable to the surface of the outer sheath.
- Next, retreat 2-3 mm from the edge of the cut shell and carefully cut off the insulation from the central core.
The same must be done with the other end of the cable.
Is it possible to connect a television cable with your own hands without losing quality?
To correctly connect a telecommunications wire with a coaxial cord, you should use one of the following methods:
- Purchase a standard extension cord of standard length, with which you can increase the length of the antenna cable to 20 meters;
- Use special F-sockets that allow you to connect antenna wires without soldering;
- Modern technologies make it possible to extend several wires simultaneously using splitters;
- Solder the wires together to create an unbreakable connection.
Connecting the Antenna Wire
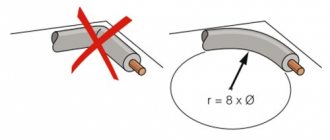
Also, special care should be taken to select the correct coaxial cord since the antenna wire has a resistance of 75 ohms. The outer braid must have extreme elasticity, since this property will allow it not to break at the bends. In addition, to avoid loss of image quality, it is necessary to purchase products that have a dense internal braid to guarantee the reception of a stable continuous signal.
Note ! The dielectric, which acts as an insulator, must be made of polyethylene and foil to prevent signal failure due to external interference during operation. The cable core can be made of copper, aluminum or steel. The frequency signal settings should be low.
Cable connection without network loss
Connection with adapter
One of the popular ways to connect a television cable is to use a special coaxial adapter. It is suitable for both extension and splicing of damaged wire.
It is a small cylindrical piece of metal about 5 cm long, with a nut in the center and threads on both sides. The cable is connected using F-connectors, which are used when connecting satellite TV.
This connection method provides a high-quality signal. It is carried out without any problems, does not have any unnecessary gaps and holds the joint securely. The main thing is to correctly cut the cable and strip its ends.
The connection procedure is performed as follows:
- First, an F-plug is placed on both prepared ends of the wire to be connected, so that it sits tightly on the sheath, clamping the screen that was turned away during stripping.
- Next, take the connecting element itself, insert one end of the core into the small hole in the adapter, and then screw the nut on top.
- They do the same with the second contact, tighten it and check the strength of the connection, as if trying to separate the joint.
The adapter and contact nuts are made of stainless steel, so it does not corrode and is resistant to mechanical damage. This significantly extends not only the service life of the parts, but also the joint itself.
Thanks to these advantages, this method of connecting the antenna cable can be used outdoors and indoors.
To route the cable to two TVs, there are triple adapters that are connected in a similar way.
How to make the connection correctly
Before connecting a TV cable without causing loss of the antenna signal, it is necessary to install F-type connectors on the two ends being connected. The action is quite simple, even beginners can handle it. To work you need a sharp knife, the connector itself and pliers.
- First, the cable sheath is removed from the edge by 1 cm.
- The screen straightens and bends in the opposite direction (inward).
- The vein is exposed. To do this, 7-8 mm of the inner layer is removed from the previously cleaned area.
When the cable for the F-connector is cut, installation is done. Start winding the part onto the wire with your hands. If installation is difficult, use pliers to help. But you don’t need to clamp it too hard, as this can lead to breakage of the connector housing. Modern parts are made of thin metal of poor quality.
Also mount the antenna connector on the end of the second TV cable.
Afterwards, complete the connection by screwing the connectors onto the barrel.
If you need to connect three cables, then not a double, but a triple coupling is used. The principle of operation is similar, only three wires are processed.
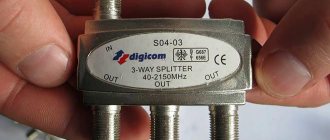
Extending the cable using a splitter
This method of connecting and extending the TV line is used less often than others. It is carried out through a special block called a splitter.
The device is designed to distribute a signal to two tuners from one antenna.
- The connection method itself is not very different. First, the ends of the wire are cut, the plugs are put on, which are then screwed to the splitter.
- When connecting, you should follow the following instructions: First, connect the end of the cable coming from the antenna to a single socket marked IN.
- Next, alternately connect the ends coming from the receivers to the outputs marked OUT. There may be two or three.
Application of passive antenna
A homemade antenna extender can be used in conjunction with a laptop, access point or Wi-Fi modem
It is important to understand that after such manipulations the result may not always be positive, and in the event of a breakdown, it will be impossible to repair the equipment under warranty
Updating network adapters to match your router
If not, look up your model number online to see its exact specifications. Of course, depending on what devices you own, find out what wireless standard they can use.
Buy or build a high gain antenna
Most wireless routers and wireless adapters with external antennas come with cheap omnidirectional antennas.
Turn your cable or electrical outlets into wireless access points
If you want to double or even triple your wireless range, you can try adding additional wireless access points to your network. However, this performance hit may be acceptable if you plan to do basic web browsing on these computers; You won't really enjoy transferring large files or streaming video between computers on a network.
Additional wireless access points
A router is basically a network controller, and it connects to or is integrated with your internet modem.
If you decide to connect the antenna to the modem, then you need to study the features of the process. The fact is that inside the modem there is a small antenna, to which a homemade antenna is attached. To complete this process, you will have to disassemble the modem flash drive. You can remove the cover using a scalpel, screwdriver or utility knife (pull towards the top from the USB connector, do not press too hard, otherwise the case will break).
When a signal passes through any cable, it loses strength. Thus, the shorter the cable, the less loss. Less is more in this situation, and the correct cable length is important to maintain signal quality. All cell phone signal boosters are complete kits and come with the appropriate cable type and length to maintain reasonable dB gain
But there are times when you need a little more reach, so it's important to figure out how much length you can afford before the signal loss offsets any signal gain
Opening the modem, you will see two connectors covered with paper. Follow these instructions:
- remove the protective layer from the modem elements;
- connect the antenna you assembled yourself to the left connector (the hole you need will be on the left side if the device itself is positioned with the USB connector facing you);
- use a coaxial cable that is not too long, otherwise the result will not be much different from using a modem without an extension cord.
There are three types of cables for home cell phone signal boosters. As mentioned earlier, as the cable length increases, more signal loss occurs. Signal gain and loss are measured in decibels. And decibels are measured exponentially.
And as always, you can convert your cable installation. Think of the signal as the drink and the cables as the straws. 75 ohm cables are your typical soda straws, and 50 ohm cables are the big straws of the carlav's throat. Nothing is more frustrating than trying to install a new TV on a cable or satellite system and discovering that the existing coaxial cable is not long enough to fit it into the desired viewing location. Coaxial cable, often called "coaxial cable", can become expensive in length, so replacing the entire cable may be out of a consumer's budget.
Twist
Although this method is considered the most primitive, outdated and unreliable, it is still used. It does not require adapters, plugs or other parts.
Twisting is easy to do, but the signal quality with such a connection drops and can be compensated by soldering the contacts.
- To make twisting, it is necessary to cut both ends of the cable, stripping the working cores and braiding, taking into account their subsequent twisting.
- They shouldn't be too short.
- After connecting two parts of the wire, it is recommended to solder the joint with a regular soldering iron and then insulate it.
- Regardless of the connection method, the joints need to be additionally fixed, especially if they are located on the street.
- This will protect against loosening of connections by the wind.
To prevent water from entering the joint, it can be placed in a box made from cut plastic bottles.
Connecting the cable to the plug
F - male connector
In order to immediately correctly connect the antenna cable to the plug without any modifications, it is enough to follow certain dimensions and sequence of actions, but do not be afraid that you may get an electric shock, since the voltage in the cable is very low. So, to properly strip the TV cable you need:
- at a distance of 12 - 15 mm, make an incision in the outer shell so as not to damage the braid and, tilting it to the sides, break it off and pull it off (you can do this in a way convenient for you);
- wrap the braid;
- when folding the foil, keep in mind that its inner layer does not conduct current, so turn it around the axis again with the outer layer up or remove it altogether;
- cut the dielectric of the central core at a distance of 8 -10 mm from the end and remove it;
- screw the F connector onto the cable;
- screw the plug into the connector.
If the central core protrudes more than 4 mm, it may rest inside the connector and prevent the nut from screwing in completely, so remove the excess.
If the cable diameter is small, you can wrap a little electrical tape and then wrap the braid on it.
Crimp plug
In this case, the central core is clamped with a screw, and the braid is crimped by the plug body:
- a protective casing is put on the cable;
- the outer shell is stripped to 10 mm;
- aluminum foil is removed;
- the insulation of the central core is removed by 3 mm;
- the braid is wound onto the remaining dielectric;
- the central core is inserted into the groove and clamped with a screw;
- the braid is crimped onto the plug body;
- We screw the protective casing onto the body.
Connecting the antenna power supply separator
In this case, when connecting the cable to the power supply, the dimensions change slightly:
Correctly connect the power supply to the antenna
- the outer protective shell is stripped to 15 mm;
- the foil is removed;
- the braid moves towards the protective sheath;
- the dielectric of the central core is removed by 5 mm;
- the cable fastening screws in the separator are loosened;
- The cable is inserted into the resulting openings and clamped with screws.
Be careful when clamping the braid: firstly, it must touch the tinned area on the board; secondly, make sure that the braid does not touch the central core.
Photo instructions on how to connect the antenna cable
Types of Coaxial Cables
There are two types of coaxial cables:
- thin coaxial cable
- thick coaxial cable
The choice of one type of cable or another depends on the needs of a particular network.
Thin coaxial cable is a flexible cable with a diameter of about 0.5 cm (about 0.25 inches). It is easy to use and suitable for almost any type of network. Connects directly to computer network adapter cards. Thin coaxial cable can transmit signals up to 185 m (about 607 ft) without noticeable attenuation distortion.
Equipment manufacturers have developed special markings for various types of cables. Thin coaxial cable belongs to a group called the RG-58 family, its characteristic impedance is 50 0 m. Impedance is the resistance to alternating current expressed in ohms. The main distinguishing feature of this family is the copper core. It can be solid or consist of several intertwined wires.
- RG-58 /LJ - Solid copper core
- RG-58 A/U - Intertwined wires
- RG-58 S/u - Military standard for RG-58 A/U
- RG-59 - Used for broadband transmission (such as cable television)
- RG-6 - Larger in diameter than RG-59, designed for higher frequencies, but can also be used for wideband transmission
- RG-62 Used in ArcNet networks
Thick coaxial cable is a relatively stiff cable with a diameter of about 1 cm (about 0.5 inches). It is sometimes called "standard Ethernet" because it was the first type of cable used in Ethernet, a popular network architecture.
The copper core of a thick coaxial cable has a larger cross-section than a thin one. The thicker the cable core, the greater the distance the signal can travel. Consequently, thick coaxial cable carries signals further than thin coaxial cable—up to 500 m (about 1,640 ft). Therefore, thick coaxial cable is sometimes used as a backbone cable that connects several small networks built on thin coaxial cable. To connect to a thick coaxial cable, a special device is used - a transceiver.
The transceiver is equipped with a special connector, which is named very impressively - “vampire tap” or “piercing tap”. This “tooth” penetrates the insulating layer and comes into direct physical contact with the conductive core. To connect the transceiver to the network adapter, you need to connect the transceiver cable to the connector of the AUI port of the network card. This connector is also known as a DIX connector (Digital Intel Xerox^), in accordance with the names of the development companies, or a DB-15 connector.
Coaxial cable. Video cable HELUKABEL
Purpose and structure of coaxial cable
Not long ago, coaxial cable was the most common type of cable. This was due to two reasons.
- First, it was relatively inexpensive, lightweight, flexible and easy to use.
- Secondly, the widespread popularity of coaxial cable has made it safe and easy to install.
The simplest coaxial cable consists of a copper core (core), insulation surrounding it, a screen in the form of a metal braid and an outer sheath. If a cable, in addition to a metal braid, also has a layer of foil, it is called a double shielded cable. If there is strong interference, you can use a cable with quadruple shielding. It consists of a double layer of foil and a double layer of metal braid.
Some types of coaxial cables are covered with a metal mesh called a shield. It protects data transmitted over a cable by absorbing external electromagnetic signals called interference or noise. This way, the screen doesn't allow interference to distort the data.
Electrical signals encoding data are transmitted along the core. A core is one wire (solid) or a bundle of wires. The solid core is usually made of copper. The core is surrounded by an insulating layer that separates it from the metal braid. The braid plays the role of grounding and protects the core from electrical noise (noise) and crosstalk (crosstalk). Crosstalk is electrical interference caused by signals in adjacent wires. The conductive core and the metal braid must not touch, otherwise a short circuit will occur, noise will penetrate into the core, and the data will be destroyed. On the outside, the cable is covered with a non-conductive layer - made of rubber, Teflon or plastic.
The oaxial cable is more noise resistant, the signal attenuation in it is less than in twisted pair. Attenuation is the decrease in signal magnitude as it moves along the cable. Signal attenuation leads to deterioration in its quality. As already mentioned, the braided protective sheath absorbs external electromagnetic signals, preventing them from affecting the data transmitted along the core, so coaxial cable can be used for long distance transmission and in cases where high-speed data transmission is carried out over simple equipment.
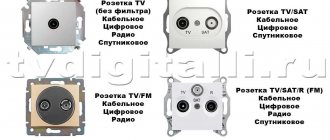
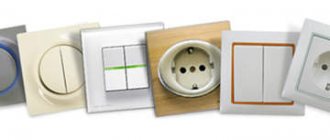
Antenna plug selection
When you have selected the desired option, connect the antenna cable correctly. You can do this in the following ways:
- Soldering. Only suitable for installing homemade TV antennas. We don't recommend it.
- F-plug. Suitable for connecting antennas for both digital and analogue television. Structurally, it is a washer that is screwed onto the end of the cable, where the outer insulation has been stripped and the braid and screen have been bent. The plug crimps the bent shielding elements, and the exposed central core is connected to the signal slot. We recommend!
- Old style plug. They were produced back in Soviet times. It differs from the F-plug in that it requires complete disassembly for installation. It has greater rigidity, and when assembled correctly, the strength is higher than modern ones. It is permissible to use.