You should be aware of the problems that may arise when switching from an hdmi to vga cable.
Problems with VGA to HDMI cable
Problems that may be identified when moving from the high-definition multimedia interface output to the lower graphics matrix output include signal loss, signal quality, and no signal. These problems could be the result of a bad connector or port on the graphics array monitor or a bad signal being transmitted through the hdmi vga cable. When any of these problems occur during conversion of a high-definition media interface signal to a video graphics array signal, it can lead to frustration and loss of time or productivity as you try to resolve the problem.
If the cable does not have a built-in board that converts the signal, then there will be no video.
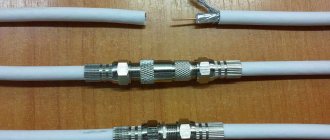
Accordingly, the simple solution to this VGA to HDMI cable problem is to buy a hdmi vga cable with a built-in electronic board, which is the central element in this matter.
Signal quality and compatibility!
Resolving signal problems between the high-definition media interface and the video graphics interface begins with identifying the type of problem you are experiencing. A low quality, poor quality, or no signal may indicate something as simple as misidentification of the signal source and receiver.
First of all, determine what the source of the signal is. For example, the source or image transmitter via HDMI can be a laptop, TV set-top box, PS game console, xBox or desktop computer. Typically, the receiver can be a monitor or TV with a VGA connector. Accordingly, the signal transmission direction will become HDMI source to VGA receiver.
Examples:
- HDMI computer to VGA monitor - an hdmi vga cable without power with a built-in board that converts the signal is suitable;
- HDMI set-top box (DVB-T2, tricolor or satellite receiver) to a VGA monitor - you will need an HDMI VGA converter WITH POWER (it often happens that such set-top boxes do not have enough power at the HDMI connector, so they use additional power supply);
- HDMI game console PS4 or XBOX360 to VGA monitor - HDMI VGA converter with power! It is reliably known and verified repeatedly that game consoles require an HDMI VGA converter with power!!!
To summarize the above: for a laptop and computer with an HDMI connector to connect a monitor, the simplest and cheapest hdmi vga cable or adapter is suitable. In other cases, it is better to play it safe and take a converter with HDMI VGA power.
Data interfaces
Any technology has I/O ports in its design. For ease of use, connectors are installed in the device housings. Depending on the type of signal being transmitted, they can be digital or analog.
The signal, regardless of its nature, represents electromagnetic disturbances of various shapes and frequencies. Depending on what type of vibration is transmitted, the device receiving this signal processes it and generates a signal that can be perceived. The analog transmission code has a continuous waveform, and the digital code has a discrete waveform.
The disadvantages of the analog form of transmission include: the signal is noisy due to its strong perception of interference and poor security. At the same time, the digital signal has a quality that is several orders of magnitude higher and is practically unaffected by interference and has high security due to the encryption algorithms used.
A special device is used to convert one type of signal into another. A device that changes the analog type of signal to a digital one is called an analog-to-digital converter (ADC), and conversely, a device that performs the opposite function is called a digital-to-analog converter (DAC). It is important to understand that a simple cord with VGA and HDMI connectors at the ends will not work, since due to the difference in the nature of the signals, an active converter will be required.
Analog port
With the development of computer technology, IBM introduced the VGA video interface into its devices in 1978. The use of an analog signal made it possible to reduce the number of conductors in the cable and improve color image transmission. The first generation interface was called XGA, but was eventually replaced by SVGA. Having undergone minor changes, it was able to transmit a signal in higher resolution. The connector and cable of this standard used did not change for more than ten years, until digital technologies replaced analog ones.
The VGA connector is a 15-pin device. VGA, broadcasting the signal, changes its voltage level line by line, which corresponds to a change in the brightness and intensity of the beam. The connector pinout looks like this :
- RED - used to transmit red color in the signal.
- GREEN - used to transmit green color in the signal.
- BLUE - used to transmit blue color in the signal.
- ID 2/RES - backup channel.
- GND - common channel.
- RED_RTN — red screen.
- GREEN_RTN — green screen.
- BLUE_RTN - blue screen.
- KEY/PWR - used as a key or to transmit +5 volt DC voltage.
- GND - common channel.
- D0/RES - zero bit.
- D1/SDA is the first.
- HSync - designed for horizontal synchronization.
- VSync - designed for vertical synchronization.
- D3/SCL - third bit.
By the beginning of 2010, VGA became obsolete and was replaced by DVI and HDMI digital interfaces. For compatibility, some of the lines in the new connectors were VGA interfaces.
Digital port
The most used digital interfaces are HDMI and DVI. The difference between them is the transmission standard. In 1999, the Digital Display Working Group developed the concept of digital signal broadcasting. And then, the Silicon Image company developed algorithms that allow sequential transmission of data, which were used to create the DVI format.
What you need to connect a laptop to a TV using a wire
Wired connections are among the simplest. Thanks to them, the user can watch their favorite films and TV series on a huge screen in just a few steps.
There are several ways to connect a laptop to a TV via hdmi; the most commonly used are HDMI and Video Graphics Array cables.
Note! In addition to the connection itself, to watch movies on the TV screen, you need to configure the data both on the TV itself and on your personal computer.
Is it possible to connect a laptop to the TV wirelessly?
The process of connecting modern devices is quite easy - all you need to do is connect the devices to your home router using a Wi-Fi wireless network. Gadgets produced by different manufacturers have approximately the same connection principle. However, it is worth noting that in this case it is incredibly important to set the initial settings correctly.
For older TVs and personal computers that do not have built-in support for a wireless network, the presented connection method will not work.
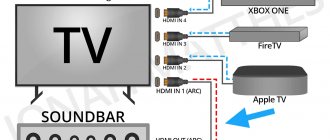
Instructions for connecting TV
- First of all, we connect the TV to the computer via cable. If the TV has several VGA ports, then make sure that it is named “IN” or “PC”. For sound, connect the tulips to the “AUDIO” ports - there will be two bells, red and white. The second end of the audio cable can be connected to the audio output or inserted into the headphone port.
- Now on the TV remote control you need to select the button for “incoming ports” or “INPUT”.
- A window will open where you need to select the appropriate input - select “VGA”.
- The easiest way to cast the screen is to press the “Win” key and the English letter “P” at the same time in Windows. After this you should see a window like this. Select “Duplication” or “Projection” - as you wish.
- If the method does not produce results, then we will try to go another way. Right-click on the desktop and select “Screen Resolution”.
- The connection must have two screens. If there is only one, click “Find”, then a little lower we select the second display, which will be our TV.
- Next, specify the screen resolution. Do not set the resolution too high, as this may prevent the image from being displayed.
- Now you need to specify the broadcast type. The most useful in my opinion is the first option. If you need to display an image from a laptop, but at the same time turn off the laptop itself, then choose the last method.
- If you are using HDMI output, then right-click on the speaker in the lower right corner and select “Playback Devices”.
- Next, choose to use the default HDMI output.
If you did everything correctly, video should be displayed on the TV, and sound should come from the speakers of the second screen.
Connection via VGA
This format allows you to transmit an analog image, but there will be no sound, and the picture will not be of the highest quality. However, if there is no other connector, then this is the only method left. It should be noted that using a special adapter you can even organize sound. Recently, especially Chinese manufacturers, have been offering all sorts of solutions that allow you to work with a variety of connectors.
The connection itself is performed as follows:
- turn off both devices;
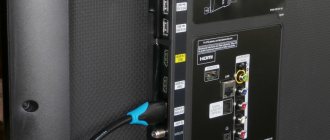
- Using the appropriate cable, we connect the computer and TV;
- we launch the equipment;
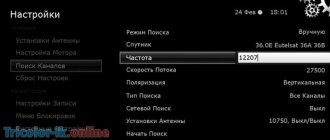
- in the TV menu set the VGA connection point;
- go to the audio section and check that the sound is coming through the connected wire.
After turning on the computer, its screen will appear on the TV.
Review
From the package there was a regular bag, because... I took several things in one order, then all the goods in the postal bag were wrapped in bubble wrap, there was nothing remarkable, so let’s move straight to the adapter.
The kit consists of a rather stunted power cable (Micro-USB) and 3.5 mm. audio, but they perform their tasks despite their physical parameters...
You can disassemble it with an ordinary kitchen knife; no fasteners are provided in the case.
The board looks neat despite the remaining flux after soldering in some places, the soldering is of high quality.
The filling is the previously familiar MacroSilicon, only the chip is not for capturing video, but for converting an analog signal to a digital one.
The main work is done by MacroSilicon MS9288C , powered by two AMS1117 at 3.3V and 1.8V, next to a quartz at 24.576 MHz, some SMD resistors with capacitors and you're done.
Block diagram of MS9288C:
MS9288C Specifications:
The most interesting thing is the maximum pixel frequency that the adapter can “digest”, and it is at the level of 165 MHz (analog sampling rate in the table), this will not allow you to set the resolution to 2048x1536, or even 1920x1200 at 60 Hz, but 1600x1200 and 1920x1080 is well within the stated capabilities of the chip.
How to connect via WiFi and Bluetooth
Modern TV models that have Bluetooth and WiFi provide ways to connect your PC wirelessly. There are two technologies – Intel WiDi and Miracast. To connect:
- In PC settings, find "Devices" and o.
- Select Wireless Display or Dock.
- On your TV, enable the Miracast/Intel WiDI feature (can be found in the network settings section). Now you need to confirm the connection. Select your TV from the list and enjoy watching.
By default, the sound will be output to the TV speakers. If you want to output sound to your computer, change the device in the sound settings. Go to the “Sound Control Panel” as described above and select the appropriate device. After choosing o.
Interesting! How to contact Tricolor company support - ways