18
Feb
Category: Just Me Tags:
Setting up the TV-139F universal remote control with Aliexpress + codes
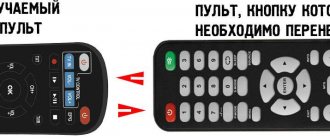
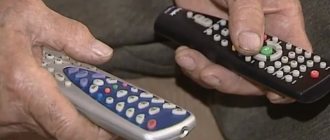
My father has an old Samsung TV in the village and its remote control has completely died. the TV-139F universal remote control helped me .
I managed to purchase this TV-139F universal remote control for my TV 200 rubles , and from this purchase I also received a small cashback from Letyshops. Small thing, but nice
Setting up the watson urc 22b 6n remote control
I. Device programming.
1) Press and hold the SET button. Then press the button of the device you want to control (for example TV1, TV2, CD/HIFI, VCR1, VCR2, CBL, SAT, etc.) 2) As soon as the indicator (LED) lights up, release the pressed buttons. 3) Enter the 3-digit device code. 4) If the entered code is correct, the indicator (LED) will go off. If the entered code is incorrect, the indicator (LED) will blink several times and the remote control will return to programming mode. You must enter the CORRECT device code again! (clause 3)
Note: If you want to exit the programming mode, you must press the device button (eg TV1, TV2, CD/HIFI, VCR1, VCR2, CBL, SAT, etc.). If no key is pressed within 10 seconds, the remote control will automatically exit programming mode.
II. Quick search.
1) Turn on the device to which the remote control is configured. 2) Press and hold the SET button. Then press the button of the device you want to control (for example TV1, TV2, CD/HIFI, VCR1, VCR2, CBL, SAT, etc.) 3) As soon as the indicator (LED) lights up, release the pressed buttons. 4) Press and release the SET button. Now the remote control has entered the fast search mode and the indicator (LED) began to blink quickly. 5) Point the URC22 remote control at the device you want to control and press the POWER or PLAY keys, etc. If the device responds to pressing, go to step 6, if it does not respond, go to step 5 6) Then check other keys, such as [CH+/-], [VOL+/-], that they work. If they do not work, return to step 5 7) Some devices may take a long time to respond to pressing the POWER button. During the search process, you can use the SET button to select the Forward/Backward search direction to find the desired code quickly.
To exit the quick search mode, press the device button (for example TV1, TV2, CD/HIFI, VCR1, VCR2, CBL, SAT, etc.), and the indicator (LED) will go off.
Note: In search mode, in addition to the [POWER] button ([POWER] and [PLAY] in the VCR control unit), all other buttons can be tested. This means that you can check all other buttons without leaving the Quick Search mode. If no key is pressed within 30 seconds, the remote control will automatically exit programming mode.
III. Automatic search.
1) Turn on the device to which the remote control is configured. 2) Press the button of the device you want to control (for example TV1, TV2, CD/HIFI, VCR1, VCR2, CBL, SAT, etc.) 3) Press and hold the SET button. Then press and hold the POWER button for 3 seconds. 4) As soon as the indicator (LED) starts blinking, release the pressed buttons. 5) As soon as the controlled device turns off, immediately press the SET button. 6) Frequency saved. You should check whether the device responds to the URC2 remote control. If not, you should go to step 3
Codes for TV-139F remote control
Manually setting up the remote control means that we ourselves will select the desired parameter settings code . To do this, press and hold (about 3 seconds) the “ SET ” button on the remote control until the LED next to it lights up very brightly . Then enter the three-digit code suitable for your TV from the list below . After which the LED indicator will go off.
- SONY: 044 049 005 094106 148 237 238 230 240;
- PANASONIC: 020 001 002 014 015 021 022 059 066;
- PHILIPS: 043 023 024 039 040 043 141 244 242;
- SAMSUNG: 008 011 016 021 024 025 033 037 039 040 043 050 051 091 123;
- TOSHIBA: 000 014 016 027 033 053 056 007 008 015 028 030 089 090 091 079 285 286 287;
- CHANGHONG: 000 008 009 091 092 093 010 011 014 016 026 028 033 051 052 057 058 067 071 086 087 088 100 159 162 182 183 184 266 288 289 290 291 292 297;
- KONKA: 011 017 029 032 034 054 067 069 071 075 076 077 078 079 080 081 407 143 117 457 163 164 165 177 210 235 260 254 252 253 254 255 266 257;
- SKYWORTH: 011 025 033 045 046 060 070 071 072 073 074 079 083 101 107 108 109 143 160 168 169 170 176 180 194 195 196 197 198 199 200 232 234 275 276 277 278 280 281 282 283 284;
- TCL: 051 053 068 071 073 082 083 084 085 110 111 144 156 216 243 244 245 246 247 248 249;
- HISENSE: 000 006 007 008 010 014 015 025 045 046 103 105 107 115 116 428 129 130 131 138 130 171 172 173 174 185 186 187 188 189 490 191 224 225 233 265 266 269 270 271 273 274 299;
- HAIER: 103 105 112 118 119 175 178 185 186 187 188 201 205 206 218 272;
- HITACH: 007 015 014 027 000 006 008 010 048 179 228;
- SHARP: 003 018 016 025 135 136 137;
- MITSUBISHI: 011 051;
- NEC: 006 011 016 004 025 033 053 056 024 079;
- DAEWOO: 012 042 031;
- JVC: 004;
- AKAI: 033 053 056 079;
- LG: 040 043 140 259 260 264;
- BENQ: 294;
- AIWA: 009 057 058;
- Other brands: 036 044 057 077 101 102 103 104 106 114 178 206 235 266 278 288 293 295 296 297 298 209;
Don't forget to turn on the TV and check if all the buttons are configured correctly. If not, then try another code .
Setting up the Rostelecom universal remote control
The Interactive TV kit from the provider Rostelecom includes a universal remote control that can be configured to work both on the set-top box and on the TV. The main convenience is that now you don’t need to use two devices by programming one RTK remote control. This can be done for almost any modern TV. In the box with the set-top box you will find a user manual describing all the digital setup codes for various manufacturers. You can program the remote control in two ways: using the codes described in the instructions or by searching through all the codes recorded by the manufacturer in the device’s memory.
Frequently asked questions about setting up the Rostelecom remote control
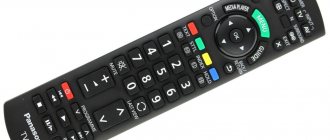
Below is a diagram from which you will learn how to use and control the Rostelecom remote control.
You can adjust the sound and volume on the Rostelecom remote control using both the VOL +/- buttons (adjusts the volume level) and MUTE (turns off the sound completely or turns it on to a previously set level). If the control is incorrect, read below about resetting and resetting the settings.
To switch channels, use the CH+/- buttons. You can also select a channel by dialing its serial number using buttons 0 to 9. Or switch between two programs using the LAST CHANNEL button. A/V is used to enter/exit TV control mode. BACK button to return from the menu window. OK—to confirm the selection of a channel or menu option. The BACK/FORWARD and PLAY/PAUSE keys are designed for movie viewing mode (rewind, pause, play).
The button is used to enter the main menu of the set-top box. This turns on the Interactive TV screensaver; use the RIGHT/LEFT/UP/DOWN keys to switch between functions. For a list of all TV receiver options, video and file viewing capabilities, read the instructions for Interactive TV from RTK.
Description
. Manual. I. Programming (option 1) Find the code in the code table. corresponding to your device. 1. Press the SET button and simultaneously one of the TVTXT buttons. TVXT2. VCR1. VCR2. SAT/CBL. CBL/CAT or HIFI/CD/LD until then. until the LED lights up. Then release both buttons. 2. Dial the code (3 digits). 3. Press the POWER button. If the code is correct. the device will turn off. and the remote control will control all functions of the device. If encoding fails. repeat steps 1-3. by typing a different code. indicated in the table. NOTE: All functions must be performed within 10 seconds. II. Quick search (option 2). After that . as you have selected the device code several times. which you want to manage. and it still does not work (for example, the device cannot be controlled by URC22). or you cannot find the correct code in the code list. then you can use the quick search functions. Note. When the remote control entered search mode. you can use the SET button. to switch between “search forward” and “search backward”. 1. Turn on the device. If it's VCR. then there should be a cassette there. 2. Press the SET button and simultaneously one of the T/ТХТ1 buttons. TVTHT2. VCP1. VCR2. SAT/CBL. CBL/SAT or HIFI/CD/LD until the LED lights up. 3. Briefly press SET. Automatic search is enabled and the LED is flashing. 4. Briefly press POWER. At this time, a pulse is emitted from the remote control to turn off the device. 5. In case of device shutdown. turn it on again using its keyboard and check that the basic functions of the remote control are performed correctly 6. In case. if the orders given are executed partially or incorrectly. step 4 should be repeated. 7. To exit the search mode, press the device button. The LED will go off. III. AUTO SEARCH. 1. Turn on the device. which one you need. If it's VCR. then there should be a cassette there. 2. Press and hold SET. At the same time, press POWER for more than 3 seconds. Search works. 3. Press any button to exit. 4. Rules for reading codes:
Greetings to all ukrshopper readers!
Today I will tell you about a necessary and useful thing - an inexpensive universal remote control, with a very Chinese name, Chunghop, for TVs. In short, you can safely take it - it’s a worthwhile thing, more details in my review. Although summer is still far away, I decided to take care in advance of purchasing a universal remote control for use in the country. Where for a long time all the old, but still working TVs from several apartments were taken, in the process of replacing them with modern ones. Some have missing or poorly functioning remotes, which was the reason for this purchase. Looking ahead, I’ll say that I liked the remote control and have plans to buy several more of the same ones. Parcel - a feature of the store is that all components of the order, even if made and paid for with one invoice, are sent in different parcels. Although there is a rational grain in this - if some product is out of stock, this will not affect the rest of the order items. The packaging is also traditional for this store, a thick, greenish-black bag and inside the order is wrapped in many layers of shockproof film. Chunghop RM-139EX remote control is supplied in blister packaging
The packaging is convenient because you don’t have to cut it - it easily opens into two halves. This perfectly protects the goods from the dangers of transportation and allows you to store them during periods of long downtime. On the back is a short list of supported brands, which is actually much, much longer.
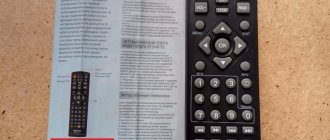
The remote control comes with instructions in several languages; the main value is a table with codes for TVs from various manufacturers. This is exactly the case when it is not recommended to lose the instructions.
The remote control itself is absolutely classic, with all the standard TV controls. It’s not suitable for smart TVs in terms of managing smart functions, but switching channels, controlling sound, selecting a video source, image format, etc. - work great on smart phones, tested on Smart TV Samsung 5500 series.
On the back there is a compartment for 2 AA batteries and instructions for setting up the remote control.
Here are the instructions
Using AA cells instead of the more common AAA batteries increases the service life of one pair of batteries and adds a little weight.
As I already mentioned, the remote control was tested on a Samsung 5500 series Smart TV. The setup is as follows: 1. Turn on the TV - the remote control is configured when the TV is on. 2. Hold the Set button on the remote control until the LED next to it starts blinking. 3. Enter the three-digit code corresponding to the desired brand from the code table in the instructions. There can be 10k or more code options for each brand. 4. After entering, the LED blinks to confirm the entry and continues to light steadily. 5. Without using the number buttons, we check the operation of the remote control, for example by adjusting the volume or flipping through channels. 6. If it doesn’t work, enter the following combination of numbers. 7. If it works, press the Set button again to remember the operating mode. The LED goes out and lights up only when confirming the pressing of any of the cult buttons. Now you can use all the buttons, the on/off button works, switching and flipping channels, volume, selecting a video source, image mode (standard, dynamic, cinema), settings menu. Smart functions do not work, but the remote control is supposed to be used on regular TVs. The code table must be kept in a safe place - without it, the remote control will remain tied to only one type of code.
The remote control settings are saved even when the battery is removed. For that kind of money - in my opinion, not bad, I consider the task solved. I think it’s worth buying a couple of these remote controls, they’re necessary and useful and inexpensive.
How the kettle read the remote control
For a long time I’ve been planning to connect an IR receiver (1838B) and an IR transmitter (IR diode 5 mm, 940 nm, radiation angle about 80 degrees) to the Raspberry, to understand how they will work and what can be done with them. And then one day such a day came. Having studied the issues, including materials from Habr, I realized that in addition to an IR diode and an IR receiver, you also need a transistor and several resistors, I became a little depressed. It’s easier with the receiver - it came as a kit, but there wasn’t enough transistor for the diode, but nevertheless I decided to try it, what if it works? And it turned out... Basically, I found all the necessary information in the open spaces, but in each material some point was missed, and I had to figure out something myself. What made the situation especially complicated was that I’m a beginner at programming, so some aspects weren’t easy, so I’ll try to describe everything step-by-step and in as much detail as possible for people like me.
So, I connected the IR receiver module to GPIO23, gnd and 3.3V - there are corresponding symbols on it. Between GPIO and 3.3V there is a 10 kom resistor. LED - through a 1 kOhm resistor to GPIO22 (anode) and gnd (cathode).
Next, install LIRC:
sudo apt-get install lirc Edit the /etc/modules file: sudo nano /etc/modules Add the lines to the file: lirc_dev lirc_rpi gpio_in_pin=23 gpio_out_pin=22 Where: gpio_in_pin=23 is the pin to which the receiver is connected. gpio_out_pin=22 - pin for the transmitter.
Edit the file /etc/lirc/hardware.conf:
sudo nano /etc/lirc/hardware.conf It should look like this:
/etc/lirc/hardware.conf
################################################## ###### # /etc/lirc/hardware.conf # # Arguments which will be used when launching lircd LIRCD_ARGS="-uinput"
# Don't start lircmd even if there seems to be a good config file # START_LIRCMD=false
# Don't start irexec, even if a good config file seems to exist. # START_IREXEC=false
# Try to load appropriate kernel modules LOAD_MODULES=true
# Run "lircd -driver=help" for a list of supported drivers. DRIVER=“default” # usually /dev/lirc0 is the correct setting for systems using udev DEVICE=”/dev/lirc0″ MODULES=“lirc_rpi”
# Default configuration files for your hardware if any LIRCD_CONF="" LIRCMD_CONF="" ################################# #########################
Edit the file /boot/config.txt: sudo nano /boot/config.txt Add the line to the file: dtoverlay=lirc-rpi,gpio_in_pin=23,gpio_out_pin=22 Where: gpio_in_pin=23 is the pin to which the receiver is connected. gpio_out_pin=22 - pin for the transmitter.
The settings are completed and you can now check how everything works
Checking the IR receiver
Stop the lirc daemon: sudo /etc/init.d/lirc stop Check the operation of the receiver with the command: mode2 -d /dev/lirc0 Now take any remote control and press the buttons, pointing at the receiver. Numbers should run across the screen.
There must be something like this
space 1805 pulse 315 space 122 pulse 215 space 731 pulse 232 space 122 pulse 214 space 1067 pulse 1379 space 114 pulse 210
Creating an image of the remote control
Now the most interesting thing is to write down the configuration of your remote control (or several) so that the program matches the IR signal from the remote control with the name of the button and can use this signal in the future.
To do this, we use the irrecord program included in lirc.
irrecord -d /dev/lirc0
/aa59-00741a.conf Where aa59-00741a is the model of my remote control, you can use any other name. In this example, the configuration file is saved in the home folder.
After launching, you need to follow the program prompts on the screen (in English).
Brief instructions in Russian
1) Launched 2) Enter 3) Picked up the remote control 4) Enter 5) Press different buttons on the remote control until the program prompts you to enter the name of the button. In this case, each click should lead to the appearance of a dot, but no more than 10 dots per click 6) Enter the name of the button to press 7) Press the button
And so on until the buttons run out 9) Then Enter
When entering button names, it is better to use the list built into the program.
Long list of buttons (displayed with irrecord -list-namespace)
KEY_0 KEY_102ND KEY_1 KEY_2 KEY_3 KEY_4 KEY_5 KEY_6 KEY_7 KEY_8 KEY_9 KEY_A KEY_AB KEY_ADDRESSBOOK KEY_AGAIN KEY_ALTERASE KEY_ANGLE KEY_APOSTROPHE KEY_ KEY_AUDIO KEY_AUX KEY_B KEY_BACK KEY_BACKSLASH KEY_B ACKSPACE KEY_BASSBOOST KEY_BATTERY KEY_BLUE KEY_BLUETOOTH KEY_S KEY_BREAK KEY_BRIGHTNESS_CYCLE KEY_BRIGHTNESSDOWN KEY_BRIGHTNESSUP KEY_BRIGHTNESS_ZERO KEY_BRL_DOT10 KEY_BRL_DOT1 KEY_BRL_DOT2 KEY_BRL_DOT3 KEY_BRL_DOT 4 KEY_BRL_DOT5 KEY_BRL_DOT6 KEY_BRL_DOT7 KEY_BRL_DOT8 KEY_BRL_DOT9 KEY_C KEY_CALC KEY_CALENDAR KEY_CAMERA KEY_CANCEL KEY_CAPSLOCK KEY_CD KEY_CHANNEL KEY_CHANNELDOWN KEY_CHANNELUP KEY_CHAT KEY_CLEAR KEY_CLOSE KEY_CLOSECD KEY_COFFEE KEY_COMMA KEY_COMPOSE KEY_COMPUTER KEY_CONFIG KEY_CONNECT KEY_CONTEXT_ KEY_COPY KEY_CUT KEY_CYCLEWINDOWS KEY_D KEY_DASHBOARD KEY_DATABASE KEY_DEL_EOL KEY_DEL_EOS KEY_DELETE KEY_DELETEFILE KEY_DEL_LINE KEY_DIGITS KEY_DIRECTION KEY_DIRECTORY KEY_DISPLAY_OFF KEY_DISPLAYTOGGLE KEY_DOCUMENTS KEY_DOLLAR KEY_DOT KEY_DOWN KEY_DVD KEY_E KEY_EDIT KEY_EDITOR KEY_EJECTCD KEY_EJECTCLOSECD KEY_ KEY_END KEY_ENTER KEY_EPG KEY_EQUAL KEY_ESC KEY_EURO KEY_EXIT KEY_F10 KEY_F11 KEY_F12 KEY_F13 KEY_F14 KEY_F15 KEY_F1 KEY_F16 KEY_F17 KEY_F18 KEY_F19 KEY_F20 KEY_F21 KEY_F22 KEY_F23 KEY_F24 KEY_F2 KEY_F KEY_F3 KEY_F4 KEY_F5 KEY_F6 KEY_F7 KEY_F8 KEY_F9 KEY_FASTFORWARD KEY_FAVORITES KEY_FILE KEY_FINANCE KEY_FIND KEY_FIRST KEY_FN KEY_FN_1 KEY_FN_2 KEY_FN_B KEY_FN_D KEY_FN_E KEY_FN_ESC KEY_FN_F KEY_FN_F10 KEY_FN_F 1 KEY_FN_F11 KEY_FN_F12 KEY_FN_F2 KEY_FN_F3 KEY_FN_F4 KEY_FN_F5 KEY_FN_F6 KEY_FN_F7 KEY_FN_F8 KEY_FN_F9 KEY_FN_S KEY_FORWARD KEY_FORWARDMAIL KEY_FRAMEBACK KEY_FRAMEFORWARD KEY_FRONT KEY_G KEY_GAMES KEY_GOTO KEY_GRAPHICSEDITOR KEY_GRAVE KEY_GREEN KEY_H KEY_HANGEUL KEY_HANJA KEY_HELP KEY_HENKAN KEY_HIRAGANA K EY_HOME KEY_HOMEPAGE KEY_HP KEY_I KEY_ KEY_INSERT KEY_INS_LINE KEY_ISO KEY_J KEY_K KEY_KATAKANA KEY_KATAKANAHIRAGANA KEY_KBDILLUMDOWN KEY_KBDILLUMTOGGLE KEY_KBDILLUMUP KEY_KEYBOARD KEY_KP0 KEY_KP1 KEY_KP2 KEY_KP3 KEY_KP4 KEY_KP5 KEY_KP6 KEY_KP7 KEY_KP8 KEY_KP9 KEY_KPASTERISK KEY_KPCOMMA KEY_KPDOT KEY_KPENTER KEY_KPEQUAL KEY_KPJPCOMMA KEY_KPLEFTPAREN KEY_KPMINUS KEY_KPPLUS KEY_KPPLUSMINUS KEY_KPRIGHTPAREN KEY_KPSLASH KEY_L KEY_LANGUAGE KEY_LAST KEY_LEFT KEY_LEFTALT KEY_LEFTBRACE KEY_LEFTCTRL KEY_LEFT KEY_LEFTSHIFT KEY_LINEFEED KEY_LIST KEY _LOGOFF KEY_M KEY_MACRO KEY_MAIL KEY_MAX KEY_ KEY__REPEAT KEY_MEMO KEY_ KEY_MESSENGER KEY_MHP KEY_MINUS KEY_MODE KEY_MOVE KEY_MP3 KEY_MSDOS KEY_MUHENKAN KEY_MUTE KEY_N KEY_NEW KEY_NEWS KEY_NEXT KEY_NEXTSONG KEY_NUMERIC _0 KEY_NUMERIC_1 KEY_NUMERIC_2 KEY_NUMERIC_3 KEY_NUMERIC_4 KEY_NUMERIC_5 KEY_NUMERIC_6 KEY_NUMERIC_7 KEY_NUMERIC_8 KEY_NUMERIC_9 KEY_NUMERIC_POUND KEY_NUMERIC_STAR KEY_NUMLOCK KEY_O KEY_OK KEY_OPEN KEY_OPTION KEY_P KEY_PAGEDOWN KEY_PAGEUP KEY_PASTE KEY_PAUSE KEY_PAUSECD KEY_PC KEY_PHONE KEY_PLAY KEY_PLAYCD KEY_PLAYER KEY_PLAYPAUSE K EY_POWER KEY_POWER2 KEY_PRESENTATION KEY_PREVIOUS KEY_PREVIOUSSONG KEY_PRINT KEY_PROG1 KEY_PROG2 KEY_PROG3 KEY_PROG4 KEY_PROGRAM KEY_PROPS KEY_PVR KEY_Q KEY_QUESTION KEY_R KEY_RADIO KEY_RECORD KEY_RED KEY_REDO KEY_REFRESH KEY _ KEY_RESERVED KEY_RESTART KEY_REWIND KEY_RFKILL KEY_RIGHT KEY_RIGHTALT KEY_RIGHTBRACE KEY_RIGHTCTRL KEY_RIGHT KEY_RIGHTSHIFT KEY_RO KEY_S KEY_SAT KEY_SAT2 KEY_SAVE KEY_SCALE KEY_SCREEN KEY_DOWN KEY_LOCK KEY_UP KEY_ KEY_SELECT KEY_SEMICOLON KEY_SEND KEY_SENDFILE KEY_SETUP KEY_SHOP KEY_SHUFFLE KEY_SLASH KEY_SLEEP KEY _SLOW KEY_SOUND KEY_SPACE KEY_SPELLCHECK KEY_SPORT KEY_SPREADSHEET KEY_STOP KEY_STOPCD KEY_SUBTITLE KEY_SUSPEND KEY_SWITCHVIDEOMODE KEY_SYSRQ KEY_T KEY_TAB KEY_TAPE KEY_TEEN KEY_TEXT KEY_ KEY_TITLE KEY_TUNER KEY_TV KEY_TV2 KEY_TWEN KEY_U KEY_UNDO KEY_UNKNOWN KEY_UP KEY_UWB KEY_V KEY_VCR KEY_VCR2 KEY_VENDOR KEY_VIDEO KEY_VIDEO_NEXT KEY_VIDEOPHONE KEY_VIDEO_PREV KEY_VOIC KEY_VOLUMEDOWN KEY_VOLUMEUP KEY_W KEY_WAKEUP KEY_WIMAX KEY_WLAN KEY_WORDPROCESSOR KEY_WWW KEY_X KEY_XFER KEY_Y K EY_YELLOW KEY_YEN KEY_Z KEY_ZENKAKUHANKAKU KEY_ZOOM KEY_ZOOMIN KEY_ZOOMOUT KEY_ZOOMRESET BTN_0 BTN_1 BTN_2 BTN_3 BTN_4 BTN_5 BTN_6 BTN_7 BTN_8 BTN_9 BTN_A BTN_B BTN_BACK BTN_BASE BTN_BASE2 BTN_BASE3 B TN_BASE4 BTN_BASE5 BTN_BASE6 BTN_C BTN_DEAD BTN_DIGI BTN_ BTN_FORWARD BTN_GAMEPAD BTN_GEAR_DOWN BTN_GEAR_UP BTN_JOYSTICK BTN_LEFT BTN_MIDDLE BTN_MISC BTN_MODE BTN_MOUSE BTN_PINKIE BTN_RIGHT BTN_SELECT BTN_SIDE BTN_START BTN_STYLUS BTN_STYLUS2 BTN_TASK BTN_THUMB BTN_ THUMB2 BTN_THUMBL BTN_THUMBR BTN_TL BTN_TL2 BTN_TOOL_AIRBRUSH BTN_TOOL_BRUSH BTN_TOOL_DOUBLETAP BTN_TOOL_FINGER BTN_TOOL_LENS BTN_TOOL_MOUSE BTN_TOOL_PEN BTN_TOOL_PENCIL BTN_TOOL_QUADTAP BTN_TOOL_RUBBER BTN_TOOL_TRIPL ETAP BTN_TOP BTN_TOP2 BTN_TOUCH BTN_TR BTN_TR2 BTN_TRIGGER BTN_WHEEL BTN_X BTN_Y BTN_Z
You will get a configuration file - in our case with the name aa59-00741a.conf, it will be saved in the home folder. In the resulting file, I added comments via # to understand what the button is.
My file is aa59-00741a.conf
# Please make this file available to others # by sending it to # # this config file was automatically generated # using lirc-0.9.0-pre1(default) on Wed Feb 10 02:11:48 2021 # # contributed by Malina-shop .ru # # brand: Samsung /home/pi/aa59-00741a.conf.conf # model no. of remote control: aa59-00741a # devices being controlled by this remote: Color TV screen # begin remote
name Samsung_TV bits 16 flags SPACE_ENC|CONST_LENGTH eps 30 aeps 100
er 4565 4509 one 570 1677 zero 570 553 ptrail 570 pre_data_bits 16 pre_data 0xE0E0 gap 108301 toggle_bit_mask 0x0
begin codes KEY_POWER 0x40BF KEY_CYCLEWINDOWS 0x807F #SOURCE KEY_1 0x20DF KEY_2 0xA05F KEY_3 0x609F KEY_4 0x10EF KEY_5 0x906F KEY_6 0x50AF KEY_7 0x30CF KEY_8 0xB04F KEY_ 9 0x708F KEY_PREVIOUS 0xC837 #PRE-CH KEY_0 0x8877 KEY_TEXT 0x34CB #TTX/MIX KEY_MUTE 0xF00F KEY_CHANNELUP 0x48B7 KEY_CHANNELDOWN 0x08F7 KEY_VOLUMEUP 0xE01F KEY_VOLUMEDOWN 0xD02 F KEY_LIST 0xD629 #CH LIST KEY_ 0x31CE #.P KEY_ 0x58A7 KEY_EPG 0xF20D #GUIDE BTN_TL 0xD22D #TOOLS KEY_UP 0x06F9 BTN_RIGHT 0x46B9 KEY_LEFT 0xA659 KEY_DOWN 0x8679 KEY_OK 0x1 6E9 #ENTER BTN_BACK 0x1AE5 #RETURN KEY_EXIT 0xB44B KEY_A 0x36C9 #RED KEY_B 0x28D7 #GREEN KEY_C 0xA857 #YELLOW KEY_D 0x6897 #BLUE BTN_START 0xFC03 #E-MANUAL KEY_SUBTITLE 0xA45B #AD/SUBT. KEY_STOP 0x629D KEY_REWIND 0xA25D KEY_PLAY 0xE21D KEY_PAUSE 0x52AD KEY_FORWARD 0x12ED KEY_P 0x7C83 #P.SIZE end codes
This action must be done for each remote control. The configuration file contains an important field - name. This is the name of the device by which lirc will determine which file to take the command from (in my case, Samsung_TV).
Copy the resulting file somewhere. I put it in the /etc/lirc/rc folder and added the line to the /etc/lirc/lircd.conf file:
include "/etc/lirc/rc/aa59-00741a.conf" So the lirc configuration file will take the information about my remote from the aa59-00741a.conf file located in the /etc/lirc/rc folder. In my opinion, this is the easiest way to add remote configuration information to the program settings.
sudo /etc/init.d/lirc restart Now lirc can use the remote control data to transmit using the transmitter, or to recognize commands from the remote control and trigger some actions in response to the raspberry.
Checking the operation of lirc and the IR transmitter
To do this, we place the transmitter as close to the device as possible (for testing, then it will be possible to experimentally determine from what distance it will work) and write a command in the terminal, for example: irsend SEND_ONCE Samsung_TV KEY_POWER where irsend is a program for controlling the transmitter; SEND_ONCE — attribute of one-time signal sending; Samsung_TV — device name from the configuration file (in the name field); KEY_POWER - the name of the command from the configuration file that needs to be sent.
This way the TV can turn on or off. Using this command I turn the TV on or off.
Another check of the IR receiver, as well as the correct perception of the configuration file by lirc
In the terminal, enter the command: irw After this, when you press the remote control buttons, their names from the configuration file will be displayed.
The next step is to control the transmitter via the browser, but I haven’t explored that yet.
Source
Universal 3-in-1 remote control Chunghop RM-88E for TV/DVD/VCD
Let's help children together! From each order we transfer 10 rubles to a charity fund for orphans! more details
Chunghop RM-88E is a 3-in-1 universal programmable remote control that is suitable for various brands of TVs, DVD players and VCRs/video players. The code is entered in the standard way, as in other remote controls of this type. The model of this remote control RM-88E will be a good replacement for a broken or lost remote control.
Specifications:
- Model: RM-88E
- Type: Universal programmable remote control
- Compatible brands: LG, MITSUBISHI, AIWA, TOSHIBA, SANYUAN, TCL, SONY, PHILIPS, FUJITSU, PANASONIC, HITACHI, SAMSUNG, ROWA, JVC, NEC, GOLDSTAR, NIKON, PIONEER, KENNOOD, etc.
- Operating distance: Up to 8 meters (depending on the TV, DVD or VCR model)
- Power: 2 AA batteries (not included)
Equipment:
- Factory blister packaging
- Remote control Chunghop RM-88E
- Instructions in English
Mini-instructions using a TV as an example:
- Insert AA batteries into the remote control.
- Find in the instructions the required brand of TV and codes for it.
- Press the “SET” button on the remote control, and without releasing it, press the “TV” button.
- As soon as the red indicator on the remote control lights up, you can enter the code.
- The codes are sorted out sequentially until the remote control works correctly (switch channels, increase/decrease volume, etc.).
A universal TV remote control is an indispensable assistant in the home
Surely many remember the times when TVs were push-button and in order to change the channel you had to run to the “box”. The situation was especially sad when, during advertising, parents said, “Come on, little one, go and click through the channels!” Now everything is much simpler, everyone in the house has a remote control that solves all problems. Press the right button and that’s it, no need to get up and go anywhere. But if the remote control breaks down, the situation changes radically, because now there are not 5 channels on the TV, but 150 (!) and you can only switch them on the TV using the PR +/- buttons. It’s scary to even imagine pressing the button a hundred times to switch from TV series to news.
Personally, such situations happen to me quite often, since there are little kids running around the house who don’t mind pouring juice on the remote control or slamming it against the wall during gameplay. The first time I was really taken aback, because they crushed the remote control from my old Thomson, to which none of the universal remote controls sold in supermarkets fit. No, probably a model for 150+ UAH. would work, but I have no desire to buy them. After walking around the market, I found a suitable remote control, which they gave me a guarantee and time to check. The seller honestly said that the thing was Chinese, but of high quality, so 90 UAH. ($11) I gave it to him without much sadness. I set up the remote control in a couple of minutes, it works with most TVs, and to this day.
After searching the Internet, I found out that this model CHUNGHOP H-1880E costs about $7 on TinyDeal. I decided to order a trial batch for friends and acquaintances, since they liked my new remote control. I took the remote control in a plastic bag, without packaging with instructions, so it was very interesting how it would all arrive from the Middle Kingdom.
First meeting
The first parcel (I ordered several times already) arrived in 23 days. I received a large yellow package in which ten remote controls were wrapped in bubble wrap. In principle, everything arrived in good condition, not one of the remote controls was damaged during transportation. I’ll say right away that my expectations of finding a defective product were not justified - all the remote controls turned out to be working. Over the entire period, there were 2-3 broken remote controls, and even then they broke during delivery by free mail.
The CHUNGHOP H-1880E remote control comes in a blister pack without batteries. The body is made of durable, odorless plastic, the buttons are silicone with clear, indelible symbols. Moreover, I can really say that the inscriptions on the buttons are not erased, they can only be removed with acetone or cut off with a blade - during operation they have not disappeared in a year and a half. The remote control itself is slightly large, but it fits comfortably in the hand, and you can easily reach all the buttons with your thumb in the standard position. The battery compartment lid is latched with force, so a small child cannot open it - the batteries will not be swallowed.
A few photos from TinyDeal
Connection and setup
The designations of all the buttons are described in the attached instructions and on the website, so if you don’t have the original packaging, then look for it on TinyDeal. Brief setup instructions are glued to the back of the remote control so you don't lose it. So, actually, the setup procedure:
• turn on the TV;
• press the “SET” button on the remote control until the indicator lights up;
• press the “VOLUME +” button until the volume increase action is displayed on the TV screen;
• press “SET” to save the settings and exit.
This algorithm allows you to configure the remote control to work with any TV in a couple of seconds, so there is nothing complicated. As for supported models, it’s easier to say that I simply couldn’t find any that weren’t supported. The CHUNGHOP H-1880E remote control works perfectly with both new LCD panels and old CRT TVs from the last millennium. For the experiment, we found in my grandmother’s closet an old “Electron 51TC 433D” manufactured in 1987, which was removed back in 1996-97 due to the loss of the remote control and the purchase of a new TV. It took a little over half a minute to set up, but the receiver worked! True, I had to figure out the designations of the buttons, but the main ones (sound, settings, channel switching) correspond to standard settings.
The beauty of operation
The CHUNGHOP H-1880E remote control is most often bought by those who have very expensive TVs at home. As a rule, this is explained by the fact that a native remote control from Samsung or LG costs about 200-300 UAH, there are a lot of “show-offs” there. This device copes well with the tasks assigned to it - all functions work, such as “LIST” (list of channels), teletext, picture in picture, image enlargement and much more. In other words, if you can use a universal remote control instead of an expensive “native” one, then why overpay?
But not everything is as rosy as it seems at first glance, at least for me. Although the case is very durable and can easily withstand even a kick from an adult 100-kilogram man, you can kill the remote control, just like everyone else, by filling it with water or, even worse, milk. My kids succeeded, after which even cleaning the contacts did not help revive the remote control. In order to avoid this, I advise you to buy special heat-shrinkable plastic bags that hermetically seal the remote control on all sides. If you consider that standard batteries last for six months to a year, then a set of five sachets will last you for three years, or even more.
Let's sum it up
If you skip all the eloquent statements and say briefly, it’s worth taking! Well, there are no and cannot be any downsides to a universal remote control at this price, especially considering the fact that it works with all models of TVs. So if you need a remote control for every day, or just a spare one, then take a closer look at CHUNGHOP H-1880E, I’m sure you won’t regret it.
Happy shopping everyone!