A projector is a device whose main task is to project images from a laptop or PC onto special screens, plasma or interactive whiteboards. This technique is most often used during lectures, conferences, and presentations to demonstrate multimedia content. Connecting the projector to a laptop takes a minimum of time and is not difficult. To make the process go as quickly as possible, you need to read the step-by-step connection instructions.
Features of connecting a projector to a laptop
The connection itself is a fairly simple task, but if a person has not done this at all, some of the settings and parameters may cause him difficulties. That is why it is important to study the relevant instructions in detail.
Wired connection
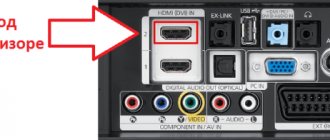
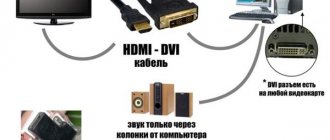
- First, you should carefully inspect the body of the projector and laptop to look for a VGA, HDMI or DVI connector. It would be ideal if these two devices are equipped with an identical connector.
Note! As practice shows, HDMI is the most optimal, since it is capable of providing high-quality images.
Equipment setup
It was mentioned earlier that projector setup often occurs for video signal transmission. How to check if the connection was successful? It's simple: after starting work, the projector will start displaying the image from the laptop.
- Some models of the equipment described above include a control panel with a “Source” button. If you click on it, the search for a signal will begin, and after it is detected, the image from the key monitor will be duplicated on the wall.
Changing screen resolution
It is necessary to see at what resolution the projector is capable of functioning normally. Budget options support 800x600 or 1024x768, but more expensive ones handle 1920x1080
- Having familiarized yourself with the resolution settings on the laptop, you need to set an identical value.
Users of the latest version of Windows will not be able to find the above section in the context menu, so they need to adjust the resolution in Screen Settings.
You need to open Start and visit the Settings section. Go to the “System” tab, after which the “Screen” section will appear. Next you should go to additional parameters.
After setting the optimal parameters, the configurations are saved.
After performing all these manipulations, a normal and clear image will appear on the wall. The next connection step is to select the demonstration mode display.
Display Mode Changes
To change the operating principles of the equipment, you need to press two keys on the keyboard at once - Win + P.
Then several options will appear:
- computer . The equipment itself will turn off, the picture will remain exclusively on the main monitor;
- duplicate . The projector copies the image from the main monitor;
- expand . The image becomes identical for the laptop and equipment. In this case, the main screen will be located on the left;
- only the second screen . The image remains only on the projector wall.
When using a laptop, there is an Fn button on the keyboard. With its help, you can instantly switch the display option.
If these steps are performed correctly, it will not be difficult to achieve a positive result by successfully connecting and setting up the projector.
How to work with Power Point?
Typically, a projector is used to show slides through PowerPoint. In this case, to properly configure the display, you will need to perform a few more steps, namely, decide on the display to display. So far, only the slides on the projector are visible to the public, and other information is available on the monitor screen, for example, the text of the abstract.
- Before selecting a screen, you must make a connection and change the projector settings.
- When the equipment is prepared for work, you need to find the “Slide Show” section in the program itself and select your multimedia projector in the “Show presentation on” menu.
Option 1: Sharing the screen with your interlocutor
Most often, screen sharing refers to displaying content during a conversation in one of the communication programs. Then the interlocutor will be able to see everything that is happening, suggest a solution to the problem, or use the information received for other purposes. Let's look at the three most popular instant messengers that support this function.
Zoom
During this time of remote work and learning, Zoom has become the most popular conferencing software. Sometimes the format of such communication involves screen sharing, which can be implemented using a built-in function. During a conversation, you only need to press one button and confirm the start of the broadcast, after which your interlocutors will be able to see all the windows between which you will switch.
Read more: Enable screen sharing in Zoom for Windows, Android and iOS
Discord
Although Discord was originally intended primarily for gamers, now completely different people use it, communicating with other participants on servers or in personal conversations. The program not only supports voice and video communication, but also allows you to show your interlocutor the screen with a special button that appears during a call. For information on how to make preliminary settings and correctly show the screen in Discord, read the article at the link below.
Read more: Enabling screen sharing in Discord
Skype
Skype is another popular program for communicating using text, voice and video. Each participant also has the opportunity to activate screen sharing and show the desired content to the other person. In different versions of Skype, the function is enabled in a certain way, which is described in more detail in the instructions from our other author.
Read more: Share your screen with your interlocutor in Skype
How to fix a problem connecting equipment to a computer
If a recently purchased projector was connected to the device, but the signal does not want to appear, this indicates that the user has configured the equipment incorrectly. In this case, it is necessary to double-check whether everything was connected in the correct order.
First, the device is connected, and only then the laptop is turned on. The connection process itself is performed via a VGA or HDMI cable, which gives the most detailed picture. There are models that operate via WI-FI. In each individual case, you must carefully re-read the instructions and understand that everything was done correctly.
Note! If there is no signal from the equipment and the laptop does not display new devices, it is better to reboot the system. Most likely, there are problems recognizing the new device.
Sometimes it happens that the laptop suddenly stops contacting the projector, although until recently there were no such problems. If this happened when the OS was reinstalled, there was most likely a driver problem.
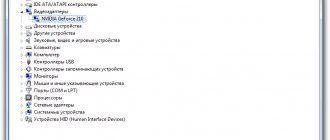
- It’s worth going to “Device Manager” and searching the list for your driver. If there are any problems with the equipment, a yellow exclamation mark will be drawn next to it.
As practice shows, problems of lack of connection usually occur due to inattention during connection. Modern projectors have simple controls, so all you need to do is read the instructions described above and everything will work out. Moreover, even after successful connection and configuration of programs, work with the equipment does not end. It is important to place the equipment securely and correctly, to correctly calculate the distance so that the image is detailed and clear.
Video - How to connect a projector to a laptop
Did you like the article? Save so you don't lose!
There is one interesting feature in Windows 10 called Project to This PC. In recent updates it has been added to the system settings and the Project menu. Previously, this all worked through the “Connect” application. In principle, the same as now, but the function itself is already integrated into the system. This makes it more convenient to use. Thanks to this function, you can broadcast images to the screen of a desktop computer (monitor) or laptop from other devices. That is, you can broadcast an image from an Android phone/tablet to Windows 10, or from another computer/laptop to Windows 8.1 and Windows 10.
Using this function, you can duplicate the screen from computer to computer, or from phone to computer via Wi-Fi network. No wires required. Miracast technology is used. This means that the devices should simply be located close to each other (approximately within a small apartment or house). It is not necessary to connect devices to the same Wi-Fi network. The devices are connected directly, the connection does not occur through a router. There is no need to connect to the Internet at all.
Along with the image, sound is also transmitted. For example, if we display an image from a phone to our computer or laptop with Windows 10, then the sound will also be played through the computer's speakers. And one more feature - you can control the device from which we are projecting the image from the computer on which we are projecting. But in my case, this trick only worked when projecting an image from another computer onto the computer. When broadcasting a picture from a phone to Android, I did not have the ability to control the phone from a computer. A message with instructions appears there, but it is impossible to complete it. As I understand it, control is only possible when projecting from computer to computer. Touch screen devices are likely not supported.
Analogue past and IP present
Today, when installing a high-definition video surveillance system, you basically have to choose from two options: analog (AHD, HDSDI, HDCVI) or IP.
In analog video surveillance systems, the video camera sends the video signal to the monitor directly without compression. These are easy to install, reliable, but cumbersome systems with limited functionality. Today, such solutions are mainly used only in small systems with several closely spaced cameras or in highly specialized industries. We will not consider analog video surveillance systems based on PAL/NTSC formats, developed more than 60 years ago. They are obsolete because they have a resolution of 720x480 and do not provide acceptable image quality, for example, for reliable recognition of a face or car license plate. Today the most popular analog format is AHD. It provides 720p (1280x720) and 1080p (1920x1080) resolutions, making analogue CCTV not completely a thing of the past and finding use in simple solutions.
Fig.1. Analog systems are built on the simple principle of direct video transmission
HDSDI, HDCVI also use HD cameras and can be based on old cable networks left over from analog systems. They are usually used for highly specialized tasks, for example in casino video surveillance systems, where real-time surveillance and video data protection come first.
Rice. 2. IP cameras are more flexible
Digital surveillance systems based on IP cameras use compressed video transmission over networks, including the Internet and wireless. Such systems are easily scalable, have many customizable parameters and broader functionality, for example, the ability to transmit high-resolution video at a high frame rate per second for clearly capturing fast-moving vehicles. Therefore, IP cameras are used in a wide variety of surveillance systems: from home systems with remote access to large-scale networks for monitoring nature reserves and city blocks.
How does projection to a computer work and on what devices?
As I wrote above, everything works via Wi-Fi. Miracast technology is used. Therefore, both devices must have a Wi-Fi module with Miracast support installed. If we are talking about desktop computers (PCs), then you need to buy and connect a Wi-Fi adapter. Read more in this article. In laptops it is usually built-in. Wi-Fi on the computer should be working (driver installed, wireless enabled). The requirements here are the same as when setting up the “Wireless Display” function in Windows 10. When we display an image not on a computer, but from a computer on a TV screen, for example.
You can only receive images from other devices on Windows 10. You can broadcast images from other computers that have the “Connect to a wireless display” function. These are computers running Windows 8.1 and Windows 10. And, accordingly, with hardware (Wi-Fi module, video card) that supports this feature. You can also mirror the screen to a computer from phones and tablets that run Android. Depending on the device, Android version, skin, etc., this feature may be called differently. For example, Smart View on Samsung devices. Or “Wireless Display”, “Miracast”, “Broadcast” item in the screen settings.
This does not work on iPhone and iPad. To mirror the screen from these devices, Apple's proprietary technology called AirPlay is used. And not Miracast, which is used in our case. If you have an iPhone or iPad, then you may be interested in reading the article on how to mirror the screen of an iPhone or iPad to a TV.
How I tested everything: I have a relatively new and powerful PC with an external Netis WF2190 USB adapter, an old ASUS K56CM laptop but with a Wi-Fi module replaced with an Intel Dual Band Wireless-AC 3160, and a not-new Samsung Galaxy J5 2017 phone (Android 8.1) . Windows 10 is installed on the PC and laptop.
From a PC, I can easily broadcast the image to the laptop screen and vice versa - from the laptop the image is broadcast to the computer monitor. I was never able to use the “Project to This Computer” feature to connect my Samsung phone to my laptop. The phone sees the computer, a connection request appears in Windows, but everything freezes during the connection process. In addition, on a laptop, in the settings for this function there is the following warning: “This device may have problems displaying content because its hardware was not specifically designed for wireless projection.”
While the screen from this phone is duplicated on a desktop computer without any problems at all. And there is no warning about possible problems with displaying content on a desktop computer. Apparently this is due to outdated hardware in the laptop, or drivers. But let me remind you that the combination of PC - laptop and laptop - PC works perfectly.
Setting up Project to This PC in Windows 10
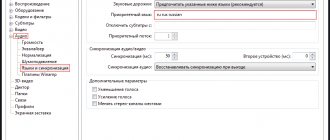
In Windows 10 settings, in the “System” there is a tab “Project to this PC” . Open it and look at the settings:
- In order for devices with Windows and Andro > (if you know, write in the comments).
- Request to project to this computer: “First time only” – the connection request will appear only once when connecting for the first time, in the future the image will be broadcast from this device automatically. “Every time you connect” – the connection permission request will appear every time.
- Require a PIN for linking. If you enable this feature, you will need to enter a PIN code on the device from which you will be projecting. The PIN will be displayed on the computer screen. I think this is unnecessary. A simple connection request is sufficient.
- This computer can only be detected for projection when it is connected to a power source. If you enable this item, then as far as I understand, the function will not work when the laptop is powered by battery.
- Computer name. This name will be displayed on the Android device or other computer from which we will connect to this computer to broadcast the image. It can be changed if necessary.
Everything is simple and clear with the settings. Just select “Available everywhere” in the first menu. Well, disable setting number 4 if you have a laptop and it is not connected to power.
If you, like me, have a message on your laptop (above is a screenshot from a PC, everything is ok) “This device may have problems displaying content because its hardware was not specifically designed for wireless projection,” then All right, turn on this function and try to connect the device.
In my case, only the phone did not connect. And the broadcast worked from a laptop to a PC. We will discuss possible problems with setting up this function and errors during the process of connecting devices at the end of this article.
Conclusion
No matter what, investing in wireless video pays off when it comes to outfitting your projector. After all, you don't want tens of hundreds of feet of cable running through your walls and ceiling. Keep it simple and use wireless video. Once you get started, you won't regret this simplicity.
We have a similar tutorial on how to build wireless regular speakers. This is extremely useful for a home theater located in the living room, in oddly shaped rooms, or even if you don't want to deal with running a ton of cables!
Recording source: https://thehometheaterdiy.com
How to mirror the screen from a phone or tablet to a Windows 10 computer?
Let me remind you that this method only works on smartphones and tablets that run Andro (on a computer that will act as a wireless monitor), as I showed above.
On your phone, you need to open the status bar and find there the icon for starting screen casting using Miracast technology. On my Samsung phone this is Smart View (located on the second screen, swipe left). Perhaps on your device this function is located in the settings, somewhere in the “Connections” or “Screen” section.
In the list of available screen mirroring devices, select your computer.
You need to confirm the phone connection on your computer to perform projection.
The “Connect” application will immediately open in full screen and the connection process will begin.
If everything is fine, then after a few seconds the phone screen will appear on your computer monitor.
Another strange message will appear that touch input is disabled. Where it will be written how to enable it. But as I already found out (and wrote at the beginning of the article), controlling a touch phone in this mode does not work.
You can exit full screen mode, resize the window, or minimize the Connect app.
In horizontal mode, everything works fine too. For example, you can stream videos from YouTube without any problems.
The sound from the phone is also transmitted to the computer. You need to control wireless image broadcasting via Miracast on your phone. There is a special icon displayed on the screen for this. You can pause the broadcast, change the device, or disconnect from the computer.
Broadcasting an image from a computer/laptop to another computer running Windows 10
The scheme is the same as in the case of connecting a telephone. On the computer on which we will display the image, we need to activate the “Project to this computer” function (I wrote about this above).
Next, on the computer from which we will display the image via Wi-Fi, you need to go to the “Project” menu. , press the key combination Win + P. And go to the “Connect to a wireless display” section.
A search will begin for devices where our computer should be on which we want to project the image. Let's choose it.
Next, on the computer that will receive and display the image on its screen, you need to confirm the connection.
The connection process will begin. After a successful connection, the image from one computer will be transferred to the screen of the other and displayed in the “Connect” application. This is how projection from one computer to another works in Windows 10. Wirelessly, over a Wi-Fi network.
On the computer from which you are broadcasting, in the “Project” menu (Win + P) – “Connect to a wireless display”, you can check the box next to “Allow mouse, keyboard, touch, and stylus input from this device.” This will make it possible to control the computer that performs the broadcast from the computer that receives the image broadcast.
You can also change the projection mode (as when connecting via an HDMI cable).
You can, for example, extend the screen to another computer, or duplicate it (Repeating mode).
Possible difficulties with transfer
- The HDMA connector may not work. In this case, if there is another connector, try using it.
- Defective cable.
- The computer may not see the TV. You need to understand the settings.
- No sound transmission from the laptop, as in the previous case, you should understand the settings.
- Inappropriate connection method.
Modern technologies amaze with the simplicity of their actions. Carefully reading the instructions will help you choose the right connection method and ensure a productive pastime
Possible problems when using Windows 10 as a wireless monitor
Everything doesn't work as perfectly as we would like. This may be because the Project to This PC feature is in development mode. For example, it is not always possible to connect devices the first time. Sometimes I had to restart my computer. Because when connecting to another computer, the error “Could not connect” .
Or the receiving computer (in the Connect app in Windows 10) was displaying a "There's a problem with projection" .
If you were unable to set up projection to a wireless monitor in Windows 10 the first time, try again. If the settings display a warning that your device may have problems displaying content due to its hardware (I wrote about this at the beginning of the article, there are also screenshots there), then be prepared for the fact that the “Project to this” function the computer" will not work at all. Or it will not work with all devices.
Solving the most common problems:
- In Windows 10 settings, “Project to this PC” does not work, the settings are grayed out. Error: “We are still trying to determine the capabilities of the component” or “This device does not support Miracast reception and cannot project wirelessly.”
Make sure your computer has a Wi-Fi module, it is turned on and working. Check the status of the wireless module in Device Manager. The module installed on your computer may not support Miracast, so this function is not available. You may find the article updating (installing) the Wi-Fi driver in Windows 10 useful. You can also try updating the driver if there is an error in the wireless monitor settings: “This device may have problems displaying content because its hardware has not been specifically designed for wireless projection." - If other devices do not see the wireless monitor , then make sure that they are not very far from each other. Check if the projection function is enabled on the receiving computer (you need to set it to “Available everywhere”). You can also try disabling this feature and enabling it again. Or restart your computer. Manually launch the Connect application (via search in Windows 10).
- There is no "Connect to a wireless display" button on the computer. You may encounter this when you want to connect your computer to another computer to cast the screen. Most likely this computer has limitations on the part of the Wi-Fi module or video card. There is more information on this topic in this article.
In case of any problems, start by updating the Wi-Fi adapter driver, since this is most likely the cause. Download drivers only from the official website of the wireless adapter or laptop manufacturer. You can install the latest Windows 10 updates. If experiments with drivers do not help, wireless projection does not work, then there really are hardware limitations. Perhaps replacing the Wi-Fi module or connecting a USB adapter will solve the problem. If you have a laptop, then after connecting the USB adapter, do not forget to disable the built-in Wi-Fi module in the device manager.
Leave comments, ask questions and don’t forget to share useful information on this topic. Best wishes!
If you want to have a second monitor for your PC, you can use a laptop as it. How? Now we'll tell you.
This option is not bad if you hate throwing away an old laptop that has a working display. You can turn it into a second monitor for your desktop computer, and the device will serve you a little longer. How to connect a laptop as a monitor?
By cable
This method is the simplest and most reliable.
You just need to buy a cable if you don’t have a suitable one in your house. To do this, we determine the video input ports on both devices: on a PC it is usually VGA, DVI or HDMI, on a laptop it can be VGA, HDMI, DisplayPort or even USB. If the connectors are different, you will need to buy a cable and an adapter - for example, from DVI to HDMI (classic case). Adapter between PC monitor input and laptop video output
One end of the cable (with or without an adapter attached) needs to be inserted into the PC port, and the other connected to the laptop. After this, we launch both devices and perform the following actions:
- Wait until the OS desktop loads on your PC.
- Right-click on it.
- Select “Display Settings” (or “Screen Resolution”, depending on your OS).
- Click on the screen image with the number “2”.
- In the “Multiple screens” , select “Duplicate screens” .
- Click OK.
A copy of your PC's desktop will appear on your laptop.
This configuration of a PC and laptop is convenient to use purely pragmatically, which is often used by freelancers. You can open your work on a laptop, and run a game or movie on a PC.
Transfer using Instashare
Instashare is one of the best programs for transferring any type of files between devices on iOS and not only.
In order to transfer a file through the program, you need to download it to both devices, here is the official website of the service - https://instashareapp.com/. You can also download the application by following the links:
- ;
- .
After installing the software, to transfer files you just need to drag and drop them onto one of the available devices. During the first transfer, the program will ask you to add the device to which the file is being transferred to the trusted ones. You can monitor the download status by looking at the download line.
Instashare also allows you to transfer files to cloud services, for example, DropBox or the Mail.ru cloud.
The above is quite difficult for you, watch the video and learn how to transfer files easily.
On Windows 10
The easiest thing to do here is for owners of laptops based on the Intel chipset with Windows 10 installed. You have a built-in Screen Projection , which allows you to “distribute” the PC screen to a laptop via Wi-Fi. Of course, the PC should also have “ten”.
You can find it through the system parameters. On your laptop, open Start > Settings and select System . In the left menu, find Project to this computer.
Change the resolution to “ Available everywhere ” and connect from your PC and laptop to your home Wi-Fi router.
On the PC, open the right curtain and select “ Transfer to screen ” - “ Connect to a wireless display ”. We select the device we want to connect to and wait for the connection to complete. The PC desktop will be displayed on the laptop screen.
On Mac
It’s also easy for Mac and Macbook owners: there is a special program for them AirDisplay . By the way, you can use it to make both an iPad and an iPhone a second monitor.
It can be downloaded from the AppStore - it is important that it is installed on the device that will be the second screen, that is, on a laptop.
After that, connect your PC and laptop to your home router, launch the utility and, having selected the desired device in the list - that is, your PC - click Connect . Once the connection is complete, your Mac's desktop will appear on your Macbook's screen.