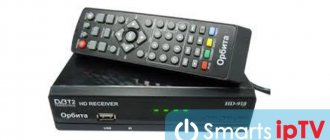
How to connect the Orbita set-top box to your TV
Before you start connecting the Orbit receiver to your TV, make sure you have a set of necessary tools:
- Orbit tuner;
- Remote Control;
- antenna;
- wires for connection.
For correct connection, you will also need instructions, described in detail below.
Connecting the device
First, the user needs to connect the set-top box to the TV. To do this, perform the following steps:
- connection from the router to the set-top box;
- HDMI connection to TV;
- turning on the TV to the corresponding digital channel (HDMI);
And most importantly, don’t forget to plug in the TV and set-top box afterwards.
Initial settings
Before starting the set-top box, the user must:
- wait until the device boots up completely;
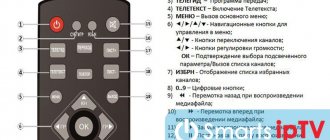
- Use the remote control to select the TV section and press OK to confirm;
- wait for the channel list to be displayed;
- select a channel, press OK;
- return to the menu page using the button of the same name;
- open “Video” using the up or down buttons on the remote control, press OK;
- Use the Up/Down/Right/Left buttons to select the channel you want to watch from the list, confirm by pressing OK;
- press “EXIT” to exit to the main menu;
In the “Personal information” section you can find out the contract number, connection and disconnection dates. In this section the user can change the password. This is necessary to activate channels that operate without free access.
Basic Operations
Orbit tuners are represented by a wide range of models. DVD T2 Orbita HD 911 is a digital receiver that combines the functions of a tuner and media player. Made in a metal case, has a built-in power supply. Models HD 924, HD 910, HD 925 are suitable for almost any TV. Supports USB flash drives, audio and video files in HD quality. Allows you to use the Internet, YouTube, PTV. Thanks to these devices, you can record a video or part of it on a flash drive and view photos. And also set up parental controls - passwords for channels that are not intended for children.
Suitable for different TVs, support TVs from such manufacturers as LG, Samsung, Philips.
Program Manager
Developers offer various applications for the Smart media set-top box. Most often, users install:
- Setting up and connecting the Lumax set-top box to your TV - step-by-step guide
- X-Plore - file manager for copying, deleting, transferring from one column to another;
- AirScreen is an application that allows you to transfer your smartphone screen to a TV monitor.
The applications are aimed at facilitating the operation of the smart platform.
Image Settings
To set up a high-quality picture of a set-top box for 20 channels, it is advisable to first check the data by pressing the INFO button. The following inscriptions indicate poor quality:
If you have any questions or complaints, please let us know
- signal indicator less than 60%;
- The receiver receives a signal of poor quality.
After you install the problems, try one of the following to resolve them:
- point the antenna at the repeater tower;
- use special signal power amplifiers.
As a result, channels should be displayed in high quality without any lag.
Search channels
To activate channel search you must:
- open menu;
- go to settings;
- select the name of the country in the proposed list;
- select signal type - DVB-T2;
- confirm automatic settings;
Next, wait a few minutes while the receiver automatically searches for available channels.
If no channel is displayed as a result, you will have to search manually. Follow the same steps, just select "Manual Search". You must specify the broadcast frequency. To clarify the indicator, find what frequency is available for the city in which you are located.
If desired, the channels can be sorted. To do this, go to “Settings” / “Sorting channels”.
- How to connect a set-top box to a monoblock
- Select the desired channel, confirm your choice.
- Use the Up/Down buttons to move it to the desired location.
- Click OK to fix the channel at the selected position.
If you accidentally moved the channel to the wrong place, press F3 on the remote control. The system will automatically display the initial data.
Setting the time
To display the correct time on the set-top box, open the settings, go to “Time Zone”, enter the time using the buttons on the remote control.
Setting options
The functionality of the options depends on the correct sequence:
- installation of the antenna cable to the set-top box;
- connecting the set-top box to the TV;
- turning on the TV and receiver;
- turning on the power to the signal amplifier (if equipped).
To increase the number of channels, you can additionally connect to cable TV from your provider.
System Settings
For correct operation of the device on an ongoing basis, it is advisable to immediately set the system settings:
- select language;
- set the image mode to 1080i_25;
- define format - Auto;
Some TV models interpret formats differently, so test each one offered.
System settings are configured once. Afterwards they are automatically displayed.
When to update the firmware
Firmware is a new version of the software that controls the set-top box. It is available on both smart devices and regular digital television devices with a minimum of functions. The firmware is responsible for displaying the menu and working with its functions, decoding channels and converting them for display on the TV screen.
Before you upgrade your 20-channel digital set-top box, you need to figure out whether you need it. Check these points:
- Constant errors and malfunctions in functionality: channels do not switch, the volume level drops, channels are shuffled, the remote control does not respond (while its batteries are charged), the menu does not open or does not work correctly, errors when recording the broadcast and playing it back, and so on.
- Errors in television display are also possible: the image is of poor clarity, problems with sound (disappeared when playing through a set-top box) and with television stability, fewer channels than it should be (for example, it shows 10 instead of 20).
- However, other methods to solve the problem do not work: reboot, reset to factory settings, check on another TV, and others.
- Problems do not disappear over time - that is, they did not arise on the television side, they are definitely related to your device.
Even in the case described, there is a possibility that you have a hardware problem, for example the power supply is malfunctioning. But you can check this either by giving the device to a service center, or by being well versed in electrical engineering. If the problems are not hardware related, then upgrading your digital TV set-top box may fix your situation.
Separate from the problems described above, there is another reason to update the software of a digital set-top box - a more positive one. These are new features added by the manufacturer: support for clearer television, built-in programs, faster performance, getting rid of old errors and bugs and other features. In this case, the result of flashing will bring only positive aspects.
Typically, updating a digital set-top box is a safe and simple process. But there are nuances here too. I have done this operation many times, but if this is your first time, you should strictly follow the instructions.
How to set up Wi-Fi on the Orbit receiver
To set up Wi-Fi you need to do the following:
- How to connect and configure digital channels on the Oriel set-top box
- insert the USB cable;
- go to “Settings”/”System”;
- scroll down the page, select “Network settings”, confirm with OK;
- select “Wi-Fi Settings”, click on the required name;
- wait for a password request, enter the data and confirm.
After these steps, you can watch shows, movies, etc. on your TV using the Internet.
Possible problems and their solutions
When setting up or while using the Orbit console, minor problems may occur, which in most cases can be resolved independently. Let's look at the most common breakdowns below.
Orbita set-top box does not find channels
When the set-top box does not find channels, the message “No signal” automatically appears on the screen. It is necessary to check that the antenna is connected correctly.
Does not respond to the remote control or the button does not work
The remote control does not respond to actions, mainly for two reasons:
- the batteries are low;
- The remote control is not directed correctly.
In the first option, you need to replace the batteries, in the second, point the remote control in front of the receiver.
No signal
A missing signal most often occurs when:
- the device is not connected to power;
- The power switch is not turned on.
Check if you forgot to connect the device to the outlet and if the plug is inserted tightly.
Poor image quality
If the signal is disrupted, the antenna cable is most likely not connected correctly. Check whether the antenna plug is in the right connector and whether it fits tightly.
In Russia, terrestrial digital television is rapidly replacing analogue television. Better picture quality, excellent sound and additional functions speak in favor of such a transition and the advisability of purchasing a set-top box.
Until recently, Orbit digital set-top boxes were considered in our country as budget options for DVB-T2 receivers. Receivers from the company could be purchased from 1200-1400 rubles and this was normal. With the significant development of digitalization of the country, many other companies have entered the market offering their tuners at lower prices. And the statement indicated at the beginning has lost its validity.
Today, these set-top boxes can be found in various online stores and retail outlets. We could not find the official website of the Orbita company. However, we know for sure from colleagues that these receivers are actively sold and are in demand. All models of devices from this company work adequately and fulfill their assigned tasks of searching for digital channels. For owners of Orbit set-top boxes, we will provide complete instructions on how to set up the receivers and also show clearly the entire process of installing them on a TV.
Possible problems and their solutions
Channels are not picked up at all
Sometimes the connected set-top box does not find a single channel. What could be causing this and what should I do?
- Cable fault. It is possible that the antenna cable in the input jack is poorly connected or it has become unsoldered on the antenna. You can fix it by checking the connectors and cable integrity.
- The antenna is not aimed correctly. Moreover, if a ground antenna can catch the reflected signal, then a satellite dish is very narrowly directed and can only receive in a small angle. This can be corrected by checking the orientation of the antenna and, if necessary, adjusting the directional setting.
- The antenna is of the wrong type. This is observed when trying to catch digital TV with an old antenna that received analogue channels well. If an antenna was used for the VHF range, it will have to be replaced with a UHF one. There are no other options: digital TV broadcasts only on decimeters.
- In the case of cable television, damage to the wire or junction box. You need to contact your provider and call repairmen.
- You are using a receiver that does not accept DVB-T2. You can check by reading the instructions or information on the manufacturer’s website. Nothing can be fixed here, you can only purchase new equipment.
Only part of the channels are caught
Another common problem is that some channels are missing. How can the cause be identified and eliminated?
- Check which channels are generally received at the point where the antenna is located. This can be done using the “CETV Interactive Map” service. Here you need to remember that digital TV is transmitted in multiplexes - sets of 10 channels (there are 2 main multiplexes; in MSC and Crimea there is access to a third with fewer channels). Perhaps the specific repeater at which the antenna is pointed does not actually broadcast the 2nd multiplex. In this case, you can try to play with the direction of the antenna: perhaps you will be able to catch a signal from another, “full-fledged” repeater.
- Errors when setting up the receiver. Some of the channels might not have been recorded in his memory and would have gone astray. Since digital TV is transmitted in multiplexes, unlike analogue, either all of them are caught at once, or none of them: a set of 10 channels is on the same frequency. To correct the situation, you need to reconfigure the receiver.
Weak signal
If the set-top box shows that the signal level is weak, then the reasons may be:
- Long distance to the repeater. The closer to the transmitting antenna and the more powerful the transmission, the higher the signal level. You can correct the situation by purchasing a higher quality antenna with a gain of at least 15 dB, or by using, in addition to the receiver, a signal amplifier.
- "Radio Shadow". UHF radio waves are in many ways similar to light: they propagate in a line-of-sight zone, and many objects are opaque to them. It may turn out that either the antenna is separated from the repeater by a hill, or it is located in a lowland, or there is an “opaque” object between it and the transmitting repeater (for example, a reinforced concrete building, a high steel fence, etc.). This can be fixed by changing the location of the antenna. In some cases, it is possible, by playing with the orientation of the antenna, to catch a reflected signal of suitable quality;
- For satellite TV - weather conditions. Although the frequencies used by satellite transponders are good at penetrating clouds, some weather conditions (such as thunderclouds) can seriously weaken the signal. The only way to solve the problem here is to wait until the bad weather stops.
No signal
If there is no signal at all, the reasons may be:
- Antenna failure or cable break. You need to carefully check the cable from its connection with the antenna to the plug.
- Technical work at the provider or at the repeater tower. You can check on official websites or local news. Here you can only wait.
The image slows down or freezes
Image freezing is usually due to the following reasons:
- Interference. Unlike analog TV, in digital TV the receiver tries to restore the signal. Therefore, if there is strong interference, instead of ripples and hiss, there will be pauses in the sound, “cubes” on the screen, and frame slowdown. If the interference is due to weather conditions, you need to wait it out. If there are any devices nearby (for example, a traffic police radar: sometimes they interfere with reception), try to change the setting by finding a different frequency;
- Outdated software. This is typical for satellite TV. Here you need to get the update kit via the info channel or computer;
- Equipment conflict. Sometimes Chinese-made TVs receive signals in an extremely peculiar way. Here you can try to reflash the TV in a specialized workshop.
Characteristics of Orbita digital set-top box models
All Orbit models on the market do not differ from each other, and if they have differences, they are insignificant and most likely the owner simply will not notice them. The first models were made mainly on a metal body, but new ones began to be produced using plastic. This makes the device lighter and safer.
| Orbit model | DVB-T2 standard | Display | Connector | Teletext | Remote control | Wifi |
| HD910 | + | + | HDMI and RSA | + | + | + |
| HD911 | + | + | HDMI and RSA | + | + | + |
| HD914 | + | + | HDMI and RSA | + | + | + |
| HD915 | + | + | HDMI and RSA | + | + | + |
| HD917 | + | + | HDMI and RSA | + | + | + |
| HD916 | + | + | HDMI and RSA | + | + | + |
| HD918 | + | + | HDMI and RSA | + | + | + |
| HD922 | + | + | HDMI and RSA | + | + | + |
| HD923 | + | + | HDMI and RSA | + | = | + |
| HD924 | + | + | HDMI and RSA | + | + | + |
| HD925 | + | + | HDMI and RSA | + | + | + |
| HD926 | + | + | HDMI and RSA | + | + | + |
| HD927 | + | + | HDMI and RSA | + | + | + |
| HD928 | + | + | HDMI and RSA | + | + | + |
*WiFi setup is carried out with a special antenna adapter for receiving a wireless network. The table shows the connectors that can be used to connect to a TV.
Errors on Orbit TV set-top boxes
Unfortunately, no one is safe from them and Orbit tuners are no exception. Here are the most common problems and possible solutions:
The device does not work/reboots periodically
- In the first case, check the power cord for bare spots.
- Reset the console to factory settings through the menu. If the receiver asks for a password, first try entering “000000”; if it refuses, enter “888888”.
Can't pick up any channels/can't pick up much
- Reset the settings and search manually.
- Check the antenna and select it correctly.
Connecting Orbit set-top boxes to a TV using the example of HD911 and HD924
To provide you with a visual diagram of connecting the Orbit set-top box to a TV, we took and summarized it using the example of 2 best-selling receiver models: HD911 and HD924 . However, we dare to assure you that everything stated below will also apply to other receivers of the company, for example, HD928, HD917, etc.
In general, the procedure for connecting receivers depends on the presence of one or another input on the TV itself. On the latter, in turn, in 90% of cases there will be:
- HDMI connector. It is a single cable. Connects directly to the TV itself, to the appropriate inputs. Provides better image quality and is selected first. The Orbit set-top boxes do not include this cable, so you will have to buy it additionally. Depending on the length of the wire, the price in our stores for a high-quality brand will be around 500 rubles.
- RSA. These wires are also called tulips because of their colors. Present on most older types of TVs. In practice, there are various types of this cable (3-3, 2-2, 3-1, etc.). For set-top boxes, they connect exactly 3-3 or 3-1, depending on the equipment configuration. In any case, the connection should be made according to color, connecting each wire to its own input. Such cables usually come with the receiver.
- Adapters. On completely outdated TV models, in most cases, there will be a SCART input. In this case, it would be advisable to use a special RSA-SCART adapter. The same combination options are available for RSA-HDMI.
After the set-top box is connected, as in the diagram, according to the instructions, you must:
- Select the appropriate display mode setting on your TV. The choice is made depending on the selected method of connecting the receiver. So for HDMI, the TV must have HDMI mode, and for RSA - AV.
- After this, using the remote control of the Orbit set-top box, the device is turned on and the channels are configured.
The diagram also shows the connection of additional hi-fi devices via coaxial cable. Typically, this includes additional speakers or a home theater.
Instructions for setting up 20 channels on the Orbita set-top box
The main problem with correctly tuning channels on Orbit is the wrong choice of digital antenna. If it is not capable of providing the required signal level and strength, then the channels will simply be impossible to configure.
With a correctly selected antenna, the channel search procedure will be as follows:
- When you turn it on for the first time, the set-top box will give you a welcome message and ask you to specify the display language and country of residence. After this, the search for channels will begin.
- Press it and the device will automatically start searching and setting up the list. As a result, the receiver will go through all frequency ranges known to it and try to find the maximum possible number of programs.
- Upon completion, the list of these programs will be saved.
This will perform an auto search. If for some reason the set-top box fails to find channels or there are too few of them, then you need to independently find out the broadcast frequency of the transmitting TV tower in your region and perform a manual search. It requires:
- Find out the broadcasting parameters on the interactive map of CETV. We are interested in the channel number for RTRT 1 and 2.
- Go to the menu from the device's remote control.
- Find the channel search section there.
- Select “Manual Search”.
- Indicate the number of the first channel taken from the map in step 1. Make sure that the signal (Quality) at the bottom of the search window has changed.
- At the end of the search, perform the same actions, but for RTRS-2.
The set-top box in this mode will search for channels at the frequency you specify. If it is selected correctly, then with a working antenna, the maximum currently possible number of digital channels will be found.
WiFi setup
Orbit receiver models are also additionally equipped with the ability to connect to a Wifi wireless network. This is necessary primarily for timely updating of receivers and installation of fresh device firmware.
To connect to the network, you need to additionally buy yourself a special adapter that visually resembles a simple antenna. It connects to the USB connector of the set-top box. Firmware updates can also be performed from a flash device. To do this, you need to download the latest version and burn it to media. After this, you need to go to the menu, to the USB section and click “Software Update”. All that remains is to select the file you are looking for and click OK.
Setting up channels
Setting up channels through the set-top box is done according to the step-by-step instructions for this device.
Its order is as follows:
- The set-top box and TV turn on.
- In the receiver menu, select the “Settings” item.
- Select the country and signal type. For Russia it will be DVB-T2.
- The item “Automatic signal search” or similar is turned on.
- The receiver goes through the frequencies available to it and detects the channels available on them.
- If programs are detected, you need to select “Save” from the menu. After this, the found channels can be viewed.
- If channels are not found, you can try to find them using manual tuning. To do this, you need to enter the frequency on which broadcasting occurs in this area. After channels are detected, they are also stored in the set-top box’s memory.
Checking the signal quality
Sometimes it happens that some channels are not received. A common reason for this is low signal strength.
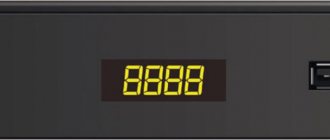
To find out, you need to use the check function. Usually it is launched by pressing the “INFO” key on the remote control of the set-top box. After this, the receiver will display a quality rating on the screen:
- 50% and above is a normal indicator, you can use it.
- Below is unstable reception. You may have to move the antenna, aim it more accurately, or get a signal amplifier.
Reviews for Orbita
Like all digital set-top boxes, Orbita devices have their own disadvantages and advantages. The first users note a limited set of functions. You cannot access the Internet from the receiver to watch videos or search for IP channels. In addition, not everyone is happy with the average price. Even the very first models today cost around 1,100 rubles.
Receivers also have plenty of advantages. The main one is the build quality. In simple terms, everything is assembled according to the simplest principle, therefore it works much better and more durable than its more popular analogues.
Digital Receiver Errors
Unfortunately, no one is safe from them and these tuners are no exception. We will try to talk about the most popular situations and possible ways to solve them.
The device does not work/reboots periodically
- In the first case, check the power cord for bare spots.
- Reset the console to factory settings through the menu. If the receiver asks for a password, first try entering “000000”; if it refuses, enter “888888”.
Can't pick up any channels/can't pick up much
- Reset the settings and search manually.
- Check the antenna and select it correctly.
The remote control does not switch / does not work
- Replace the batteries and make sure that the distance to the device does not exceed the permissible operating limit of 5 m.
- If the remote control does not work within a 5m zone, then there may be a manufacturing defect.
Thus, today we tried to give you complete instructions for Orbita consoles. We hope it will help you catch all 20 free digital channels.
The state program for a phased transition to the digital television broadcasting standard DVB T2 is approaching the final stage - a gradual reduction in the number of analogue repeaters. This suggests that the time has come to join new technologies and switch to digital. We will talk about the equipment necessary to receive a television signal in the new format, as well as how to properly connect a digital set-top box (receiver) to a TV or monitor.
Content
Reviews of the Orbit TV set-top box
Like all digital set-top boxes, Orbita devices have their own disadvantages and advantages. The first users note a limited set of functions. The receiver cannot access the Internet to watch videos or search for IPTV channels. In addition, not everyone is happy with the average price. Even the very first models today cost around 1,100 rubles.
Receivers also have plenty of advantages. The main one is the build quality. In simple terms, everything is assembled according to the simplest principle, therefore it works much better and more durable than its more popular analogues.
Necessary equipment
To watch digital broadcasting, as opposed to analogue, you will need a receiver that decodes the signal. Many modern TV models (Philips, Samsung, Sony, Toshiba, LG, Panasonic, etc.) are equipped with such a unit. To make sure of this, you should refer to the user manual, this brief instruction is included with each product. At the same time, check whether the built-in tuner supports the DVB-T2 format; if not, you will need to purchase a receiver.
Receiver Supra
Depending on the set of functionality, the cost of such a device can vary from 800 to 3000 rubles. Note that many digital cable television providers provide receivers for rent to subscribers.
In addition, we will need to receive a digital signal. In cities and large towns this will not be a problem; just contact your local providers. Residents of rural areas will need to install a UHF antenna or satellite dish. The latter is preferable, since it is not a fact that your home is within the coverage area of the nearest digital repeater. In addition, the option with a satellite dish provides a wider selection of television channels.
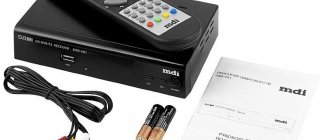
Standard equipment for digital set-top box
Let's look at what is included in the standard set of the receiver; this information may be useful when connecting it to a television receiver.
Standard equipment for digital set-top box
Let's list what is shown in the figure:
- A – user manual, we recommend that you carefully read this manual to get a complete understanding of all the functionality of the device and its connection to the TV and antenna.
- B – “Tulip” cable (RCA) with characteristic connectors allows you to connect the set-top box to almost all modern models of television receivers.
- C – a device for decrypting and converting a digital signal into an analogue one (receiver).
- D – packing box.
- E – remote control for the device.
- F – batteries for the remote control.
- G – network adapter for connecting the device to a household power supply.
- H – warranty service coupon.
The basic configuration may differ slightly from what is shown in the photo (for example, the “Tulip” is replaced by an HDMI cable).
Connectors and their purpose
There are various connectors on the back of the device; we’ll briefly explain what they are for.
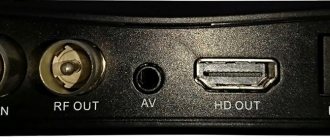
Figure 3. Connectors of the SDT-96 receiver from the SUPRA range
Explanation of the picture:
- Antenna output.
- Connector for connecting a satellite dish, UHF antenna or cable from a local provider.
- A socket for an HDMI cable allows you to connect a monitor or TV equipped with such an input (digital output can transmit sound and image).
- Sockets for the “Tulip” cable (transmits an analog video signal, as well as stereo sound).
Some devices may be additionally equipped with a “SCART” connector; a TV, VCR or DVD player with a video recording function can be connected to it.
Receiver with SCART connector
In addition, you may find devices that have D-SUB (Fig. 5) or DVI outputs instead of an HDMI jack.
Fig 5. Digital set-top box with standard VGA (D-SUB) output
Please note that such interfaces do not transmit sound, so an additional connection using “tulips” will be required to transmit it.
Purpose of connectors: what is needed for what
To connect the set-top box to the TV, you need to connect the antenna, receiver and TV itself with cables. To connect cables, you need appropriate connectors, and now more than one standard is used. Where and what plugs should I plug in?
Standard connectors
Each set-top box, regardless of its type, must have two connectors:
- Antenna input. Can be labeled as “RF IN” or “ANT IN”. The plug from the over-the-air antenna or cable television distribution board is connected here.
- Input for power supply. Marked as “DC-5V”, “DC-IN”. The included power supply is inserted into it. In some models, the power cord is made non-removable.
In addition to the mandatory ones, there are a number of connectors that you will almost always encounter:
- Antenna output. May be called "RF-OUT", "RF-LOOP", LOOP-OUT". Designed for serial connection of another set-top box. On models that have a built-in RF modulator, the signal from this port can be sent to the antenna input of the TV and catch local analog TV.
- RCA output. From it, video and audio signals enter through the corresponding plugs (marked in red, white and yellow) of the TV. Used for most older television receivers, but no longer provides high image quality.
- HDMI.High Definition Digital Output. If the TV has a corresponding input, then we recommend using this particular connector, and leaving RCA only for outputting sound to external speakers.
- USB. A connector familiar from computers. Used to connect external storage devices (from flash drive to HDD). As a result, it becomes possible to record programs or view video and audio files of a supported format. In addition, if the set-top box has such a function, you can connect a Wi-Fi module through this connector.
Rare connectors
In addition to the common ones, digital set-top boxes may also have rare types of connectors. These include:
- Component video interface used in monitors and video adapters»>VGA. This is an old connector, developed back in 1987 to connect computer monitors to a video card. Later it was sometimes used to connect DVD players. It is commonly used for plasma and LCD TVs. HDMI is now outdated and is being actively replaced. Additionally requires audio connection via a separate cable.
- ">SCART. This is a standard connector for equipment used in Europe. Therefore, it is often found not only in televisions, but also in set-top boxes aimed at the European market.
- S-Video. An old connector, actively used for video players and game consoles. Now it usually requires purchasing an adapter. Provides high quality TV signal, but only for standard definition: it does not transmit HD images.
The process of connecting a digital set-top box to a new TV step by step
Important! All manipulations must be done with the equipment turned off. If you connect working equipment, there is a high probability of its failure.
Let us describe the order of our actions:
- You need to select the interface for connecting the set-top box to the TV. It can be analog (tulips, D-SUB, SCART) or digital (HDMI, DVI). The choice is made depending on the specific TV model. Despite the fact that many FULL HD television receivers have an analog input, it is better to feed them “digital”, since double conversion of the signal will negatively affect the quality of the “picture”.
HDMI input on the TV
This interface allows you to transmit video and audio, so the connection can be made with one cable.
If the TV does not have a digital input, it can be connected using any analog interface; the easiest way to do this is using tulips. In the case where the device only has a bulky SCART connector, you can purchase a tulip adapter for it. In this way you can connect almost any model, except for very ancient ones.
- We check the availability of the cable necessary for connection; it may come with the receiver or television set. If you cannot find one, you will need to purchase it.
- We remove the protective film from the set-top box (if any), install it in the chosen place and connect it to the TV. The cables are made in such a way that it is physically impossible to insert them into a connector not intended for this purpose. The exception is tulips, they can be mixed up. But to prevent this, manufacturers make nests for them in the appropriate color.
Standard colors of RCA interface connectors (tulips)
As you can see, the colors of the connectors match the colors of the sockets (4 in Fig. 3).
- Connect power to the console. If the network adapter is built-in, simply plug the plug into the socket; pre-connect the remote power supply to the corresponding socket of the receiver.
- We connect the provider’s cable, a decimeter antenna or a satellite dish to the antenna input (2 Fig. 3).
- We insert the batteries into the remote control, turn on the set-top box and the TV.
This completes the connection procedure, and you can begin setting up channels. If your TV does not have the interfaces listed above, do not worry, we will tell you how to get out of this situation.
Connecting a digital set-top box
To a modern TV
If the TV is more or less new and supports at least RCA, connecting the receiver looks like this:
- The TV turns off.
- Cables from the antenna and power supply are connected to the receiver.
- The TV and set-top box are connected in one of the available ways (“>RCA,” “>SCART,” “>HDMI) using the appropriate cables. Since RCA is color-coded, and SCART and HDMI have correspondingly shaped input and output plugs, it's hard to go wrong here.
- If there is an RF-OUT output, it is connected to the antenna input of the TV (this way you can watch digital and analogue channels simultaneously).
- Turn on the TV. In the menu, select the corresponding input to which you connected the tuner (AV, SCART, HDMI).
Connecting via RCAConnecting via HDMI is very simple
To the old TV
If the TV is very old (something like the Soviet “Rubin” or “Horizon”) and does not have any digital inputs at all, you can try to connect it via an antenna cable using the RF OUT output on the receiver. This requires that the set-top box supports this mode.
Expert opinion Vitaly Sadovnikov Specialist in connecting and setting up digital television If there is no support, you will have to purchase an additional TV modulator that converts the low-frequency signal from the RCA output of the set-top box into a high-frequency one that matches the analog format. His TVs of older models can already receive directly. Read detailed instructions on connecting a set-top box to an old TV. Connecting a digital set-top box via a TV modulator
Connecting to an old TV
The signal converter can work even with older models of television receivers when connecting them to the antenna output (1 in Fig. 3). To do this, you will need a piece of antenna wire of the appropriate length and two antenna plugs. In order not to bother with soldering, you can take special F-connectors; the procedure for installing them on the cable is demonstrated in Figure 8.
Installation on the F-connector cable
Procedure:
- We remove the insulation from the antenna cable, carefully so as not to damage the braiding (it is enough to clean 15 mm).
- We bend the braid as shown in the picture.
- Carefully remove the insulation from the central core.
- It is necessary to expose 10 mm of the central wire.
- We screw the connector clockwise.
- We do this until the central core protrudes 2 mm from the connector.
Using a manufactured cable, we connect the antenna input of the TV to the corresponding output of the set-top box. In this way you can connect any TV, be it Horizon 101 or the legendary KVN.
How to connect 2 TVs to a digital set-top box
Two television receivers can be connected via the antenna output; this requires a special adapter from one to two cables (splitter).
Double splitter
Since the set-top box is intended for only one device, two TVs will work synchronously, that is, show the same channel.