Comparison of Cadena console models
To date, the company has developed more than 20 models of digital set-top boxes that work with the DVB-T standard and receive a digital signal. Their main difference from each other is the presence of certain connectors through which they are connected to the TV. For example, earlier models can be connected via more wires than new ones.
A list of all consoles is presented in the table below.
| Model | Connector | DVB-T2 |
| CDT-100 | HDMI | + |
| CDT-1814SB | HDMI | + |
| CDT-1813 | HDMI | + |
| CDT-1811 | HDMI | + |
| CDT-1891M | HDMI | + |
| CDT-1711SB | HDMI+RSA | + |
| CDT-1712 | HDMI+RSA | + |
| CDT-1753SB | HDMI+RSA | + |
| CDT-1791SB | HDMI+RSA | + |
| CDT-1792S | HDMI | + |
| CDT-1793 | HDMI | + |
| CDT-1631 | HDMI+RSA | + |
| CDT-1632SBD | HDMI+RSA | + |
| CDT-1651SB | HDMI+RSA | + |
| CDT-1652S | HDMI+RSA | + |
| CDT-1671S | HDMI | + |
| HT-1110 | HDMI+RSA | + |
| ST-203AA | HDMI | + |
| ST-603AD | HDMI+RSA | + |
| 1104T2N | HDMI+RSA | + |
| 1104T2 | HDMI+RSA | + |
What is needed to connect
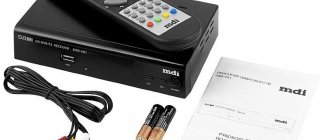
When purchasing a receiver with a built-in DVB-T2 tuner, you receive the following kit:
- Remote control.
- Battery.
- Instructions.
- Guarantee.
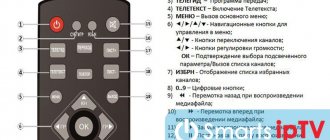
As you can see, the package does not include the necessary cables. You will have to buy an HDMI cable or tulips separately - it depends on the type of input. You must first insert the batteries into the remote control and turn off the mains power to the receiver and TV. You should also initially familiarize yourself with the purpose of the keys on the remote control; in the future you will make settings using it. Below is an image with a detailed description of all the buttons.
Connection diagram to a TV using the example of Cadena CDT-100 and 1711SB
For clarity, we specifically took the 2 most popular models of Cadena set-top boxes and will try to understand the procedure for connecting them to any TV.
First, we need a general connection diagram for a digital set-top box for receiving over-the-air broadcasts through a conventional external or indoor antenna. As you can see, the antenna cable output must always pass through the set-top box.
The point here is that the digital signal is transmitted in encrypted form. To put it simply, it’s just a set of ones and zeros. To decrypt it and provide it to the user, a decryptor is needed. In modern TV models it is already built-in. However, in older ones you have to pass this signal through additional converters, which are set-top boxes.
Connecting models like Cadena CDT-100
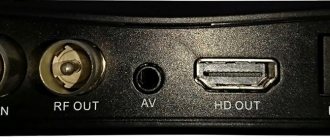
As a first example, let's take the CDT-100 . This set-top box has only 1 output through which it can be connected to a TV. This is HDMI. This is an interface that allows you to view images in high definition.
If your TV has one, you will need to purchase a wire from the store to connect the set-top box via this interface. Its cost is not high and starts from 100 rubles. It's better to pay a little more so that the cable lasts longer.
However, not all TVs that do not have the ability to independently receive digital numbers have an HDMI input. Usually this is RSA or SCART. If this is your case, then for a Cadena set-top box with connectors like the CDT-100, you can purchase a signal converter for RSA.
In our stores, this can cost a decent amount, around 700-1200 rubles. Here you will have to think several times whether it is worth it.
Connection options for 1711SB
Cadena set-top boxes of this type are more preferable, because they can be connected to almost any TV. At least you will have at least 3 options that can configure digital broadcasting 90% of the time.
- HDMI. If the TV is capable of directly (without a converter) receiving a signal via hdmi, you should choose it first, as it provides the best image.
- RSA. Tulips should be connected by color. In this case, 2 colored wires will be responsible for the sound, and 3 for displaying the image on the screen.
- SCART. It occurs very rarely and in quite old TV models. If this input is available, you must additionally purchase a special adapter with RSA cables.
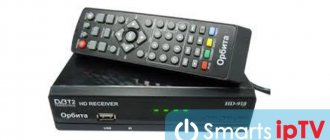
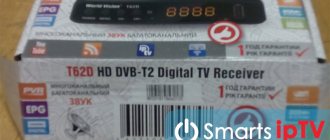
Digital broadcast receiver CADENA CDT-1711SB with Tricolor ID key
The CADENA CDT-1711SB digital terrestrial receiver is designed for viewing free high-quality digital terrestrial television.
It has a unique code for connecting to viewing Tricolor Online channels on tablets and smartphones without a subscription fee.
A highly sensitive tuner ensures stable quality of the received signal. By connecting an external USB device, you can record broadcast TV channels, as well as play multimedia files and images on your TV. The receiver has an HDMI output, which can be used to display images in high-definition HD 1080p format on a TV; you can also connect to a TV using an analog RCA output. Supports subtitles, teletext, electronic program guide (EPG).
Main characteristics
System Processor: MSD 7T01 chip Flash memory: SPI FLASH 32 Mbit RAM DDR II: 512 Mbit (800 MHz)
Decoder Video decoder: MPEG-2 [email protected] , MPEG-4 AVC/H.264 [email protected] Audio decoder: MPEG-1 layer 1/2, MPEG-4 HE-AAC v.1/2 Analog video output system : PAL Screen format: 4:3/16:9/Auto Video output resolution: 576i/576p/720p/1080i/1080p
Tuner Demodulator: combined with processor Tuner: R836 Standard: ISO/IEC 13818-1 RF input: IEC socket 75 Input signal level: 75dBm 10dBm Modulation mode: OFDM Carrier modulation: 256QAM, 64QAM, 16QAM and QPSK Input frequency range: MV 174~ 230MHz; UHF 470~862 MHz Guard interval: 1/4,19/256, 1/8, 19/128, /16.1/32, 1/128 Code rate: 1/2, 3/5, 2/3, 3 /4, 4/5, 5/6, 7/8 Stream Bandwidth: 6MHz/7MHz/8MHz Multi-PLP: Supported
Features System language: Multi-language, (Russian support) Converting HD programs to SD for analogue output: Supported List of TV and radio channels: Supported EPG (electronic program guide): P/F EPG, 7-day EPG Favorites list for radio and TV: Supported Multimedia: Music/Photo/Video player Video: avi, mpg, mkv, mpeg4, ts. Audio: wma, mp3. Images: jpg, bmp. Supported format of external USB devices: NTFS, FAT32, FAT16. Parental Control: Supported Recording and Delayed Viewing: Supported Teletext: Supported (VBI/OSD) Time and Date Setting: Supported Ease of Initial Setup: Supported LCN: Supported (On by Default) Auto/Manual Channel Search: Supported Software Update via USB: Supported Subtitles (OSD): Supported HDMI: Supported Antenna power: +5V (max.300mA), overload protection
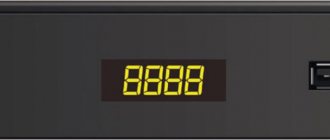
Interfaces RF input: IEC169-2, RF output jack: loop out, IEC169-2, HDMI jack: ver.1.3 Analog output: RCA (video: CVBS; audio: L/R) USB 2.0: USB 2.0 IR: 38kHz Front panel USB connector: Yes Display: 4-digit LED Indicator: LED red/green IR receiver: Yes Buttons: On/Off standby mode/Channel+/Channel–
Rear Panel Antenna In: Yes Antenna Out: Yes (Loop) HDMI Connector: Yes Analog Out: RCA (Video: CVBS; Audio: L/R)
Dimensions W x D x H: 140x80x30 mm
Operating conditions Operating temperature: +5 ~ 45°C Relative humidity: up to 80% (20C)
Equipment
- Digital terrestrial receiver CADENA CDT-1711SB
- Remote control RC1711IR
- Battery 1.5V AAA – 2 pcs.
- User guide
- Warranty card
Search 20 digital channels on the Cadena set-top box
To check that the Cadena set-top box is connected correctly, you need to switch to the display mode on the TV through which the connection took place. Depending on the manufacturer, the choice of source may be done differently. Typically in practice the situation is as follows:
- Select HDMI if you connected the set-top box via this cable.
- AV. In case of using RSA.
- SCART. Again, if one was used.
After this, you can turn on the power of the console. When you turn it on for the first time, the auto-tuning window should open. Usually it is enough to find all 20 digital channels. To carry out the operation you need:
- Set the initial menu language and country.
- Specify “Open” in the channel type.
- Click on the “Search for channels” button.
After the set-top box scans the entire frequency range, all found TV channels will be saved. The menu will exit automatically.
Manual search on the Cadena console
If the TV tower is located at a considerable distance from you, then a situation may arise when you have to configure the digital number manually, according to the data you have on the channel number and frequency. In this case, you will need to do the following:
- Find out the exact frequency of digital broadcasting in your region. To do this, you will need an interactive CETV map.
- After that, you can go to the device menu. Here we are interested in the channel search section. We select manual search in it.
- In the menu that appears, you need to select the reception frequency you need. You just need to indicate the channel number that you received in the first step. After specifying this parameter, non-zero marks should appear in the signal level and quality column.
During the manual search, the set-top box will only pass through the frequency band you specified and scan the digital channels available on it.
Setting up and searching for channels
When the connection is complete, you can figure out in practice how to set up the receiver. First of all, you need to check whether the set-top box is connected correctly; to do this, select the display mode on the TV that corresponds to the connection type: HDMI, SCART or AV (for RSA).
Attention! The receiver's power should be turned on after checking.
At the first start, an auto-search for channels is performed. In order for it to be carried out, in the settings window, which opens automatically, you need to specify the country and language of the menu, and also select the open type of channels. The channel search is activated by a button with the same name, the receiver scans the frequency range and saves the detected TV channels, after which the setup menu automatically closes.
Manual search is also available, which may be required if the connection location is located far from the TV tower. It works like this:
- Using the interactive CETV map, you need to find out the frequency of digital television broadcasts in the region.
- Open the set-top box menu, then go to the TV channel search section, select manual search there.
- Specify frequency band.
The receiver will scan the specified frequency, detect available channels and store them.
Possible malfunctions of the Kadena console
No one is immune from troubles. However, for a number of possible problems with the operation of the set-top box, there are already several solutions available. We will provide some of the most popular errors.
The set-top box is not searching/Too few channels/No signal
- Look for a problem in the antenna. Perhaps it is selected incorrectly or one of the wires has come loose.
- Try to manually search for channels using the broadcast frequency specified for your region.
Forgot password
In order to reset all settings to factory settings, including the password, you need to search for all channels again. Just run auto-tuning.
There is sound, but no picture / Vice versa
- Check that the correct display source is selected on your TV.
- Carefully examine the cable connecting the set-top box. If it is RSA, then you need to look for the problem in the plugs responsible for sound (R and L) or image (Video).
The set-top box turns off/reboots on its own
Check the device's power cord. If it is working, then reset the set-top box to factory settings or restart the auto-tuning of channels.
Pros and cons of Cadena consoles
Kadena digital receivers provide access to multiple channels and provide high quality images. They attract buyers because they have a number of advantages, namely:
- Russification of all models;
- support for teletext and subtitles;
- the presence of media player functions, which make it possible to read video, audio and photos from a USB drive;
- the ability to record TV programs on a removable storage device, including automatically at a specified time;
- convenient remote control and simple menu;
- parental control support;
- compact size;
- support for 1080p mode;
- the ability to create a list of favorite channels;
- budget cost;
- simple initial setup;
- A number of models have three outputs at once (RF, HDMI and analog), which allows you to connect the Kadena set-top box to any TV.
There are more than 20 models of Kadena receivers, and in reviews of some of them, disadvantages were also noted. Thus, the Cadena CDT-1671S and HT-1110 do not have the longest service life, and the SHTA-1511S2N DVB-T2 model gets very hot, although otherwise it performs well.
Reviews
Currently, Cadena products are in demand. The company additionally produces various cable and broadcast equipment. Digital set-top boxes have not yet become so popular, with the exception of some models.
For example, many praise the simplicity and reliability of the CDT-100. This attachment is made as simple as possible and setting it up will not be difficult. In addition, those who have already used it claim that it can work around the clock.
In the future, the company's digital set-top boxes will only develop. Judging by the reviews, buyers will sooner or later appreciate all the advantages of these devices over similar ones already available in our markets.
Basic Operations
Basic operations can be divided into the following categories:
- Program manager, including editor, TV guide, channel type.
- Image settings.
- Search for channels.
- Time parameters.
- Language settings.
- System.
Let's consider each point separately.
Program Manager
If necessary, use the built-in channel editor. To go to this section you will need to enter your PIN code – 000000. Then you can:
- Move the TV channel by pressing the red key.
- To skip a TV show, click on the green button.
- For blocking - yellow.
- To delete a specific channel – blue.
- To add a TV broadcast to your favorites list, press the corresponding “FAVORITE” button and use it to move it to the desired folder.
- To rename a channel, click on.
The settings will be saved automatically after pressing the “EXIT” key on the remote control.
If you have any questions or complaints, please let us know
Ask a Question
The next point is sorting. The manufacturer allows you to sort TV programs using a special function. The sorting itself depends on the selected option:
- By LCN - by serial number.
- ONID – by name.
- Service Name – by service name.
- Service ID – by ID.
Next is the “Channel Type” section. In this tab, the user sets the display of television programs. You can set the option to “Everyone” or “Public”. The first option will show the full list of what the receiver found. When you select the second option, you will see a list of TV broadcasts that are not subject to the broadcaster's restrictions.
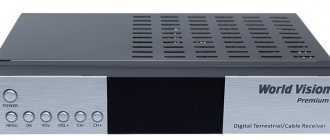
How to connect and configure digital channels on the World Vision set-top box
Image Settings
In the image parameters, you can change the format, choosing the optimal one for the characteristics of the TV - PAL or NTSC. In the permissions tab, select one of the options you want:
- 576i.
- 576 rub.
- 720 rub.
- 1080
- 1080r.
Please note that all points except the first require an HDMI connection.
Search channels
The next setup step is to search for channels. Usually the system does this on its own; the user can select auto search. But, you can also perform the procedure manually using and. When all channels are detected, they will be added to the general list.
Setting the time
During setup, use the same navigation buttons - and “OK”. Finally, press “EXIT” on the remote:
- Enter the time zone that is relevant for your region of residence.
- Next, you can set a timer to automatically turn off the TV. For example, you can set a specific time when the receiver will work.
- In the time settings, select automatic mode or change the indicator manually.
- Sleep mode will allow you to put the device on standby. In this case, you can set a specific time when the standby mode will be activated.
Setting options
There is no need to configure built-in options in the tuner. You can use all the built-in functions, including the TV Guide and other useful sections, without additional manipulations.
System Settings
The following options are available in the “System” tab:
- Age restrictions. The login password is six zeros. Select a digital channel and limit viewing access by age ranging from 4 to 18 years. When you turn on this broadcast, a warning message “Age Level” will appear on the screen.
- Change the default six-zero password to your own. Please note that if you forget the PIN code, many functions on the tuner will be blocked in the future. The password cannot be recovered.
- If serious errors occur that cause the device to stop working, you can reset the settings to factory settings. Just enter your PIN and confirm the procedure.
- The “Information” tab will allow you to familiarize yourself with the version of the receiver’s operating system.
ISP blocking service error code 202 on Samsung TV: reasons, what to do?
In the same tab you can update the software.