To connect your TV to a cable network or digital television antenna, you need to purchase a special television cable and put F-plugs on its ends.
If this problem is not solved competently, the TV may operate unstably or with interference when receiving an analog signal, and digital image and sound may disappear due to signal losses in the cable and its connection points.
The advantage of digital television is the absence of interference in the picture and sound. But if the signal has a lot of noise, then the picture and sound on the TV will periodically disappear, and if the signal is weak, then it will be completely absent.
Selecting a TV cable
Even an excellent TV and correctly placed F-plugs on the ends of the cable will not be able to provide high quality images on the screen when using a low-quality television cable. And the question arises, which antenna cable is better for connecting a TV and what criteria should you use to choose it?
TV cable device
Let's look at how a modern television coaxial cable works using the example of a CAT-703 cable.
Along the center of the entire length of the coaxial cable runs a copper or steel wire core covered with a copper layer. This core is covered with a layer of insulation made of dielectric material. The insulation is covered with a shielding copper or aluminum foil braid, which acts as a second conductor. To protect against mechanical and climatic influences, the cable is covered with a sealed protective sheath.
Inexpensive cables use only aluminum braid, budget cables use copper, and expensive cables use aluminum and copper at the same time, as shown in the photo.
How does current flow through an antenna cable?
To consciously choose a good antenna cable, you need to imagine how high-frequency current flows. Current in an electrical network flows across the entire cross-section of conductors.
The high-frequency current of a television signal flows according to a different law. Everyone knows how laundry is spun in the centrifuge of a washing machine: the higher the speed, the stronger the centrifugal force acts on the water, and it is better removed from the laundry, the laundry becomes drier. Many people experienced the effects of centrifugal force on their own bodies in childhood while riding on carousels.
The high-frequency current of the television signal flows in the antenna cable in a similar way. The higher the frequency, the closer to the surface of the conductor it flows. The skin effect appears. If we take, for example, a copper wire with a diameter of 10 mm and a copper tube of the same diameter with a wall thickness of 1 mm, then a current with a frequency of 1000 MHz will flow through them with the same losses!
Therefore, in antenna cables used for military and space equipment, to reduce signal loss (attenuation), the central core and cable braid are often coated with a thin layer of silver and even gold. This is a very expensive pleasure, and such cables are not used in everyday life.
Due to the small magnitude of the television signal in the antenna cable and its high frequency, it is not possible to determine its presence in the cable, much less carry out measurements at home without specialized expensive instruments. Only connecting the antenna cable to the TV will determine the presence and quality of the television signal.
TV cable marking
The most widely used antenna cables on the market are coaxial antenna cables from different manufacturers with a characteristic impedance of 75 Ohms, brands RG 6U, SAT 50, SAT 703B and DG 113, which can be successfully used for receiving analog and digital television signals up to transmitting them from a satellite antenna with a frequency of up to 2. 15 GHz. The brands are listed in order of increasing quality of the antenna cable - reducing signal loss (attenuation) during transmission. The marking (designation) must be applied to the antenna cable sheath along its entire length every meter with a digital meter mark.
This antenna cable marking indicates the following:
- CABLETECH – manufacturing company CABLETECH (China).
- RG 6U/48 – cable brand.
- HIGH QUALITY COAXIAL CABLE – high quality coaxial cable.
- 75 OHM – characteristic impedance 75 Ohm.
- 055M – meter mark, with each meter the mark changes by 1.
How to choose a TV antenna cable
The antenna cable sheath must be marked as shown above. The antenna cable must have a characteristic impedance of 75 Ohms (all televisions and switching devices are designed for this impedance - amplifiers, splitters, set-top boxes for receiving DVB-T2 digital channels). The outer diameter of the antenna cable sheath must be at least 6 mm. Central core and shielding braid made of electrical copper. Antenna cables of the SAT 703B and DG 113 brands meet these requirements. The RG 6U cable has a central steel core, galvanically coated with copper, an aluminum foil screen and copper alloy braiding, this is a budget option.
It is impossible to describe all the television cables on the market, but the information presented is quite enough for you to make the right choice yourself.
Samsung AutoSave Feature
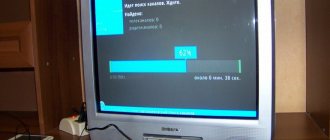
You can use the TV autosave feature to set up both digital and analogue channels. Before setting up a digital antenna on a Samsung TV, search for and save available digital channels by doing the following:
- Press the MENU button on the remote control.
- Use the up arrow buttons to navigate.
- Scroll down to AutoSave and press ENTER.
- Select the antenna type - aerial or cable, and press the ENTER button.
- Select a channel source and press the ENTER button.
- Select Digital, press the ENTER button.
- Select Search, press the ENTER button.
- This starts the process of scanning for available analogue channels.
How to install the antenna plug on the cable
There is no need to invite specialists to connect the TV to the antenna cable. Every home craftsman can do this work independently using available tools if he follows the instructions below.
The voltage of an analog or digital television signal in an antenna cable is millionths of a volt, so an antenna cable connected to a cable network or another TV is not dangerous to humans. You can easily cut the cable without disconnecting its other end from the splitter or TV. When cutting a cable, an accidental short circuit between the central conductor and the shielding braid is also not dangerous.
How to install an F-plug on an antenna cable
The plugs are sold in three sizes for antenna cables of different diameters. When purchasing, make sure that the F-plug is suitable for your TV antenna cable. This type of plug is suitable for analogue, digital TV and satellite signals.
You can screw the F-plug onto the cable by cutting it in two ways, with the shielding braid wrapped in the diagram on the left side, and without wrapping it in the diagram on the right, in accordance with the cutting diagram below.
The F-plug will hold more securely if the shielding braid is twisted, but if you cannot screw it in, you can use the second method.
To cut a television cable, lightly pressing the knife so as not to damage the shielding braiding of the antenna cable, its outer shell is cut along a few centimeters.
After cutting the shell, it is bent to the side and cut off at the start of the cut.
The aluminum foil and copper braid are turned away. The screen in antenna cables comes in three versions: one copper braid, aluminum foil and on top of it a copper braid (as in my case), only aluminum foil.
Many people do not know that to give mechanical strength, the foil is coated on the inside with polyethylene.
It is impossible to clean the plastic. If you screw the plug onto the inside of the antenna cable foil, there will be no contact, or it will be very poor. To prevent this from happening, you need to bend half of the foil turned back, then the conductive side will be on the outside.
There are situations when the diameter of the hole in the internal thread F of the plug is larger than the diameter of the antenna cable. In this case, before wrapping the foil, you need to wind several layers of insulating tape onto the antenna cable to adjust the size of the cable. Then do everything as described. The insulation is removed from the central core using the technology described in the article “Preparing wires for installation.”
The F plug is screwed onto the foil “wrap onto the cable”.
The central core of the antenna cable is bitten off so that about 2–3 mm remains protruding.
The second half of the plug is screwed in until it stops, and the F-plug is ready for use.
There are times when, after inserting the antenna plug into the TV socket, the cable has to be bent at a right angle or it is impossible to install the TV close to the wall due to the interfering antenna cable. In this case, you can use an F-socket - a plug with an angled design.
The difference between the two described plugs is only in their shape. The technology for installing straight and angled plugs on a television cable is the same.
How to install an old design plug on an antenna cable
Before the advent of antenna F-plugs, plugs of a different design were used, which also did not require soldering, but were connected to the antenna cable using their own technology.
Before you begin installing the plug on the antenna cable, you need to hold it by the metal part and unscrew the plastic case by rotating counterclockwise. Then put the case on the cable so as not to forget.
The next stage is preparing the antenna cable for installation. To do this, use a knife blade to cut through its outer shell to a length of about a centimeter with light pressure. Next, remove the sheath and trim the shielding braid by 5 mm. Remove five millimeters of insulation from the central core. The antenna cable is now ready to be inserted into the plug.
When threading the cable into the plug, it is necessary to ensure that the conductors of the braided fasteners of the central core do not touch. Using pliers, the petals of the antenna plug are crimped around the shielding winding. There shouldn't be much effort. The main thing is to have reliable contact.
Next, screw in the screw securing the central core of the antenna cable until it stops.
The last step is to screw the plastic part onto the metal part of the plug and insert the plug into the TV socket.
Where to insert the antenna cable on the TV
Once the connector is installed on the cable, it can be connected to the TV. The socket for connecting the TV to an antenna or cable network is usually located on its back wall and is marked next to it in the form of the abbreviated inscription “ANT”.
In the photo on the right side you can see the socket for connecting the antenna. The socket is special, standard and differs from all other connectors and sockets available on the patch panel. Therefore, it is physically impossible to mistakenly insert the antenna plug into another socket. Any of the connectors, the installation of which is discussed in the article above, fits well into the television socket.
In modern televisions, to receive a television signal, two connectors are installed to connect an antenna: - cable (digital) television and a satellite antenna.
One, designated RF (ANT 1 IN), is designed to connect a digital television or cable network antenna; this is installed on all models of TVs, both old and modern. The second one began to be installed recently, LNB (ANT 2 IN with external thread) is intended for connecting a satellite dish.
If the TV supports the DVB-S2 standard, then the satellite dish can be connected without a receiver, directly to the LNB connector. To receive digital television channels from a television tower to an individual antenna, the TV must support the DVB-T2 standard. Therefore, when buying a TV, you need to pay special attention to the list of broadcasting standards that it supports.
To receive a signal from a given connector on the TV, you need to select the signal source Antenna or Satellite TV in its Menu and perform automatic or manual channel tuning.
How to connect an antenna cable to a TV without a plug
There are situations in life when you urgently need to connect an antenna cable to your TV, but you don’t have a plug at hand. You can temporarily connect the antenna cable without a plug. To do this, you must first remove the top sheath to a length of 5 cm, develop and unscrew the shielding braid, remove the insulation from the central core of the cable and bend the core itself into a loop. The width of the loop should be slightly larger than the hole in the central connector socket.
If the connector on the TV is like in the photo, then you need to put an insulating tube on the central contact. Next, the loop is inserted into the central contact, and the shielding braid is tucked into the connector using the blade of a screwdriver. The main thing is to prevent the shielding braided wires from coming into contact with the central core of the cable.
If the braid is aluminum, then you can insert it into the television connector and fill the free space with thin copper wires taken from any stranded copper wire. To prevent the wire from falling out of the TV connector, you can secure it with several toothpicks or matches. Such an improvised connector will serve quite reliably.
How to connect an antenna cable to a crab without a plug
The cable is prepared in the same way as for putting on an F-plug, the central core is inserted into the crab's F-connector, and the screen is put on the protruding part of the crab's connector and secured with any wire or clamp. As a last resort, you can fix the cable by tightly wrapping several layers of electrical tape. It will work no worse than with an F-connection.
If you use a clamp with a screw crimping device, the quality and reliability of the connection will be no worse than with an F-connector.
Which antenna plug is better?
The answer is clear: the best of the three considered plugs for television coaxial cable is the F-plug. This is easy to see in the photographs above, even without special knowledge.
As you can see, the antenna plug of the old design and the Soviet antenna plug have a small section of the central core of the cable that is not covered by the shielding braid. This disrupts the uniformity of wave impedance, which leads to minor losses of the television signal.
The F-plug does not have an open section of the central core of the antenna cable. Another advantage of the antenna F-plug is ease of installation. With a minimum set of standard tools and no skills, almost anyone can correctly attach the antenna F-plug to the cable.
How to connect multiple TVs to a cable network or antenna
Connecting several televisions to a cable network or antenna transmitting an analog or digital television signal is no more difficult than one, except that you will have to put not one F-plug on the cable, but several. For this purpose, there are television signal splitters, popularly called “crabs”, they are also called “splitter”, “splitter” or “divider”.
The crab has one connector for connecting a signal from an antenna or a splitter in the entrance, marked IN (input), and several connectors for connecting televisions, marked OUT (output). If there is no marking, then usually the crab's entrance is on one side of the body, and the exits are in a row on the opposite side. All outputs for the crab to work properly must be connected to TVs.
If there are two outputs, then to two TVs, if there are three outputs, then to three, and so on. There should be no loose connectors on the crab. If the output remains unconnected, then it must be loaded onto a resistor with a resistance of 75 Ohms. Or, as they say, put a plug. But in this case, part of the useful signal will be lost; it is better to use a crab, in which the number of taps is equal to the number of connected TVs.
The design of the splitter is a thin-walled casing made of silumin or brass, which also contains connectors for connecting F-plugs. The divider circuit is usually a transformer, one turn of enameled wire with a diameter of 0.2–0.4 mm, threaded through ferrite rings or tubes. Installation of transformers is carried out using a hinged method. The case is hermetically sealed with a metal lid and sealed or fixed with glue.
Eyelets are provided for mounting the crab on the wall. The housing also has a thread with a screw for grounding, although it is not clear where to get the ground wire in the vast majority of apartments. They are usually not grounded, so on some channels there may be interference from electrical wires, the Internet, and a telephone running next to the television cable. Whenever possible, such proximity should be avoided when laying cables. For a more detailed look at the design and electrical circuit of the crab, you can visit the page “How to connect a television antenna amplifier to a power supply.”
If you wish, you can make a crab, which is not inferior in technical parameters to expensive samples from well-known companies, with your own hands.
When connecting TVs through a crab, the level of television signal reaching each TV connected to it, regardless of whether the TV is working or not, will be reduced due to losses in the crab and the additional cable length. When connecting two TVs - by 30%, three - by 60%, four - by 90%, and if the analogue or digital television signal coming to the crab is already weak, then the image quality on all connected TVs may decrease significantly. Usually the signal in cable television is quite powerful, and its level is sufficient for the normal operation of all televisions connected to the crab.
How to connect an antenna cable to the television signal line at the entrance of a house
Typically, a television cable is laid along the roof of a house and then, after being amplified by a main amplifier, it branches out along the entrances of the house. Since there are different packages of television programs, at the entrance to the entrance the cable is branched using a filter crab, which is a crab with two outputs. From one output the signal comes out unchanged, and from the second output it is cut off by a high-pass filter. Thus, the ability to watch all television channels is limited for those who buy cheaper social packages. Therefore, two cables run down the entrances.
If you examine the walls in your entrance, you will definitely find on each floor a metal box from which television antenna cables go to the apartments. In modern houses, boxes are no longer installed, but everything is placed in wall cabinets, in which case you will see a metal door with a lock. These boxes house TV signal subscriber taps. If you remove the lid from the box or open the cabinet door, you will see something like this. In the photo on the left is a coupler for subscribers of the full package of television programs, and on the right is for subscribers of the social package.
According to the rules, taps must be secured and grounded, but cable technicians do not do this to simplify their work. Perhaps this is better, since if the grounding is poor, then such grounding can create interference.
Taps installed in junction boxes are not fundamentally different from crabs for connecting several TVs, but they work somewhat differently. One F connector is used to connect the cable coming from the IN trunk. The second OUT is designed to carry the signal to the next tap installed on the floor below. The remaining F TAP connectors, there can be from one to five, are intended for connecting subscribers, that is, for connecting television cables going to apartments.
There should be no unconnected subscriber connectors. In case of disconnection of one subscriber, for example for non-payment, it is allowed to install an F-connector with a load resistance of 75 Ohms instead of the cable. If you need to connect a new subscriber to a cable television network, then the splitter for two subscribers, as in this example, is replaced with a three-slot one.
Thus, to connect a TV to a cable network, a piece of television cable of the required length with antenna F-connectors installed at the ends is sufficient. One F-connector of the antenna cable is connected to the subscriber tap in the entrance, and the second to the TV.
Where to go if problems arise?
The ARS-Master repair shop does not do miracles and will not be able to entertain you instead of watching TV. But the work of our specialists can be called real magic. And all because we know everything about receiving and transmitting devices:
- Differences between indoor and outdoor antennas.
- Operating principles of satellite, digital and cable television.
- Features of connecting antennas of different types and modifications.
- Pros and cons of TV brands, including built-in capabilities of the models.
- We can imagine connection diagrams even with our eyes closed.
The company's specialists successfully apply their knowledge and experience in practice. During our work, we have successfully connected several tens of thousands of antennas, laid kilometers of coaxial cable, and securely secured millions of plugs, adapters and connectors.
You can contact ARS-Master in the following cases:
- I don’t want to have to deal with connecting the TV antenna myself.
- There is no desire to understand the theory of connection, but I want to see an interesting program today.
- You don’t understand anything about the connection diagram, the cable, amplifiers, plugs, tuners and other elements.
- An attempt to complete the work on our own was unsuccessful and the desired result was not achieved.
- Consultation is required regarding the purchase of additional equipment for connection.
With a connection from ARS-Master, the television antenna always transmits brighter, faster, and better!
What is the difference between a crab and a coupler?
In crab, the power of the incoming television signal is usually divided into equal parts between all connected televisions. Unlike the crab, in the coupler only a small part of the signal power received at the input is allocated to subscribers, about 6 dB.
To ensure a sufficient level of the television signal reaching subscribers, the signal to the input of the coupler is supplied from the main power amplifier, depending on the number of connected subscribers. Taken together, all branches installed in one entrance represent a crab with numerous branches.
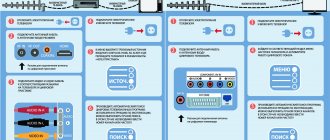
Preparing to connect
Before connecting, determine the type of antenna connector on the TV, which is usually located on the back or side. There are two main versions of this input:
- Standard on most modern devices, a coaxial RF threaded cylinder with a hole in the center.
- Connection for older IEC TVs.
Before setting up the TV antenna on the TV, find out the location of the nearest radio station. There are dedicated signal analysis sites such as AntennaWeb.org and TVFool.com. They can tell you exactly how strong an antenna is needed to pick up available signals based on your residential address. It is recommended to choose an HDTV antenna that is powerful enough to receive all signals. A TV antenna that is too powerful may overwhelm the digital tuner if the user is in an area with high signal strength.
TV signal amplifier
If after installing the crab the image becomes unsatisfactory, you will have to additionally install a television amplifier in front of it. The amplifier is designed in the same way as the crab, but its body additionally contains active elements (transistors or a microcircuit) that amplify the video signal. A television amplifier will additionally require a supply voltage, and this must be taken into account when choosing its installation location.
The television amplifier must be installed as close as possible to the source of the television signal, since the amplifier amplifies noise along with the useful television signal. The photo shows the TERRA HA123 television amplifier, designed for operation in a home television network that has one output, with the ability to adjust the gain from 8 to 28 dB. If possible, the ideal option is to place the amplifier directly in the box of the main signal splitter for apartments.
If the televisions are located not far from the television amplifier, then it is more advisable to install only one television signal amplifier with several outputs instead of a television amplifier and a crab. For example, a television amplifier-splitter model Televes 5523 (Spain), which has a gain of 16 dB and five outputs, which makes it possible to connect up to 5 TVs to it.
If the signal is taken from an individual antenna, then there are amplifiers that are designed to be installed directly on the antenna instead of a matching loop. Antenna amplifiers provide high-quality reception at a distance of up to 100 km from the transmitting antenna.
The photo shows the SWA-555/LUX television signal antenna amplifier, which is available with different gains, from 10 to 15 dB in the meter range and from 34 to 43 dB in the decimeter range. You can find out how to properly connect the power supply to a television cable to supply voltage to a television antenna amplifier on the website page “How to connect a television antenna amplifier to a power supply.”
The antenna amplifier, depending on the signal level at the antenna installation point, must be selected according to the gain for each specific case. The supply voltage for such amplifiers is supplied via a coaxial cable.
Basic mistakes when connecting an antenna and their solutions
Many people have very similar difficulties here:
- No TV signal. Try moving the antenna around the room. If this does not help, it is recommended to choose another reception option (for example, satellite TV).
- Not all channels are received. Most likely, only one channel package is connected. First you need to determine the broadcast frequency of the repeater (tower) using the RTSR card, then manually configure the remaining channels in the menu. Enter “Menu” – “Channel settings” – “Manual tuning” – “Program”. Using the button on the remote control, assign the channel the desired number. Run “Search”, then “Save”. Set up other channels in the same way.
- The signal is noisy. The antenna also receives additional noise. You need to place the receiver higher, keeping the direction towards the television tower.
Anti-interference by installing a ferrite ring on the antenna cable
Sometimes, after connecting to cable television or the antenna of several TVs using a crab, interference may appear on some channels in the form of chaotically appearing white or black dots, traveling waves or a grid across the screen. When receiving digital television, image and sound may periodically disappear or be completely absent.
This may occur due to high-frequency interference from a local oscillator, parallel connected TVs, or other sources of interference entering the antenna input of the TV. It is possible that interference can also come from televisions connected in neighboring apartments.
The level of this kind of interference can be significantly reduced or even eliminated completely by installing a ferrite ring on the cable.
The effectiveness of interference suppression by a ferrite filter depends on the cross-sectional area of the ring: the larger its area, the greater the inductance of the inductor made. A ferrite ring placed on the antenna cable forms a choke and, together with the linear capacitance of the antenna cable, forms a U-shaped high-frequency filter. Maximum interference suppression will be achieved by installing two rings on the antenna cable at its ends.
Ferrite rings are sold in stores and come in two types: solid and consisting of two halves, pressed into a plastic case with latches. But you can do it without extra costs. If you look closely at the interface wires running from the computer system unit to the printer, scanner, monitor and other peripheral equipment, you can see thickening of the cylindrical cables. These are ferrite filters.
You probably have an old CRT monitor collecting dust or have unnecessary interface cables. It is enough to cut the plastic with a knife, remove the ferrite ring and install it on the antenna cable. After installing the ferrite ring, interference on the TV screen will no longer interfere with watching TV programs.
Sony Auto Program
To change the tuning range, press the HOME button >> Settings >> Digital Tuning >> Auto Tuning Range >> Normal.
Where:
- normal - search for available channels in the region;
- full - searches for available channels regardless of region.
Before setting up the Sony TV antenna, you can start the digital search again. For example, after moving to a new location, changing service providers or searching for new channels. Sony has an automatic tuning program that scans and stores available channels through your service provider. Updating this list is useful when moving or launching new channels. TV also helps make it easier to find specific channels by adding your favorite channels to the list for easy access.
Setting algorithm:
- Press the "HOME" button and then select "Settings" using the buttons.
- Select “Digital Setup” using the buttons and then press the button.
- Select “Digital Auto Tuning” using the buttons.
- Follow the on-screen instructions to tune in to all available digital channels and save your settings to your TV.
- To return to the last viewed source, press the HOME button twice.
- Click the "Auto Program" button, then "+" to open the dialog box, and then "+" to select "OK" on the screen. She will start searching for digital channels.
- Displays the channel to be added to the favorites list.
- Press the Home button on the remote to view device settings.
- Press the arrow button to move to the Heart symbol and then press the + button to confirm.
- The displayed channel will be added to the list on the screen.