You decide to move the TV to another place in the room, but the length of the TV antenna cable is not enough. During renovations at the entrance, the builders damaged the television cable. Your best friend, the dog, chewed through the cable and the TV stopped showing. Cable repair is inevitable. Replacing the cable completely from the connection point to the TV is labor-intensive work. It is possible to independently connect sections of television cable at minimal cost.
There are three ways to connect the cable: ☞ TV extension cable, commercially available in lengths from 2 to 20 meters, the most expensive option, but if you have money and availability, this is the simplest solution to the problem; ☞ Using an adapter TV F-socket - F-socket; ☞ Soldering with a soldering iron.
If you need to purchase an additional piece of television cable for extension, you can read the recommendations on choosing a brand of television coaxial cable and how to connect it to a TV in the site article “Connecting a TV cable.”
Is it possible to connect a television cable with your own hands without losing quality?
To correctly connect a telecommunications wire with a coaxial cord, you should use one of the following methods:
- Purchase a standard extension cord of standard length, with which you can increase the length of the antenna cable to 20 meters;
- Use special F-sockets that allow you to connect antenna wires without soldering;
- Modern technologies make it possible to extend several wires simultaneously using splitters;
- Solder the wires together to create an unbreakable connection.
Connecting the Antenna Wire
Also, special care should be taken to select the correct coaxial cord since the antenna wire has a resistance of 75 ohms. The outer braid must have extreme elasticity, since this property will allow it not to break at the bends
In addition, to avoid loss of image quality, it is necessary to purchase products that have a dense internal braid to guarantee the reception of a stable continuous signal.
Note! The dielectric, which acts as an insulator, must be made of polyethylene and foil to prevent signal failure due to external interference during operation. The cable core can be made of copper, aluminum or steel
The frequency signal settings should be low.
Cable connection without network loss
How to extend the wire: 3 options
It is very inconvenient to use the Internet when you cannot move freely. Many people install network cables to make using the Internet more comfortable. There are several simple ways to extend the cable.
When purchasing, it is important to pay attention to the appearance of the joyner, as it is very similar to a telephone adapter. It will not be difficult to distinguish a twisted pair, since the adapter has 8 contacts, while the telephone adapter has only 7. A computer network card is inserted into the patch cord, the other end of the cord is connected to the network cable
A computer network card is inserted into the patch cord, and the other end of the cord is connected to the network cable.
Internet cable extension options:
- Router.
Convenient and reliable extension option. The router has a couple of sockets to which you can connect a network cable. A router is a “splitter” of the Internet. It allows you not only to extend the cable, but also to connect additional devices to the channel. You can skip the cable altogether if you buy a Wi-Fi router. - Purchasing a new cable.
The old cable can be replaced with a new one by simply measuring its length first. This method is time-consuming because you will have to call a technician to reconnect. But if we are not talking about a multi-storey building, but about a private one, then the method is quite suitable. - Performing twisting.
Masters do not recommend using this method. It involves cutting the cable and then inserting an additional piece of the required length into it. The two pieces need to be connected with electrical tape.
Twisting can lead to short circuits, which will lead to poor connection speed or a complete lack of Internet access. The most reliable and modern way to extend the cable is to use a router. If you are not sure that the attempt to extend it yourself will be successful, you can always turn to your Internet provider for help.
It often happens that the technician interrupted the wiring while performing repair work. While working with an angle grinder or other tools, some people may accidentally cut the electrical wire laid in the wall. Damage is indicated by sparks, power cuts, or knocked out plugs.
The wires located in the installation box may also break. Often there is not enough length to connect them correctly. It should be noted that experts advise not to repair one wire, but to replace the entire damaged section. Of course, this method is suitable for those who are not afraid of damage to finishing materials and are ready to make new repairs.
How to extend an aluminum cable:
- Twist the ends of the cable if they are long enough. The twist must be wrapped with electrical tape. This method is the most unreliable, because the twist may break again, which will return the problem.
- A special heat-shrinkable tube can be attached to the ends of the wires. This method is suitable for connecting and extending any cable. In order to carry out the plantings correctly, the tube must be heated.
- All types of wires (copper and aluminum) can be extended using a block. The ends of the cable must be stripped, and then the block must be selected.
- If the wires have broken off, they can be repaired using a coil. It is screwed onto the ends of the wires. After the required density has been achieved, you need to insulate the wires.
Extending twisted pair cables does not require special qualifications, and if done correctly can even be reliable. When twisting wires, you need to follow the one level rule and insulate each individual connection. An interesting method is the displacement of joints made by twisting or soldering.
What can such an antenna do?
It is quite difficult to implement a high-quality unidirectional antenna without special tools and skills, so the antenna will be classified as low-power. Homemade products can be useful in the following cases:
- Short range to the repeater. The distance limit to the radio station is 15-20 km.
- There are no obstacles in the direct line of sight to the repeater in the form of buildings or forest belts.
- The signal itself is picked up by the receiver. The main thing is that the latter is not in the dead zone.
You can check the signal level using various methods. The easiest way is to use the options of advanced digital TVs.
The test usually proceeds according to the principle:
- Turn on your TV and open Settings instead of video. An antenna is not needed at this stage.
- Find the signal strength indicator in the parameters.
- This indicator should indicate the signal strength. If it is more than 15%, digital TV can be caught on homemade TV. If less, then you need to connect a more powerful device.
Advantages and disadvantages of connecting an amplifier
Connecting an amplifier to a TV antenna promises tangible benefits:
- a sharp increase in signal power even when using an antenna of the same design;
- no more worrying about where to place your TV. This is especially noticeable if an active antenna is used, in which the amplifier board is part of the structure. In this case, the power of the signal transmitted to the TV is so great that even a whole bay of cable will not become a noticeable obstacle. When using an external amplifier, it will need to be placed closer to the antenna, but the gain in signal power and quality will still be noticeable.
If you intend to connect an amplifier at home, then you need to keep in mind possible disadvantages and limitations:
- The complexity and cost of equipment is increasing. Even if you use the simplest amplification unit that can be soldered, you will need new elements: fasteners, connectors, power supply, special tools, etc. But if you like to work with your hands, this item will not be a problem.
- You will need to take care of nutrition. Any amplifier, in fact, turns the incoming signal into its exact copy, which has greater power. Additional energy must come from somewhere - you need an external adapter that connects to the mains. A set-top box or TV that has the function of an active antenna socket with voltage transmission through the feeder is suitable as a power source.
- The use of amplification is not appropriate in all cases. To create a powerful copy, you need a high-quality original, and if the TV signal is clogged with noise and interference, then the amplifier will boost them too. As a result, even filters and tuners will not always be able to separate the useful signal from the spurious ones.
- Over-amplification will have the opposite effect. If too strong a signal is received at the antenna input, the equipment will consider it non-existent and refuse to play. Therefore, in the area where reliable reception is possible with a passive antenna, you should either refrain from using an amplifier or lower the power factor (if the model has a regulator).
Thus, in order for a TV antenna amplifier to be useful, it requires both a high-quality and a weak signal.
Application of passive antenna
A homemade antenna extender can be used in conjunction with a laptop, access point or Wi-Fi modem
It is important to understand that after such manipulations the result may not always be positive, and in the event of a breakdown, it will be impossible to repair the equipment under warranty
Updating network adapters to match your router
If not, look up your model number online to see its exact specifications. Of course, depending on what devices you own, find out what wireless standard they can use.
Buy or build a high gain antenna
Most wireless routers and wireless adapters with external antennas come with cheap omnidirectional antennas.
Turn your cable or electrical outlets into wireless access points
If you want to double or even triple your wireless range, you can try adding additional wireless access points to your network. However, this performance hit may be acceptable if you plan to do basic web browsing on these computers; You won't really enjoy transferring large files or streaming video between computers on a network.
Additional wireless access points
A router is basically a network controller, and it connects to or is integrated with your internet modem.
If you decide to connect the antenna to the modem, then you need to study the features of the process. The fact is that inside the modem there is a small antenna, to which a homemade antenna is attached. To complete this process, you will have to disassemble the modem flash drive. You can remove the cover using a scalpel, screwdriver or utility knife (pull towards the top from the USB connector, do not press too hard, otherwise the case will break).
When a signal passes through any cable, it loses strength. Thus, the shorter the cable, the less loss. Less is more in this situation, and the correct cable length is important to maintain signal quality. All cell phone signal boosters are complete kits and come with the appropriate cable type and length to maintain reasonable dB gain
But there are times when you need a little more reach, so it's important to figure out how much length you can afford before the signal loss offsets any signal gain
Opening the modem, you will see two connectors covered with paper. Follow these instructions:
- remove the protective layer from the modem elements;
- connect the antenna you assembled yourself to the left connector (the hole you need will be on the left side if the device itself is positioned with the USB connector facing you);
- use a coaxial cable that is not too long, otherwise the result will not be much different from using a modem without an extension cord.
There are three types of cables for home cell phone signal boosters. As mentioned earlier, as the cable length increases, more signal loss occurs. Signal gain and loss are measured in decibels. And decibels are measured exponentially.
And as always, you can convert your cable installation. Think of the signal as the drink and the cables as the straws. 75 ohm cables are your typical soda straws, and 50 ohm cables are the big straws of the carlav's throat. Nothing is more frustrating than trying to install a new TV on a cable or satellite system and discovering that the existing coaxial cable is not long enough to fit it into the desired viewing location. Coaxial cable, often called "coaxial cable", can become expensive in length, so replacing the entire cable may be out of a consumer's budget.
Extension of TV cable using F-connectors
This option for connecting the wire involves visiting a store where you need to purchase two F-plugs (for each of the 2 ends of the cable) and one adapter - F-socket. It is recommended to take a piece of TV cable with you, since components are sold for different diameters. The tools you will need are a regular or construction (segment) knife and wire cutters.
Building up an antenna cable begins with preparing its sections:
Make a careful cut into the outer shell. For ease of operation, the length of the cut should be greater than the length of the F-plug body. In the future, it can be adjusted by removing the excess part of the central core. Fold the casing in the opposite direction and remove it completely. Turn the copper shield and the foil underneath towards the remaining outer shell. To perform the procedure, they can be slightly incised
At this stage, pay attention to the possible presence of a coating of a thin layer of polyethylene or lavsan on the inside of the foil. These materials greatly impair the transfer of contact to the F-plug housing
To solve the problem, screw back half of the wrapped foil. This way the side with poor current transmission will be on the inside. Using a sharp knife, cut the insulation of the central core. Try not to leave notches on it, as they reduce strength and can lead to breakage. Take the F-plug and screw it onto the cable. It must fit snugly, since the fixation is achieved only by clamping force. Trim off any excess center core. Its edge should protrude 3-5 mm beyond the F-plug body.
If the diameter of the cable is smaller than the internal diameter of the F-plug, then before turning off the screen with foil, wrap electrical tape around the outer sheath.
This completes the preparation of the two ends of the cable. Now take the F-socket and connect the first and second plug to it. Fixation is ensured by screwing the movable head of the F-connector onto the thread of the adapter. The result will be a neat and reliable connection. In its place, you can also install a splitter, which will be discussed later.
Connecting TV wires by soldering
For this method you will need a soldering iron, solder and rosin (an alternative is soldering acid). You should also have basic soldering skills.
The method allows you to connect different cable variations. Let's consider step by step the process of soldering two cables with a single core and a double screen (copper braid + aluminum foil):
- On each cable, make a cut along the outer sheath 5-6 cm long.
- Unscrew the shell and the screens underneath it - copper mesh and foil.
- Cut the central core along with the insulation to a length of 2 cm.
- Cut off part of the insulation from the central core - the result will be some kind of step. When folding two parts of the cable, this design should ensure complete closure of the contact, with virtually no gaps.
- Bend the central core away from the insulation by 45 degrees. Tin it and solder it to the second part of the wire. In the absence of an assistant, before soldering, the cores can be tied with thin wire taken from a copper screen.
- Inspect the soldering results. If the cured solder has sharp edges or beads, remove them using fine-grit sandpaper or a file.
- Close the two steps cut from the insulation together, removing excess if necessary. Secure the resulting structure with insulating tape - 2-3 turns.
- Replace the foil on the two parts of the cable. On the inside it is covered with a non-conducting layer, so you need to properly wrap this part of the screen, ensuring contact between the conductive sides.
- Return the copper mesh - first one, then the other. To improve contact, wrap the area with several pieces of tinned wire of the same diameter. Then solder these parts.
- Unscrew the outer shell one by one. As a result, one should envelop the other. Secure the connection with insulating tape.
Connection of plug and socket
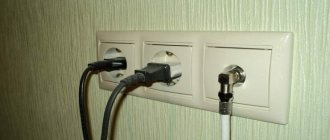
This method is suitable for you if you already have a “destination” to which you need to direct and then connect the antenna cord. This can be the F-type receiving socket of a TV or set-top box; you can also connect a coaxial cable with a plug to the nearest antenna socket and connect it to the F-socket of the extension cable. For such connections it is convenient to use corner terminals.
The simplicity of this, outdated today, method of connecting the ends of the cable does not compensate for the signal losses that will inevitably occur with any deformation of the joint. In addition, twisting by itself will not be enough. If you have already decided on this type of merging of coaxial cables, then stock up on at least a soldering iron and electrical tape. Solder the connection of the central cores to each other and, separately, solder the braids. Then carefully insulate everything.
Although this applies to general rules for handling cables, it is especially relevant for joints made by twisting and soldering:
- do not drop objects on the television cable and protect it from impacts,
- do not bend the joint - it is fragile,
- Do not allow the spliced wire to “dangle” in the wind.
Connection via a splitter
Twisting three or more cables together is not the best solution. If you need to watch more than one TV receiver from one terrestrial DVB-T2 antenna, you should connect through a splitter.
To connect, use the instructions above about using a coupling (adapter). The splitter uses threads of the same diameter, so the connection principle is no different.
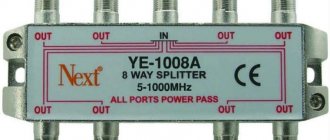
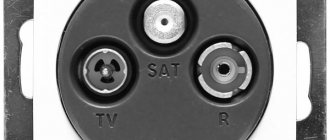
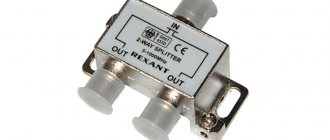
The only thing is that the nests must match. The crab's input is signed IN, ANT IN. This is the input for connecting the cable that leads from the antenna. Each output is signed OUT with a number. There can be up to 8 of the latter on one device. The quantity depends on the splitter.
If the antenna is active, then the same divider is needed. The ability to pass power from an external unit or set-top box through a splitter is required. Typically the divider will have a "Power Pass" designation on it.
Extension of a television cable using an F-socket - F-socket adapter
To connect two cables using an adapter, you need to purchase 2 pieces of F-plug for wrapping on the cable and a TV F-socket - F-socket adapter. The plugs come in three sizes, designed to fit onto television cables of different diameters. Purchase F-plugs in accordance with the diameter of the connected television cables.
With little effort to cut through the cable shielding, the outer sheath of the cable is cut a few centimeters along.
After the cut, the shell is turned in the opposite direction and removed at the point where the cut begins.
As shown in the photo, the aluminum screen is bent in the opposite direction - foil and braided copper wire. There are three types of screen in television cables. Copper braid only, aluminum foil combined with copper braid and staniol foil only. For the demonstration, I specifically chose a television cable with a combined screen, aluminum foil in combination with copper braiding, for clarity.
To give mechanical strength to the foil, it is coated on the inside with a thin layer of lavsan or polyethylene. It is almost impossible to remove the plastic. If the F-plug is wound onto the inside of the foil, there will be no contact of the screen with it, or it will be very poor.
To avoid bad contact, you need to return half of the wrapped foil back, then the conductive side will be on the outside. If the outer diameter of the television cable is smaller than the threaded hole of the F-plug, then before turning the screen, several turns of insulating tape are wound to ensure a tight fit when screwing the F-plug onto the cable.
Next, using a knife blade oriented almost parallel to the cable, carefully cut off the insulation from the central core. The main thing is to avoid notches in the copper wire of the central core, since notches reduce the mechanical strength of the core and it can easily break off.
When the ends of the coaxial cables to be connected are prepared, the F-plugs are wound onto the foil and wrapped onto the cable.
The central cores of the cables are shortened so that about 5 mm protrudes from the F-plug.
All that remains is to screw the ends of the television cable equipped with F plugs onto the TV F-socket - F-socket adapter.
The result is such a beautiful detachable connection for a television cable.
If the need arises, it will be easy to install a crab in this place to split the television signal to feed several TVs.
Check the result using a multimeter
Once the circuit has been designed and connected, it makes sense to test it and check the characteristics of the resulting design. To do this, you need to have a tester - a multimeter or any other similar device.
Check the following settings:
- The characteristic impedance of the cable should not exceed 75 Ohms.
- The difference between the braid of the coaxial cable and the central core should be several tens of ohms. If the device shows “0”, it means there is a break or short circuit.
- When connecting the central core and braid, the device should show infinity, that is, the maximum of the scale. But if both the braid and the core are disconnected from the antenna and shorted to each other, the result should be zero.
If all 3 tests are passed, then the amplifier is connected correctly.
Cable device
Sometimes you have to make adjustments to an already installed home TV network. This happens when rearranging furniture, or if an additional television receiver “starts up” in your home, or a section of the coaxial cord is simply damaged and requires an insertion. Then you are faced with the task: how to extend the television cable or how to increase the damaged section to the required length? Before you get serious about the solution, learn how to properly connect the antenna cable, because any inaccurate connection of the TV cable is fraught with loss of reception quality. Here it would be nice to remember the cable structure.
Coaxial cable is a telecommunications wire for transmitting low-power signals, consisting of two conductors that are separated from each other by a dielectric material. The conductor in the center and the outer metal layer form concentric cylinders with a common axis. The conductor in the center of the coaxial is a solid or seven-core wire. It is usually made of copper, silver or copper-plated aluminum, copper-plated steel, etc. A braided metal fabric acts as an external conductor - a shielding braid. Most often this is copper braid or aluminum braid. Many products use an additional shell of insulating foil film, which precedes the woven layer - an aluminum screen.
Now do you understand that connecting two pieces of such a cable is not at all as simple as tying your shoelaces? Fortunately, more than one way to do this reliably and quickly has long been invented.
Wiring of the built-in amplifier SWA
A passive antenna can be amplified by installing an SWA card on it. The most delicate place in this process is the wiring of contacts. The video shows the entire process from choosing an amplifier to its correct installation. Just follow the recommendations and success is inevitable.
There may be many reasons for extending the television cable, for example, moving the TV from one room to another or replacing some part of the wire due to damage.
To perform this action, you need to understand how to extend the television cable so that it functions and the image quality does not suffer.
Knowing the rules for cable extension plays an important role in terms of saving money, because it is much cheaper than completely replacing it with a longer version.
How to fix an antenna cable
Each television antenna cable consists of a central core with polypropylene insulation, an aluminum foil screen, an outer braid and polyethylene armor. The last two components of the product are required to protect the cable from mechanical action and to form a coaxial structure that prevents unexpected damage. Given this composition of the connector, it is necessary to carefully twist each part to be connected before soldering them together. Next, you will need to use a socket, splitter, proprietary extension cord, soldering or ordinary twisting in order to increase the TV wire, repair it and connect it to the antenna network.
DIY repair
TV extension cord
If you just need a small amount of cable, and you don’t want to do it yourself, the question is how to make the TV cable reach the equipment, you can use an extension cord.
Read here - Do-it-yourself kettle repair: principle of operation, design, main types of malfunctions. Step-by-step photo repair instructions. Prevention of breakdowns
There are many different types of extension cords. You can find ones up to 20 m long, but their price is many times higher than the cost of coaxial cable.
How to lengthen and build up a television cable from an antenna
11.04.2020
Digital television
At the end of winter, the antenna cable at my dacha was broken by a falling block of ice. With the onset of spring, I decided to move the antenna to another location, which is why I had to lengthen the television cable. Throwing away a new one is completely out of the question due to certain circumstances, so building it up is the best solution! The same thing often has to be done to connect a coaxial cable if it breaks in the entrance or around the apartment. This is the easiest way to repair a television cable and today I will tell you about it in detail!
When is extension needed?
The television cable needs to be extended in the following cases:
- if it is accidentally damaged in some section of its length, and when this section is removed, the remaining length becomes insufficient;
- when rearranging furniture, the TV took a different place, as a result of which the cable length was insufficient;
- moving the antenna to another location also required external extension of the television wire.
In the latter case, you may also need an additional antenna amplifier to compensate for losses in a much longer cable.
Preparation and tools
As for the tools, you and I will need ordinary side cutters and a construction knife (instead of a construction knife, a stationery knife can also do). To connect the ends of a television cable, you need special coaxial cable connectors. They are also called F-connectors.
More specifically, we need two FS-5 threaded F connectors and one straight F reducer. They are usually quite inexpensive!
If you need to extend the antenna cable when moving a TV or antenna, you must also buy a cable. To do this, before going to the store, carefully inspect your wire and rewrite the markings, or better yet, cut off a small piece from it and go to the store with it.
What is required to extend the wire?
The procedure is quite simple, but in order for everything to go as smoothly and beautifully as possible, you need to prepare the necessary tools and materials. So, we need:
- Nippers or metal scissors;
- A stationery knife (you can take a kitchen knife or any other knife, the most important thing is that it is sharp);
- A roll of electrical tape;
- A piece of cable suitable in cross-section diameter and color;
- Heat shrink tube to match the cable color;
- Lighter.
Finding all this will not be difficult. Almost all of this can be found in any house or apartment. Of course, not everyone has heat-shrink tubing, but you can buy it at any hardware store at a reasonable price.
Coaxial cable connection
There are several ways to connect a television cable to each other:
1. Using F-connectors 2. Using a splitter 3. Soldering the cable ends 4. Twisting the cable
I will only consider the first two methods. And that's why.
I just don't see the point in soldering coax at a time when there are modern ways to connect cables. And not everyone knows how to solder. But twisting a coax is generally an extremely unreliable connection and should not be done that way!
We use F-connectors
Before you begin to extend the wire, it must be properly cut. Using a knife, carefully remove the top shell without damaging the screen. The shielded braid must be bent in the opposite direction.
Next, you need to use wire cutters to remove the insulation from the central core so that its approximate length is about one and a half centimeters. This must be done at both ends of the antenna cable being connected. After this, you need to screw the F-connector onto each end so that the central core does not contact the outer screen and protrudes from the connector by about 5 millimeters.
After this, you need to pick up the straight F-junction, insert one end into it one by one, tighten the nut, then the other end and tighten the nut. It should look like this:
For a stronger fixation, I recommend wrapping the connection point with electrical tape. This will prevent it from falling apart during bending and deformation.
This was the first option on how to extend the antenna cable. But there is a second method, which may be more practical for many.
TV tee splitter
First, let's figure out what a splitter is and in what cases it is used. A television splitter is a small box that has one input and two or more outputs. It is intended for branching a television antenna into several televisions. Therefore, when choosing a splitter, you should decide in advance on the required number of outputs. As you understand, it can be used not only as a tee, but also as a simple way to connect a television cable.
Thanks to the available fasteners, this device can be screwed to the wall and it will hold securely. This method of extending an antenna cable is similar to the previous one, so I will not again tell you how to plug the ends of the wire into the F-connectors and screw them. Here you need to do the same thing, but a television tee-splitter is used as a direct F-junction. The main thing is not to confuse the entrance and exit! What makes this option convenient is that you can connect another TV from this connection. That is, there is the possibility of further branching!
Attention! Competently and efficiently performed work will not affect the quality of the received signal in any way. If you have any malfunctions or after all the quality of TV signal reception has deteriorated, then you need to carefully check all connections
f-connector, antenna, coaxial, splitter
How to make the connection correctly
Before connecting a TV cable without causing loss of the antenna signal, it is necessary to install F-type connectors on the two ends being connected. The action is quite simple, even beginners can handle it. To work you need a sharp knife, the connector itself and pliers.
- First, the cable sheath is removed from the edge by 1 cm.
- The screen straightens and bends in the opposite direction (inward).
- The vein is exposed. To do this, 7-8 mm of the inner layer is removed from the previously cleaned area.
When the cable for the F-connector is cut, installation is done. Start winding the part onto the wire with your hands. If installation is difficult, use pliers to help. But you don’t need to clamp it too hard, as this can lead to breakage of the connector housing. Modern parts are made of thin metal of poor quality.
Also mount the antenna connector on the end of the second TV cable.
Afterwards, complete the connection by screwing the connectors onto the barrel.
If you need to connect three cables, then not a double, but a triple coupling is used. The principle of operation is similar, only three wires are processed.
What is needed to extend the antenna cable
Ideally, the signal cable should be laid in one piece without breaks or connections to ensure:
- minimum active and inductive resistance of the transmission line;
- uniformity of wave resistance along the length;
- continuity of the screen, for protection against electromagnetic fields.
As practice shows, lossless connections are not possible with HDMI cables designed to transmit signals in Ultra HD format. A high-quality connection of sections of a coaxial antenna cable cannot negatively affect the level of the received TV signal.
The list of necessary materials and tools for joining will depend on the chosen connection method. And it will be described in detail when considering each method separately. However, no matter what option you choose, you will definitely need an additional piece of cable of the required length.
If you go to a specialized store, you will come across at least 5–10 types of cable, significantly different from each other. The sales consultant will tell you about the product presented and advise you on the best option, but you need not just a piece of high-quality wire, but a piece of cable with the most similar characteristics to the existing one.
Therefore, before going to the store, carefully study and write down the markings on the piece you have, or even better if you can cut off and take a small piece with you for a sample.
How to extend a TV cable
Extending the cable, as well as connecting television cables to each other, increases signal resistance, so they must be kept to a minimum. The number of connections should be no more than 1-2. If necessary, this can be done in different ways.
Via adapter or plug and socket
The easiest and fastest way to connect a television cable is F-plug and F-socket:
- Remove the outer layer of insulation on one of the wires at a distance of 25-30 mm;
- Wrap the braid in the opposite direction. The inner side of the aluminum foil is coated with lavsan or polyethylene for strength, so part of the screen is folded back to ensure contact;
- Strip the end of the central core to a length of 10 mm. This must be done without damaging it, otherwise the wire becomes brittle;
- The F-plug is screwed onto the TV cable through the foil. The central wire should protrude by 0.5 cm. The excess is cut off with wire cutters or side cutters;
- Operations 1-4 are repeated for the second end of the cable;
- The prepared F-plugs are screwed into the F-socket.
The connection using a TV plug and TV socket is carried out in the same way. The difference is that it has less mechanical strength, so the finished connection is wrapped with electrical tape, or a piece of heat-shrinkable tubing is put on it and heated with a hairdryer or lighter.
Interesting. Connectors are available in straight and 90 degree angles. Curved ones are used when there is no room for a smooth cable bend. The installation method does not change from using the corner connector.
Solder connection
Another way to reliably and efficiently connect wires is soldering. It's cheaper, but more difficult and longer than using a connector:
Using a knife, cut the outer shell to a length of 50-60 mm;
Carefully! The shielding braid must remain intact
- Like the skin of a banana, the outer insulation and screen fold back;
- The central core is cut to a length of 20mm;
- The insulation is cut to a length of 10mm on one side. As shown in the photo, it is necessary to leave a “step”;
- The central core is bent at an angle of 45 degrees. The ends are tinned;
- Operations 1-5 are repeated for the other cable;
- The central cores of the connected wires are soldered “overlapping”. Irregularities and drips of tin are removed with a file or soldering iron;
- The soldering area is covered on both sides with the remaining uncut insulation of the central core, and is wrapped with electrical tape for strength;
- The aluminum foil of the screen is returned to its place;
- The shielding braid is put in place one by one. For better contact, the screens can be soldered;
- The previously bent outer insulation is applied to the connection on both sides;
- The finished structure is wrapped with electrical tape, or a previously placed piece of heat-shrink tubing is placed over it and heated with a hairdryer.
Attention! On the inside, the shielding foil is covered with a layer of insulation, so the layer laid on the outside turns inside out
Twist
This is the most low-quality connection method. At the point of twisting, contact is lost, it oxidizes, is mechanically fragile and has an unaesthetic appearance. You can connect the cable by twisting it in two ways:
- Similar to a soldered joint. Instead of soldering, twist the central cores together;
- Strip the outer insulation by 40-50mm, and the inner insulation by 20-25. Twist the central wires and screens in pairs, insulating the twists with electrical tape.
Connecting multiple cables via a splitter
When connecting one antenna to several TVs, the connection is made through a special device - a splitter, or “crab”.
This is a small box with one input marked “IN” and several outputs marked “OUT”. TV cables are connected via F-connectors or TV-plugs.
Inside the splitter there is a ferrite ring with windings, and in cheaper models - resistors. These elements distribute the input signal evenly across the outputs, so it is not recommended to install a “crab” with spare outputs.
If the number of outputs is more than four, an active splitter is installed - a device in which the amplifier is located.
Splitter
Types of antenna extensions and connection rules
Antenna extension cables are produced ready-made - a cable with already existing F-connectors and plugs or tulip-type connectors.
The cable length is several meters. There is no point in using a longer length (more than 10 m) - the antenna requires an additional broadband amplifier designed for the “decimeter” range.
For an indoor antenna, where the signal attenuation is ensured by the walls of the house, building, or structure itself, 5 m of cable is sufficient.
Until 2021, analogue television, which also used the “meter” frequency range, needed a composite antenna amplifier designed for the frequency band 49-860 MHz. With the advent of digital TV, the range in which all-digital television operates, the range “shrank” from 480 to 600 MHz. At the same time, in one frequency band at 8 MHz, designed for one analog channel, an entire digital television multiplex broadcasts - from 8 to 10 standard definition TV channels or 1-3 HD channels.
The development of “digital” allows you to watch TV channels with virtually no on-air noise, and if the signal level is insufficient, the image will simply slow down. To avoid this, extenders and antenna amplifiers were invented.
The most common ways to extend a cable are to use F-connectors or splitters. The first allow you to extend the cable without almost compromising the integrity of the cable structure: the braid, which serves as a screen from external interference, and the central conductor. The latter make the antenna collective, serving as hubs (splitters). Splitters can contain an additional amplifier stage - the so-called active splitter, but passive connecting devices are more often used.
To connect a cable break with an F connector, do the following:
- Remove the protective sheath of the braid by 2.5 cm.
- Unravel the braid (it consists of thin wires) and pull it back.
- Remove the protective sheath of the central conductor at a distance of 1 cm. Be careful - the core should not have notches (often it is copper-plated steel or an aluminum alloy) that can lead to rupture.
- Disassemble the connector by unscrewing the retaining nut and place the nut on the cable.
- Press the central core with the conductor into the plug-plug junction on one side. The end of the central conductor will come out from the back of the adapter (no more than 5 mm is needed).
- Tighten the nut. It will press the braid and prevent the cable from easily being pulled out of the adapter.
- Similarly, strip and press the other end where the cable breaks.
The central conductors in the adapter will touch each other, and the braids will be connected through the housing. If the cable is replaced entirely with a longer one, the connection to the TV is made directly: instead of the traditional “tulip” type connector, the TV receiver itself already has a built-in F-connector.
To connect cables from several TVs through a splitter, you should perform the following operations:
- press the ends of the cables into the plugs according to the above diagram;
- connect the antenna (with an amplifier) to the splitter input, and the TVs to its outputs.
Place the splitter in a convenient location. Check that there is a TV signal on all TVs by switching to different channels (if there are several) on each connected TV. If there is a TV amplifier on the antenna or in the splitter, then you need to check that it is turned on (power is supplied to it).
How to lay the cable correctly
For a television cable, after it is extended, the question of its fastening always arises. Extending a TV cable, according to many TV owners, is not difficult, but you must comply with the requirement, which experts consider an additional requirement during the installation process - the bending angle of the cable should not be sharp or straight.
This is not allowed due to the design of the cable, since the main core can push through the internal insulation and get dangerously close to the shielding braid or, in the worst case, touch it.
In the first case, there will be a noticeable weakening of the television signal, and if the main core touches the screen, it may disappear altogether. You should always adhere to the rule that says that the bend of the cable should not be less than 5 of its diameters.
In modern apartment design, skirting boards with cable channels are used, into which the television cable is laid. Television cords are also laid in plastic boxes; they have different overall dimensions; the cable is laid in a P-shaped profile and snapped on with a lid. In such boxes it is allowed to lay Internet and communication cables together with television wires. Power wires of electrical wiring are laid separately.
Experts use the methods described to recommend how to repair a TV cable and talk about the need for proper installation. When laying it in the baseboard channel, it is advisable to use a construction stapler to create a fastening for the inner wall of the baseboard.
Important! When renovating an apartment, always leave a supply of television wires, based on half the perimeter of the room, in case you rearrange furniture or TV. The image quality is also affected by the shelf life (operability of the TV cable), the reason for this is the qualitative change in television broadcasting stations, improvement in technology
For this reason, when looking for a malfunction or a bad TV picture on the screen, you need to start from the parameters of the laid TV wire
The quality of the image is also affected by the shelf life (operability of the TV cable), the reason for this is the qualitative change in television broadcasting stations and improvement in technology. For this reason, when looking for a malfunction or a bad TV picture on the screen, you need to start from the parameters of the installed TV wire.
Additional Information.
In order to simplify the work of extending the television wire, experts recommend choosing threaded F connectors, without soldering. There are plugs with a soldered screen, then before soldering the screen, you need to tin it and quickly solder it to the plug without melting the internal insulation.
If you connect a TV extension cable to an antenna with an amplifier, you should use only the plug that is included with the antenna. It has a decoupling device and a power supply with connection.
- during the renovation process, install a television cable in each room of the apartment;
- try to install television wires with hidden installation in a protected version: corrugated sleeve or plastic box;
- it is recommended to use a cable with a lower attenuation coefficient, but not less than 22 decibels;
- the distance between the power electrical wiring on one side and the antenna cable with Internet wires on the other side must be at least 150 millimeters.
When choosing a method for extending a television cable, you must understand that this violates its integrity and always reduces the quality of the resulting image on the television receiver - it is advisable to change the cable completely, from the splitter to the TV signal receiver. Connection using F connectors is considered the simplest and most accessible for cable extension; in addition, the reliability of the connection is maintained.
When choosing soldering to extend wires, you need to remember about the temperature heating of the surfaces, carry out all operations without melting the insulation, check the reliability and quality of soldering, do not make low-quality twists, it is better to have a soldered bandage on the central cores.