This article covers the disassembly of remote controls in detail. You will learn how to disassemble the remote control for a Samsung TV, or almost any model from other manufacturers. The RC (Remote Control) device is very simple, so different companies use the same assembly principles. Whether it's Panasonic or Philips, you most likely won't encounter new design solutions in this area. The scheme presented below is suitable regardless of the manufacturer’s brand.
To disassemble the TV remote without damaging anything in the process, you need to choose the right tools and control your movements.
What you need to do
During the analysis process, you need to have a few simple tools on hand:
- small diameter Phillips screwdriver;
- flat blade screwdriver;
- knife;
- plastic card or mediator.
The device body can be secured with glue. Subsequently, glue will be needed again to carry out assembly after successfully completing cleaning or repairing the remote control.
IMPORTANT! Do not use a bank card for this operation. Take, for example, a discount card for a store.
Checking codes
If you have set up the remote use procedure in the Find Your Code section, you can find out which four-digit code works with your device.
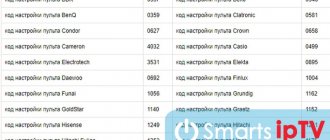
For example, to find out what code is for your TV: 1. Slide the mode switch to TV 2. Press and hold MUTE, then press SELECT (for 5 seconds until the LED blinks twice) and release both buttons. 3. Enter 9 9 0. The LED will blink twice. 4. To view the code for the first digit, press 1. Count the number of times the LED blinks (for example, blink 3 times) and write down the number. NOTE: If the code digit is zero, the LED will not flash. 5. Repeat step 4 for the remaining three digits, using 2 for the second digit, 3 for the third digit, and 4 for the fourth digit. 6. To test for other device codes, repeat steps 1-5, replacing the appropriate mode (key) for each device you test.
Sequencing
Simple instructions for opening almost any modern remote control:
- Inspect the remote control for placement of fasteners. Some manufacturers put some of the screws in the battery compartment. Remove the batteries;
- Take a screwdriver of the appropriate size and remove all fasteners;
It may be difficult to ask the question - how to disassemble the remote control for an LG that does not have screws? Pay attention to the joints on the sides of the device. You need to create gaps in the joints, then widen the cracks and pry to remove the plastic shell. Step-by-step instructions, with a description of the nuances:
- Check the seams on the body. If they are connected with glue for security, use a knife or flat-head screwdriver. Use them to pry up the edges of the case until the edges separate;
- Sony Bravia TV remote control , like many other devices of this type, you need to use a knife to remove the latches located inside the case. Do not pull the body halves in different directions at once, run the blade along the edges and feel for hidden fasteners. Gently squeeze them out;
- Use a plastic card to slide it along the joints between the cases to finally loosen the plastic and open the remote control;
- Take out the keyboard;
- Carefully unscrew the chip without removing the sensor from it;
- Carry out the necessary procedures to clean or repair the product.
How to open the remote control if the plastic is sitting on mounting screws and there is no Phillips-head screwdriver nearby? The fasteners can be rolled using the tip of a knife. It will be convenient to take a knife with a curved blade at the end for this purpose.
IMPORTANT! Try not to cut your hands - if you have problems with fine motor skills, first put on a thick work glove. Regardless of your confidence in your dexterity with tools, choose a dull knife.
The Philips remote control can be easily snapped off using even simple tweezers. In Philips, the fastening of the top cover may be slightly recessed into the plastic of the rear surface. How to properly disassemble the remote control in this case? Carefully pry the lid at the joints, preferably not with a blade. A knife may scratch the lid and ruin its appearance. There is also a danger of accidentally running a sharp edge over the buttons. If you damage something, it’s okay - remote controls for Samsung TVs and other common manufacturers are inexpensive, and in some cases are interchangeable.
Some buttons don't work
It happens that some buttons on the TV remote control do not work well: you have to press them with great force each time. This is also a very common problem, which can be solved by simply cleaning the device.
The remote control may be clogged with dust or small particles of household dirt. These devices are also often filled with water, coffee or juice. The sticky mucus that collects under the button prevents the contacts from touching, which is why there is a delay or complete absence of the signal.
But how can you repair buttons with such dirt on your own? It’s very simple: the device should be disassembled and cleaned.
- Remove the batteries.
- Unscrew the connecting screws on the remote control.
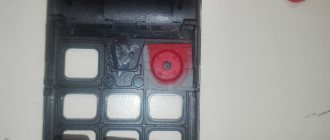
- Carefully separate the two parts of the housing from each other. If something is in the way, do not force it, but inspect the device again; perhaps you missed some kind of fastening connection (often a bolt can be hidden under the batteries, for example). If the case has special latches, then you need to open them using a flat screwdriver inserted into the strip connecting the two parts of the remote control.
- You should have 2 housing parts, an internal contact rubber band and a microcircuit in your hands.
Carefully and slowly inspect each element. Despite the simplicity of the device, there are many small workers in it, so it is better to carry out an inspection using a magnifying glass.
Features of disassembling the touch panel
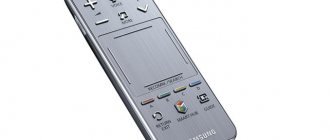
The touch control panel is disassembled according to a similar scheme. Many companies equip their devices with modern remote controls with touch sensors. Despite the significant difference in the control principle between conventional remote controls and sensors, the touch sensor in a Samsung TV does not interfere with disassembly.
IMPORTANT! Try not to damage the cables that connect the touch sensor to the board. Remove these parts from the plastic shell, handling the sensor as carefully as possible.
Samsung TV and its competitors are equipped with approximately the same additional devices. Parsing the remote control from Samsung or any other brand will not be difficult if you understand the general design principle of these devices.
Video tutorial: how to open the PHILIPS
Any household appliance is subject to wear and tear, especially small devices such as the remote control. As a rule, many people have it lying around anywhere. More often than others, this household item is at risk of being crushed or drenched in sweet tea drunk while watching your favorite show. We will tell you how to fix the remote control without being a master in this article.
Changing the volume lock
WARNING: Changing the volume lock settings may affect the performance of your TV cable/Satellite system. Please read these instructions completely before making any changes.
DirecTV 4 - The remote comes preset to allow independent volume control of each selected device (Master Volume Unlock). However, you can change the Volume Lock settings to Master Volume Lock so that the volume of one device controls the volume of all other modes. After this, perform Individual Volume Unlock on the selected device to set its volume for independent operation. NOTE: You cannot lock the volume in SAT mode, or in AV1/AV2 modes if these modes are set for the Satellite Receiver.
Volume Lock for One Mode (General Volume Lock) 1. Slide the mode switch to the position of the device you want to use to control the volume. 2. Press and hold MUTE, then press SELECT (for 5 seconds until the LED blinks twice) and release both buttons. 3. Enter 9 9 3 and then press SELECT. The LED will blink twice. Now, when you press VOL+, VOL-, or Mute, the selected device (for example, TV) will adjust the volume regardless of the current mode.
Unlocking Volume for a Single Device (Individual Unlocking Volume) 1. After performing Master Volume Lock (see above), slide the mode switch to the device you want to unlock for volume control. 2. Press and hold MUTE, then press SELECT (for 5 seconds until the LED blinks twice) and release both buttons. 3. Enter 9 9 3 and then press VOL-. The LED will flash 4 times. 4. Repeat steps 1-3 for any other devices that you want to have independent volume control.
Unlocking Total Volume Control (Restore Master Unlock) 1. Press and hold MUTE, then press SELECT (for 5 seconds until the LED blinks twice) and release both buttons. 2. Enter 9 9 3 and then press VOL+. The LED will flash 4 times. Self-controlled volume for all programmable devices.
Step-by-step guide to disassembling the Philips TV remote control
Important: Before you start disassembling the device, we remind you that if you are not confident in your abilities, contact a professional Philips TV repairman. For competent specialists, this procedure takes a minimum of time.
- Any repair begins with opening the case. Many beginning craftsmen have difficulty with this. To avoid breaking the plastic, carefully pry the edges of the remote control with a thin object and unfasten the latches along the entire perimeter of the device.
- After the case is opened, the microcircuits should be inspected for soldering defects and contact oxidation. If necessary, we repair damage. We clean the board with alcohol or another special solution.
- Next, remove the rubber keyboard and wash it thoroughly.
- If you want to improve and prolong the operation of your remote control for a long time, purchase a repair kit for the remote control with special conductive pads. Using the glue included in this kit, glue the spacers to the inside of the buttons.
Next, assemble the remote control in the same sequence. If you have any questions, call the Philips service center specialists or contact a technician online.
You can contact the masters from our service center by calling or writing your question on the feedback form.
Troubleshooting procedure
Most faulty alarm control panels can be repaired. The process is carried out in stages:
- Identifying the location of the failure. Determined by disassembling into its component components. A visual inspection checks the integrity of the board and the parts on it. Using a multimeter, the electrical circuits are tested, the battery and socket contacts are checked.
- Repair possibilities are being assessed. Having received the diagnostic results, a decision is made on further actions. Some motorists decide to disassemble the remote control and repair minor damage themselves. This applies to replacing housing parts, stripping, soldering contacts, reprogramming, in accordance with the recommendations of the operating instructions. If necessary, replace the battery.
- Checking the working condition of the car alarm kit.
- More complex breakdowns are repaired in specialized workshops. These include: Replacement of screens, buttons, antennas.
- Restoring the printed circuit board.
The workshops restore alarm key fobs for any security systems of varying complexity and class. If you cannot disassemble it yourself, it is recommended to immediately contact a specialist. Leave for yourself to change the battery and minor repairs - cleaning contacts from dirt, replacing faulty elements, provided they are available and the necessary experience with a soldering iron. Read about how to properly repair a car alarm key fob yourself on our website in advice from experts.
Philips TV repair in 1 day
Order repairs from our service center and receive a working device on the same day, with a warranty of up to 1 year
Find out the exact time and cost of repairs Thank you, no need
Comments (0)
Add a comment
Leave your question using the feedback form and the specialist will call you back and answer without imposing any services.
A faulty remote control can cause a modern person a lot of trouble and cause a feeling of discomfort. Watching your favorite programs becomes impossible or you have to get up from your chair every time and press the TV buttons. If your Philips TV does not respond to the remote control, there are many reasons for this.
General acquaintance with the device of an LCD TV
- Image
- Text
General acquaintance with the device of an LCD TV
. SCART - SCART connector for connecting a video recorder
tape recorder or decoder to the TV.
TV ANTENNA — Connector for connecting an external
SPDIF (Digital Audio Out) - when processing digital
audio signal, digital audio will be available over an SPDIF connection to your home theater.
AV OUT – Connectors for outputting Audio/Video signals
to external sources.
AUDIO – AUDIO connector for connecting personal
SERVICE - Connector for service (for
VGA – Connector for connecting analog sources
HDMI - HDMI connector - through this connector you can
connect a DVD player or game console. The HDMI interface allows the transmission of high-definition digital video data and multi-channel digital audio signals.
COMPONENT (Y/Pb/Pr with Audio L/R) - Connectors
for connecting to main video sources, a DVD player or from a game console. Connectors of external component devices are sometimes marked Y, BY, RY or Y, Cb, Cr.
NETWORK CABLE: used to connect the LCD TV
levizer to the power source.
Holes on the back cover of the TV required for installing a special wall bracket.
Causes of failure
The technician can identify the problem in a few minutes, but he will use special tools and equipment. Ordinary users may not have such knowledge and skills, so they are forced to turn to specialists for help. But you shouldn’t make hasty conclusions and immediately run to the nearest workshop in panic. The reason for the failure may be so trivial that to restore the device you will need to perform a few simple steps.
The most common causes of remote control failure include the following:
- Low batteries. It is recommended to replace the batteries or check the functionality of the old ones. Using a voltmeter or tester, you need to measure the power source. The minimum indicator should be at 1.3 V.
- Different signal frequency. You need to pair it with your TV receiver. If the device is used simultaneously for several electronic devices, you need to make a separate connection for each.
- Some buttons may not work. The cause is usually dirt or moisture, but sometimes it is due to mechanical damage resulting from a fall or impact.
- When you press one of the keys, the command of the other is executed.
- The malfunction lies in the operation of the TV itself.
If the user spills liquid on the device, it is recommended to disassemble it and clean it. Water becomes a short circuit catalyst, and when it settles under the rubber components, it forms a sticky consistency. The sticky layer on the contacts must be removed with a soft cloth soaked in alcohol, or use a cotton swab for this purpose.
Cleaning from moisture and dirt
Anything that has oily dirt can be wiped with a damp cloth or cotton wool soaked in alcohol. However, if the remote control is old, the dirt may be unexpectedly heavy. It would seem where this dirt would come from, but, as practice shows, all remote controls collect dirt.
Take a small basin and pour warm, clean water into it. Add a few drops of dish detergent and lather the solution. Place all the elements of the remote control in it, including the circuit board. Don't worry, without power there will be no short circuit. After some time, all the dirt will become wet and it will be easy to remove, for example, with a regular toothbrush.
Clean the board with radio components especially carefully: they must not be damaged. The contacts on the microcircuit and the buttons themselves on the reverse side of the rubber element must be black! After all dirt has been removed, rinse the parts with running water, pat them dry with a dry towel and place for 30-40 minutes in a warm, dry place for final drying.
If the button contact has a graphite coating, then the reason for poor operation may be that it is worn out and erased. Regular chocolate or cigarette packaging will help solve the problem. You just need to cut paper-based foil into squares or circles of the appropriate size and glue the pieces with the paper side to the contacts.
Why does the TV receiver not respond to the remote control module?
To find the reason why your Philips TV does not respond to the remote control, it is recommended to follow these steps:
- The first step is to check whether the TV itself responds to the button command. You can do a reset by unplugging all wires and accessories such as antenna cable, HDMI cable, CI+ module.
- Next, unplug the power cable from the socket and leave the TV turned off for a few minutes; the LED indicator should go off.
- After connecting the power plug, you should try to start the receiver using the remote control module.
- Change batteries. Batteries have their own service life; discharged cells will need to be replaced with new ones.
If the TV does not start, the cause of the problem lies in the remote control itself. If the receiver turns on, you need to reconnect all cables and accessories. It is better to check each external device, it may cause the plasma panel not to respond to signals from the remote control module.
The functionality of the remote control can be checked using one simple test. You will need a smartphone equipped with a digital camera. The human eye is not able to recognize infrared radiation, but a mobile phone with its camera turned on will notice it. This recommendation is not suitable for owners of an iPhone or iPad, since these gadgets are equipped with a special infrared filter. You need to do the following:
- Having activated the camera of the mobile device, point the indicator light of the remote control module at its lens;
- Press any button on the remote control, for example, the channel switching key.
Which battery to choose
Before you change the battery in your Volkswagen key, you need to decide which batteries are suitable for the key fobs. The manufacturer has several options for central control systems that require specific current sources. Depending on the size, or more precisely, the thickness of the key, the dimensions and batteries change.
Almost all electronic keys are equipped with a flat-format battery the size of a 2-ruble coin, but its height may vary. There are at least 3 options on the shelves:
- 1.8 mm;
- 2.5 mm;
- 3.2 mm.
In order not to be mistaken for sure, it is better to pay attention to the old one and read all the information from it. It may be inconvenient that this must be done in advance, since a car may be needed for a trip to the store
Do-it-yourself device repair
Experienced users can independently determine the malfunction of the remote control module and, if the problem is minor, carry out repairs. Armed with a thin lancet, you need to open the lid around the entire perimeter. The upper part, together with the keyboard, can be easily separated; under it there will be a board with buttons. The keys are made of plastic, and on the inside they are covered with thin metal.
The contact group is separated from the board; this must be done carefully. The operating condition of the buttons is checked using a tester. Two contactors will need to simultaneously press the desired button. If a short circuit occurs, the device will begin to play a sound signal, and its absence will indicate a malfunction of the buttons.
The problem of wear of the metal coating can be solved independently. For repairs, it is recommended to use a special conductive silver-based adhesive. A little adhesive is applied to the tip of a toothpick, after which the inside of the keys is painted over. After the glue has dried, the tester should show satisfactory results. Next, reassembly is performed, the contacts are aligned in their places with the board, and the case is snapped in place around the entire perimeter. You can check the operating status of the remote control module using the camera on your phone.
How to insert and remove the battery?
Many people wonder how to insert batteries into a laser pointer, vape or mech mod, frog, vibrator, speaker, calculator, immobilizer, holter and other devices? But essentially the principle of insertion and removal is the same.
Here is a general algorithm for changing removable power sources:
- Open the battery compartment cover. This is usually done by simply pressing a special latch. You can simply push or pull on it. After which the mechanism will move and the lock will open. So it can be removed. Now just pull it up or down. Remove the lid using gentle movements.
- The negative pole is usually on a spring. Therefore, press down on the positive contact, and then pull the battery towards you. If the device has several batteries, then do the same with all the others.
- After emptying the compartment, prepare a new batch of energy sources.
- Install according to polarity. Plus to the positive pole, and minus to the negative.
- Insert the cover into the grooves, if any, or screw it on if you have a threaded one.
- After this, apply light pressure if necessary.
- Now the batteries are installed and all you need to do is start the device!
This is how you install and remove batteries from almost every device. Sometimes it can be difficult to get round and other batteries if they have dried out. It's better not to let it come to this. And sometimes a non-removable battery can act as a current storage device.
Controlling the TV receiver using a smartphone
If the user is unable to repair the remote control module or the device has been lost, you can purchase a Philips universal remote control. The instructions for setting it up will tell you how to properly link the device to the TV.
Those users who bought a new device from the manufacturer Philips will also need to go through the binding procedure. Pairing is a prerequisite for the remote control to interact with the TV. Pairing is performed automatically when you first install the TV receiver. The user only needs to confirm the action by clicking on the “OK” button. The pairing will remain even after disconnecting from the TV, and the device can store data about the binding to 5 modules in its memory.
If the remote control is already paired with another device, it is recommended to place the device at a distance of 10-15 cm from the receiver, and then simultaneously press the red and blue buttons. A message should appear on the screen that the binding was successful.
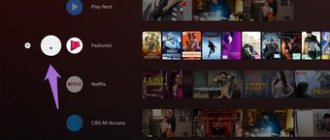
Another universal solution in a situation where the remote control is out of order is to install a special application for Android. The Android TV Remote application is available in the Google Play online market. You can download it for free to your phone, and after downloading and installing it, configure it and connect it to your TV receiver. In the list of devices you need to find the TV model and insert the required code into the appropriate line. The receiver can now be controlled via a program on a smart device.
When none of the above tips help, it is recommended to contact the manufacturer’s support service. The user needs to find out the address of the nearest Philips representative office and prepare the necessary documents. We are talking about a warranty card and certificates that indicate the date of purchase of the equipment, model type and serial number.
Functionality of Smart TV technology
- Providing access to the Internet, without using a PC or additional set-top boxes. This function allows you to play various videos located on the Internet. Some models have the function of recording a video file to an external drive connected to the TV. You can also open social networks. This allows you to display various content without connecting your mobile phone to the TV.
- A large number of built-in games allows you to pass the time or keep the children occupied for a while. In addition to the built-in games, there are a large number of its applications that are available for download on the Internet.
- This function also allows you to view the forecast of weather conditions and exchange rates and much more.
- Very convenient playback of photo and video materials on connected USB devices. You can also edit them, delete them, create different folders and albums for better sorting.