Hello dear readers of the site. We continue the topic of satellite reception. As usual, a little or a lot of theory. And mothers are nowhere without her. Let's begin.
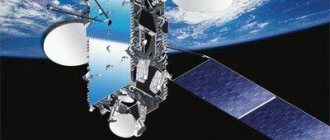
We know that satellites are located in Geostationary Orbit, and to us they appear to be motionless, i.e. as if hanging at one point. Remember the post in which we looked at the principle of operation of satellite television and satellite Internet.
Let's try to figure out what kind of orbit this is.
Imagine a rainbow after the rain, which rises above the horizon, so the orbit is somewhat similar to a rainbow. But we can only see part of the orbit, depending on where you are looking at it from the Earth, which means we don’t see all of the satellites.
Thus, the visible part of the orbit is an arc, rising in the southeast and setting in the southwest, and the satellites located on it have strictly their place, i.e. your coordinates. For example, the EutelsatW4 satellite is located at 36 degrees east. (Eastern longitude), or 36E (East).
To find out whether reception is possible in your area from the selected satellite, just use satellite coverage maps
, which can be viewed, for example, on the website: www.sat-media.net.
And on the website: www.lyngsat.com you will receive complete information about which television channels and Internet providers are located on a particular satellite, as well as on what transponder frequencies they are transmitted.
For example, here is a map of the coverage area for the EutelsatW4 satellite taken from the website: www.sat-media.net.
Knowing the coordinates of our locality, which are easy to find on the Internet, and the exact location of the satellite in Geostationary Orbit, we can always tune in to it. You may ask, where can I get the coordinates of this satellite? There are programs that are specially written for this, and using one as an example, we will look for these same coordinates.
We determine the coordinates of the EutelsatW4 satellite using an online calculation program.
What is good about this program is that it also calculates the time of alignment of the azimuths of the Sun and the satellite. That is, it indicates the time when the Sun and the satellite are on the same line.
And so, you have already found the latitude and longitude of the settlement, I will show it using the example of my city of Astrakhan: this 46° 22′
north latitude and
48° 5′
east longitude.
And we will choose the satellite EutelsatW4
, by far the most popular due to the TricolorTV and NTV-PLUS packages.
We follow this link and an online calculation program window opens in front of us. I have already entered my data and received the result.
Setting up Samsung and LG TVs: instructions
Before making adjustments, make sure that the CAM module is present in the receiver. In addition, check that the wires are correctly connected to the appropriate connectors and that the set-top box and TV are turned on.
Step-by-step instructions for setting up NTV-plus for Samsung TV:
- Go to the menu, select the “Broadcast” section.
- From the list of proposed configurations, select EutelsatW4 36E and confirm saving.
- Open the “LBN settings” item with any transponder. Turn off DiSEqC mode. The parameters of the upper LNB are 10750, the lower ones are 9750, tone 22 is deactivated.
- Press “Return” twice on the remote control.
- Proceed to searching for channels manually.
- Re-select the satellite EutelsatW4 36E, transponder No. 11900 (V/R) 27500, confirm with the “OK” button.
- Set up a network search.
- In the “Broadcast” item, click on “Change channels”, selecting the program to which you want to assign a number. The operation is performed in the “Change number” section.
- After sorting the channels into categories, the setup is considered complete. If the process was handled by a specialist, it is recommended to mark the programs that are most often viewed by the consumer.
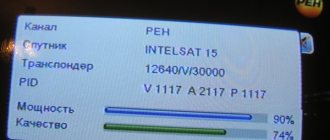
For LG TVs, NTV-plus adjustment is done identically, only the transponder indicators are indicated as in the photo below.
Online calculation program window:
Now let's look at everything in order.
In the top window, you find your locality and click on it with the mouse. Next, in the “satellite name” column, find Eutelsat W4 and click on it. All. The parameters we need have been found, I have outlined them with a large rectangle.
For those who did not find the name of their locality in the program window, do this:
in the “latitude” column, enter your latitude, as a decimal number, in the rectangle, and click on the circle with the mouse. In the “longitude” column we do the same, and below in the “satellite name” column, find EutelsatW4 and click on it in the same way. All parameters have been received.
What does the NTV-plus set consist of?
The equipment in question is used to receive satellite television channels; you can connect to it in any region of the country. The kit includes:
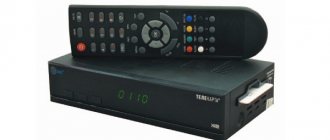
- A receiver that provides demodulation of the satellite pulse with subsequent transmission of clear pictures and sound to the consumer’s television receiver.
- Access card. It processes information about the current tariff and activates access to the selected tariff package. The element is compatible only with modern modifications of televisions capable of reproducing all full-screen image configurations. If the receiver is purchased separately, then the smart card must be purchased accordingly.
- Antenna. The satellite dish has a diametric polarity of 0.6 m, is made of steel, and is equipped with fasteners. The device is mounted on a window or roof.
- Converter with circular polarity, documentation for connecting services.
The parameters we received for setting up the satellite dish:
1. Azimuth is the direction to the satellite in the horizontal plane, i.e. where your antenna will be pointed between southeast and southwest. For us it was 196.48
degrees, which means that our satellite is almost in the South.
2. Elevation angle , or also called the satellite elevation angle
- this is the angle between the horizon line and the direction to the satellite relative to the receiving point from the Earth.
This means that the closer the satellite’s orbital position is to the geographic longitude of the receiving location, the greater the elevation angle, the higher the satellite is above the horizon. And this means that our plate with its mirror will look up at an angle of 35
degrees relative to the horizon. As the orbital position moves away from geographic longitude, i.e. the satellites will be lower, the elevation angle will decrease, which means the dish will gradually turn around and tilt towards the horizon.
3. Time of alignment of the azimuth of the Sun and the satellite - the time is indicated here when the Sun becomes aligned with the satellite, i.e. at this moment in time it is our satellite. A very convenient option, since you kill several birds with one stone. You decide on the installation location of the antenna, you can see, if there are any, obstacles (trees or buildings) that interfere with the signal, and remember the area of the sky of the proposed satellite relative to the horizon. And if obstacles are visible in the path of the supposed signal, it will not be difficult for you to find another place to install the antenna.
What if the weather is cloudy? So, our good old compass will help out. Of course, it does not always show the exact direction on the spot (reinforced concrete structures, electromagnetic fields, magnetization, etc.) all this interferes with it, but in any case you will find the approximate direction to the satellite.
4. The angle of rotation of the converter is a very important parameter that should not be forgotten. Due to the fact that the Geostationary Orbit is an arc, the further west or east the satellite is, it will be tilted towards you, which means it is necessary to align the converter with respect to the satellite. For vertex satellites located in the South, the converter will stand almost straight. The head (irradiator) of the converter is specially marked with divisions provided for these cases. The value between two divisions is usually ten degrees. To properly rotate the converter, remember, you must always look at the forehead
, and then there will be no confusion or doubt.
And in general, make it a rule that before installing the plate on the wall mount, turn the converter in the desired direction to the value specified by the program. And already in the process of fine tuning, in search of the best signal, you can additionally rotate the converter by several values clockwise or counterclockwise.
5. Satellite position
– this column indicates its position in the Geostationary orbit. In our case it is 36E (East).
Well, you have figured out what basic parameters are needed to tune to any satellite. In the future, as you gain experience, you will easily find the location of the main satellites, and it will not be difficult for you to point your antenna at them.
Concept Basics
In the modern world, saturated with gadgets and technology, only a few can independently find a direction of interest using a compass and map.
The ability to find azimuth can be useful and help out in any business. True (geographic) azimuth is a dihedral angle, measured clockwise (from 0 to 360 degrees) from the northern geographic meridian to the direction line.
Magnetic azimuth is the angle formed by the magnetic meridian and the given direction of the landmark line. The countdown is clockwise (from 0 to 360 degrees). Finding an angle can be done using compasses and compasses. Magnetic azimuth is not accurate, since the compass needle points to the magnetic meridian, which is subject to annual changes.
Magnetic declination is the angle of difference between the true and magnetic meridian, which was mentioned earlier. It can be positive if the compass needle is deviated from the true meridian to the right, or negative if it is deviated to the left. On maps, magnetic declination is indicated relative to the year of printing. Each subsequent year of operation, the provided data can be adjusted.
Naturally, the magnetic declination for each region and location varies.
A topographic map of an area is used for various purposes. It is a universal map, with the maximum amount of information about a particular region. A topographic map is divided by parallels (horizontal lines) and meridians (vertical lines). The map is convenient for orientation using a compass. Geographic data of a place contains information about the terrain, soils, waters, roads and other terrain features.
Selecting a location for installing a satellite dish.
Try to find a place to install the antenna so that it is easily accessible. The most optimal is your balcony, or the wall under the window, since it is always possible to retune to another satellite or add a few more, and servicing the dish is easier.
When you attach the wall mount, I recommend making markings using a “level”; the more level the bracket is installed, the fewer problems and questions there will be about adjusting the plate. The figure shows the places where you need to apply a “level” when marking the holes for the bracket.
Use only a metal anchor bolt on concrete and brick surfaces. The antenna should not dangle, since any deviation even by 3-5 mm is fraught with loss of signal, and with a strong gust of wind the bracket can be torn out of the wall. Do you need these problems?
When purchasing a set of equipment, be sure to ask the seller to demonstrate the operation of your
receiver. Additionally, you will have to purchase a coaxial cable, the length of which you first measure at home, special connectors called F-connectors (two pieces), and anchor bolts for attaching the bracket, since all this is not included in the equipment delivery.
Finding values and working with acquired parameters
Information regarding the determination of azimuth will be discussed next.
- Plan for determining true azimuth (using a magnetic compass):
- The compass is aligned horizontally to the ground, allowing the magnetic needle to point north;
- The desired object is determined and a reference point is taken;
- Without changing the position, adjust the compass bulb to the arrow, so that the letter N (C) is clearly opposite the magnetic pointer;
- The degree is counted by compass divisions, from zero to the given direction line of the object (clockwise);
- Result – magnetic azimuth was obtained;
- The magnetic declination of the region is added or subtracted to the found degree;
- And so, the true azimuth has been found.
- Calculation of azimuth on the map:
- The desired landmark is selected and marked on the map with a dot;
- Next, from the intended landmark, a continuous line is drawn from the starting point to the marked area;
- From the starting point, a parallel straight line is projected relative to the geographic meridian;
- Having two drawn lines, the protractor finds the angle that will be equal to the true azimuth.
Calculation by coordinates is similar to the process of finding azimuth on a map. Instead of a marked landmark on the map, the coordinates of the point are taken and the direction is plotted.
- Reverse azimuth.
The desired direction, determined by a compass or map, changes by one hundred and eighty degrees, receiving a reverse calculation.
Benefits of the acquired information:
- One of the ways to receive mirror data from the opposite direction point.
- The ability to make an accurate turn and follow the path back.
Cable selection.
Take your cable choice seriously. In satellite television and the Internet via cable, in addition to the received signal, supply voltage is also supplied to the converter and special signals that are used to switch converter modes. Among the brands I can recommend CAVEL, SAT 703, 700, SAT 50, Bigsat.
It is not advisable to use a Chinese RG6, but if there is no other option, then try, when laying it, to reduce its length from the converter to the receiver as much as possible, since it has significant signal losses due to its low parameters and quality.
The bend radius of the cable should be 8-10 times the diameter of the cable itself, and try to find the shortest distance from the antenna to the receiver. The shorter the cable length, the better.
And so, let's summarize. You have chosen a satellite provider, purchased a set of equipment, decided on the antenna installation location, installed the bracket, assembled the antenna according to the instructions that came with the equipment, installed the converter and turned it to the value specified by the program. Now all that remains is to connect and configure the antenna. How to do this, read the continuation of the topic of setting up a satellite dish yourself in the second part. Good luck!
What is a converter
First of all, a satellite converter is a device that is a guide to the world of high-quality satellite TV. It is an element of a satellite antenna that amplifies received signals and converts their Ku-band frequency (10.7 - 12.75 GHz) or C-band (3.5 - 4.2 GHz) into a lower intermediate frequency 950 - 2150 MHz.
It works in the following scheme. Satellite services are provided by appropriate transponders. The video signal from the transponders hits the satellite dish umbrella, is reflected from it and hits the focal point where the converter is mounted. It irradiates the antenna and further enhances the signal. From it, amplified and converted to a lower frequency, the signal is transmitted to the input of the satellite receiver. It is in this device that real miracles happen: the converted signal comes to the TV via a coaxial cable, and you enjoy watching high-quality images.
LNB converters get their name from the abbreviation, which translated from English means “low noise block”. And in the Russian user environment you can hear the simplified name “head”.
General characteristics
There is no best LNB, and there is no single parameter that would define this superiority. Converter is different from converter to converter, it cannot be characterized only by color, country of origin or the ill-fated noise indicator, which has been falsified for many years to improve sales.
A really good converter for a satellite dish is distinguished by a solid body that is resistant to weather conditions, especially the sun, because otherwise its body will crumble within a year. What is important is the repeatability of its parameters throughout the entire receiving range from bottom to top, the absence of gaps in frequencies or problems at the beginning of the reception band.
Here are the LNB characteristics that definitely deserve your attention:
| Execution | The converter housing must be made of high quality material that ensures complete sealing. It is good if the case has at least protection for the connectors to protect this area from moisture. Try to avoid products with a body in dark colors. The reason is simple: in the summer it will become excessively hot in the sun, which can lead to electronic failure or damage. |
| Noise level | The noise level introduced by an LNB into a system, better known as noise figure, is measured in decibels. Sensitive LNBs have a low noise figure and are able to receive weak satellite signals. The current standard is 0.1-0.3 dB. Noise values below 0.1 dB offered by some manufacturers border on magic rather than reflecting reality. |
| Gain | This characteristic is relevant when you have a long cable. The standard is 50-65 dB; in principle, all modern heads provide it. |
| Input | Incoming signal from a satellite dish (GHz). The most popular bands are 10.7-11.7 GHz and 11.7-12.75 GHz. Remember, the wider the range, the better. |
| Output | Output signal (MHz). The most popular ranges are 950-1950 MHz (horizontal polarization) 1100 – 2150 MHz (vertical polarization). |
| Local oscillator frequency (GHz) | For the range of 10.7-11.7 GHz it is 9.75 GHz, and for 11.7-12.75, respectively, 10.6 GHz. |
| Current consumption | Different models have different current consumption. |
| Guarantee period | It often turns out to be a decisive factor when choosing a model. For higher quality devices, manufacturers are not afraid to give it even for 5 years. |
Transfer orbits
When describing satellite launch processes, concepts such as low reference orbit or low Earth orbit (LEO), transfer orbit (TO), and geotransfer orbit (GTO) are used.
Low Earth orbit is the orbit of a spacecraft near the Earth (altitude approximately 200 km). It is called supporting if its height is expected to increase or its inclination changes. To move along a circular or elliptical reference orbit, the device must move at the first escape velocity.
Transfer orbit is the path of motion of a satellite from one orbit to another. A geostationary transfer orbit is an orbit that is a transition between a low reference orbit and a geostationary orbit. The movement of satellites in transfer orbits is carried out under the influence of a rocket propulsion system.